
Grow Spicy Chilies at Home and ignite your culinary adventures! Have you ever dreamed of plucking fiery peppers straight from your garden, adding a personal touch of heat to your favorite dishes? Well, dream no more! This DIY guide is your passport to cultivating a thriving chili pepper patch, no matter your gardening experience.
Chili peppers boast a rich history, dating back thousands of years in the Americas. From ancient civilizations using them for medicinal purposes to their global spread through trade, these vibrant fruits have captivated cultures worldwide. Today, they’re a staple in countless cuisines, adding zest and depth to everything from salsas to stir-fries.
But why settle for store-bought chilies when you can grow spicy chilies at home, tailored to your exact heat preference? Imagine the satisfaction of nurturing your plants from seed to harvest, knowing exactly what went into them. Plus, growing your own chilies is often more economical and environmentally friendly than buying them. This DIY guide will equip you with the knowledge and simple tricks to successfully cultivate these fiery gems, even if you have limited space or a brown thumb. I’ll show you how to choose the right varieties, optimize growing conditions, and troubleshoot common problems, ensuring a bountiful harvest of flavorful chilies that will spice up your life!
Growing Spicy Chilies at Home: From Seed to Sizzle!
Hey there, fellow spice enthusiasts! Ever dreamt of having a constant supply of fiery chilies right at your fingertips? Well, you’ve come to the right place! I’m going to walk you through everything you need to know to grow your own spicy chilies at home, from selecting the right seeds to harvesting your blazing bounty. Get ready to add some serious heat to your kitchen!
Choosing Your Chili Varieties
Before we dive into the nitty-gritty, let’s talk about chili varieties. The world of chilies is vast and exciting, ranging from mild to scorching. Here’s a quick rundown of some popular choices:
* **Jalapeño:** A classic, medium-heat chili perfect for stuffing, pickling, or adding a kick to your favorite dishes.
* **Serrano:** A bit hotter than jalapeños, serranos are great for salsas and sauces.
* **Cayenne:** These slender red chilies pack a punch and are often dried and ground into powder.
* **Habanero:** Now we’re talking serious heat! Habaneros are fruity and floral, but be warned, they’re intensely spicy.
* **Scotch Bonnet:** Similar to habaneros in heat and flavor, Scotch bonnets are a staple in Caribbean cuisine.
* **Ghost Pepper (Bhut Jolokia):** Enter the extreme heat zone! Ghost peppers are not for the faint of heart. Handle with care!
* **Carolina Reaper:** The reigning champion of heat! Carolina Reapers are incredibly spicy and should be used sparingly.
Consider your spice tolerance and culinary preferences when choosing your chili varieties. I personally love growing a mix of jalapeños, cayennes, and habaneros to cover all my bases.
Getting Started: Germinating Your Chili Seeds
Okay, let’s get those seeds sprouting! You can either start your seeds indoors or directly sow them in your garden, but I highly recommend starting them indoors, especially if you live in a cooler climate. This gives them a head start and protects them from harsh weather.
Here’s what you’ll need:
* Chili seeds (obviously!)
* Seed starting tray or small pots
* Seed starting mix (a light, well-draining mix is essential)
* Spray bottle
* Heat mat (optional, but highly recommended)
* Grow light (optional, but beneficial)
Now, let’s get germinating!
1. **Prepare your seed starting tray or pots:** Fill each cell or pot with seed starting mix, leaving about half an inch of space at the top. Gently tap the tray or pots to settle the mix.
2. **Sow your seeds:** Place 2-3 seeds in the center of each cell or pot. This increases your chances of at least one seed germinating.
3. **Cover the seeds:** Lightly cover the seeds with a thin layer of seed starting mix (about ¼ inch).
4. **Water gently:** Use a spray bottle to moisten the soil. Avoid overwatering, as this can lead to rot. The soil should be damp, not soggy.
5. **Provide warmth:** Place the seed starting tray or pots on a heat mat. Chili seeds germinate best in warm temperatures (around 80-85°F). If you don’t have a heat mat, you can place them in a warm spot in your house, like near a radiator.
6. **Provide light:** If you’re using a grow light, position it a few inches above the seed starting tray or pots. If not, place them in a sunny windowsill. However, be careful that the seedlings don’t get scorched by direct sunlight.
7. **Maintain moisture:** Keep the soil consistently moist, but not waterlogged. Check the soil daily and mist with a spray bottle as needed.
8. **Be patient:** Chili seeds can take anywhere from 7 to 21 days to germinate, depending on the variety and temperature. Don’t give up if you don’t see sprouts right away!
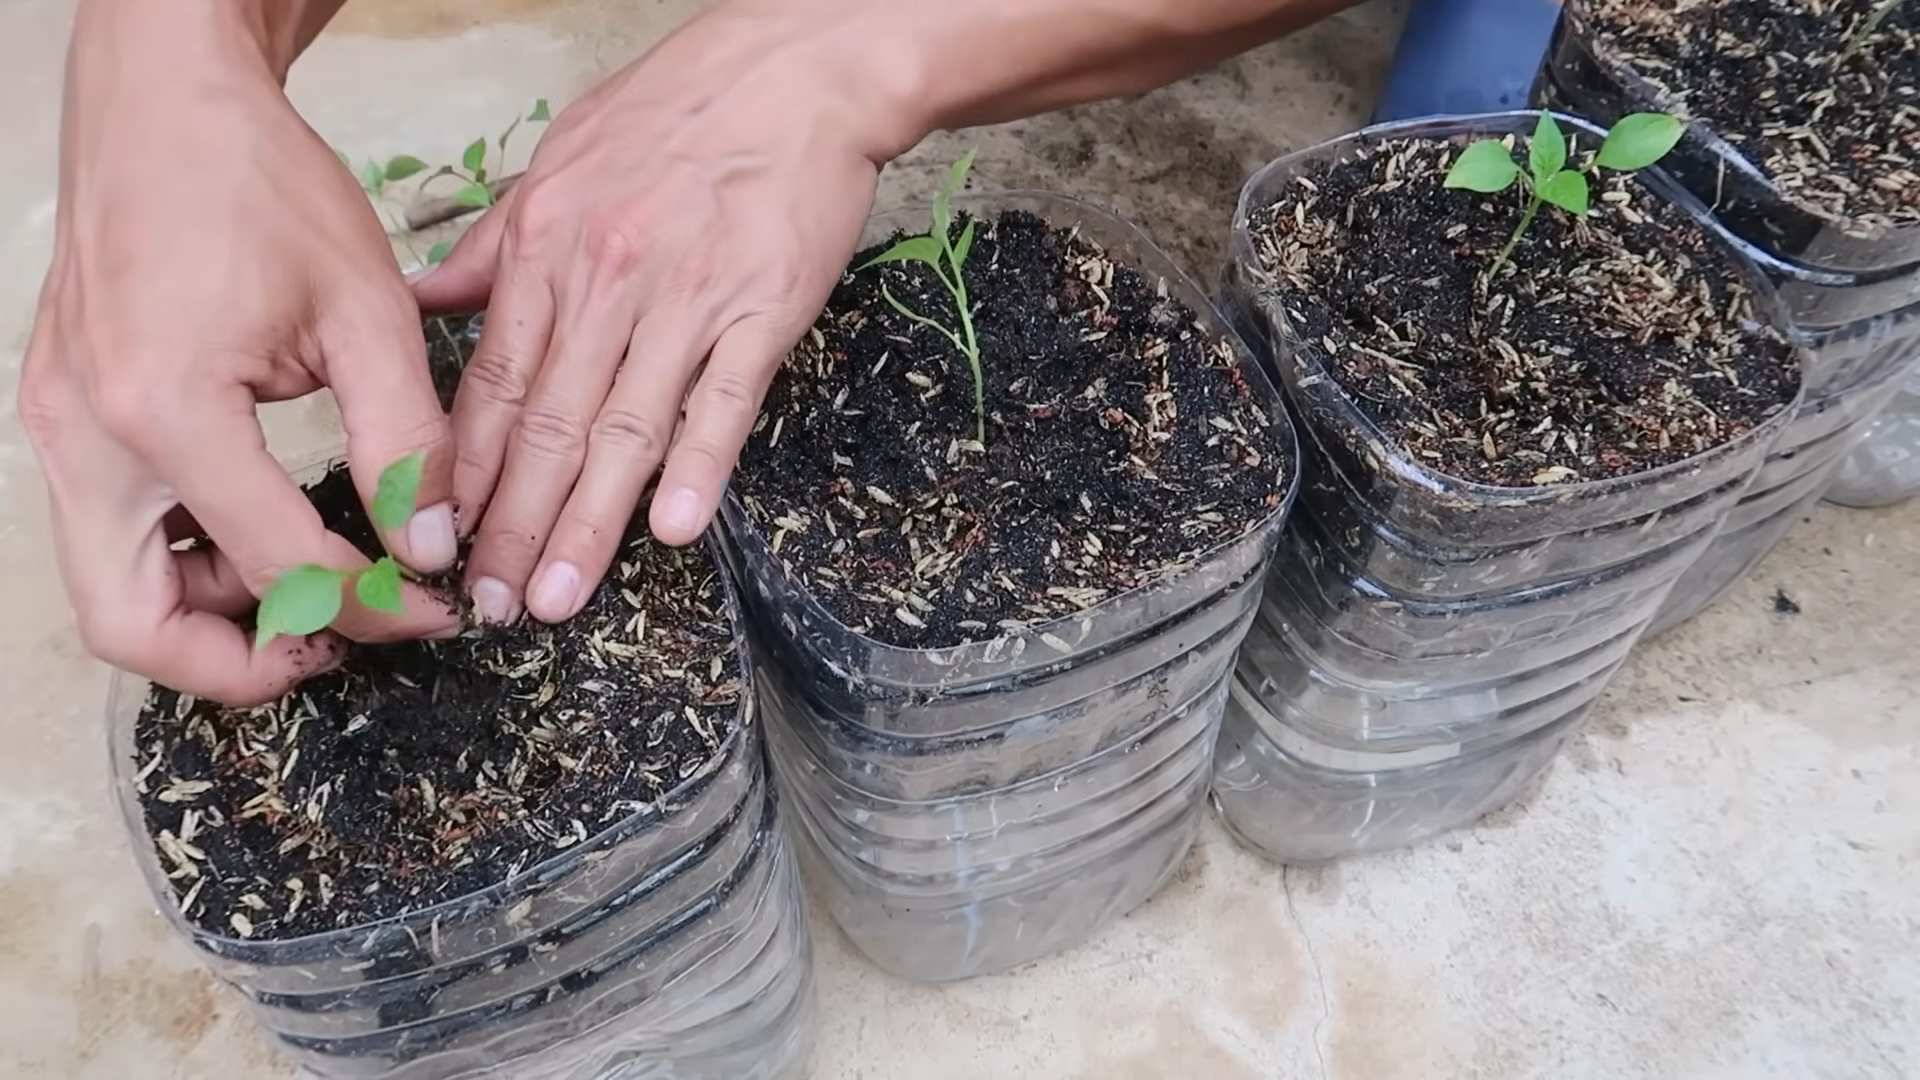
Transplanting Your Chili Seedlings
Once your seedlings have developed their first set of true leaves (the leaves that look like miniature versions of the adult leaves), it’s time to transplant them into larger pots.
Here’s what you’ll need:
* Larger pots (at least 4 inches in diameter)
* Potting mix (a good quality potting mix is essential)
* Trowel or spoon
* Watering can
Let’s get transplanting!
1. **Prepare your pots:** Fill each pot with potting mix, leaving about an inch of space at the top.
2. **Gently remove the seedlings:** Carefully loosen the soil around the seedlings in the seed starting tray or pots. Use a trowel or spoon to gently lift the seedlings out, being careful not to damage the roots.
3. **Plant the seedlings:** Make a hole in the center of each pot, large enough to accommodate the seedling’s root ball. Place the seedling in the hole and gently backfill with potting mix.
4. **Water thoroughly:** Water the seedlings thoroughly after transplanting.
5. **Provide light and warmth:** Place the transplanted seedlings in a sunny location or under a grow light.
Caring for Your Chili Plants
Now that your chili plants are growing strong, it’s time to provide them with the care they need to thrive.
Here are some key things to keep in mind:
* **Watering:** Water your chili plants regularly, especially during hot weather. Allow the soil to dry out slightly between waterings, but don’t let them dry out completely.
* **Fertilizing:** Chili plants are heavy feeders and need regular fertilization to produce a good crop. Use a balanced fertilizer (e.g., 10-10-10) every 2-3 weeks. You can also use a fertilizer specifically formulated for tomatoes and peppers.
* **Sunlight:** Chili plants need at least 6-8 hours of sunlight per day. If you’re growing them indoors, make sure they’re getting enough light from a grow light or a sunny window.
* **Temperature:** Chili plants thrive in warm temperatures (70-85°F). Protect them from frost and cold temperatures.
* **Pest and disease control:** Keep an eye out for pests like aphids, spider mites, and whiteflies. Treat infestations promptly with insecticidal soap or neem oil. Also, be aware of diseases like powdery mildew and blossom end rot. Provide good air circulation and avoid overwatering to prevent these problems.
* **Support:** As your chili plants grow, they may need support to prevent them from falling over. Use stakes or cages to support the plants, especially if they’re producing a lot of fruit.
Hardening Off Your Chili Plants
If you started your chili plants indoors, you’ll need to “harden them off” before transplanting them outdoors. Hardening off is the process of gradually acclimating your plants to outdoor conditions.
Here’s how to do it:
1. **Start slowly:** Begin by placing your chili plants outdoors in a sheltered location for just a few hours each day.
2. **Gradually increase exposure:** Over the course of a week or two, gradually increase the amount of time your plants spend outdoors.
3. **Protect from harsh conditions:** Protect your plants from strong winds, direct sunlight, and cold temperatures.
4. **Monitor your plants:** Watch your plants closely for signs of stress, such as wilting or leaf burn. If you see any signs of stress, bring them back indoors and give them a break.
Transplanting Your Chili Plants Outdoors
Once your chili plants are hardened off, it’s time to transplant them into your garden or larger containers.
Here’s what you’ll need:
* Garden space or large containers (at least 5 gallons)
* Potting mix or garden soil
* Trowel
* Watering can
* Stakes or cages (optional)
Let’s get planting!
1. **Choose a sunny location:** Select a location in your garden that receives at least 6-8 hours of sunlight per day.
2. **Prepare the soil:** Amend the soil with compost or other organic matter to improve drainage and fertility.
3. **Dig a hole:** Dig a hole that is slightly larger than the root ball of your chili plant.
4. **Plant the chili plant:** Gently remove the chili plant from its pot and place it in the hole. Backfill with soil and gently firm around the base of the plant.
5. **Water thoroughly:** Water the chili plant thoroughly after transplanting.
6. **Add support:** If you’re using stakes or cages, install them now to provide support for the plant as it grows.
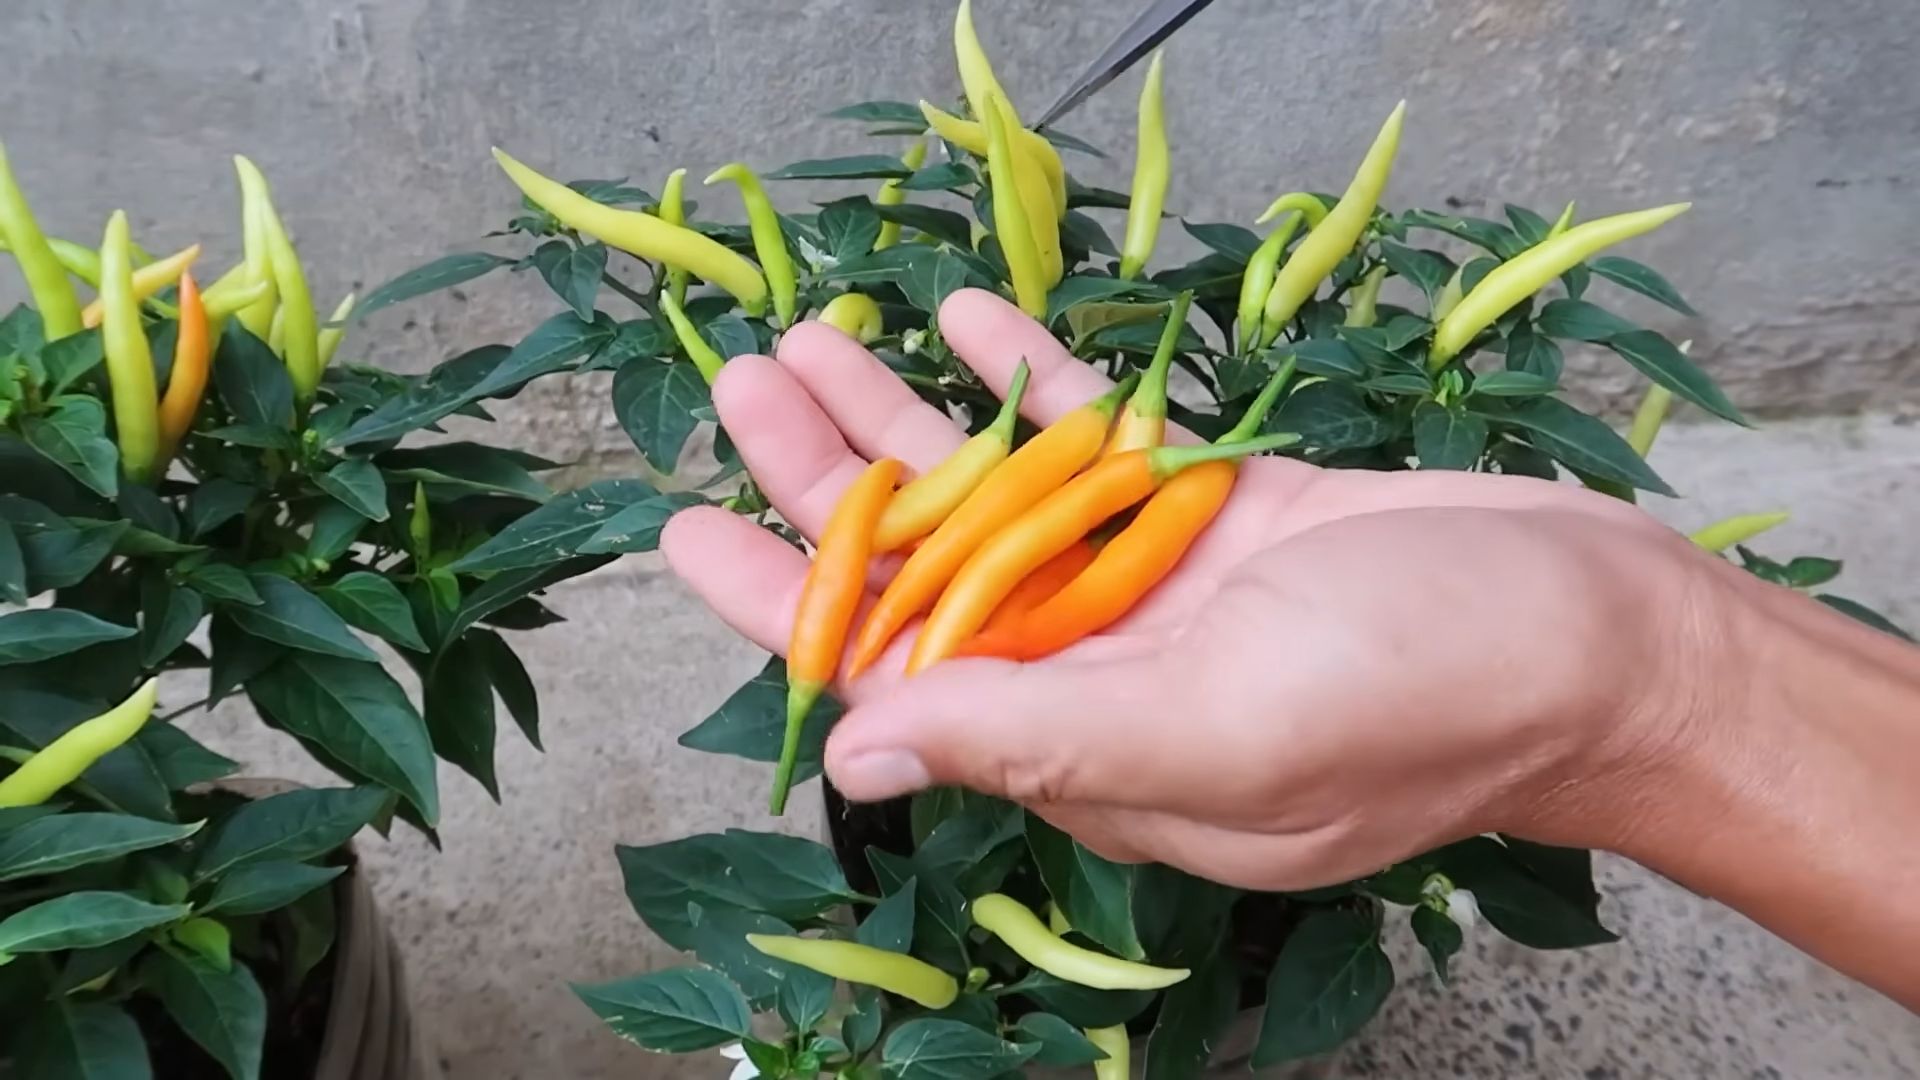
Harvesting Your Spicy Chilies
The moment you’ve been waiting for! Harvesting your homegrown chilies is incredibly rewarding.
Here are some tips for harvesting:
* **Timing:** The best time to harvest chilies is when they’ve reached their mature color and size. The color will vary depending on the variety.
*
Conclusion
So, there you have it! Growing spicy chilies at home isn’t just a fun gardening project; it’s a gateway to fresher, more flavorful meals and a deeper connection to the food you eat. We’ve walked through the essentials, from selecting the right seeds and nurturing seedlings to providing the ideal growing conditions and harvesting your fiery bounty.
Why is this DIY trick a must-try? Because it empowers you to control the entire process, ensuring your chilies are grown organically, free from harmful pesticides, and bursting with the exact level of heat you desire. Imagine the satisfaction of adding a pinch of your homegrown habanero to a salsa, knowing you cultivated that intense flavor from seed to table. Think of the bragging rights when you gift a friend a jar of chili-infused oil made with peppers you nurtured yourself.
Beyond the practical benefits, growing spicy chilies is incredibly rewarding. It’s a chance to connect with nature, learn about plant life, and experience the thrill of watching something you’ve cared for flourish. Plus, it’s a fantastic conversation starter!
But don’t stop there! Experiment with different varieties of chilies to discover your favorites. Try growing them in containers on your balcony or in raised beds in your garden. Consider companion planting with herbs like basil or oregano to enhance their flavor and deter pests. You can even explore different methods of preserving your harvest, such as drying, pickling, or making chili powder.
For variations, consider these ideas:
* **Hydroponic Chilies:** For those with limited space or a penchant for modern gardening techniques, hydroponic chili growing can be a fascinating and efficient alternative.
* **Chili Bonsai:** Train your chili plant into a miniature tree for a unique and ornamental addition to your home.
* **Chili Grafting:** Graft different chili varieties onto a single rootstock to create a plant with multiple types of peppers. This is a more advanced technique, but the results can be stunning.
* **Fermented Chili Paste:** Take your chili harvest to the next level by fermenting it into a complex and flavorful paste. This process not only enhances the taste but also increases the nutritional value.
The possibilities are endless! The key is to start, experiment, and learn from your experiences.
We wholeheartedly encourage you to embark on this spicy adventure. Don’t be intimidated if you’re a beginner; even a small pot on a windowsill can yield a surprising harvest. And remember, the journey is just as important as the destination.
So, grab some seeds, get your hands dirty, and prepare to experience the joy of growing your own spicy chilies. We’re confident you’ll be hooked!
We’d love to hear about your experiences! Share your tips, tricks, and photos in the comments below. Let’s create a community of chili-growing enthusiasts and inspire others to discover the joys of homegrown heat. What are you waiting for? Start your **chili growing** journey today!
Frequently Asked Questions
What are the best chili varieties to grow for beginners?
For beginners, some excellent chili varieties to start with include Jalapeños, Anaheim peppers, and Serrano peppers. These are relatively easy to grow and offer a good balance of flavor and heat. Jalapeños are versatile and can be used in a wide range of dishes. Anaheim peppers are mild and perfect for stuffing or roasting. Serrano peppers pack a bit more heat but are still manageable for most palates. Avoid extremely hot varieties like Ghost peppers or Carolina Reapers until you gain more experience. These require more specific care and can be less forgiving of beginner mistakes. Remember to check the specific growing requirements for each variety, as some may prefer slightly different conditions.
How much sunlight do chili plants need?
Chili plants thrive in full sunlight, requiring at least 6-8 hours of direct sunlight per day. Insufficient sunlight can lead to leggy growth, reduced flowering, and smaller, less flavorful peppers. If you’re growing chilies indoors, supplement natural light with grow lights, especially during the winter months. Position your plants near a south-facing window for maximum sunlight exposure. If you notice your plants stretching towards the light, it’s a sign they need more illumination. Rotate your plants regularly to ensure all sides receive adequate sunlight.
What type of soil is best for growing chilies?
Chili plants prefer well-draining soil that is rich in organic matter. A slightly acidic to neutral pH (around 6.0 to 7.0) is ideal. You can use a commercial potting mix specifically formulated for vegetables or create your own mix by combining equal parts of garden soil, compost, and perlite or vermiculite. Good drainage is crucial to prevent root rot, so avoid heavy clay soils that retain too much moisture. Amend heavy soils with organic matter to improve drainage and aeration. Consider adding a slow-release fertilizer to the soil at planting time to provide essential nutrients.
How often should I water my chili plants?
Water your chili plants regularly, keeping the soil consistently moist but not waterlogged. The frequency of watering will depend on factors such as the weather, the size of the pot, and the type of soil. Check the soil moisture by inserting your finger about an inch deep. If the soil feels dry, it’s time to water. Water deeply, allowing the water to drain out of the bottom of the pot. Avoid overhead watering, as this can promote fungal diseases. During hot, dry weather, you may need to water your plants daily. Reduce watering during cooler periods.
How do I protect my chili plants from pests and diseases?
To protect your chili plants from pests and diseases, practice good garden hygiene. Remove any dead or diseased leaves promptly. Monitor your plants regularly for signs of pests, such as aphids, spider mites, or whiteflies. Treat infestations with insecticidal soap or neem oil. Prevent fungal diseases by providing good air circulation and avoiding overhead watering. Consider using a copper fungicide as a preventative measure. Companion planting with herbs like basil or marigolds can also help deter pests. If you notice any signs of disease, isolate the affected plant to prevent it from spreading to others.
When is the best time to harvest my chili peppers?
The best time to harvest your chili peppers depends on the variety and your desired level of heat. Most chili peppers will change color as they ripen, typically from green to red, yellow, or orange. The color change is a good indicator of ripeness. However, some varieties are eaten green. The longer a chili pepper stays on the plant, the hotter it will become. Use gloves when harvesting chili peppers to avoid skin irritation. Cut the peppers from the plant using pruning shears or scissors, leaving a small stem attached.
Can I grow chili peppers indoors?
Yes, you can grow chili peppers indoors, but you’ll need to provide them with adequate light and warmth. Choose a sunny location near a south-facing window or supplement with grow lights. Use a well-draining potting mix and water regularly. Indoor chili plants may require hand-pollination to ensure fruit set. Gently brush the pollen from one flower to another using a small paintbrush. Keep an eye out for pests and diseases, as indoor plants can be more susceptible.
How do I increase the heat of my chili peppers?
Several factors can influence the heat of chili peppers. Stressing the plants slightly by withholding water can increase capsaicin production, the compound responsible for the heat. However, avoid stressing the plants too much, as this can reduce overall yield. Providing plenty of sunlight and warm temperatures can also enhance heat levels. Some gardeners believe that adding Epsom salts to the soil can increase heat, but this is not scientifically proven. The variety of chili pepper is the most significant factor determining its heat level.
How do I store my harvested chili peppers?
There are several ways to store harvested chili peppers. You can dry them by stringing them together and hanging them in a well-ventilated area. You can also dry them in a dehydrator or oven. Pickling is another popular method of preserving chili peppers. You can also freeze chili peppers whole or chopped. To make chili powder, dry the peppers completely and then grind them into a fine powder using a spice grinder. Store dried chili peppers and chili powder in airtight containers in a cool, dark place.
What can I do with my homegrown chili peppers?
The possibilities are endless! You can use your homegrown chili peppers in a wide variety of dishes, from salsas and sauces to stews and stir-fries. You can also make chili-infused oil or vinegar. Dry the peppers and grind them into chili powder. Pickle them for a tangy treat. Add them to your favorite recipes for a spicy kick. Share them with friends and family. Experiment with different chili varieties to discover your favorite flavors and heat levels. The only limit is your imagination!

Leave a Comment