
Grow Pumpkins Recycled Containers: Unleash your inner gardener and transform trash into treasure! Have you ever dreamed of a bountiful pumpkin patch right in your backyard, but felt limited by space or resources? Well, dream no more! This DIY guide is your ticket to a thriving pumpkin harvest, all while being eco-conscious and saving money.
For centuries, pumpkins have held a special place in cultures around the world, symbolizing abundance, harvest, and even warding off evil spirits! From the elaborate pumpkin carvings of Halloween to the delicious pumpkin pies gracing Thanksgiving tables, this versatile fruit (yes, it’s technically a fruit!) is deeply ingrained in our traditions. But growing your own pumpkins can seem daunting, especially if you’re new to gardening.
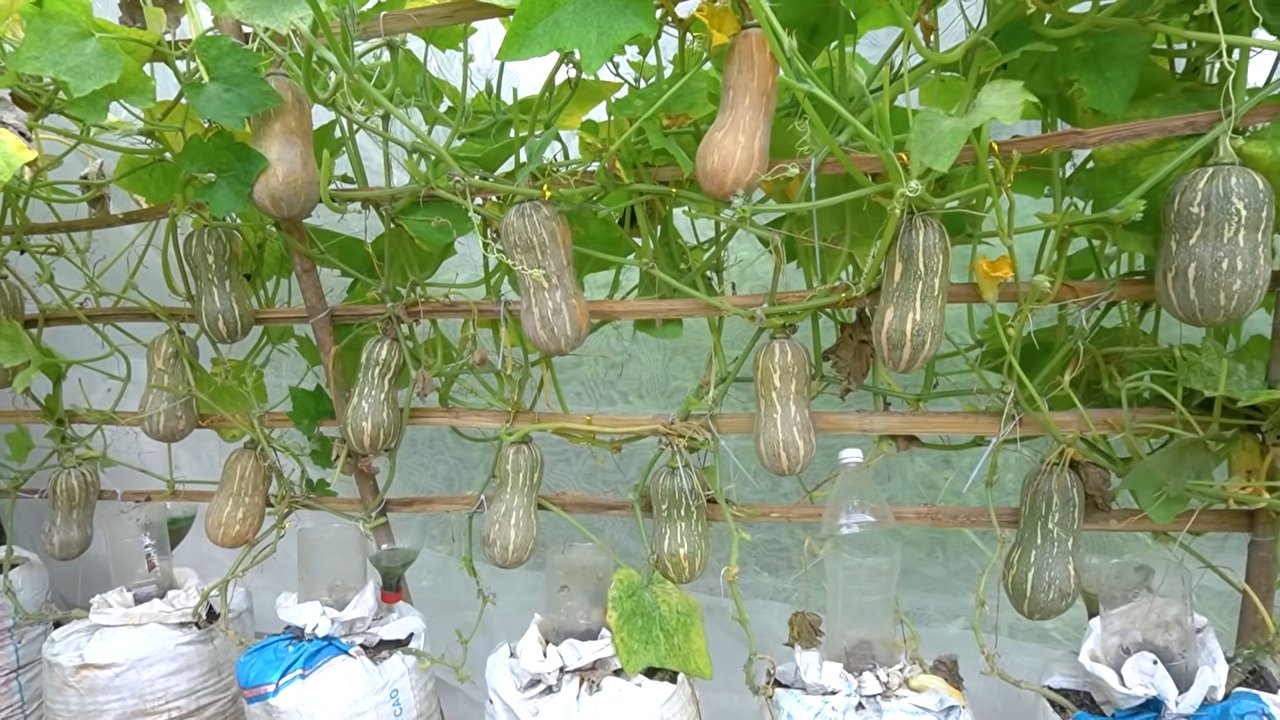
That’s where this article comes in! I’m going to show you how to grow pumpkins recycled containers, turning everyday items like old buckets, tires, and even laundry baskets into perfect pumpkin-growing havens. Why buy expensive pots when you can repurpose what you already have? Not only is it budget-friendly, but it’s also a fantastic way to reduce waste and contribute to a more sustainable lifestyle. Plus, it’s incredibly satisfying to watch your pumpkins flourish in containers you’ve personally transformed. So, let’s get our hands dirty and embark on this exciting journey of growing pumpkins in recycled containers!
Growing Pumpkins in Recycled Containers: A DIY Guide
Hey there, fellow gardening enthusiasts! Are you dreaming of carving your own jack-o’-lanterns this Halloween, but short on space or just looking for a fun, eco-friendly project? Well, you’ve come to the right place! I’m going to walk you through how to grow pumpkins in recycled containers. It’s easier than you think, and it’s a fantastic way to give those old buckets, bins, and even laundry baskets a new lease on life.
Why Grow Pumpkins in Containers?
Before we dive in, let’s talk about why container gardening is a great option for pumpkins:
* Space Saving: Perfect for balconies, patios, or small yards. You don’t need a sprawling garden to enjoy homegrown pumpkins.
* Controlled Environment: You have more control over the soil quality, watering, and sunlight exposure.
* Mobility: You can move your pumpkins around to chase the sun or protect them from unexpected frost.
* Upcycling: It’s a fantastic way to reuse old containers and reduce waste.
* Fun and Educational: A great project for kids and adults alike!
Choosing the Right Container and Variety
Okay, let’s get started! The first step is selecting the right container and pumpkin variety.
* Container Size: This is crucial! Pumpkins are heavy feeders and need plenty of room for their roots to grow.
* For smaller varieties (like Jack Be Little or Sugar Pie): A 10-gallon container is a good starting point.
* For medium varieties (like Howden or Connecticut Field): Aim for a 20-gallon container or larger.
* For larger varieties (like Atlantic Giant): You’ll need a massive container – think 30 gallons or more. Honestly, for these behemoths, in-ground planting is usually best, but if you’re determined, make sure your container is incredibly sturdy.
* Container Material: Plastic, metal, or even sturdy fabric pots will work. Just make sure the container is food-safe if you’re using something that wasn’t originally intended for gardening.
* Drainage: Absolutely essential! Pumpkins hate sitting in soggy soil. Make sure your container has plenty of drainage holes. If it doesn’t, drill some!
* Pumpkin Variety: Consider your space and what you want to use the pumpkins for.
* Jack Be Little: Tiny, adorable pumpkins perfect for decorations.
* Sugar Pie: Great for baking pies and other pumpkin treats.
* Howden: A classic carving pumpkin.
* Connecticut Field: Another good carving option, larger than Howden.
* Baby Boo: Small, white pumpkins that are super cute.
Preparing Your Container
Now that you’ve chosen your container and pumpkin variety, let’s get it ready for planting.
1. Clean the Container: Wash the container thoroughly with soap and water to remove any dirt, debris, or potential pathogens.
2. Drill Drainage Holes: If your container doesn’t have enough drainage holes, drill several in the bottom. Aim for at least four holes that are about ½ inch in diameter.
3. Add a Layer of Gravel (Optional): Some gardeners like to add a layer of gravel or small stones to the bottom of the container to improve drainage. This is optional, but it can be helpful, especially if you live in an area with heavy rainfall.
4. Line the Container (Optional): If you’re using a metal container, you might want to line it with plastic to prevent rust. You can also use a fabric liner to help retain moisture.
5. Fill with Potting Mix: Use a high-quality potting mix that’s specifically formulated for vegetables. Avoid using garden soil, as it can become compacted in containers and doesn’t drain as well. I like to mix in some compost for extra nutrients.
Planting Your Pumpkin Seeds
Alright, time to get those seeds in the ground!
1. Timing is Key: Pumpkins need a long growing season (75-100 days), so start your seeds indoors about 2-3 weeks before the last expected frost. If you live in a warm climate, you can direct sow the seeds into the container after the last frost.
2. Sowing Seeds Indoors (Optional):
* Fill small pots or seed trays with potting mix.
* Plant 2-3 seeds per pot, about 1 inch deep.
* Water gently and keep the soil moist.
* Place the pots in a warm, sunny location or under grow lights.
* Once the seedlings emerge, thin them to one plant per pot.
3. Direct Sowing (If Weather Permits):
* Sow 3-4 seeds directly into the container, about 1 inch deep.
* Water gently and keep the soil moist.
* Once the seedlings emerge, thin them to the strongest plant.
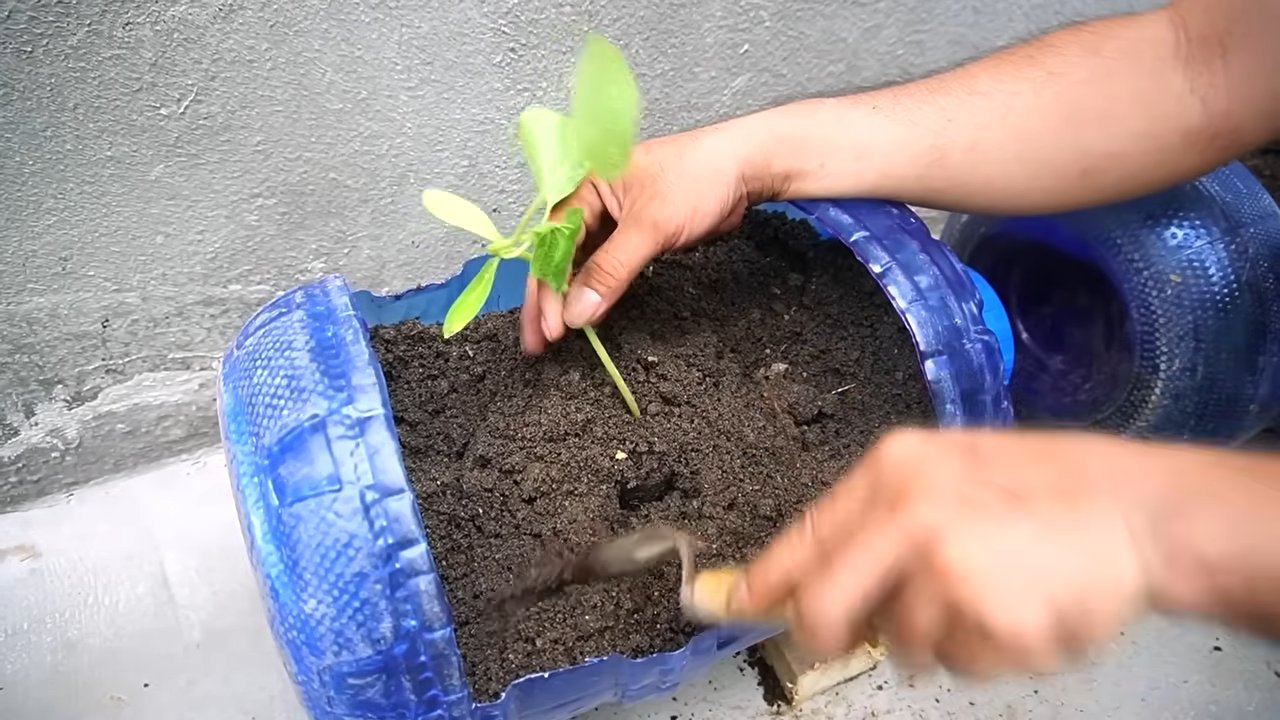
4. Transplanting Seedlings (If Starting Indoors):
* Once the seedlings have developed a few sets of true leaves and the weather is warm enough, it’s time to transplant them into the container.
* Dig a hole in the center of the container that’s large enough to accommodate the root ball.
* Gently remove the seedling from its pot and place it in the hole.
* Backfill with potting mix and water thoroughly.
Caring for Your Pumpkin Plants
Now comes the fun part – watching your pumpkins grow! Here’s what you need to do to keep them happy and healthy:
1. Sunlight: Pumpkins need at least 6-8 hours of sunlight per day. Place your container in the sunniest spot you can find.
2. Watering: Pumpkins are thirsty plants, especially when they’re actively growing and producing fruit. Water deeply whenever the top inch of soil feels dry to the touch. Avoid getting the leaves wet, as this can lead to fungal diseases.
3. Fertilizing: Pumpkins are heavy feeders, so you’ll need to fertilize them regularly. Use a balanced fertilizer (like 10-10-10) every 2-3 weeks. You can also supplement with compost tea or fish emulsion.
4. Pruning: As your pumpkin plant grows, it will produce long vines. You can prune these vines to encourage more fruit production. Pinch off the tips of the vines to promote branching. You can also remove any yellowing or damaged leaves.
5. Pollination: Pumpkins have separate male and female flowers. The female flowers have a small, immature pumpkin at the base. If you’re not seeing any pumpkins develop, you may need to hand-pollinate the flowers. To do this, use a small paintbrush to transfer pollen from the male flowers to the female flowers.
6. Support: As your pumpkins grow larger, they may need some support to prevent them from breaking off the vine. You can use slings made from old t-shirts or pantyhose to support the pumpkins.
7. Pest and Disease Control: Keep an eye out for common pumpkin pests like squash bugs, squash vine borers, and aphids. You can use insecticidal soap or neem oil to control these pests. Also, watch out for fungal diseases like powdery mildew. You can prevent these diseases by providing good air circulation and avoiding getting the leaves wet when watering.
Harvesting Your Pumpkins
The moment you’ve been waiting for! Here’s how to know when your pumpkins are ready to harvest:
1. Color: The pumpkin should be a deep, uniform color.
2. Hardness: The rind should be hard and resistant to scratching.
3. Stem: The stem should be dry and brown.
4. Sound: When you tap the pumpkin, it should sound hollow.
To harvest your pumpkin, use a sharp knife or pruning shears to cut the stem, leaving about 2-3 inches of stem attached to the pumpkin. Handle the pumpkin carefully to avoid bruising it.
Storing Your Pumpkins
Once you’ve harvested your pumpkins, you’ll want to store them properly to keep them fresh for as long as possible.
1. Curing: Cure your pumpkins in a warm, dry place for about 1-2 weeks. This will help to harden the rind and prevent rot.
2. Storage: Store your cured pumpkins in a cool, dry place with good air circulation. A basement or garage is ideal. Avoid storing pumpkins in direct sunlight or near heat sources.
Troubleshooting
Even with the best care, you might encounter some problems along the way. Here are a few common issues and how to address them:
* No Flowers: Make sure your plant is getting enough sunlight and fertilizer.
* Flowers But No Pumpkins: You may need to hand-
Conclusion
So, there you have it! Transforming recycled containers into thriving pumpkin patches isn’t just a clever way to save money; it’s a testament to sustainable gardening and a fantastic project for the whole family. We’ve shown you how to give those discarded items a new lease on life, turning them into nurturing homes for your future jack-o’-lanterns or delicious pumpkin pies.
Why is this DIY trick a must-try? Because it’s eco-friendly, budget-conscious, and incredibly rewarding. You’re reducing waste, saving money on expensive pots, and experiencing the joy of watching your pumpkins grow from tiny seeds to impressive gourds. Plus, it’s a fantastic conversation starter! Imagine the pride you’ll feel when you tell your friends and neighbors that your prize-winning pumpkin started its life in a repurposed laundry basket or a discarded storage bin.
But the fun doesn’t stop there! Feel free to experiment with different types of recycled containers. Old tires can be painted and used as raised beds, providing excellent drainage and insulation. Pallets can be disassembled and rebuilt into custom-sized planters, perfect for creating a tiered pumpkin display. Even burlap sacks can be repurposed as rustic and charming containers, adding a touch of farmhouse chic to your garden.
Consider the size of your pumpkin variety when choosing your container. Smaller pumpkins, like Jack Be Littles or Sugar Pies, will thrive in smaller containers, while larger varieties, such as Atlantic Giants, will require much more space. Don’t be afraid to get creative with your decorating! Paint your containers with fun designs, add stencils, or even let your kids decorate them with their own unique artwork.
Remember to pay close attention to drainage. Pumpkins need well-draining soil to prevent root rot. If your container doesn’t have drainage holes, be sure to drill some before planting. You can also add a layer of gravel or pebbles to the bottom of the container to improve drainage.
And speaking of soil, use a high-quality potting mix that’s rich in organic matter. This will provide your pumpkins with the nutrients they need to grow strong and healthy. You can also amend the soil with compost or aged manure to further boost its fertility.
We encourage you to embrace this DIY project and discover the satisfaction of growing your own pumpkins in recycled containers. It’s a simple, sustainable, and incredibly rewarding way to connect with nature and enjoy the bounty of your own backyard.
Don’t forget to document your progress and share your experiences with us! We’d love to see your creative container designs and hear about your pumpkin-growing successes (and challenges!). Share your photos and stories on social media using #RecycledPumpkinPatch. Let’s inspire others to join the movement and transform their discarded items into thriving pumpkin gardens.
Ultimately, learning how to grow pumpkins in recycled containers is more than just a gardening hack; it’s a step towards a more sustainable lifestyle. It’s about finding creative solutions to reduce waste, conserve resources, and connect with the natural world. So, grab your recycled containers, gather your seeds, and get ready to embark on a pumpkin-growing adventure!
Frequently Asked Questions (FAQ)
What types of recycled containers are best for growing pumpkins?
Almost any container can be used, as long as it’s large enough to accommodate the pumpkin’s root system and has adequate drainage. Some popular options include:
* Large plastic storage bins
* Laundry baskets
* Old tires (painted or covered)
* Burlap sacks
* Wooden crates or pallets (repurposed into planters)
* Buckets (5-gallon or larger)
* Old bathtubs (with drainage holes added)
The key is to ensure the container is clean and free of any harmful chemicals that could leach into the soil. Also, consider the size of the pumpkin variety you’re growing. Larger pumpkins will need larger containers.
How big should the container be for growing pumpkins?
The size of the container depends on the pumpkin variety. For smaller pumpkins, like Jack Be Littles or Sugar Pies, a 10-15 gallon container should suffice. For medium-sized pumpkins, like Howdens or Connecticut Fields, a 20-30 gallon container is recommended. For larger pumpkins, like Atlantic Giants, you’ll need a container that’s at least 50 gallons or larger. Remember, the bigger the container, the more room the roots have to grow, and the bigger your pumpkin can potentially become.
How do I ensure proper drainage in my recycled container?
Proper drainage is crucial for preventing root rot. If your container doesn’t have drainage holes, you’ll need to drill some. A few large holes (about 1 inch in diameter) should be sufficient. You can also add a layer of gravel or pebbles to the bottom of the container to improve drainage. Another option is to line the bottom of the container with landscape fabric to prevent the soil from washing out through the drainage holes.
What type of soil should I use for growing pumpkins in containers?
Use a high-quality potting mix that’s rich in organic matter. Avoid using garden soil, as it can be too heavy and compact for container gardening. You can also amend the potting mix with compost or aged manure to further boost its fertility. A good potting mix will provide your pumpkins with the nutrients they need to grow strong and healthy.
How often should I water my pumpkins in containers?
Pumpkins need consistent moisture, especially during hot weather. Water deeply whenever the top inch of soil feels dry to the touch. Avoid overwatering, as this can lead to root rot. The frequency of watering will depend on the weather conditions and the size of your container. Check the soil moisture regularly and adjust your watering schedule accordingly.
Do pumpkins grown in containers need fertilizer?
Yes, pumpkins are heavy feeders and will benefit from regular fertilization. Use a balanced fertilizer (e.g., 10-10-10) every 2-3 weeks, following the instructions on the fertilizer package. You can also use organic fertilizers, such as compost tea or fish emulsion. Avoid over-fertilizing, as this can burn the roots.
How much sunlight do pumpkins need?
Pumpkins need at least 6-8 hours of direct sunlight per day. Choose a sunny location for your container garden. If you live in a particularly hot climate, you may need to provide some afternoon shade to prevent the pumpkins from getting scorched.
How do I protect my pumpkins from pests and diseases?
Regularly inspect your pumpkin plants for pests and diseases. Common pumpkin pests include squash bugs, squash vine borers, and aphids. Common pumpkin diseases include powdery mildew and downy mildew. Use organic pest control methods, such as insecticidal soap or neem oil, to control pests. To prevent diseases, ensure good air circulation around your plants and avoid overhead watering.
Can I grow multiple pumpkin plants in one container?
It’s generally best to grow only one pumpkin plant per container, especially for larger varieties. Crowding can lead to competition for resources and smaller pumpkins. If you’re growing smaller pumpkin varieties, you may be able to get away with planting two plants per container, but be sure to provide them with plenty of space and nutrients.
What do I do when my pumpkin gets too big for the container?
While it’s ideal to start with a container that’s large enough to accommodate the pumpkin’s growth, sometimes pumpkins can outgrow their containers. If this happens, you can try to carefully transplant the pumpkin to a larger container. However, this can be risky, as it can damage the roots. Another option is to simply provide the pumpkin with extra support, such as a sling or a platform, to prevent it from tipping over.

Leave a Comment