
Grow peanuts in a small space? Absolutely! Imagine harvesting your own homegrown peanuts, even if you only have a tiny balcony or patio. It sounds like a dream, right? Well, it’s a dream that can become a reality with a few clever tricks and a little DIY spirit.
For centuries, peanuts have been a staple food in many cultures, particularly in South America, where they originated. From simple roasted snacks to complex culinary creations, the humble peanut has nourished and delighted people across the globe. But did you know you don’t need acres of farmland to enjoy the taste of freshly grown peanuts?
In today’s world, where space is often a premium, especially for urban dwellers, the desire to connect with nature and grow our own food is stronger than ever. That’s where these DIY tricks come in! I’m going to show you how to grow peanuts in a small space, maximizing your yield and minimizing the hassle. Whether you’re a seasoned gardener or a complete beginner, these simple hacks will empower you to cultivate your own peanut patch, no matter how limited your space may be. Get ready to dig in and discover the joy of homegrown goodness!
Growing Peanuts in a Small Space: A DIY Guide
Hey there, fellow gardening enthusiasts! Ever thought about growing your own peanuts? It might sound like something only large farms can do, but I’m here to tell you that you can absolutely cultivate these delicious legumes even in a small space, like a balcony, patio, or even a sunny windowsill! I’ve done it myself, and trust me, the satisfaction of harvesting your own homegrown peanuts is incredible. This guide will walk you through everything you need to know.
What You’ll Need
Before we dive in, let’s gather our supplies. Here’s a list of what you’ll need to successfully grow peanuts in a limited space:
* Peanut Seeds (Raw, Unsalted): This is the most crucial ingredient! Make sure they are raw and unsalted. Roasted peanuts won’t sprout. You can find these at most garden centers or online.
* Large Container(s): Choose containers that are at least 18 inches deep and 12 inches wide. Peanuts need room for their roots and for the “pegs” (where the peanuts develop) to bury themselves. Fabric pots are great because they allow for good drainage and aeration.
* Well-Draining Potting Mix: Peanuts thrive in loose, well-draining soil. A mix of potting soil, compost, and perlite or vermiculite works wonders.
* Watering Can or Hose: Essential for keeping your peanut plants hydrated.
* Fertilizer (Optional): A balanced fertilizer can help boost growth, but it’s not strictly necessary if your potting mix is rich in nutrients. Look for a fertilizer with a lower nitrogen content, as too much nitrogen can lead to lush foliage but fewer peanuts.
* Mulch (Optional): Mulch helps retain moisture and suppress weeds. Straw or shredded leaves work well.
* Sunny Location: Peanuts need at least 6-8 hours of direct sunlight per day.
* Patience: Growing peanuts takes time, so be prepared to wait several months for your harvest.
Step-by-Step Instructions: Planting Your Peanuts
Now, let’s get our hands dirty! Here’s how to plant your peanut seeds:
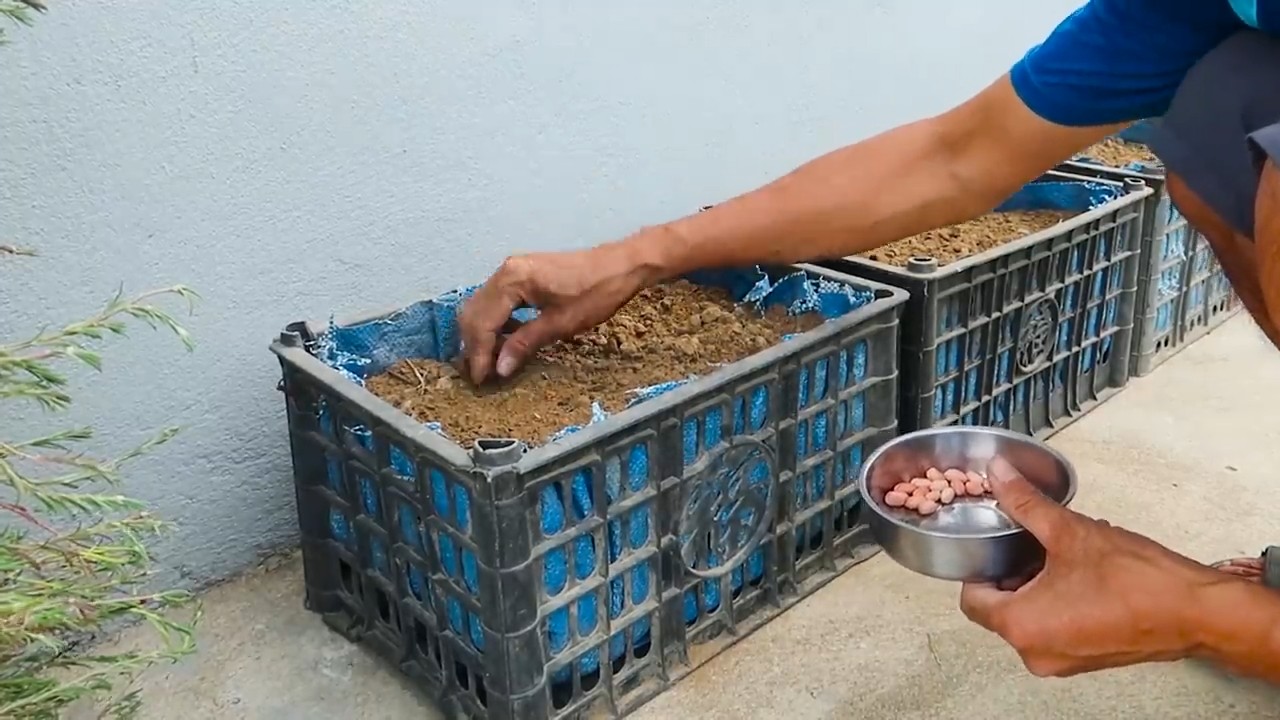
1. Prepare Your Container(s): Fill your container(s) with the well-draining potting mix, leaving about an inch or two of space at the top.
2. Soak the Seeds (Optional): Soaking the peanut seeds in water for a few hours before planting can help speed up germination. This step isn’t mandatory, but I’ve found it gives them a little head start.
3. Plant the Seeds: Make small holes about 1-2 inches deep and 6-8 inches apart in the soil. Place one peanut seed in each hole and cover it gently with soil.
4. Water Thoroughly: Water the soil well after planting, making sure it’s evenly moist but not waterlogged.
5. Choose a Sunny Spot: Place your container(s) in a location that receives at least 6-8 hours of direct sunlight each day. This is crucial for peanut development.
6. Wait for Germination: Be patient! It can take anywhere from 7 to 14 days for the peanut seeds to germinate and sprout. Keep the soil consistently moist during this time.
Caring for Your Peanut Plants
Once your peanut plants have sprouted, it’s time to focus on providing them with the care they need to thrive.
1. Watering: Water your peanut plants regularly, especially during hot, dry weather. The soil should be consistently moist, but avoid overwatering, which can lead to root rot. Check the soil moisture by sticking your finger about an inch into the soil. If it feels dry, it’s time to water.
2. Fertilizing (Optional): If you choose to fertilize, do so sparingly. Apply a balanced fertilizer every few weeks, following the instructions on the package. Remember, too much nitrogen can hinder peanut production.
3. Weeding: Keep your container(s) free of weeds, as they can compete with your peanut plants for nutrients and water. Gently pull out any weeds that appear.
4. Hilling: As your peanut plants grow, you’ll notice small, stem-like structures called “pegs” emerging from the base of the plant. These pegs are what will eventually bury themselves in the soil and develop into peanuts. To encourage this process, gently hill the soil around the base of the plants, covering the pegs with soil. This provides them with a dark, moist environment to develop in.
5. Pest Control: Keep an eye out for pests like aphids or spider mites. If you notice any infestations, you can try spraying the plants with insecticidal soap or neem oil.
Harvesting Your Peanuts
This is the most exciting part! Harvesting your own peanuts is a rewarding experience.
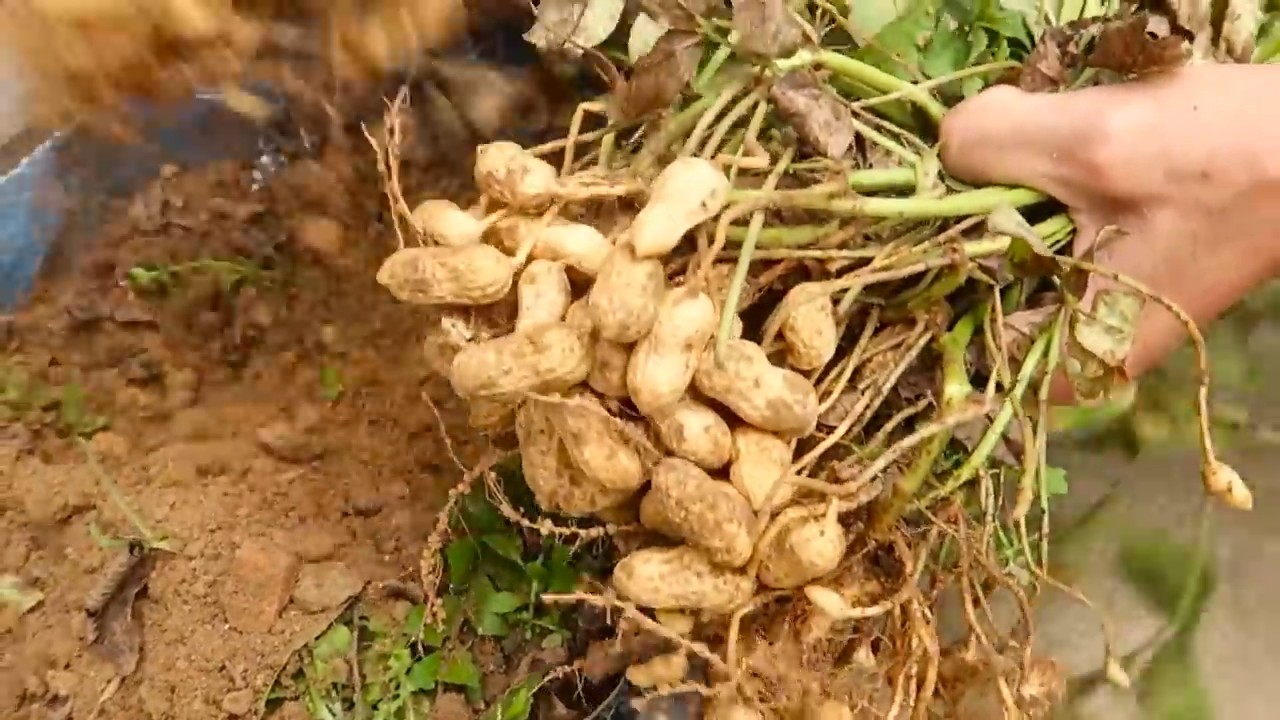
1. Timing is Key: Peanuts are typically ready to harvest about 120-150 days after planting. A good indicator that they’re ready is when the foliage starts to turn yellow or brown.
2. Dig Them Up: Gently dig up the entire plant, being careful not to damage the peanuts. You can use a garden fork or spade to loosen the soil around the plant.
3. Shake Off the Soil: Shake off as much soil as possible from the roots and peanuts.
4. Curing the Peanuts: This is a crucial step for developing the flavor and preventing mold. Hang the entire plant upside down in a warm, dry, and well-ventilated area for about 2-4 weeks. This allows the peanuts to dry and cure properly. You can also spread the peanuts out on a screen or tray to dry.
5. Separate the Peanuts: Once the peanuts are cured, you can separate them from the plant.
6. Roasting (Optional): If you want to roast your peanuts, preheat your oven to 350°F (175°C). Spread the peanuts in a single layer on a baking sheet and roast for about 20-25 minutes, or until they are golden brown and fragrant. Keep a close eye on them to prevent burning.
7. Enjoy! Now you can enjoy your homegrown peanuts! They’re delicious roasted, boiled, or even eaten raw.
Troubleshooting
Even with the best care, you might encounter some challenges along the way. Here are a few common issues and how to address them:
* Poor Germination: If your peanut seeds don’t germinate, it could be due to several factors, such as old seeds, poor soil, or insufficient moisture. Make sure you’re using fresh, raw, unsalted peanut seeds and that the soil is well-draining and consistently moist.
* Yellowing Leaves: Yellowing leaves can indicate a nutrient deficiency or overwatering. Check the soil moisture and adjust your watering accordingly. You can also try fertilizing with a balanced fertilizer.
* Lack of Peanuts: If your plants are growing well but not producing peanuts, it could be due to insufficient sunlight, poor pollination, or too much nitrogen in the soil. Make sure your plants are getting at least 6-8 hours of direct sunlight per day. Avoid using fertilizers that are high in nitrogen.
* Pests: Keep an eye out for pests like aphids, spider mites, or caterpillars. Treat infestations with insecticidal soap or neem oil.
Tips for Success
Here are a few extra tips to help you succeed in growing peanuts in a small space:
* Choose the Right Variety: Some peanut varieties are better suited for container growing than others. Look for varieties that are compact and early-maturing.
* Provide Support: As your peanut plants grow, they may need some support to prevent them from sprawling. You can use stakes or a small trellis to provide support.
* Rotate Your Crops: If you’re growing peanuts in the same container year after year, it’s a good idea to rotate your crops to prevent soil depletion.
* Don’t Be Afraid to Experiment: Gardening is all about experimentation! Don’t be afraid to try different techniques and see what works best for you.
Growing peanuts in a small space is a fun and rewarding experience. With a little patience and care, you can enjoy your own homegrown peanuts in no time. Happy gardening!
Conclusion
So, there you have it! Growing peanuts in a small space is not only achievable but also incredibly rewarding. Forget the sprawling fields; with a little ingenuity and our simple guide, you can cultivate your own peanut patch right on your balcony, patio, or even a sunny windowsill. This DIY trick transforms the often-overlooked peanut into a viable and exciting urban gardening project.
Why is this a must-try? Because it connects you to your food in a way that simply buying a bag of peanuts from the store never could. Imagine the satisfaction of harvesting your own homegrown snacks, knowing exactly where they came from and how they were nurtured. Plus, it’s a fantastic conversation starter and a unique way to impress your friends and family.
But the benefits extend beyond mere bragging rights. Growing peanuts is a surprisingly educational experience. You’ll learn about plant life cycles, the importance of soil composition, and the fascinating process of how peanuts develop underground. It’s a hands-on science lesson that’s both fun and informative, perfect for engaging children or simply satisfying your own curiosity.
And let’s not forget the taste! Homegrown peanuts, freshly roasted, possess a flavor that’s far superior to anything you’ll find commercially. The difference is truly remarkable.
Looking for variations? Consider experimenting with different peanut varieties. Valencia peanuts are known for their sweetness, while Virginia peanuts are prized for their large size. You can also try growing them in different types of containers to see which works best for your space and growing conditions. Perhaps a fabric grow bag will yield better results than a traditional plastic pot. Or maybe you’ll discover that a self-watering container simplifies the watering process.
Another fun variation is to incorporate companion planting. Marigolds, for example, are known to deter nematodes, which can damage peanut roots. Basil can help repel other pests. Experiment with different combinations to create a thriving and pest-resistant peanut patch.
Don’t be afraid to get creative with your peanut harvest, too. Beyond simply roasting them, you can use your homegrown peanuts to make homemade peanut butter, add them to stir-fries, or even bake them into cookies and cakes. The possibilities are endless!
We wholeheartedly encourage you to give this DIY trick a try. It’s a simple, affordable, and incredibly rewarding way to experience the joy of gardening, even in the smallest of spaces. We are confident that you will find the process of growing peanuts in a small space to be a fulfilling and delicious adventure.
Once you’ve harvested your first crop, we’d love to hear about your experience! Share your photos, tips, and tricks in the comments section below. Let’s build a community of urban peanut growers and inspire others to discover the magic of homegrown peanuts. What variety did you grow? What challenges did you face? What did you learn along the way? Your insights could be invaluable to other aspiring peanut farmers. So, grab your seeds, get your hands dirty, and get ready to enjoy the taste of homegrown goodness!
Frequently Asked Questions (FAQ)
1. What is the best type of peanut to grow in a small space?
The best type of peanut for small spaces are bush varieties like Valencia or Spanish peanuts. These varieties tend to be more compact and don’t require as much sprawling space as runner types like Virginia peanuts. Valencia peanuts are known for their sweet flavor and multiple peanuts per pod, making them a great choice for a bountiful harvest in a limited area. Spanish peanuts are also a good option, being smaller and faster to mature. Consider your local climate and growing conditions when making your final decision. Research which varieties thrive best in your region for optimal results.
2. How much sunlight do peanuts need when grown in containers?
Peanuts require at least 6-8 hours of direct sunlight per day to thrive. When growing them in containers, ensure they are placed in a location that receives ample sunlight. A south-facing balcony or patio is often ideal. If you don’t have access to enough natural sunlight, you can supplement with grow lights. Position the grow lights a few inches above the plants and keep them on for 12-14 hours per day. Monitor your plants closely and adjust the lighting as needed to prevent them from becoming leggy or stunted.
3. What type of soil is best for growing peanuts in pots?
Peanuts need well-draining, sandy loam soil. This type of soil allows the developing peanut pods to easily penetrate the ground. Avoid heavy clay soils, as they can become compacted and hinder peanut development. You can create your own peanut-friendly soil mix by combining equal parts of potting soil, sand, and compost. The potting soil provides essential nutrients, the sand improves drainage, and the compost adds organic matter. Ensure the soil pH is between 6.0 and 6.5 for optimal peanut growth.
4. How often should I water my peanut plants?
Peanut plants need consistent moisture, especially during flowering and pod development. Water deeply whenever the top inch of soil feels dry to the touch. Avoid overwatering, as this can lead to root rot. During hot, dry weather, you may need to water daily. In cooler, wetter weather, you can reduce the frequency of watering. Use a watering can or hose to water the base of the plants, avoiding wetting the foliage, which can increase the risk of fungal diseases.
5. How do I know when my peanuts are ready to harvest?
The best way to determine if your peanuts are ready to harvest is to check the foliage. When the leaves start to turn yellow and the plant begins to die back, it’s a sign that the peanuts are mature. You can also dig up a test plant to examine the pods. The pods should be plump and well-filled, with a distinct peanut aroma. The inside of the shell should have visible veins and a dark color. If the pods are still small and white, they are not yet ready to harvest.
6. Can I grow peanuts indoors?
Yes, you can grow peanuts indoors, but it requires providing them with the right conditions. They need at least 6-8 hours of direct sunlight per day, which may require supplementing with grow lights. Ensure the container is large enough to accommodate the root system and developing pods. Use well-draining soil and water regularly. Indoor peanut plants may not produce as many peanuts as those grown outdoors, but it’s still a fun and rewarding experience.
7. What are some common pests and diseases that affect peanut plants?
Common pests that can affect peanut plants include aphids, spider mites, and nematodes. Aphids and spider mites can be controlled with insecticidal soap or neem oil. Nematodes can be more challenging to manage, but incorporating organic matter into the soil and using resistant peanut varieties can help. Common diseases include leaf spot and root rot. Leaf spot can be prevented by ensuring good air circulation and avoiding overhead watering. Root rot can be prevented by using well-draining soil and avoiding overwatering.
8. How do I cure and store my harvested peanuts?
After harvesting your peanuts, you need to cure them to reduce the moisture content and prevent spoilage. Gently shake off any excess soil and spread the peanuts in a single layer on a screen or tray. Place them in a well-ventilated area, such as a garage or shed, for 2-3 weeks. Turn them regularly to ensure even drying. Once the peanuts are fully cured, store them in an airtight container in a cool, dry place. They can be stored for several months. You can also roast them before storing to enhance their flavor and extend their shelf life.
Leave a Comment