
Grow Onions in Pots: Unlock the secrets to a bountiful harvest, even without a sprawling garden! Have you ever dreamed of snipping fresh, flavorful onions right from your own patio? I know I have! For centuries, onions have been a culinary cornerstone, flavoring dishes across cultures and continents. From ancient Egyptian tombs to modern-day kitchens, their pungent aroma and versatile uses have made them indispensable. But what if you live in an apartment, have limited space, or simply prefer the convenience of container gardening?
That’s where this DIY guide comes in! Many people think growing vegetables requires acres of land, but I’m here to tell you that’s simply not true. Growing onions in pots is not only possible, but it’s also surprisingly easy and rewarding. Imagine the satisfaction of nurturing your own onion crop, knowing exactly where your food comes from, and enjoying the freshest possible ingredients in your meals. This article will provide you with simple, step-by-step instructions and expert tips to successfully grow onions in pots, regardless of your gardening experience. Say goodbye to bland store-bought onions and hello to a vibrant, homegrown harvest!
Growing Onions in Pots: A Beginner’s Guide
Hey there, fellow gardening enthusiasts! Ever dreamt of snipping fresh onion greens right from your balcony or patio? Well, dream no more! Growing onions in pots is surprisingly easy and rewarding, even if you’re a complete newbie. I’m going to walk you through everything you need to know, from choosing the right variety to harvesting your flavorful bounty. Let’s get started!
Choosing the Right Onion Variety
Not all onions are created equal, especially when it comes to container gardening. Some varieties thrive in pots, while others are better suited for in-ground planting. Here’s what I recommend:
* Short-Day Onions: These are your best bet if you live in a region with mild winters and shorter days. They need about 10-12 hours of sunlight per day to form bulbs. Popular choices include White Bermuda, Yellow Granex, and Red Creole.
* Intermediate-Day Onions: These are a good option if you live in a region with moderate day lengths. They need about 12-14 hours of sunlight per day to form bulbs.
* Bunching Onions (Scallions): These are super easy to grow in pots and are perfect for snipping fresh greens. They don’t form large bulbs, but they provide a continuous supply of flavorful leaves. Evergreen White Bunching and Tokyo Long White are excellent choices.
* Shallots: While technically not onions, shallots are closely related and grow well in containers. They have a milder, sweeter flavor than onions and are a great addition to any garden.
Gathering Your Supplies
Before we dive into the planting process, let’s make sure you have everything you need. Here’s a checklist:
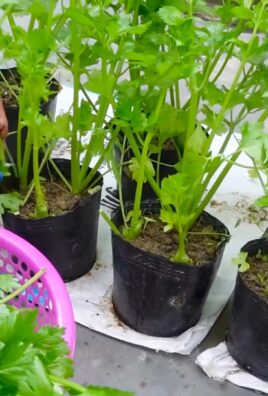
* Pots: Choose pots that are at least 8-12 inches deep and wide. This will give the onions enough room to develop healthy roots. Make sure the pots have drainage holes to prevent waterlogging.
* Potting Mix: Use a high-quality potting mix that is well-draining and rich in organic matter. Avoid using garden soil, as it can compact in pots and hinder root growth. I like to use a mix of compost, peat moss, and perlite.
* Onion Sets or Seeds: You can start onions from sets (small, immature bulbs) or seeds. Sets are easier and faster to grow, but seeds offer a wider variety of choices.
* Fertilizer: Onions are heavy feeders, so you’ll need to fertilize them regularly. Use a balanced fertilizer (e.g., 10-10-10) or an organic fertilizer like compost tea or fish emulsion.
* Watering Can or Hose: You’ll need a way to water your onions regularly.
* Trowel or Small Shovel: For planting the sets or seedlings.
* Optional: Mulch (straw, wood chips, or shredded leaves) to help retain moisture and suppress weeds.
Planting Your Onions
Now for the fun part! Here’s how to plant your onions in pots:
Planting from Sets
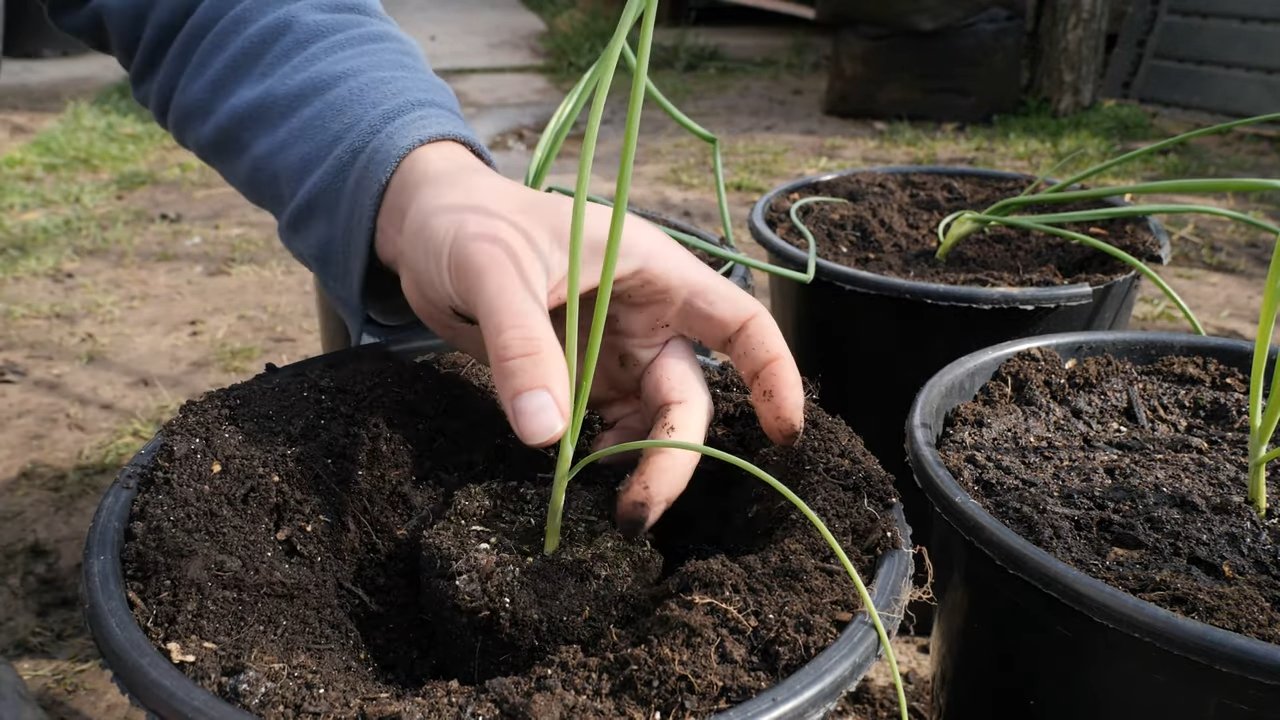
1. Prepare the Pot: Fill the pot with potting mix, leaving about an inch of space at the top.
2. Plant the Sets: Make small holes in the potting mix, about 4-6 inches apart. The depth of the hole should be just enough to cover the base of the set.
3. Place the Sets: Place the onion sets in the holes, root-end down. Gently cover them with potting mix, leaving the tips exposed.
4. Water Thoroughly: Water the pots thoroughly until the water drains out of the bottom.
5. Mulch (Optional): Add a layer of mulch around the onions to help retain moisture and suppress weeds.
Planting from Seeds
1. Start Seeds Indoors (Optional): If you live in a region with a short growing season, you can start onion seeds indoors 8-10 weeks before the last frost. Sow the seeds in seed trays or small pots filled with seed-starting mix. Keep the soil moist and warm (around 70-75°F).
2. Prepare the Pot: Fill the pot with potting mix, leaving about an inch of space at the top.
3. Sow the Seeds: Sprinkle the onion seeds evenly over the surface of the potting mix. Cover them with a thin layer of potting mix (about 1/4 inch).
4. Water Gently: Water the pots gently using a spray bottle or watering can with a fine rose.
5. Thin Seedlings (If Necessary): Once the seedlings emerge, thin them out so that they are about 2-3 inches apart.
6. Transplant Seedlings (If Started Indoors): Once the seedlings are large enough to handle (about 4-6 inches tall), transplant them into the prepared pots. Space them about 4-6 inches apart.
Caring for Your Onions
Once your onions are planted, it’s important to provide them with the right care to ensure a bountiful harvest.
1. Sunlight: Onions need at least 6-8 hours of sunlight per day. Place your pots in a sunny location. If you don’t have enough sunlight, you can supplement with grow lights.
2. Watering: Water your onions regularly, especially during dry periods. The soil should be consistently moist, but not waterlogged. Check the soil moisture by sticking your finger into the soil. If the top inch feels dry, it’s time to water.
3. Fertilizing: Fertilize your onions every 2-3 weeks with a balanced fertilizer or an organic fertilizer like compost tea or fish emulsion. Follow the instructions on the fertilizer package.
4. Weeding: Keep the pots free of weeds, as they can compete with the onions for nutrients and water. Gently pull out any weeds that appear.
5. Pest and Disease Control: Onions are generally pest-resistant, but they can be susceptible to certain pests and diseases, such as onion maggots, thrips, and fungal diseases. Inspect your plants regularly for any signs of problems. If you notice any pests or diseases, take action immediately. You can use organic pest control methods like insecticidal soap or neem oil. For fungal diseases, you can use a copper-based fungicide.
6. Mulching: Adding a layer of mulch around your onion plants helps retain moisture, suppress weeds, and regulate soil temperature. Organic mulches like straw, wood chips, or shredded leaves are great options.
Harvesting Your Onions
The time it takes for onions to mature depends on the variety and growing conditions. Generally, onions are ready to harvest when the tops start to turn yellow and fall over.
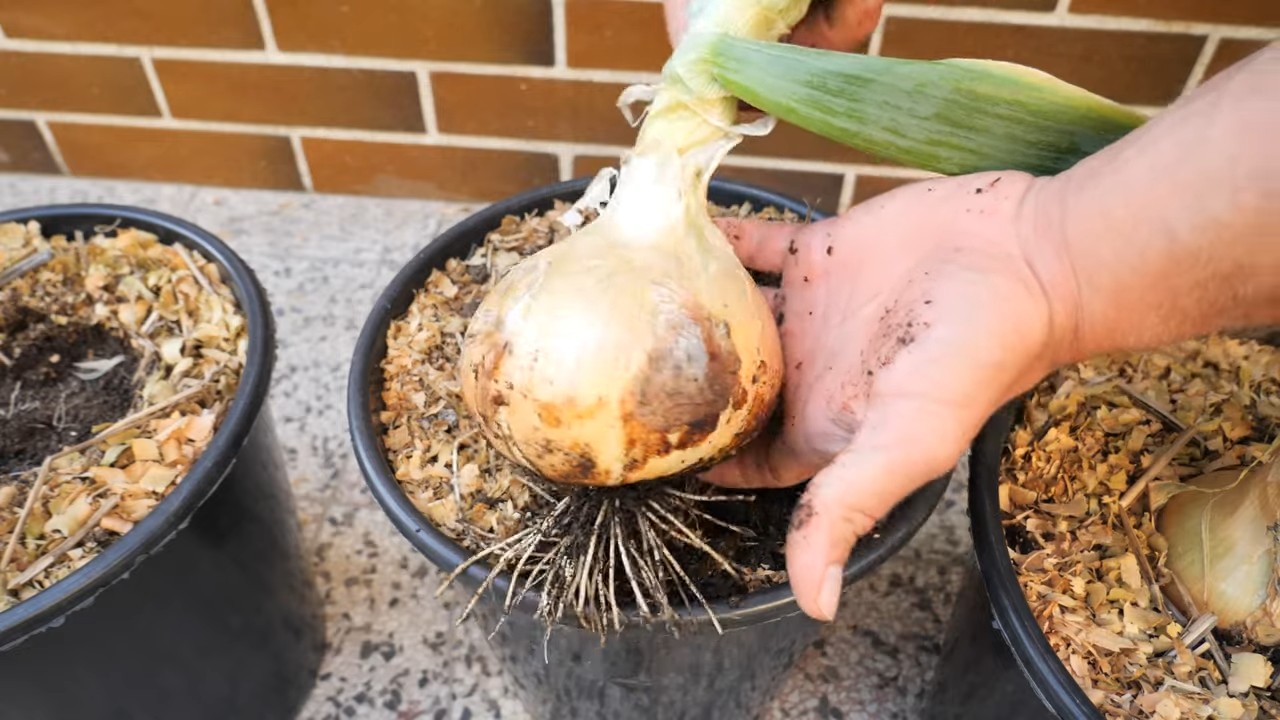
1. Harvesting Bulb Onions: Once the tops have fallen over, stop watering the onions. This will help them to cure properly. After a week or two, gently pull the onions out of the soil.
2. Curing Onions: Cure the onions by laying them out in a warm, dry, and well-ventilated place for 2-3 weeks. This will help them to develop a papery skin and prevent them from rotting.
3. Storing Onions: Once the onions are cured, you can store them in a cool, dry, and dark place. Braiding the tops together and hanging them is a traditional way to store onions. You can also store them in mesh bags or crates.
4. Harvesting Bunching Onions (Scallions): You can harvest bunching onions at any time once they are large enough to use. Simply snip off the green tops as needed. The plants will continue to produce new growth.
Troubleshooting
Even with the best care, you may encounter some problems while growing onions in pots. Here are some common issues and how to address them:
* Yellowing Leaves: This can be caused by a variety of factors, including overwatering, underwatering, nutrient deficiencies, or pests. Check the soil moisture and adjust your watering accordingly. Fertilize the onions with a balanced fertilizer. Inspect the plants for pests and take action if necessary.
* Small Bulbs: This can be caused by insufficient sunlight, poor soil, or overcrowding. Make sure the onions are getting at least 6-8 hours of sunlight per day. Use a high-quality potting mix that is rich in organic matter. Thin out the seedlings if they are too crowded.
* Bolting (Flowering): Bolting occurs when onions are exposed to cold temperatures followed by warm temperatures. This can cause them to flower prematurely, which will reduce the size of the bulbs. To prevent bolting, choose onion varieties that are suitable for your climate. Avoid planting onions too early in the spring.
* Rotting Bulbs: This can be caused by overwatering or poor drainage. Make sure the pots have drainage holes and that the soil is well-draining. Avoid overwatering the onions.
Enjoying Your Homegrown Onions
Congratulations
Conclusion
So, there you have it! Growing onions in pots is not only achievable, but it’s also a rewarding and surprisingly simple endeavor. We’ve walked you through the process, from selecting the right onion variety and pot size to nurturing your green shoots into plump, flavorful bulbs. But why should you bother with this DIY project?
First and foremost, growing onions in pots offers unparalleled convenience, especially for those with limited garden space. Whether you have a sprawling balcony, a sunny patio, or just a small windowsill, you can cultivate your own supply of fresh onions. Imagine the satisfaction of snipping off a few chives for your morning omelet or harvesting a bulb to add depth to your favorite soup, all from your own container garden.
Beyond convenience, growing your own onions allows you to control the quality and type of onions you consume. You can choose organic seeds or sets, ensuring that your onions are free from harmful pesticides and herbicides. Plus, you can experiment with different varieties to discover your personal favorites. From the mild sweetness of Walla Walla onions to the pungent bite of red onions, the possibilities are endless.
And let’s not forget the sheer joy of watching something grow from seed to harvest. There’s a certain magic in nurturing a tiny onion set into a thriving plant, and the sense of accomplishment you’ll feel when you finally pull those onions from the soil is truly unmatched. It’s a connection to nature that can be incredibly grounding and fulfilling.
But the benefits don’t stop there. Growing onions in pots can also be a cost-effective way to supplement your grocery shopping. While the initial investment in pots, soil, and seeds may seem like a lot, the long-term savings can be significant, especially if you regularly use onions in your cooking. Plus, you’ll always have fresh onions on hand, eliminating the need for last-minute trips to the store.
Ready to take your onion growing to the next level? Consider these variations:
* Companion Planting: Plant your onions alongside other herbs and vegetables that benefit from their presence. Carrots, chamomile, and rosemary are all excellent companions for onions, as they help to deter pests and improve the overall health of your plants.
* Succession Planting: Plant new onion sets every few weeks to ensure a continuous harvest throughout the growing season. This is a great way to maximize your yield and always have fresh onions available.
* Green Onions Galore: If you’re primarily interested in green onions, you can harvest them continuously by snipping off the green shoots as needed. The bulbs will continue to grow, providing you with a steady supply of fresh greens.
* Experiment with Varieties: Don’t be afraid to try different onion varieties to find your favorites. From sweet Vidalia onions to pungent Spanish onions, there’s a whole world of flavors to explore.
Growing onions in pots is a rewarding experience that offers numerous benefits, from convenience and cost savings to improved quality and a deeper connection to nature. So, what are you waiting for? Grab a pot, some soil, and a few onion sets, and get ready to embark on your own onion-growing adventure.
We encourage you to try this DIY trick and share your experience with us. Let us know what varieties you grew, what challenges you faced, and what tips you discovered along the way. Together, we can create a community of passionate onion growers and inspire others to embrace the joys of container gardening. Share your photos and stories on social media using #PottedOnions and let’s celebrate the deliciousness of homegrown onions! We are confident that you will find that **growing onions in pots** is a simple and satisfying way to enjoy fresh, flavorful onions all season long.
Frequently Asked Questions (FAQ)
What is the best time of year to plant onions in pots?
The best time to plant onions in pots depends on your climate and the type of onion you’re growing. In general, you can plant onion sets (small, immature onions) in early spring, as soon as the soil is workable. For seed-grown onions, start them indoors 8-10 weeks before the last expected frost. If you live in a warmer climate, you can plant onion sets in the fall for a winter harvest. The key is to provide your onions with enough time to mature before the weather gets too hot or too cold.
What type of pot is best for growing onions?
Choose a pot that is at least 6-8 inches deep and wide for individual onions. If you’re planting multiple onions in the same pot, select a larger container that allows for adequate spacing between the plants (about 4-6 inches apart). Terracotta pots are a good choice because they allow for good drainage and airflow, but plastic pots are also suitable. Make sure the pot has drainage holes to prevent waterlogging.
What kind of soil should I use for growing onions in pots?
Onions prefer well-draining, fertile soil that is rich in organic matter. A good potting mix for onions should consist of equal parts of compost, peat moss (or coconut coir), and perlite or vermiculite. Avoid using garden soil, as it can be too heavy and may contain pests or diseases. You can also amend your potting mix with a slow-release fertilizer to provide your onions with the nutrients they need to thrive.
How often should I water my potted onions?
Water your potted onions regularly, especially during dry periods. The soil should be kept consistently moist, but not waterlogged. Check the soil moisture by sticking your finger into the soil about an inch deep. If the soil feels dry, it’s time to water. Avoid overwatering, as this can lead to root rot. During hot weather, you may need to water your onions more frequently.
How much sunlight do onions need?
Onions need at least 6-8 hours of direct sunlight per day to grow properly. Choose a sunny location for your potted onions, such as a south-facing balcony or patio. If you don’t have enough sunlight, you can supplement with grow lights. Rotate your pots regularly to ensure that all sides of the plants receive adequate sunlight.
How do I fertilize my potted onions?
Onions are heavy feeders, so they need regular fertilization to produce large, healthy bulbs. Start by amending your potting mix with a slow-release fertilizer at planting time. Then, fertilize your onions every 2-3 weeks with a balanced liquid fertilizer, such as a 10-10-10 or 20-20-20 formula. Follow the instructions on the fertilizer label for proper application rates. Avoid over-fertilizing, as this can burn the roots of your plants.
How do I know when my onions are ready to harvest?
Onions are typically ready to harvest when the tops (the green shoots) begin to fall over and turn yellow or brown. This usually happens about 100-120 days after planting. You can also check the size of the bulbs by gently digging around the base of the plants. If the bulbs are large and well-formed, they are likely ready to harvest.
How do I store my harvested onions?
After harvesting your onions, cure them for 1-2 weeks in a warm, dry, and well-ventilated place. This allows the outer layers of the bulbs to dry and harden, which helps to prevent spoilage. Once the onions are cured, you can store them in a cool, dry, and dark place, such as a pantry or basement. Properly cured and stored onions can last for several months.
What are some common pests and diseases that affect onions?
Some common pests that affect onions include onion maggots, thrips, and aphids. Diseases that can affect onions include onion rot, downy mildew, and purple blotch. To prevent pests and diseases, choose disease-resistant onion varieties, practice good sanitation, and avoid overwatering. If you notice any signs of pests or diseases, treat your plants with an appropriate insecticide or fungicide.
Can I grow onions from scraps?
Yes, you can regrow onions from scraps! Save the bottom inch or two of an onion bulb with the roots attached. Plant this scrap in a pot of soil, leaving the top exposed. Water regularly, and new green shoots will emerge. While the resulting onion bulb may not be as large as one grown from seed or set, it’s a great way to reduce waste and enjoy fresh green onions.
Leave a Comment