
Grow Okra at Home? Absolutely! Imagine stepping into your backyard and harvesting fresh, vibrant okra, ready to be transformed into a delicious gumbo or a crispy, fried delight. It’s not just a dream; it’s an achievable reality with a few simple tricks and DIY techniques.
Okra, with its rich history tracing back to ancient Ethiopia, has nourished communities for centuries. It traveled across continents, becoming a staple in Southern cuisine and a beloved vegetable worldwide. But you don’t need a sprawling farm to enjoy this versatile plant. I’m here to tell you that you can easily grow okra at home, even if you have limited space or gardening experience.
Why should you bother with this DIY project? Well, store-bought okra often lacks the freshness and flavor of homegrown varieties. Plus, growing your own food is incredibly rewarding! You’ll know exactly what went into nurturing your plants, avoiding harmful pesticides and enjoying the satisfaction of harvesting your own bounty. This article will equip you with the knowledge and simple hacks to successfully cultivate okra in your own backyard, balcony, or even on a sunny windowsill. Let’s get started and unlock the secrets to a thriving okra harvest!
Grow Your Own Delicious Okra: A Beginner’s Guide
Hey there, fellow gardening enthusiasts! I’m so excited to share my experience with growing okra at home. It’s surprisingly easy, rewarding, and you get to enjoy fresh, homegrown okra all season long. Okra is a warm-weather vegetable, so it thrives in sunny locations and well-drained soil. Let’s dive into how you can cultivate your own okra patch!
Choosing the Right Okra Variety
Before we get our hands dirty, let’s talk about okra varieties. There are several types to choose from, each with slightly different characteristics. Here are a few popular options:
* Clemson Spineless: This is a classic and widely available variety. It produces dark green, ribbed pods that are relatively spineless, making harvesting a breeze. It’s a great choice for beginners.
* Burgundy: If you’re looking for something a little different, Burgundy okra boasts beautiful red pods. It’s not just pretty; it also has a delicious flavor.
* Emerald: This variety is known for its smooth, dark green pods and excellent yields. It’s a good option if you want a reliable and productive okra plant.
* Dwarf Green Long Pod: Perfect for smaller gardens or containers, this variety produces shorter plants with long, slender pods.
I personally love Clemson Spineless because it’s easy to grow and the pods are tender and flavorful. But feel free to experiment and find the variety that suits your taste and garden space.
Preparing Your Garden Bed
Okra needs plenty of sunshine and well-drained soil to thrive. Here’s how to prepare your garden bed for success:
* Sunlight: Choose a location that receives at least 6-8 hours of direct sunlight per day.
* Soil: Okra prefers well-drained soil that is rich in organic matter. If your soil is heavy clay, amend it with compost, aged manure, or other organic materials to improve drainage and fertility.
* Soil pH: Okra grows best in soil with a pH between 6.0 and 6.8. You can test your soil pH using a soil testing kit or by sending a sample to your local agricultural extension office. If your soil is too acidic, you can add lime to raise the pH. If it’s too alkaline, you can add sulfur to lower the pH.
* Fertilizing: Before planting, incorporate a balanced fertilizer into the soil. I like to use a 10-10-10 fertilizer, following the instructions on the package.
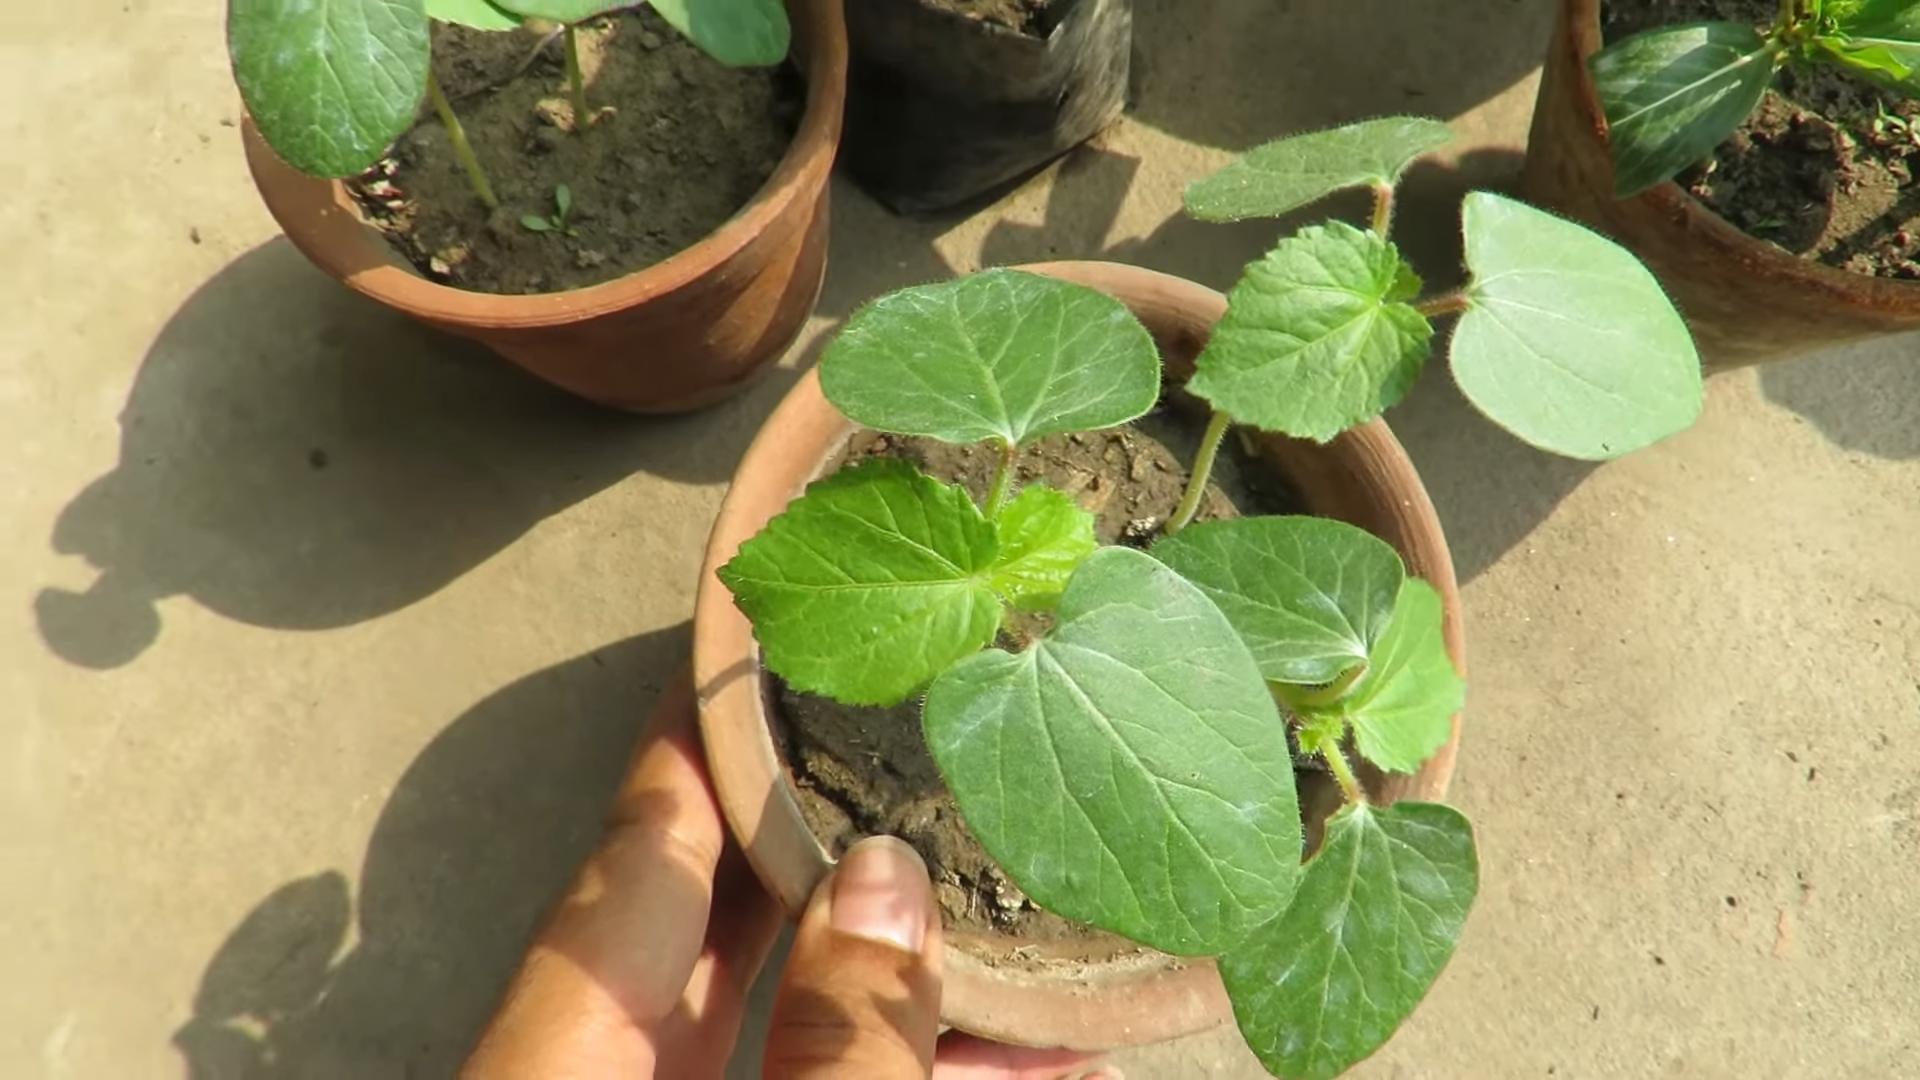
Planting Okra Seeds
Okra is typically grown from seed, and it’s best to sow the seeds directly into the garden after the last frost. Here’s how to plant okra seeds:
1. Soaking the Seeds: To speed up germination, soak the okra seeds in warm water for 12-24 hours before planting. This helps soften the seed coat and encourages sprouting.
2. Planting Depth: Plant the seeds about 1/2 to 1 inch deep.
3. Spacing: Space the seeds about 12-18 inches apart in rows that are 3-4 feet apart. This gives the plants enough room to grow and prevents overcrowding.
4. Watering: After planting, water the seeds thoroughly. Keep the soil moist but not waterlogged until the seeds germinate.
5. Germination: Okra seeds typically germinate in 7-14 days, depending on the soil temperature and moisture levels.
Caring for Your Okra Plants
Once your okra plants have sprouted, it’s important to provide them with proper care to ensure healthy growth and abundant yields.
* Watering: Water your okra plants regularly, especially during hot, dry weather. Aim to water deeply and less frequently, rather than shallowly and often. This encourages the roots to grow deeper into the soil, making the plants more drought-tolerant.
* Fertilizing: Side-dress your okra plants with a nitrogen-rich fertilizer every 4-6 weeks during the growing season. This will help promote leafy growth and pod production. I like to use a fertilizer like ammonium nitrate or urea, following the instructions on the package.
* Weeding: Keep the area around your okra plants free of weeds. Weeds compete with okra for water, nutrients, and sunlight. You can hand-pull weeds or use a hoe to cultivate the soil. Mulching around the plants can also help suppress weed growth.
* Pruning: Okra plants can grow quite tall, so you may need to prune them to keep them manageable. You can prune off the lower leaves as they start to yellow or brown. This will improve air circulation and prevent disease. You can also top the plants when they reach a height of 4-5 feet to encourage branching and more pod production.
* Pest Control: Okra can be susceptible to certain pests, such as aphids, flea beetles, and corn earworms. Inspect your plants regularly for signs of infestation. You can control these pests with insecticidal soap, neem oil, or other organic pest control methods.
* Disease Control: Okra is generally resistant to diseases, but it can be affected by fungal diseases such as powdery mildew and verticillium wilt. To prevent these diseases, provide good air circulation, avoid overwatering, and use disease-resistant varieties. If you notice signs of disease, treat the plants with a fungicide.
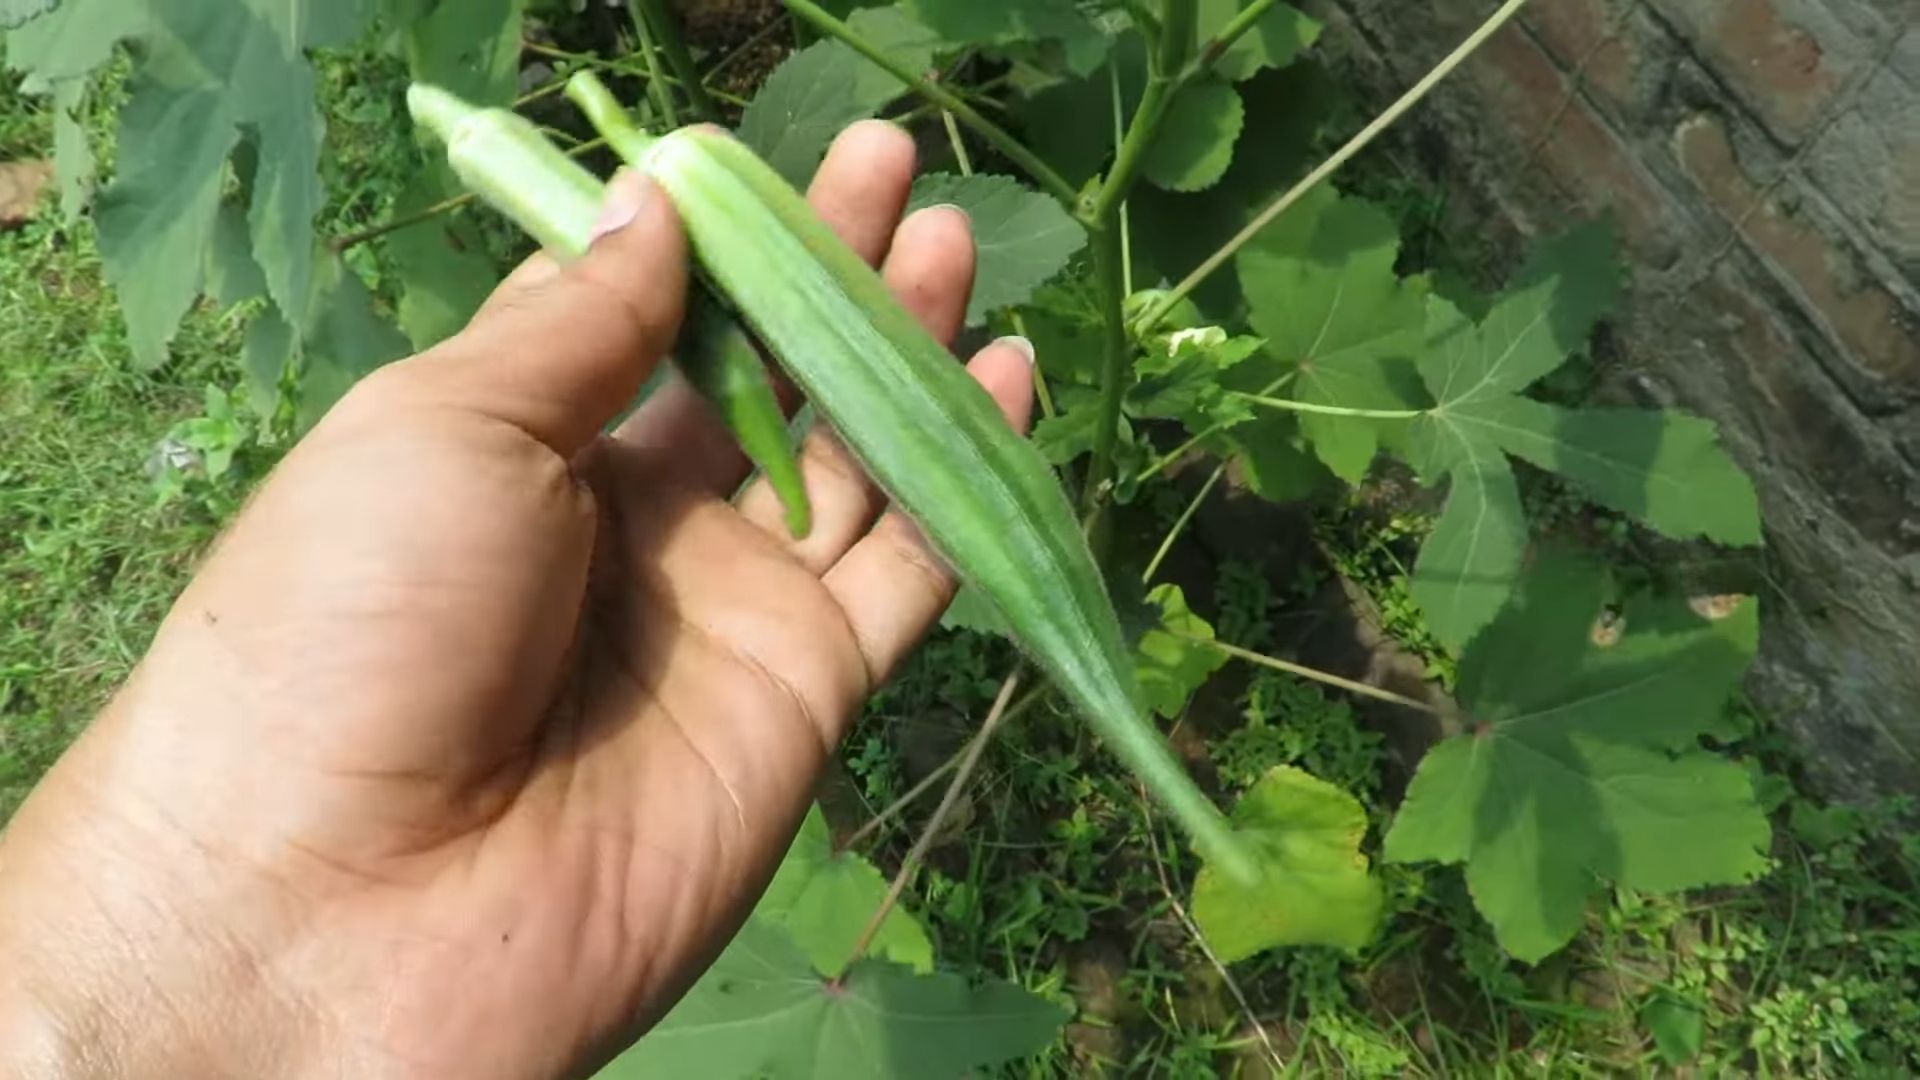
Harvesting Okra Pods
Okra pods are ready to harvest about 50-60 days after planting. Here’s how to harvest okra pods:
1. Harvesting Time: Harvest the pods when they are 2-4 inches long and still tender. Overripe pods become tough and fibrous.
2. Harvesting Technique: Use a sharp knife or pruning shears to cut the pods from the plant. Be careful not to damage the plant.
3. Frequency: Harvest okra pods every 1-2 days. This encourages the plant to produce more pods.
4. Handling: Wear gloves when harvesting okra, as the pods can be prickly and irritating to the skin.
Dealing with Common Okra Problems
Even with the best care, you might encounter some challenges while growing okra. Here are a few common problems and how to address them:
* Yellowing Leaves: Yellowing leaves can be a sign of nutrient deficiency, overwatering, or disease. Check the soil pH and nutrient levels, adjust your watering schedule, and inspect the plants for signs of disease.
* Lack of Pod Production: If your okra plants are not producing pods, it could be due to insufficient sunlight, poor soil fertility, or lack of pollination. Make sure your plants are getting enough sunlight, fertilize them regularly, and encourage pollinators to visit your garden by planting flowers nearby.
* Tough Pods: Tough pods are usually a sign that you’re harvesting them too late. Harvest the pods when they are young and tender.
* Pest Infestations: As mentioned earlier, okra can be susceptible to certain pests. Monitor your plants regularly and take action to control pests as soon as you notice them.
Extending the Okra Season
If you live in a region with a short growing season, you can extend the okra season by starting the seeds indoors 4-6 weeks before the last frost. Transplant the seedlings into the garden after the last frost. You can also use row covers or other protective measures to protect the plants from frost.
Saving Okra Seeds
If you want to save seeds from your okra plants for next year, allow a few pods to mature on the plant. Let the pods dry completely on the plant, then harvest them and extract the seeds. Store the seeds in a cool, dry place until next planting season.
Enjoying Your Homegrown Okra
Now that you’ve harvested your homegrown okra, it’s time to enjoy it! Okra can be used in a variety of dishes, such as gumbo, stews, soups, and stir-fries. You can also fry it, grill it, or pickle it.
Here are a few of my favorite okra recipes:
* Fried Okra: This is a classic Southern dish that’s crispy on the outside and tender on the inside.
* Okra Gumbo: A hearty and flavorful stew that’s perfect for a cold day.
* Grilled Okra: A simple and healthy way to enjoy okra.
* Pickled Okra: A tangy and crunchy condiment that’s great with sandwiches or salads.
Growing okra at home is a rewarding experience that allows you to enjoy fresh, delicious vegetables all season long. With a little bit of care and attention, you can have a thriving okra patch in your own backyard. Happy gardening!
Conclusion
So, there you have it! Growing okra at home is not only achievable, but it’s also incredibly rewarding. Forget those bland, overpriced okra pods from the grocery store. Imagine stepping into your own backyard and harvesting fresh, vibrant okra, bursting with flavor and nutrients. This DIY approach puts you in control, allowing you to cultivate organic, pesticide-free okra that’s far superior to anything you can buy.
Why is this a must-try? Because it’s about more than just saving money. It’s about connecting with your food, understanding the growing process, and enjoying the unparalleled taste of homegrown produce. Plus, okra is a nutritional powerhouse, packed with fiber, vitamins, and antioxidants. Incorporating fresh okra into your diet is a fantastic way to boost your health and well-being.
But the benefits don’t stop there. Growing okra at home is also a sustainable practice. You’re reducing your carbon footprint by eliminating the need for transportation and packaging. You’re also contributing to a healthier environment by avoiding harmful chemicals and pesticides.
Ready to take your okra game to the next level? Consider these variations:
* Experiment with different okra varieties: From the classic Clemson Spineless to the colorful Burgundy okra, there’s a variety to suit every taste and preference.
* Try companion planting: Okra thrives alongside other vegetables like peppers, tomatoes, and basil. Companion planting can help deter pests and improve overall plant health.
* Get creative with your recipes: Okra is incredibly versatile. Use it in soups, stews, gumbos, or even grill it for a smoky, delicious side dish.
Don’t be intimidated if you’re a beginner gardener. Growing okra at home is surprisingly easy, even for those with limited space. With a little bit of sunlight, well-drained soil, and regular watering, you’ll be harvesting your own okra in no time.
We encourage you to give this DIY trick a try. Start small, learn as you go, and don’t be afraid to experiment. The satisfaction of growing your own food is truly unmatched.
And most importantly, we want to hear about your experience! Share your tips, tricks, and photos in the comments below. Let’s build a community of okra-loving gardeners and inspire others to embrace the joy of homegrown produce. Let us know what challenges you faced and how you overcame them. Did you find a particular variety that thrived in your climate? What are your favorite okra recipes? Your insights will be invaluable to other readers who are just starting out.
So, what are you waiting for? Grab your seeds, get your hands dirty, and start growing okra at home today! You won’t regret it.
Frequently Asked Questions (FAQ)
What is the best time to plant okra?
The ideal time to plant okra is in late spring or early summer, after the last frost has passed and the soil has warmed up to at least 65 degrees Fahrenheit (18 degrees Celsius). Okra thrives in warm weather and requires plenty of sunlight to grow. Planting too early can result in stunted growth or even death of the seedlings. If you live in a region with a short growing season, you can start your okra seeds indoors a few weeks before the last frost to give them a head start.
How much sunlight does okra need?
Okra requires at least 6-8 hours of direct sunlight per day to thrive. Choose a planting location that receives full sun throughout the day. If your okra plants don’t get enough sunlight, they may become leggy and produce fewer pods.
What type of soil is best for growing okra?
Okra prefers well-drained soil that is rich in organic matter. Amend your soil with compost or other organic materials before planting to improve drainage and fertility. Okra can tolerate a wide range of soil pH levels, but it grows best in soil with a pH between 6.0 and 7.0.
How often should I water my okra plants?
Water your okra plants regularly, especially during hot, dry weather. Aim to keep the soil consistently moist, but not waterlogged. Water deeply and less frequently, rather than shallowly and more often. This encourages the roots to grow deeper, making the plants more drought-tolerant. A good rule of thumb is to water when the top inch of soil feels dry to the touch.
How do I fertilize my okra plants?
Okra is a heavy feeder and benefits from regular fertilization. Apply a balanced fertilizer (e.g., 10-10-10) at planting time and then again every 4-6 weeks during the growing season. You can also use organic fertilizers such as compost tea or fish emulsion. Avoid over-fertilizing, as this can lead to excessive foliage growth and reduced pod production.
When and how should I harvest okra?
Okra pods are typically ready to harvest 50-65 days after planting. Harvest the pods when they are young and tender, typically 2-4 inches long. Use a sharp knife or pruning shears to cut the pods from the plant. Harvest okra frequently, every 1-2 days, to encourage continued production. If the pods are allowed to grow too large, they will become tough and fibrous.
What are some common pests and diseases that affect okra?
Some common pests that affect okra include aphids, flea beetles, and corn earworms. Diseases that can affect okra include powdery mildew and root-knot nematodes. To prevent pest and disease problems, practice good garden hygiene, such as removing weeds and debris from around your plants. You can also use organic pest control methods such as insecticidal soap or neem oil.
Can I grow okra in containers?
Yes, you can grow okra in containers, but you will need to choose a large container that is at least 12 inches in diameter and 12 inches deep. Use a well-draining potting mix and make sure the container has drainage holes. Water and fertilize your container-grown okra plants regularly.
How do I save okra seeds for next year?
To save okra seeds, allow some of the pods to mature fully on the plant. The pods will turn brown and dry out. Once the pods are completely dry, harvest them and remove the seeds. Store the seeds in a cool, dry place until next planting season.
Why are my okra leaves turning yellow?
Yellowing okra leaves can be caused by several factors, including nutrient deficiencies, overwatering, underwatering, or disease. Check the soil moisture level and adjust your watering accordingly. If the soil is well-drained and you are watering properly, consider fertilizing your plants with a balanced fertilizer. If you suspect a disease, consult a local gardening expert for advice.


Leave a Comment