
Grow potatoes at home, even if you think you don’t have the space! Imagine harvesting your own creamy, earthy potatoes, fresh from your balcony or backyard. Sounds dreamy, right? Well, it’s more achievable than you might think, and this DIY guide is going to show you exactly how to do it.
For centuries, potatoes have been a staple food source, playing a vital role in cultures worldwide. From the Andean highlands where they originated to the humble Irish potato famine, their history is rich and complex. But you don’t need a sprawling farm to participate in this agricultural legacy.
In today’s busy world, connecting with nature can be a real challenge. That’s where the magic of home gardening comes in. Learning how to grow potatoes at home offers a fantastic way to de-stress, enjoy fresh produce, and even save money on your grocery bill. Plus, there’s nothing quite like the satisfaction of digging up your own homegrown spuds! This DIY article will provide you with simple, effective tricks and hacks to get you started, regardless of your experience level. We’ll cover everything from choosing the right potato variety to troubleshooting common problems, ensuring you have a bountiful harvest. Let’s get our hands dirty and start growing!
Grow Your Own Delicious Potatoes: A Beginner’s Guide
Hey there, fellow gardening enthusiasts! Ever dreamt of digging up your own homegrown potatoes, fresh from the earth? It’s easier than you think, and trust me, the taste of a potato you’ve nurtured yourself is simply unbeatable. This guide will walk you through everything you need to know to successfully grow potatoes at home, whether you have a sprawling garden or just a few containers on your balcony. Let’s get our hands dirty!
Choosing Your Potato Variety
Before we dive into the nitty-gritty, let’s talk about potato varieties. There’s a whole world beyond the standard Russet! Different types offer different flavors, textures, and growing times. Here’s a quick rundown to help you choose:
* Russet: The classic baking potato. High in starch, fluffy texture.
* Yukon Gold: Buttery flavor, smooth texture, great for roasting and mashing.
* Red Potatoes: Waxy texture, holds its shape well when cooked, perfect for potato salad.
* Fingerling Potatoes: Small, elongated shape, unique flavor, delicious roasted or steamed.
* Purple Potatoes: Vibrant color, nutty flavor, adds a fun twist to any dish.
Consider your climate and what you plan to do with your potatoes when choosing a variety. Some varieties are better suited for certain regions than others. Local nurseries are a great resource for finding out which potatoes thrive in your area.
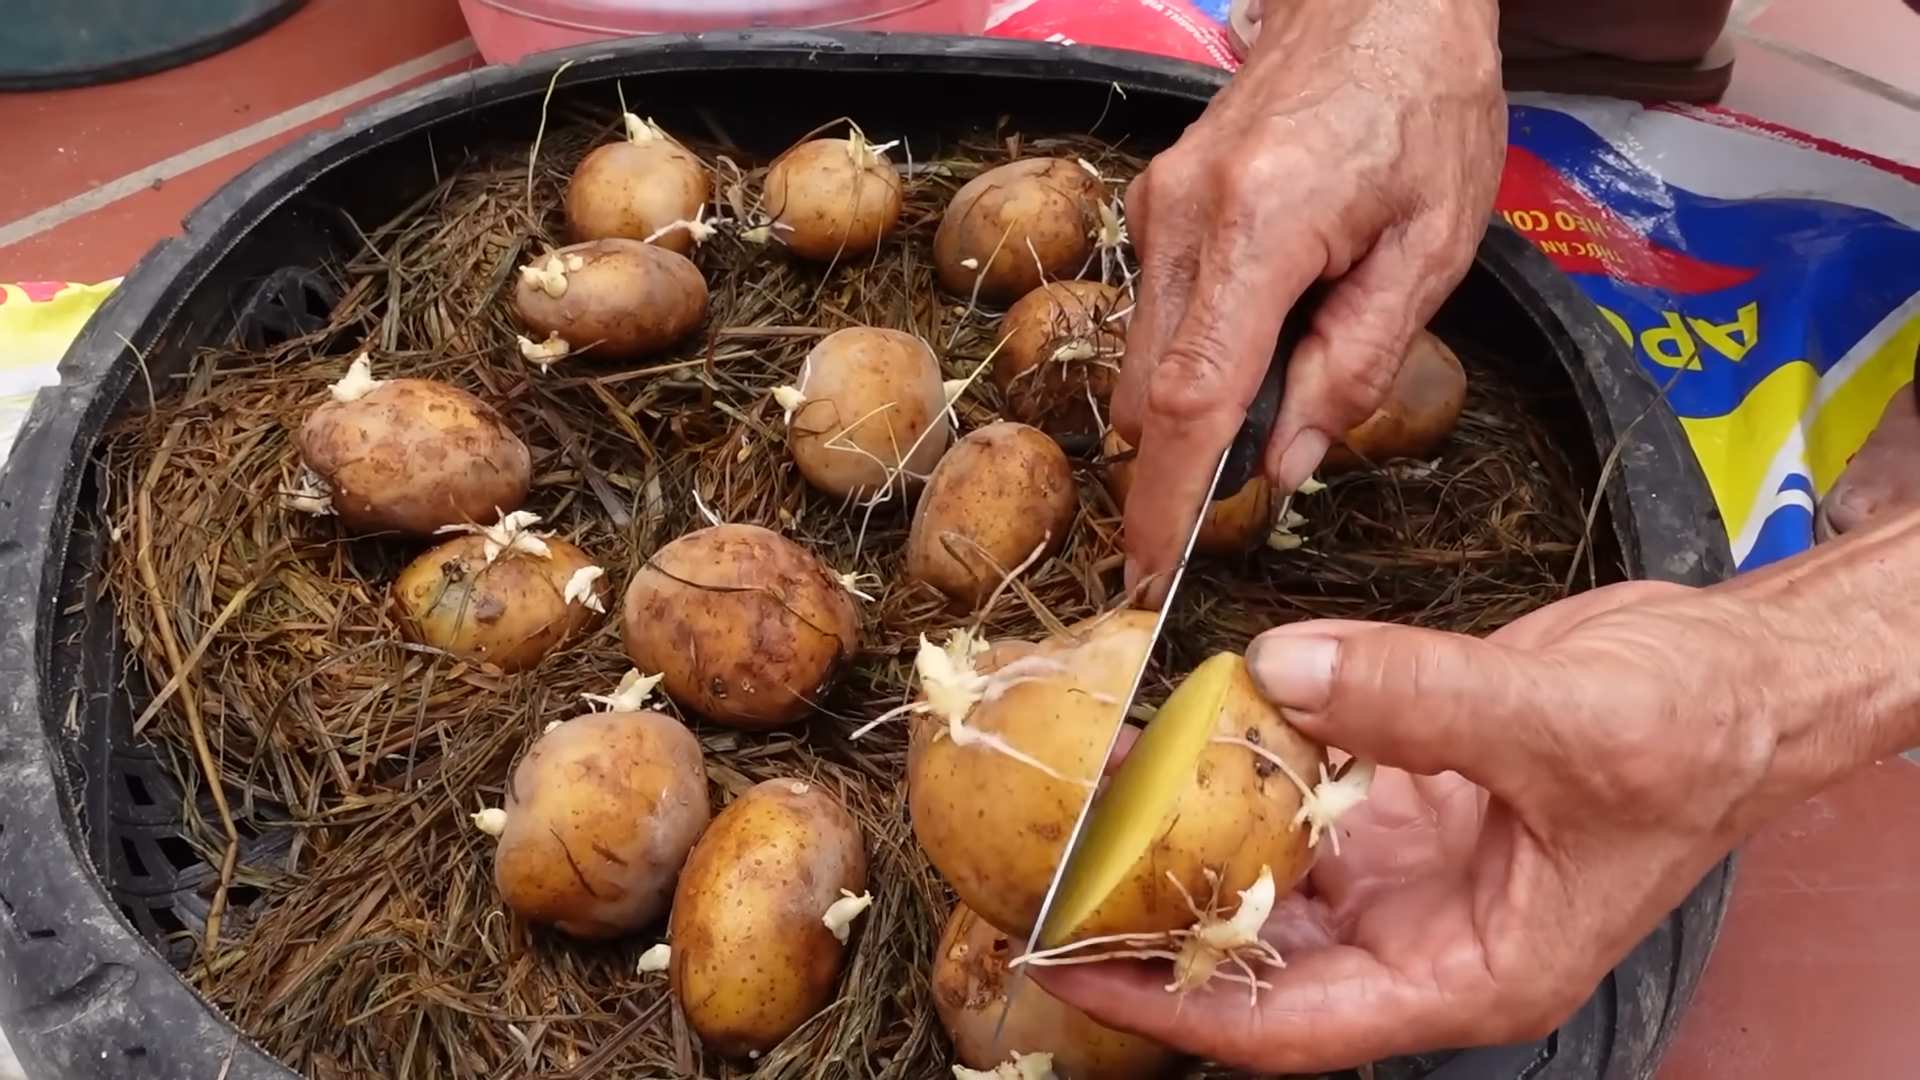
Preparing Your Seed Potatoes
Now, you can’t just plant any old potato from the grocery store. You need “seed potatoes,” which are potatoes specifically grown for planting. These are certified disease-free and will give you the best results. You can find them at garden centers or online retailers.
* Chitting (Optional but Recommended): Chitting is the process of encouraging your seed potatoes to sprout before planting. This gives them a head start and can result in an earlier harvest.
1. A few weeks before planting (4-6 weeks is ideal), place your seed potatoes in a cool, bright location. An egg carton or a tray works well.
2. Make sure the “eyes” (those little indentations on the potato) are facing upwards.
3. Over time, you’ll see small, green sprouts emerging from the eyes.
4. If the sprouts get too long and leggy, it means they’re not getting enough light.
* Cutting Seed Potatoes (If Necessary): If your seed potatoes are large (bigger than an egg), you can cut them into smaller pieces. Each piece should have at least one or two eyes.
1. Use a clean, sharp knife to cut the potato.
2. Let the cut pieces sit for a day or two to allow the cut surfaces to callous over. This helps prevent rot.
Planting Your Potatoes: In the Ground or in Containers
You can grow potatoes in the ground or in containers. Both methods have their advantages and disadvantages.
* In the Ground: Ideal if you have a large garden space. Allows for more potato production.
* In Containers: Great for small spaces like balconies or patios. Easier to control soil conditions.
Planting in the Ground
1. Choose a Sunny Location: Potatoes need at least 6-8 hours of sunlight per day.
2. Prepare the Soil: Potatoes prefer well-drained, slightly acidic soil. Amend your soil with compost or well-rotted manure to improve drainage and fertility.
3. Dig Trenches: Dig trenches that are about 6-8 inches deep and 2-3 feet apart.
4. Plant the Seed Potatoes: Place the seed potatoes (sprouts facing up if you chitted them) in the trenches, spacing them about 12 inches apart.
5. Cover with Soil: Cover the seed potatoes with about 4 inches of soil.
6. Water Well: Water the area thoroughly after planting.
Planting in Containers
1. Choose the Right Container: Select a container that is at least 15 gallons in size. A larger container is better, as it will allow for more potato growth.
2. Use a Well-Draining Potting Mix: Avoid using garden soil in containers, as it can become compacted and prevent proper drainage. Use a high-quality potting mix specifically designed for containers.
3. Plant the Seed Potatoes: Fill the container with about 4 inches of potting mix. Place the seed potatoes (sprouts facing up if you chitted them) on top of the soil.
4. Cover with Soil: Cover the seed potatoes with about 4 inches of potting mix.
5. Water Well: Water the container thoroughly after planting.
Hilling Your Potatoes: The Key to a Bountiful Harvest
Hilling is the process of gradually adding soil around the potato plants as they grow. This encourages the plants to produce more potatoes along the buried stems. It’s crucial for maximizing your yield.
1. Wait for the Plants to Emerge: Once the potato plants have emerged from the soil and are about 6-8 inches tall, it’s time to start hilling.
2. Add Soil: Gently add soil around the base of the plants, covering the stems up to about half their height.
3. Repeat the Process: Continue hilling every few weeks as the plants grow, until the soil is almost level with the top of the container or the trench is filled in.
4. For Containers: If you’re growing in containers, you can also add more potting mix to the container as the plants grow.
Watering and Fertilizing
Potatoes need consistent moisture, especially during tuber formation.
* Watering: Water deeply whenever the top inch of soil feels dry to the touch. Avoid overwatering, as this can lead to rot.
* Fertilizing: Fertilize your potato plants every few weeks with a balanced fertilizer. Follow the instructions on the fertilizer package. You can also use organic fertilizers like compost tea or fish emulsion.
Pest and Disease Control
Potatoes are susceptible to a few pests and diseases. Here are some common problems and how to deal with them:
* Colorado Potato Beetles: These beetles can defoliate your potato plants. Handpick them off the plants or use an insecticide specifically designed for potato beetles.
* Aphids: These small insects suck the sap from plants. Spray them off with a strong stream of water or use insecticidal soap.
* Potato Blight: This fungal disease can cause the leaves and stems to turn brown and die. Prevent blight by planting disease-resistant varieties and ensuring good air circulation. If blight does occur, remove infected foliage immediately.
* Scab: This disease causes rough, scabby patches on the potato tubers. Prevent scab by maintaining a slightly acidic soil pH.
Regularly inspect your plants for signs of pests or diseases. Early detection and treatment are key to preventing serious problems.
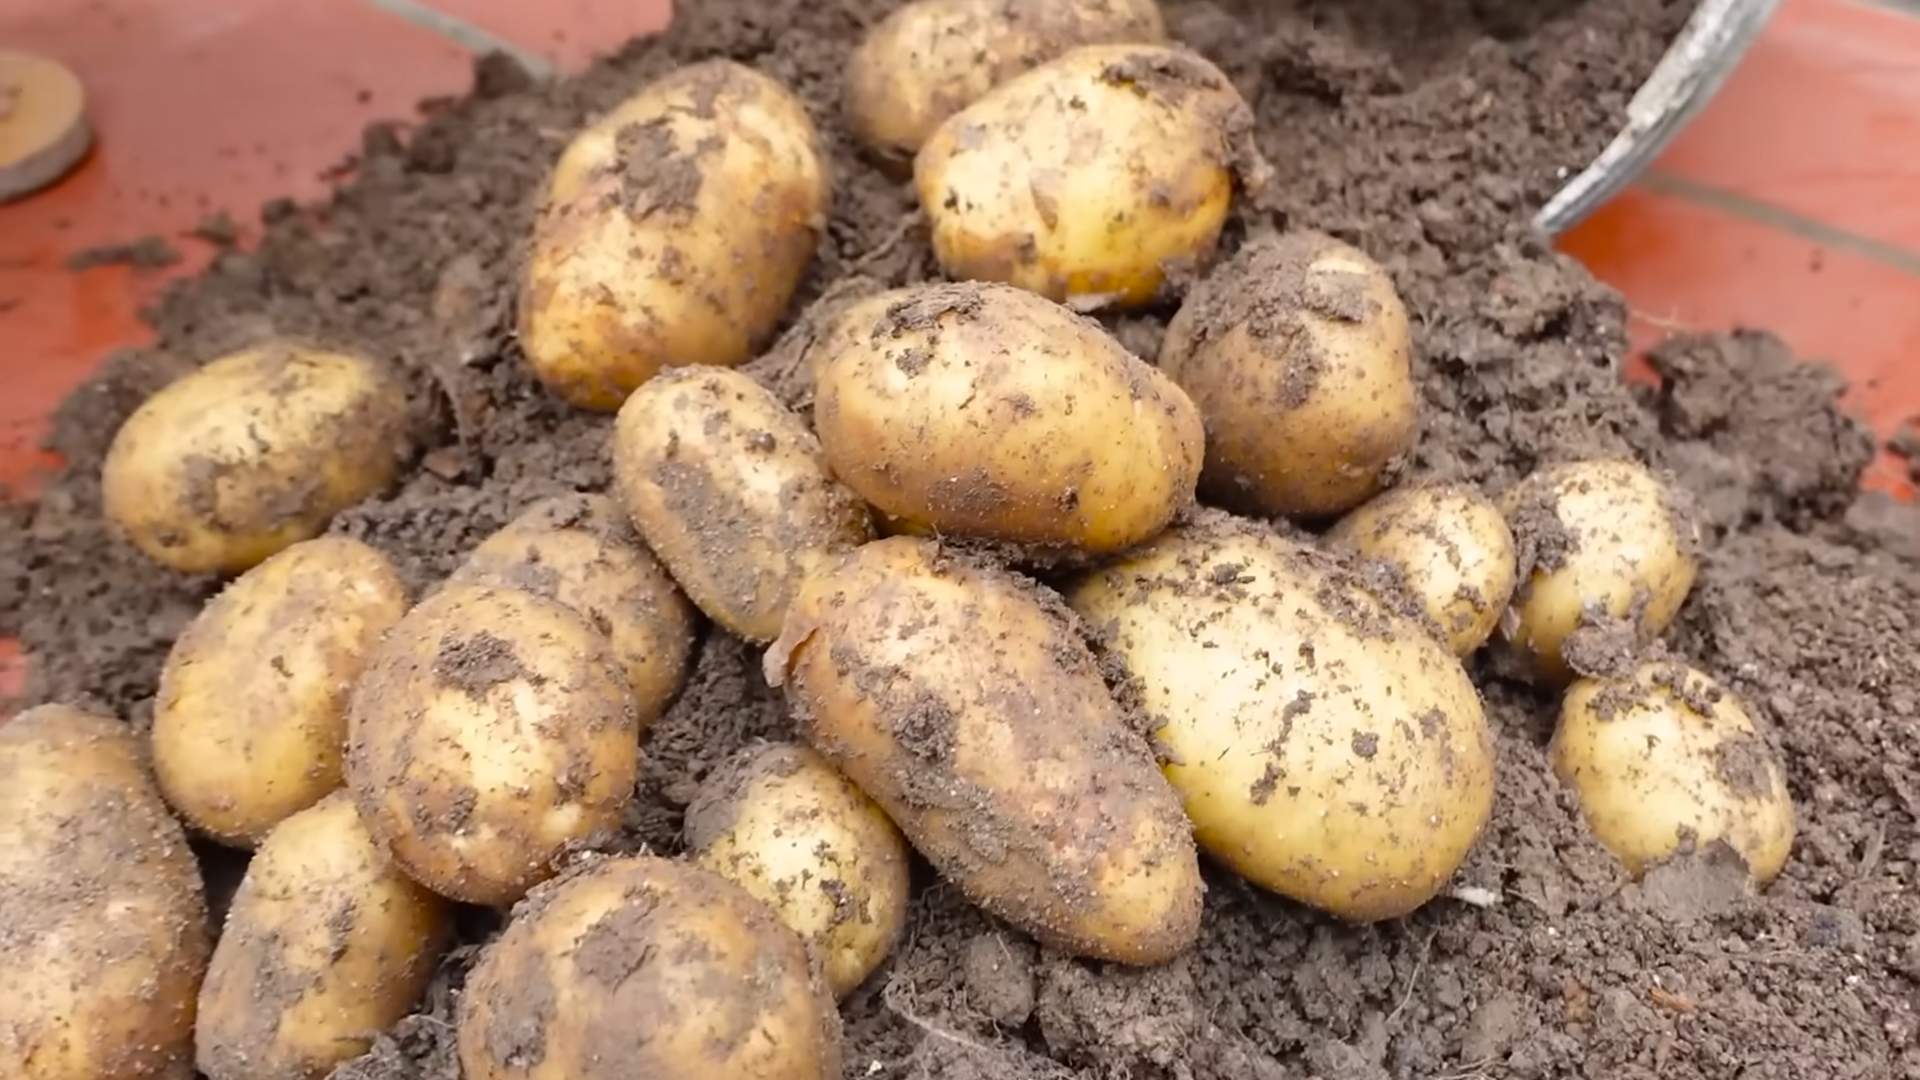
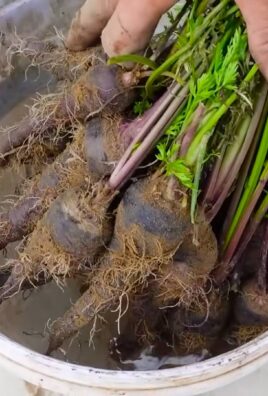
Harvesting Your Potatoes: The Moment of Truth!
The time to harvest your potatoes depends on the variety and when you planted them. Generally, you can start harvesting “new potatoes” (small, immature potatoes) a few weeks after the plants flower. For mature potatoes, wait until the foliage starts to die back.
1. Test Dig: Before harvesting the entire crop, dig up a few plants to check the size and maturity of the potatoes.
2. Dig Carefully: Use a garden fork or shovel to carefully dig around the plants, being careful not to damage the potatoes.
3. Lift the Plants: Gently lift the plants from the soil and remove the potatoes.
4. Cure the Potatoes: Allow the potatoes to dry in a cool, dark place for a few days to cure. This helps them develop a thicker skin and prevents rot.
5. Store Properly: Store your cured potatoes in a cool, dark, and well-ventilated place. They should last for several months.
Enjoy Your Homegrown Potatoes!
Congratulations! You’ve successfully grown your own potatoes. Now it’s time to enjoy the fruits (or rather, tubers) of your labor. Roast them, mash them, fry them, or use them in your favorite potato recipes. The possibilities are endless! And the satisfaction of knowing you grew them yourself? Priceless. Happy gardening!
Conclusion
So, there you have it! Growing potatoes at home, even if you only have a small balcony or patio, is not only achievable but also incredibly rewarding. Forget those bland, store-bought potatoes that lack character. With this simple DIY trick, you can cultivate your own flavorful, fresh potatoes, bursting with earthy goodness, right at your fingertips.
This isn’t just about saving a few dollars; it’s about connecting with your food, understanding where it comes from, and experiencing the pure joy of harvesting something you nurtured from a tiny seed potato. Imagine the satisfaction of serving a meal featuring potatoes you grew yourself – the taste is simply unmatched.
But the benefits extend beyond just flavor. Homegrown potatoes are often healthier, free from the pesticides and chemicals that can sometimes be found in commercially grown produce. You have complete control over the growing process, ensuring that your potatoes are as natural and wholesome as possible.
Why is this DIY potato growing trick a must-try? Because it’s accessible, affordable, and yields delicious results. It’s a fantastic project for families, a great way to teach children about gardening, and a fulfilling hobby for anyone who enjoys fresh, homegrown food.
Don’t be afraid to experiment! Try different varieties of potatoes to discover your favorites. Red potatoes, Yukon Golds, Russets – each offers a unique flavor and texture. You can also explore different growing containers, from traditional potato bags to repurposed buckets or even old tires. The possibilities are endless!
Consider adding companion plants to your potato containers. Marigolds can help deter pests, while basil can enhance the flavor of your potatoes. A little research and experimentation can lead to even better results.
And if you’re feeling adventurous, why not try growing potatoes from scraps? Potato peels with eyes can often be coaxed into sprouting, offering an even more sustainable and budget-friendly approach to home gardening.
We’re confident that once you try this DIY potato growing method, you’ll be hooked. It’s a simple, satisfying, and delicious way to bring a little bit of the farm to your home.
So, grab some seed potatoes, prepare your growing medium, and get ready to embark on a rewarding gardening adventure. We encourage you to try this DIY trick and share your experiences with us! Let us know what varieties you grew, what challenges you faced, and what delicious dishes you created with your homegrown potatoes. Share your photos and tips in the comments below – we can’t wait to hear from you! Happy growing!
Frequently Asked Questions (FAQ)
What kind of container should I use to grow potatoes?
The best container for growing potatoes is one that is large enough to accommodate the growing plant and its developing tubers. A minimum of 10 gallons is recommended, but larger is generally better. Potato grow bags, large buckets, plastic bins, or even repurposed containers like old tires can be used. Ensure the container has drainage holes to prevent waterlogging. The material of the container isn’t as important as its size and drainage capabilities.
How often should I water my potato plants?
Water your potato plants regularly, especially during dry periods. The soil should be consistently moist but not waterlogged. Check the soil moisture by sticking your finger about an inch deep. If the soil feels dry, it’s time to water. Overwatering can lead to rot, so ensure proper drainage. During hot weather, you may need to water daily.
What kind of soil is best for growing potatoes?
Potatoes prefer well-draining, slightly acidic soil with a pH between 6.0 and 6.8. A loamy soil rich in organic matter is ideal. You can amend your soil with compost, aged manure, or other organic materials to improve drainage and fertility. Avoid heavy clay soils, as they can become waterlogged and hinder tuber development. A good potting mix specifically designed for vegetables will also work well.
How do I “hill” my potato plants?
“Hilling” is the process of adding more soil around the stems of your potato plants as they grow. This encourages the plant to produce more tubers along the buried stem. When the stems are about 6-8 inches tall, add a few inches of soil around them, leaving the top leaves exposed. Repeat this process every few weeks as the plants grow taller. This is a crucial step in maximizing your potato yield.
When is the best time to harvest my potatoes?
The timing of your potato harvest depends on the variety you’re growing and whether you want “new potatoes” or mature potatoes. New potatoes can be harvested a few weeks after flowering, when they are small and tender. Mature potatoes are typically harvested after the foliage has died back, usually in the late summer or early fall. To check if your potatoes are ready, gently dig around the base of a plant and feel for the size of the tubers.
What are common potato pests and diseases, and how can I prevent them?
Common potato pests include potato beetles, aphids, and flea beetles. Diseases include blight, scab, and various fungal infections. To prevent these problems, choose disease-resistant potato varieties, practice crop rotation, and keep your garden clean. Use organic pest control methods like insecticidal soap or neem oil to control pests. Ensure good air circulation around your plants to prevent fungal diseases.
Can I grow potatoes in a small space, like a balcony?
Yes, you can absolutely grow potatoes in a small space like a balcony or patio! The key is to use a large enough container and provide adequate sunlight and water. Potato grow bags are particularly well-suited for small spaces, as they are lightweight and easy to move. Choose a sunny spot that receives at least 6 hours of sunlight per day.
How do I store my harvested potatoes?
Store your harvested potatoes in a cool, dark, and well-ventilated place. A root cellar is ideal, but a cool basement or garage will also work. Avoid storing potatoes in direct sunlight or near heat sources, as this can cause them to sprout or rot. Store them in a single layer in a breathable container like a cardboard box or burlap sack. Do not wash the potatoes before storing them, as this can promote spoilage.
Can I grow potatoes from store-bought potatoes?
While you can technically grow potatoes from store-bought potatoes, it’s generally not recommended. Store-bought potatoes may have been treated with chemicals to prevent sprouting, and they may also carry diseases. It’s best to use certified seed potatoes, which are specifically grown for planting and are guaranteed to be disease-free.
What if my potato plants don’t flower?
Not all potato varieties flower, so the absence of flowers doesn’t necessarily mean there’s a problem. Focus on providing your plants with adequate sunlight, water, and nutrients. If your plants are healthy and growing well, they should still produce tubers even if they don’t flower.
How much sunlight do potatoes need?
Potatoes need at least 6-8 hours of direct sunlight per day to thrive. Choose a sunny location for your potato plants to ensure optimal growth and tuber development. If you’re growing potatoes indoors, you may need to supplement with grow lights.
Can I grow different varieties of potatoes in the same container?
It’s generally not recommended to grow different varieties of potatoes in the same container, as they may compete for resources and have different growth requirements. It’s best to grow each variety in its own separate container.
What are the benefits of growing potatoes at home?
Growing potatoes at home offers numerous benefits, including:
* Fresh, flavorful potatoes that taste better than store-bought ones.
* Control over the growing process, ensuring that your potatoes are free from harmful chemicals.
* A rewarding gardening experience that connects you with your food.
* A sustainable way to reduce your carbon footprint.
* A fun and educational activity for families.
Leave a Comment