
Grow Chives Indoors and bring a burst of fresh, oniony flavor to your kitchen, all year round! Imagine snipping vibrant green chives straight from your windowsill to garnish your omelets, salads, or baked potatoes. No more sad, wilted herbs from the grocery store – just pure, homegrown goodness at your fingertips.
For centuries, chives have been a culinary staple, adding a delicate zest to dishes across cultures. From ancient Roman gardens to modern-day kitchens, these versatile herbs have proven their worth. But what if you don’t have a sprawling garden or live in a climate that supports year-round outdoor growth? That’s where the magic of indoor gardening comes in!
Let’s face it, we all crave fresh, flavorful ingredients, but not everyone has the time or space for a traditional garden. That’s why learning how to grow chives indoors is a game-changer. This DIY guide will walk you through simple, step-by-step instructions, ensuring you can enjoy a continuous supply of these delicious herbs, regardless of the season or your living situation. I’m excited to share these easy tricks and hacks with you, so you can experience the joy of homegrown chives without any fuss!
Chives in a Pot: How to Grow Chives in Your Apartment
Hey everyone! Are you tired of wilted, expensive chives from the supermarket? Today, I’m going to show you how you can easily grow your own chives indoors. Fresh chives straight from the windowsill—sounds good, right? It’s easier than you think and a lot of fun!
What you need:
Before we get started, here is a list of everything you’ll need:
- Chive seeds: Organic quality is best, so you know what you’re getting.
- Seed-starting mix: This is low in nutrients and perfect for germination.
- Pots: With drainage holes so water can escape.
- Saucers: To prevent excess water from running onto your windowsill.
- Spray bottle: For gentle watering.
- A bright windowsill: Chives love light!
- Optional: A small trowel or spoon for filling the pots.
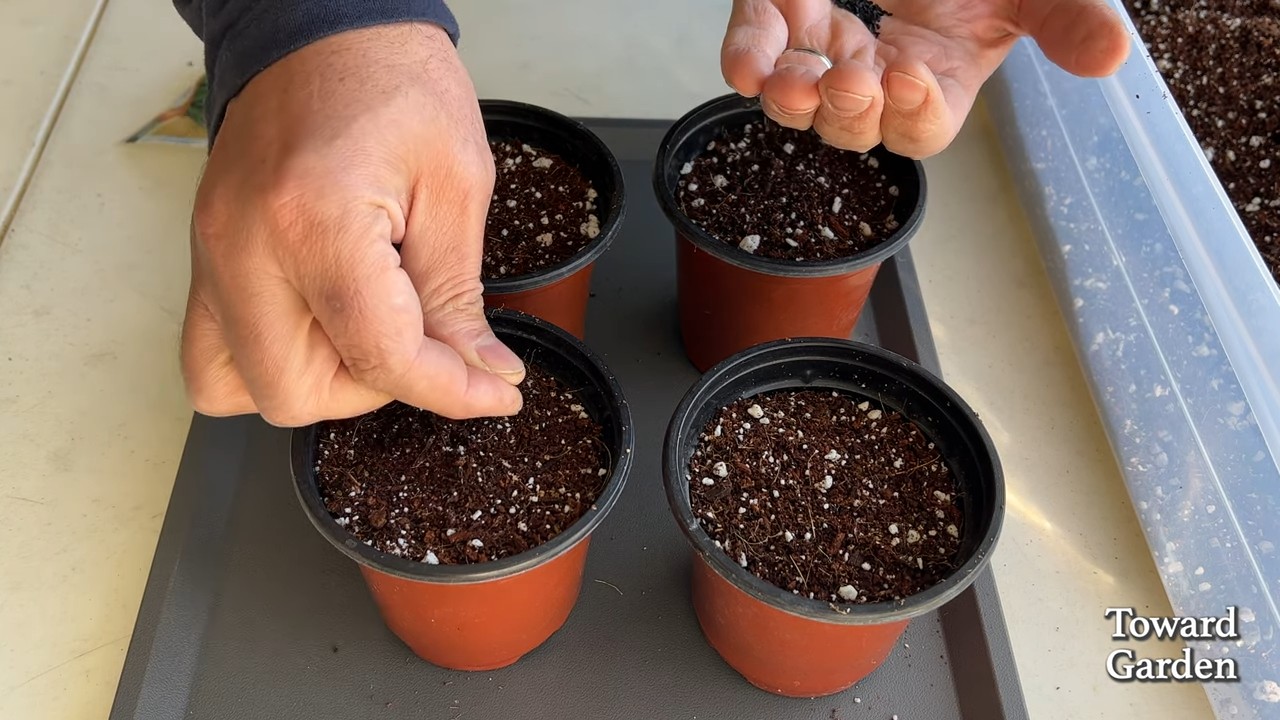
Sowing: The Start of Your Chive Adventure
- Prepare the pots: Fill the pots with seed-starting mix. Leave about 2 cm (1 inch) of space at the top. The soil should be loose, not pressed down too firmly.
- Sow the seeds: Sprinkle the chive seeds evenly over the soil. Don’t put too many seeds in one pot, or they won’t have enough space later. I usually sow about 5-10 seeds per pot.
- Cover the seeds: Cover the seeds with a thin layer of soil (about 0.5 cm / 0.2 inches).
- Water: Gently moisten the soil with the spray bottle. The soil should be damp but not wet. Avoid washing the seeds away.
- Choose a location: Place the pots on a bright windowsill. Chives need a lot of light to grow well. A south-facing windowsill is ideal, but east or west-facing windows work well too.
- Be patient: Now it’s time to wait! Chives take about 10-14 days to germinate. Keep the soil moist during this time.
Care: So Your Chives Thrive
- Watering: Water the chives regularly, but not too much. The soil should always be slightly moist. Avoid waterlogging, as this can lead to root rot. I always check with my finger to see if the soil is dry before I water.
- Light: Chives need at least 6 hours of sunlight per day. If your windowsill doesn’t get enough light, you can use a grow light.
- Fertilizing: After about 4-6 weeks, you can start fertilizing. Use an organic liquid fertilizer for herbs. Fertilize every 2-3 weeks.
- Cutting: Cut the chives regularly to encourage growth. Cut the stalks about 2 cm (1 inch) above the soil. Don’t worry, they grow back quickly! Cutting also makes them bushier.
- Remove flowers: If the chives bloom, you should remove the flowers. Flowering costs the plant energy and reduces the growth of the stalks. Additionally, the stalks often become a bit tough after flowering.
Repotting: When the Pot Gets too Small
- When to repot? When the pots become too small and the roots grow out of the drainage holes, it’s time to repot.
- Prepare larger pots: Choose pots that are slightly larger than the old ones. Fill them with herb soil.
- Carefully remove the chives from the pot: Gently loosen the soil from the pot and carefully lift the chives out.
- Plant: Place the chives in the new pot and fill it with soil.
- Water: Water the chives well after repotting.
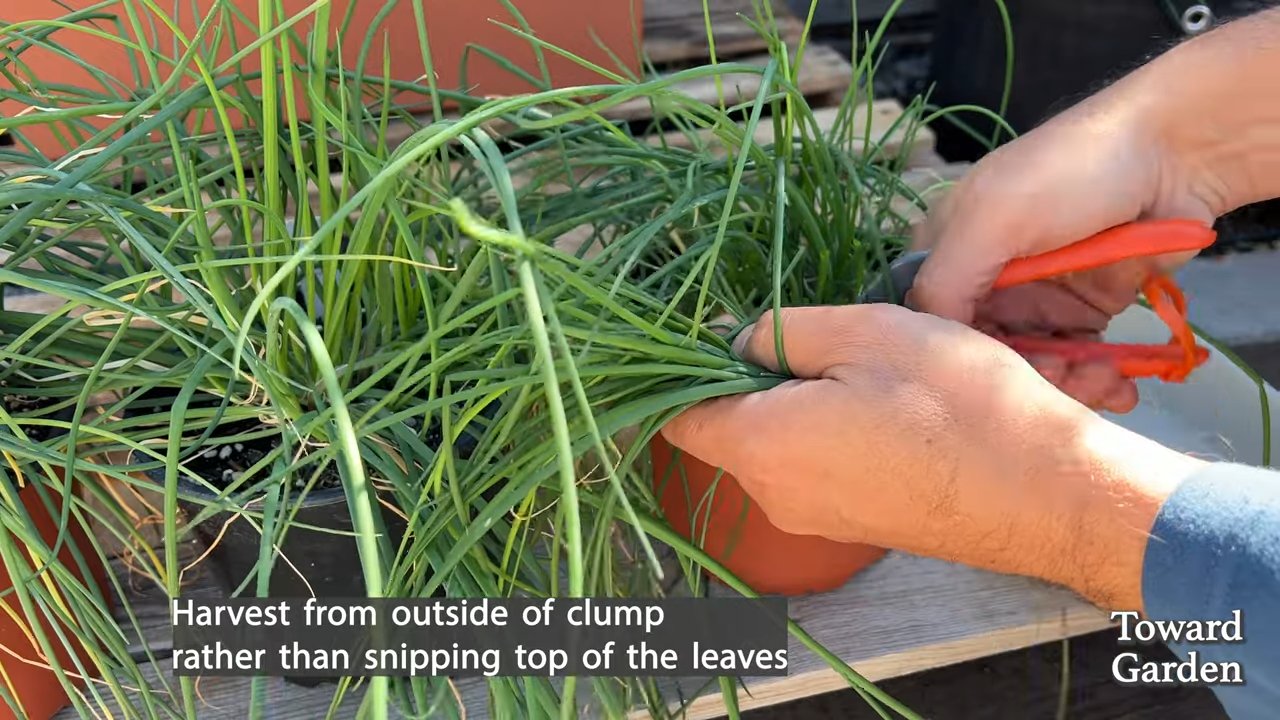
Harvest: Finally, Fresh Chives!
- When to harvest? You can harvest the chives as soon as the stalks are about 15 cm (6 inches) long.
- How to harvest? Cut the stalks with scissors or a knife. Cut them about 2 cm (1 inch) above the soil.
- Use: Use the chives fresh in salads, soups, dips, or as a garnish. They taste absolutely delicious!
Common Problems and Solutions:
- Yellow leaves: This can be due to too much or too little water. Check the soil moisture and adjust your watering.
- Poor growth: This can be due to too little light or nutrients. Move the chives to a brighter location and fertilize them regularly.
- Pests: Chives are relatively resistant to pests. If you do discover pests, you can treat them with a biological pesticide.
Additional Tips:
- Propagating chives: You can also propagate chives by division. Simply divide the plant into several parts and plant them in separate pots.
- Freezing chives: If you have too many chives, you can freeze them. Chop them finely and freeze them in a freezer bag.
- Drying chives: You can also dry chives. Tie them into small bundles and hang them in a dry, airy place.
Repotting Chives from the Supermarket: An Alternative
You can also repot chives from the supermarket. However, they are often planted very densely and the soil is depleted.
- Carefully divide the chives: Take the chives out of the pot and carefully divide them into several smaller clumps.
- Remove old soil: Remove as much of the old soil as possible.
- Prepare new pots: Fill new pots with fresh herb soil.
- Plant the chives: Plant the individual clumps in the new pots.
- Water: Water the chives well.
These chives often need some time to recover, but with the right care, they will soon be growing beautifully again.
Why Grow Chives Yourself?
- Freshness: You always have fresh chives on hand.
- Taste: Homegrown chives taste much more aromatic than store-bought ones.
- Sustainability: You save on packaging waste and transport.
- Fun: It’s just fun to grow your own herbs!
I hope this guide helps you grow your own chives indoors. Good luck and enjoy
Conclusion
So, there you have it! Growing chives indoors is not only achievable, but it’s also incredibly rewarding. Imagine having fresh, flavorful chives at your fingertips, ready to elevate your culinary creations any time of year. No more last-minute grocery store runs or settling for dried herbs that lack that vibrant, fresh taste. This simple DIY project brings the garden to your kitchen, offering a continuous supply of this versatile herb.
Why is this a must-try? Because it’s easy, cost-effective, and adds a touch of green to your indoor space. It’s a fantastic way to introduce gardening to beginners, and even seasoned gardeners will appreciate the convenience of having fresh chives readily available. Plus, it’s a sustainable choice, reducing your reliance on store-bought herbs and minimizing food waste.
But the possibilities don’t stop there! Feel free to experiment with different varieties of chives. Garlic chives, with their subtle garlic flavor, are a delicious alternative to regular chives. You can also try growing your chives in different types of containers, from repurposed yogurt containers to stylish terracotta pots. Just ensure that your chosen container has adequate drainage.
Consider companion planting your indoor chives with other herbs like parsley or basil. This can create a mini herb garden on your windowsill, adding visual appeal and maximizing your harvest. You can also use grow lights to supplement natural sunlight, especially during the darker winter months, ensuring your chives thrive year-round.
Don’t be afraid to get creative and personalize your indoor chive garden!
We wholeheartedly encourage you to give this DIY trick a try. It’s a small investment of time and effort that yields a significant return in flavor and satisfaction. Once you’ve experienced the joy of snipping fresh chives from your own indoor garden, you’ll wonder why you didn’t start sooner.
And most importantly, we want to hear about your experience! Share your tips, tricks, and photos of your indoor chive gardens in the comments below. Let’s create a community of indoor gardeners and inspire others to embrace the joy of growing their own food. What challenges did you face? What successes did you celebrate? Your insights can help others on their journey to fresh, homegrown chives. Let us know if this guide helped you successfully grow chives indoors.
Frequently Asked Questions (FAQ)
1. What kind of soil is best for growing chives indoors?
The ideal soil for growing chives indoors is a well-draining potting mix. Avoid using garden soil, as it can become compacted and doesn’t provide adequate drainage in containers. Look for a potting mix that contains ingredients like peat moss, perlite, and vermiculite, which help to retain moisture while allowing excess water to drain away. A slightly acidic to neutral pH (around 6.0 to 7.0) is also preferred. You can also amend your potting mix with compost to provide additional nutrients.
2. How much sunlight do indoor chives need?
Chives thrive in bright, indirect sunlight. Aim for at least 6-8 hours of sunlight per day. A south-facing window is often the best option, but an east- or west-facing window can also work. If you don’t have access to enough natural light, you can supplement with grow lights. Position the grow lights about 6-12 inches above the chives and keep them on for 12-14 hours per day. Insufficient light can lead to leggy growth and reduced flavor.
3. How often should I water my indoor chives?
Water your chives regularly, keeping the soil consistently moist but not waterlogged. Check the soil moisture by sticking your finger about an inch deep. If the soil feels dry, it’s time to water. Water thoroughly until excess water drains out of the bottom of the pot. Avoid overwatering, as this can lead to root rot. During the winter months, when growth slows down, you may need to water less frequently.
4. How do I harvest chives without killing the plant?
The best way to harvest chives is to snip them with scissors or shears about 1-2 inches above the soil line. Avoid pulling the chives out by the roots. Harvesting regularly encourages new growth and keeps the plant healthy. Start harvesting when the chives are about 6 inches tall. You can harvest up to one-third of the plant at a time.
5. Do I need to fertilize my indoor chives?
Yes, fertilizing your chives can help them grow strong and healthy. Use a balanced liquid fertilizer diluted to half strength every 2-4 weeks during the growing season (spring and summer). Avoid over-fertilizing, as this can burn the roots. You can also amend the soil with compost or worm castings to provide a slow-release source of nutrients.
6. How do I prevent pests and diseases from affecting my indoor chives?
Inspect your chives regularly for signs of pests or diseases. Common pests that can affect chives include aphids, spider mites, and thrips. If you notice any pests, you can try washing them off with a strong stream of water or using insecticidal soap. To prevent fungal diseases, ensure good air circulation around the plants and avoid overwatering. Remove any dead or yellowing leaves promptly.
7. Can I grow chives from seed indoors?
Yes, you can grow chives from seed indoors. Start the seeds in a seed-starting tray or small pots filled with seed-starting mix. Keep the soil moist and warm (around 70-75°F). The seeds should germinate in about 7-14 days. Once the seedlings have developed a few sets of true leaves, you can transplant them into larger pots.
8. My chives are turning yellow. What could be the problem?
Yellowing leaves can be caused by several factors, including overwatering, underwatering, nutrient deficiencies, or pest infestations. Check the soil moisture and adjust your watering accordingly. If the soil is consistently wet, allow it to dry out slightly before watering again. If the soil is dry, water thoroughly. Fertilize your chives with a balanced liquid fertilizer to address any nutrient deficiencies. Inspect the plants for pests and treat them accordingly.
9. How long will my indoor chives last?
With proper care, your indoor chives can last for several years. Repot the chives every year or two to provide them with fresh soil and more space to grow. Divide the plants if they become overcrowded.
10. Can I freeze or dry my chives for later use?
Yes, you can freeze or dry your chives to preserve them for later use. To freeze chives, chop them finely and place them in a freezer bag or container. To dry chives, spread them out on a baking sheet and dry them in a low oven (around 170°F) or in a dehydrator until they are brittle. Store the dried chives in an airtight container.

Leave a Comment