
Grow Brussels Sprouts Planter: Ever dreamed of harvesting your own delicious, miniature cabbages right from your backyard, balcony, or even your patio? I know I have! There’s something incredibly satisfying about nurturing a plant from a tiny seedling to a bountiful source of fresh, homegrown food. And that’s exactly what we’re diving into today – creating your very own Brussels sprouts planter!
While Brussels sprouts might not be the trendiest vegetable, they have a rich history, dating back to 13th-century Belgium, where they were first cultivated. For centuries, they’ve been a staple in European cuisine, and now, thanks to modern gardening techniques, you can easily grow Brussels Sprouts Planter at home, no matter how limited your space may be.
Let’s face it, store-bought Brussels sprouts can sometimes be a gamble – often bland, bitter, or just plain uninspiring. But when you grow them yourself, you have complete control over their flavor and freshness. Plus, gardening is a fantastic way to de-stress, connect with nature, and enjoy the fruits (or rather, vegetables!) of your labor. This DIY planter project is perfect for beginners and experienced gardeners alike. I’m excited to share my favorite tips and tricks to help you create a thriving Brussels sprouts garden in a container. So, grab your gardening gloves, and let’s get started!
DIY Brussels Sprouts Planter: From Seed to Sprout in Your Own Backyard!
Hey there, fellow garden enthusiasts! I’m so excited to share my tried-and-true method for growing Brussels sprouts in a planter. It’s easier than you think, and nothing beats the taste of homegrown veggies. Forget those sad, wilted sprouts from the grocery store – we’re talking fresh, flavorful, and bursting with goodness! This guide will walk you through every step, from choosing the right container to harvesting your delicious bounty. Let’s get started!
Choosing the Right Container and Soil
Before we even think about seeds, we need to set the stage for success. Brussels sprouts need space to grow, so selecting the right container and soil is crucial.
* Container Size: Opt for a large container, at least 24 inches in diameter and 12 inches deep. Brussels sprouts have a surprisingly extensive root system, and they need room to spread out. A half-barrel planter or a large, sturdy plastic container works perfectly.
* Drainage: Excellent drainage is non-negotiable. Brussels sprouts hate soggy feet! Make sure your container has plenty of drainage holes. If not, drill some yourself.
* Soil: Use a high-quality potting mix specifically formulated for vegetables. Avoid using garden soil directly in your container, as it can become compacted and doesn’t drain well. I personally love using a mix of compost, peat moss, and perlite for excellent drainage and nutrient retention.
Gathering Your Supplies
Okay, now for the fun part – gathering all the goodies we need!
* Brussels sprouts seeds (choose a variety that suits your climate)
* Large container (at least 24 inches in diameter and 12 inches deep)
* High-quality potting mix
* Watering can or hose
* Slow-release fertilizer (optional, but recommended)
* Gardening gloves
* Trowel or small shovel
* Plant labels and a permanent marker
* Stakes or tomato cages (for support as the plants grow)
* Insect netting (to protect against pests, optional)
Planting Your Brussels Sprouts
Alright, let’s get our hands dirty! This is where the magic happens.
1. Start Seeds Indoors (Optional): While you can direct sow Brussels sprouts seeds, starting them indoors gives them a head start, especially in colder climates. About 6-8 weeks before the last expected frost, sow the seeds in small pots or seed trays filled with seed-starting mix. Plant the seeds about ¼ inch deep and keep the soil consistently moist. Place the trays in a warm, sunny location or under grow lights.
2. Prepare the Container: Fill your chosen container with the potting mix, leaving about an inch or two of space at the top. Gently pat down the soil to remove any air pockets.
3. Direct Sowing (If Not Starting Indoors): If you’re direct sowing, plant the seeds about ½ inch deep and space them about 2-3 inches apart. Once the seedlings emerge, thin them out to the strongest plant.
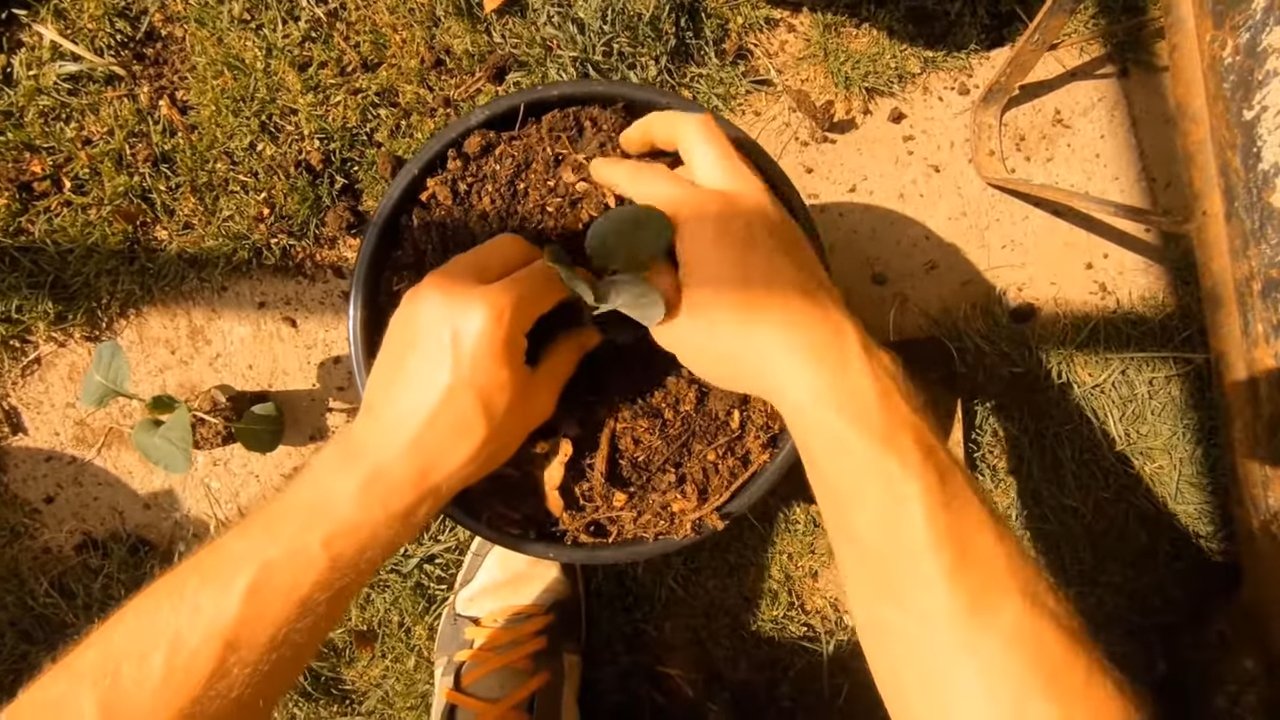
4. Transplanting Seedlings (If Starting Indoors): Once your seedlings have developed a few sets of true leaves (the leaves that look like miniature Brussels sprouts plants), they’re ready to be transplanted. Gently remove the seedlings from their pots, being careful not to damage the roots.
5. Planting the Seedlings: Dig a small hole in the potting mix, large enough to accommodate the root ball of the seedling. Place the seedling in the hole and gently backfill with soil, firming it around the base of the plant. Space the seedlings about 18-24 inches apart. This gives them plenty of room to grow and prevents overcrowding.
6. Water Thoroughly: After planting, water the seedlings thoroughly until the water drains out of the bottom of the container. This helps settle the soil and encourages root growth.
7. Label Your Plants: Use plant labels and a permanent marker to label your Brussels sprouts. This helps you keep track of what you’ve planted and when.
Caring for Your Brussels Sprouts
Now that your Brussels sprouts are planted, it’s time to provide them with the care they need to thrive.
1. Watering: Brussels sprouts need consistent moisture, especially during hot weather. Water deeply whenever the top inch of soil feels dry to the touch. Avoid overwatering, as this can lead to root rot.
2. Fertilizing: Brussels sprouts are heavy feeders, so they benefit from regular fertilization. Apply a slow-release fertilizer according to the package directions. You can also supplement with liquid fertilizer every few weeks. I like to use a balanced fertilizer with equal parts nitrogen, phosphorus, and potassium.
3. Sunlight: Brussels sprouts need at least 6 hours of sunlight per day. Place your container in a sunny location where it will receive plenty of direct sunlight.
4. Support: As your Brussels sprouts grow, they may become top-heavy and require support. Use stakes or tomato cages to provide support and prevent the plants from falling over.
5. Pest Control: Brussels sprouts are susceptible to several pests, including cabbage worms, aphids, and flea beetles. Inspect your plants regularly for signs of infestation. You can use insect netting to protect your plants from pests. For minor infestations, you can handpick the pests off the plants or spray them with insecticidal soap.
6. Weed Control: Keep the container free of weeds, as they can compete with your Brussels sprouts for nutrients and water. Hand-pull any weeds that appear.
7. Remove Yellowing Leaves: As the plants mature, the lower leaves may turn yellow and die. Remove these leaves to improve air circulation and prevent disease.
Harvesting Your Brussels Sprouts
The moment we’ve all been waiting for – harvesting our delicious Brussels sprouts!
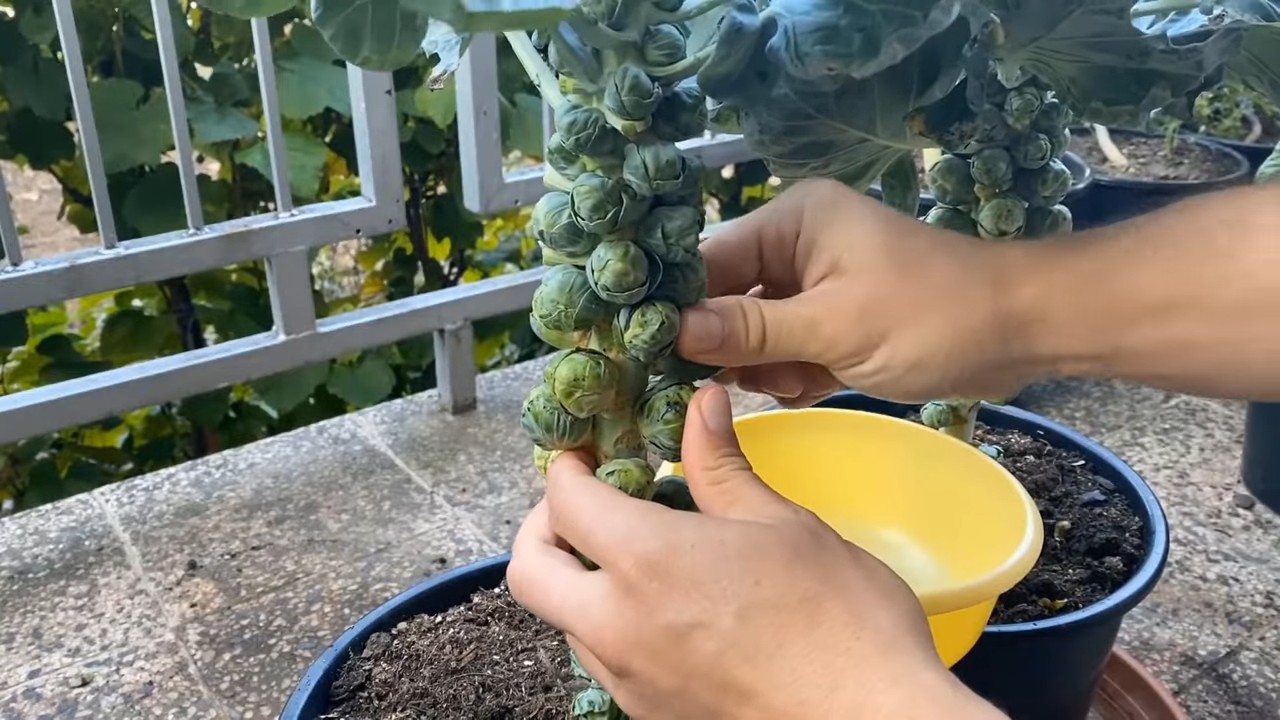
1. Timing: Brussels sprouts are typically ready to harvest about 90-100 days after planting. The sprouts should be firm, green, and about 1-2 inches in diameter.
2. Harvesting Technique: Start harvesting from the bottom of the plant, working your way up. Twist or snap off the sprouts from the stem. The lower sprouts will mature first.
3. Continued Harvest: Continue harvesting the sprouts as they mature. The plant will continue to produce sprouts for several weeks.
4. Topping the Plant (Optional): About a month before the first expected frost, you can top the plant by cutting off the top few inches of the stem. This encourages the remaining sprouts to mature more quickly.
5. Storage: Store your harvested Brussels sprouts in the refrigerator for up to a week.
Troubleshooting Common Problems
Even with the best care, you might encounter a few challenges along the way. Here are some common problems and how to address them:
* Yellowing Leaves: This could be a sign of overwatering, underwatering, nutrient deficiency, or disease. Check the soil moisture and adjust your watering accordingly. Fertilize the plants if necessary. Remove any yellowing leaves to improve air circulation.
* Sprouts Not Forming: This could be due to insufficient sunlight, poor soil, or lack of fertilization. Make sure your plants are getting at least 6 hours of sunlight per day. Amend the soil with compost or fertilizer.
* Pest Infestations: Inspect your plants regularly for signs of pests. Use insect netting to protect your plants. For minor infestations, handpick the pests off the plants or spray them with insecticidal soap.
* Root Rot: This is caused by overwatering and poor drainage. Make sure your container has plenty of drainage holes. Water only when the top inch of soil feels dry to the touch.
Choosing the Right Brussels Sprouts Variety
Selecting the right variety is key to a successful harvest. Consider your climate and growing season when making your choice. Here are a few popular varieties:
* ‘Long Island Improved’: A classic variety known for its reliable production and good flavor.
* ‘Jade Cross’: A hybrid variety that is resistant to disease and produces uniform sprouts.
* ‘Diablo’: A red Brussels sprouts variety that adds a pop of color to your garden and has a slightly sweeter flavor.
* ‘Royal Marvel’: An early-maturing variety that is ideal for shorter growing seasons.
Extending the Growing Season
Want to enjoy fresh Brussels sprouts for even longer? Here are a few tips for extending the growing season:
* Start Seeds Indoors: As mentioned earlier, starting seeds indoors gives your plants a head start.
* Use Cold Frames or Row Covers: These can protect your plants from frost and extend the growing season by several weeks.
* Choose Early-Maturing Varieties: Select varieties that mature quickly, allowing you to harvest your sprouts before the first frost.
Enjoying Your Homegrown Brussels Sprouts
Congratulations! You’ve successfully grown your own Brussels sprouts in a planter. Now it’s time to enjoy the fruits (or rather, vegetables) of your labor.
* Roasting
Conclusion
So, there you have it! Growing Brussels sprouts in a planter is not only achievable, but it’s also a rewarding experience that brings fresh, homegrown goodness right to your doorstep. We’ve walked you through the steps, from selecting the right planter and soil to nurturing your sprouts and harvesting your bounty. But why is this DIY trick a must-try?
Firstly, it democratizes gardening. You don’t need acres of land to enjoy the taste of freshly grown vegetables. Even if you only have a small balcony, patio, or deck, you can cultivate your own Brussels sprouts. This is especially beneficial for urban dwellers or those with limited gardening space.
Secondly, it gives you complete control over the growing process. You know exactly what goes into your plants – no mystery pesticides or fertilizers unless you choose to use them. This allows you to grow organic, healthy Brussels sprouts that are far superior in taste and quality to anything you can buy in the store. The satisfaction of knowing you nurtured these little cabbages from seed to table is unparalleled.
Thirdly, it’s a cost-effective way to enjoy fresh produce. While there’s an initial investment in the planter, soil, and seeds, you’ll quickly recoup that cost with the abundance of Brussels sprouts you’ll harvest. Plus, you can save seeds from your plants to grow even more sprouts next season, making it a truly sustainable and economical gardening method.
But the benefits don’t stop there. Growing your own food is also a fantastic way to connect with nature, relieve stress, and learn new skills. It’s a therapeutic activity that can bring joy and fulfillment to your life. And let’s not forget the bragging rights! Imagine serving your guests a dish made with Brussels sprouts you grew yourself. They’ll be impressed, guaranteed.
Now, for some suggestions and variations to elevate your Brussels sprouts growing game:
* Companion Planting: Try planting marigolds or nasturtiums around your Brussels sprouts to deter pests. These flowers not only add beauty to your planter but also act as natural pest repellents.
* Vertical Gardening: If space is truly limited, consider using a vertical planter or trellis to train your Brussels sprouts to grow upwards. This maximizes space and adds a unique visual element to your garden.
* Succession Planting: Plant new seeds every few weeks to ensure a continuous harvest throughout the growing season. This way, you’ll always have fresh Brussels sprouts on hand.
* Flavor Infusions: Experiment with different soil amendments or fertilizers to influence the flavor of your Brussels sprouts. For example, adding a bit of wood ash to the soil can increase the sweetness of the sprouts.
* Different Varieties: Don’t be afraid to try different varieties of Brussels sprouts. Some are more compact and better suited for container gardening, while others have unique colors or flavors.
So, what are you waiting for? Grab a planter, some soil, and some Brussels sprouts seeds, and get growing! We’re confident that you’ll be amazed at how easy and rewarding it is to grow your own Brussels sprouts in a planter.
We encourage you to try this DIY trick and share your experience with us. Post photos of your Brussels sprouts planter on social media using the hashtag #HomegrownSprouts and tell us about your successes and challenges. We’d love to see your creations and learn from your experiences. Together, we can create a community of passionate gardeners who are dedicated to growing their own fresh, healthy food. Happy gardening!
Frequently Asked Questions (FAQ)
What size planter is best for growing Brussels sprouts?
A general rule of thumb is to provide at least 12 inches of space in diameter and depth for each Brussels sprout plant. Therefore, if you plan to grow multiple plants in one container, choose a planter that is at least 24 inches in diameter and 12 inches deep. Larger is generally better, as it provides more room for the roots to grow and access nutrients. A half-barrel planter or a large, sturdy plastic container with drainage holes works well. Ensure the planter is made of a durable material that can withstand the weight of the soil and plants, as well as the elements.
What type of soil should I use for growing Brussels sprouts in a planter?
Brussels sprouts thrive in well-draining, nutrient-rich soil. A good option is to use a high-quality potting mix specifically formulated for vegetables. Avoid using garden soil, as it can be too heavy and compact for container gardening. You can also amend your potting mix with compost or other organic matter to improve drainage and fertility. Aim for a soil pH between 6.0 and 7.5, which is slightly acidic to neutral. Consider adding slow-release fertilizer granules to the soil at planting time to provide a steady supply of nutrients throughout the growing season.
How often should I water my Brussels sprouts plants in a planter?
Watering frequency depends on several factors, including the size of the planter, the weather conditions, and the type of soil you’re using. As a general guideline, water your Brussels sprouts plants whenever the top inch of soil feels dry to the touch. Avoid overwatering, as this can lead to root rot. During hot, dry weather, you may need to water your plants daily. In cooler, wetter weather, you may only need to water them every few days. Use a watering can or hose with a gentle spray nozzle to avoid damaging the plants. Ensure the water reaches the roots of the plants.
How much sunlight do Brussels sprouts need when grown in a planter?
Brussels sprouts require at least six hours of direct sunlight per day to thrive. Choose a location for your planter that receives plenty of sunlight throughout the day. If you live in a particularly hot climate, you may need to provide some afternoon shade to prevent the plants from overheating. If you don’t have a sunny spot, you can supplement with grow lights. Rotate the planter regularly to ensure that all sides of the plants receive adequate sunlight. Insufficient sunlight can result in leggy plants with small, underdeveloped sprouts.
How do I fertilize Brussels sprouts grown in a planter?
Brussels sprouts are heavy feeders and require regular fertilization to produce a good harvest. Start by incorporating slow-release fertilizer granules into the soil at planting time. Then, supplement with liquid fertilizer every two to three weeks throughout the growing season. Choose a fertilizer that is high in nitrogen, phosphorus, and potassium (NPK). You can also use organic fertilizers, such as compost tea or fish emulsion. Follow the instructions on the fertilizer label carefully to avoid over-fertilizing, which can damage the plants.
How do I deal with pests and diseases when growing Brussels sprouts in a planter?
Regularly inspect your Brussels sprouts plants for signs of pests or diseases. Common pests include aphids, cabbage worms, and flea beetles. You can control these pests by handpicking them off the plants, spraying them with insecticidal soap, or using row covers to protect the plants. Common diseases include clubroot and blackleg. Prevent these diseases by using disease-resistant varieties, practicing crop rotation, and ensuring good drainage. If you notice any signs of disease, remove the affected leaves or plants immediately.
When are Brussels sprouts ready to harvest from a planter?
Brussels sprouts are typically ready to harvest 90 to 100 days after planting. The sprouts should be firm, green, and about 1 to 2 inches in diameter. Start harvesting from the bottom of the plant and work your way up. Twist or cut the sprouts off the stem, leaving the leaves intact. You can harvest Brussels sprouts over several weeks as they mature. The flavor of Brussels sprouts improves after a light frost, so don’t be afraid to leave them on the plant until after the first frost.
Can I grow Brussels sprouts in a planter indoors?
While it’s possible to grow Brussels sprouts indoors, it can be challenging. Brussels sprouts require a lot of sunlight, so you’ll need to provide supplemental lighting with grow lights. You’ll also need to ensure that the plants have adequate ventilation and humidity. Indoor growing is best suited for those with experience in indoor gardening and the resources to provide the necessary conditions. It’s generally easier and more rewarding to grow Brussels sprouts in a planter outdoors, where they can receive natural sunlight and ventilation.
What are some common problems when growing Brussels sprouts in a planter and how can I fix them?
Some common problems include:
* Yellowing leaves: This can be caused by nutrient deficiencies, overwatering, or underwatering. Adjust your watering and fertilizing practices accordingly.
* Small sprouts: This can be caused by insufficient sunlight, poor soil, or lack of fertilization. Ensure the plants receive at least six hours of sunlight per day, use a high-quality potting mix, and fertilize regularly.
* Pest infestations: Regularly inspect your plants for pests and take appropriate action to control them.
* Disease: Prevent disease by using disease-resistant varieties, practicing crop rotation, and ensuring good drainage.
By addressing these common problems promptly, you can ensure a successful harvest of Brussels sprouts from your planter.
Leave a Comment