
Grow Brussels Sprouts Kitchen: Ever dreamt of having a miniature farm right in your kitchen? Imagine plucking fresh, vibrant Brussels sprouts straight from their stalks, ready to be roasted, sautéed, or enjoyed in a crisp salad. It sounds like a chef’s fantasy, right? Well, it doesn’t have to be! This DIY guide will unlock the secrets to cultivating these nutritional powerhouses indoors, transforming your kitchen into a thriving green space.
For centuries, Brussels sprouts have been a staple in European cuisine, with their cultivation dating back to 13th-century Belgium – hence the name! While traditionally grown in sprawling fields, modern ingenuity allows us to adapt these hardy vegetables to smaller spaces. But why bother growing them indoors? Well, think about it: access to fresh, organic produce year-round, regardless of the weather outside. Plus, you’ll know exactly what’s going into your food, avoiding pesticides and other harmful chemicals.
I know what you’re thinking: “Growing Brussels sprouts indoors sounds complicated!” But trust me, with a few simple tricks and readily available materials, you can successfully grow Brussels Sprouts Kitchen style. This article will guide you through each step, from selecting the right seeds to providing optimal lighting and care. Get ready to impress your friends and family with your newfound green thumb and enjoy the delicious rewards of your indoor harvest!
Growing Brussels Sprouts Indoors: A DIY Kitchen Garden Guide
Okay, so you want to grow Brussels sprouts indoors? Awesome! It might seem a little daunting, but trust me, with the right setup and a little patience, you can absolutely cultivate these mini cabbages right in your kitchen. I’m going to walk you through everything you need to know, from choosing the right seeds to harvesting your very own homegrown sprouts. Let’s get started!
Choosing Your Seeds and Getting Started
First things first, we need to talk about seeds. Not all Brussels sprouts varieties are created equal, especially when it comes to indoor growing.
* Choose Compact Varieties: Look for varieties specifically bred for smaller spaces or container gardening. ‘Jade Cross’ and ‘Long Island Improved’ are good options. These tend to be more compact and manageable indoors.
* Source Reputable Seeds: Buy your seeds from a reputable supplier to ensure good germination rates and healthy plants.
* Consider Organic Seeds: If you’re aiming for organic produce, opt for organic seeds.
Now, let’s get those seeds started!
1. Prepare Your Seed Starting Mix: I like to use a seed starting mix that’s light and well-draining. You can buy a pre-made mix or make your own by combining equal parts peat moss, vermiculite, and perlite. Moisten the mix thoroughly before planting.
2. Sow the Seeds: Fill small seed starting trays or pots with the moistened mix. Sow the seeds about 1/4 inch deep and gently cover them with more mix. I usually plant 2-3 seeds per cell to increase my chances of germination.
3. Water Gently: Water the seeds gently using a spray bottle or watering can with a fine rose. You want to keep the soil consistently moist but not waterlogged.
4. Provide Warmth: Brussels sprouts seeds germinate best in temperatures between 65-75°F (18-24°C). You can use a heat mat to provide bottom heat and speed up germination.
5. Cover with a Humidity Dome (Optional): Covering the seed starting tray with a humidity dome or plastic wrap can help retain moisture and create a more humid environment, which is beneficial for germination. Just remember to remove the cover once the seedlings emerge to prevent fungal diseases.
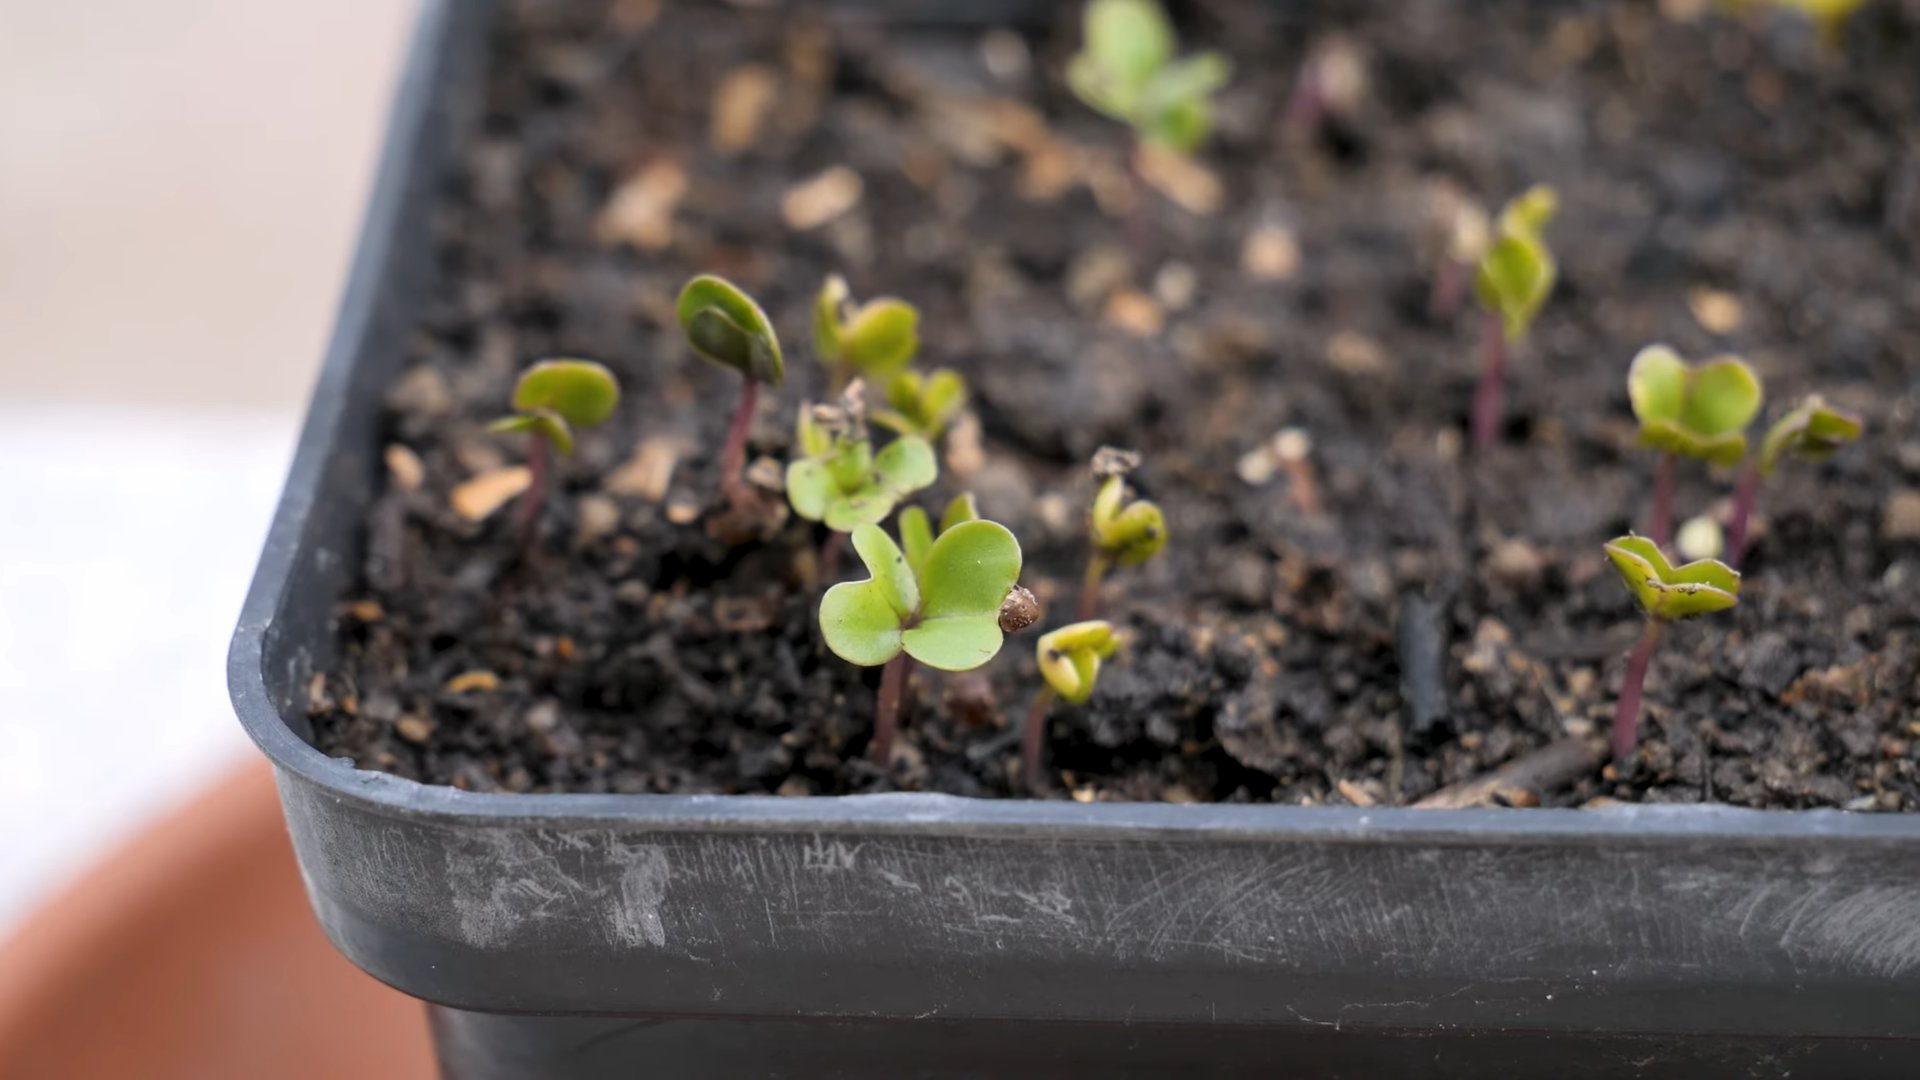
6. Wait for Germination: It usually takes about 5-10 days for Brussels sprouts seeds to germinate. Be patient!
Transplanting and Setting Up Your Indoor Garden
Once your seedlings have developed a few sets of true leaves (those are the leaves that look like miniature Brussels sprouts leaves), it’s time to transplant them into larger containers.
1. Choose the Right Containers: Brussels sprouts need plenty of space to grow, so choose containers that are at least 12 inches in diameter and 12 inches deep. I prefer using fabric pots because they allow for better drainage and aeration.
2. Prepare Your Potting Mix: Use a high-quality potting mix that’s rich in organic matter and well-draining. You can amend your potting mix with compost or aged manure to provide extra nutrients.
3. Transplant the Seedlings: Gently remove the seedlings from the seed starting tray, being careful not to damage the roots. If you planted multiple seeds per cell, thin them out by snipping off the weaker seedlings at the soil line. Plant one seedling per container.
4. Water Thoroughly: Water the transplanted seedlings thoroughly after planting.
5. Provide Adequate Light: Brussels sprouts need at least 6-8 hours of direct sunlight per day. If you don’t have enough natural light, you’ll need to supplement with grow lights. I recommend using LED grow lights, as they are energy-efficient and provide a full spectrum of light. Position the grow lights about 6-12 inches above the plants.
6. Ensure Good Air Circulation: Good air circulation is essential for preventing fungal diseases. You can use a small fan to circulate the air around your plants.
Caring for Your Brussels Sprouts Plants
Now that your Brussels sprouts are transplanted and settled in, it’s time to focus on providing them with the care they need to thrive.
1. Watering: Water your Brussels sprouts plants regularly, keeping the soil consistently moist but not waterlogged. Check the soil moisture by sticking your finger about an inch deep into the soil. If it feels dry, it’s time to water.
2. Fertilizing: Brussels sprouts are heavy feeders, so you’ll need to fertilize them regularly. Use a balanced liquid fertilizer, such as a 10-10-10 or 20-20-20, diluted to half strength. Fertilize every 2-3 weeks. You can also supplement with organic fertilizers like compost tea or fish emulsion.
3. Pinching: When your Brussels sprouts plants are about 12-18 inches tall, pinch off the top of the plant. This will encourage the plant to produce more sprouts along the stem.
4. Removing Lower Leaves: As the plants grow, the lower leaves may start to turn yellow or brown. Remove these leaves to improve air circulation and prevent fungal diseases.
5. Supporting the Plants: As the Brussels sprouts grow, they can become quite heavy and may need support. You can use stakes or cages to support the plants and prevent them from falling over.
6. Pest and Disease Control: Keep an eye out for pests and diseases. Common pests that affect Brussels sprouts include aphids, cabbage worms, and flea beetles. You can control these pests with insecticidal soap or neem oil. Common diseases include clubroot and blackleg. To prevent these diseases, make sure to use disease-free seeds and provide good air circulation. If you notice any signs of disease, remove the affected leaves or plants immediately.
Harvesting Your Brussels Sprouts
Harvesting is the most rewarding part of growing Brussels sprouts!
1. When to Harvest: Brussels sprouts are typically ready to harvest about 90-100 days after planting. The sprouts should be firm, green, and about 1-2 inches in diameter. The lower sprouts will mature first.
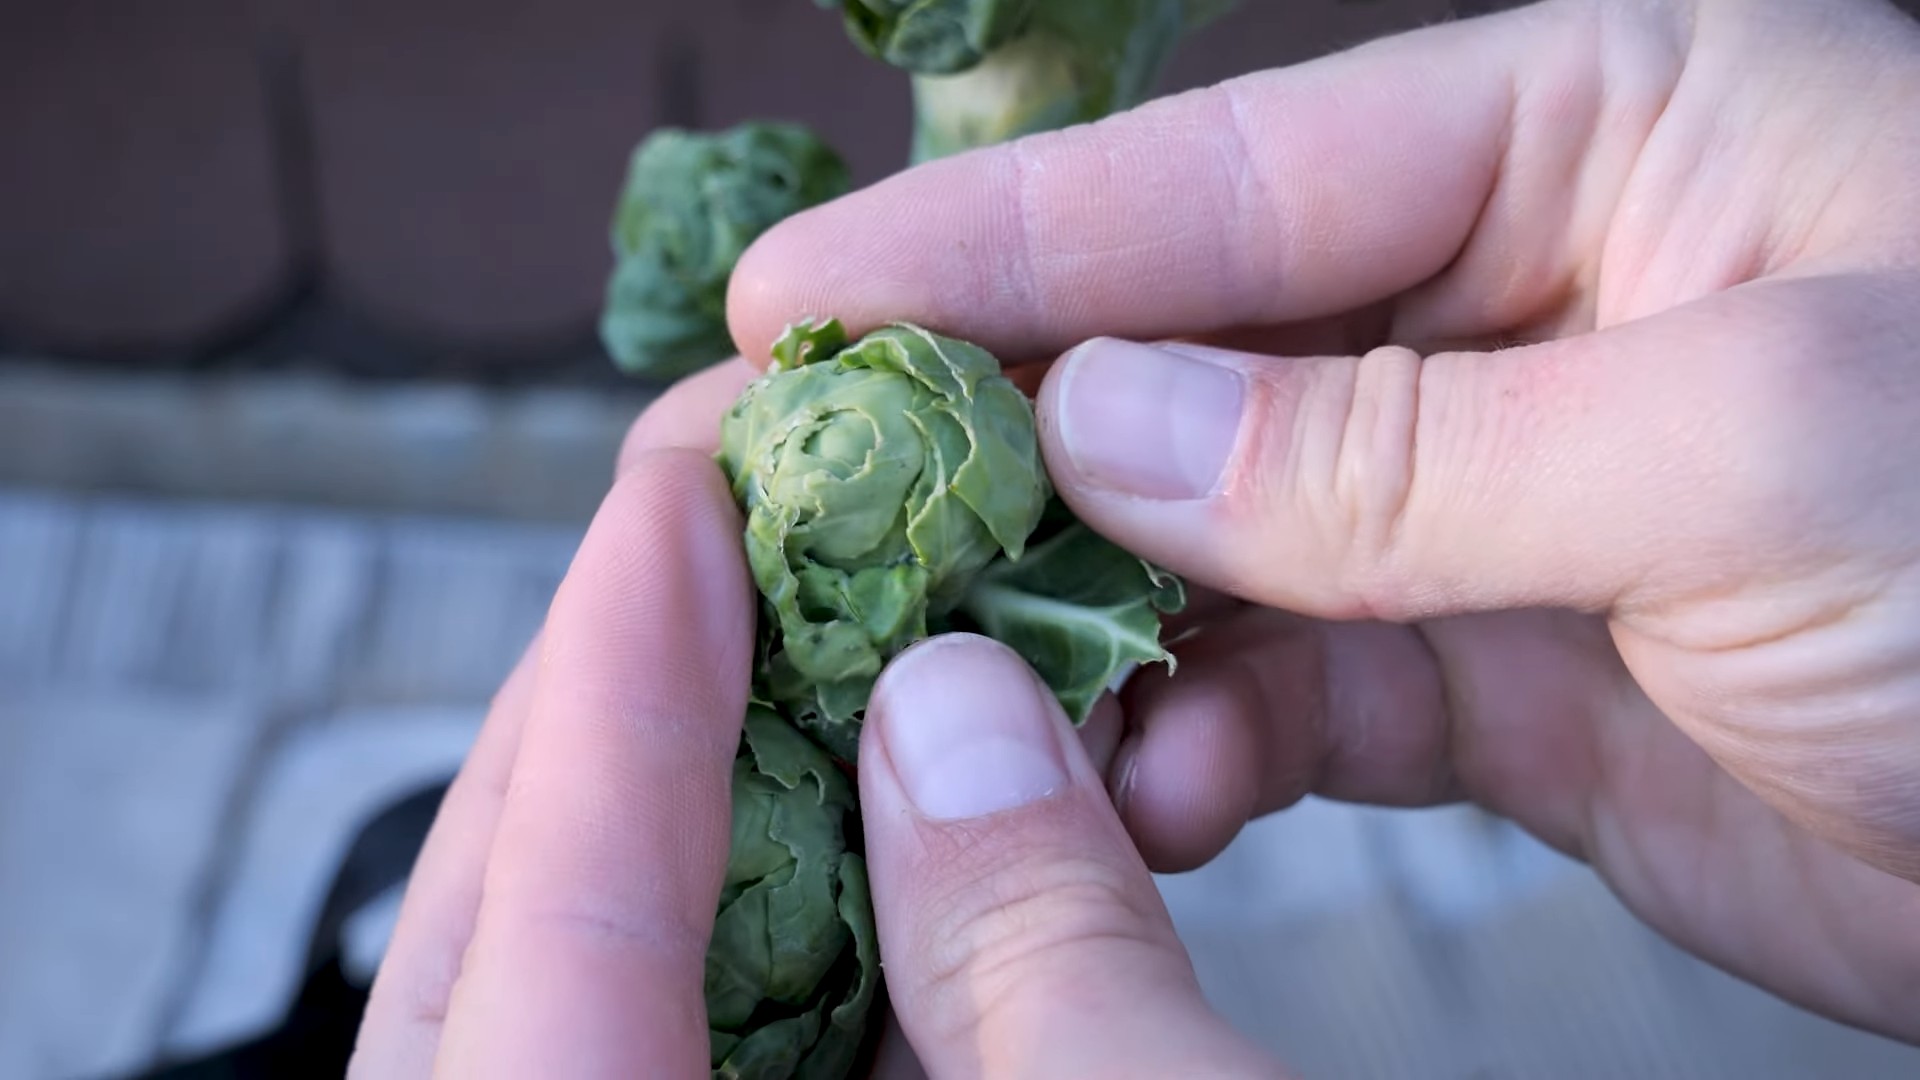
2. How to Harvest: To harvest Brussels sprouts, simply twist them off the stem. Start with the lower sprouts and work your way up. You can harvest the sprouts as they mature, or you can harvest the entire stem at once.
3. Storing Your Harvest: Freshly harvested Brussels sprouts can be stored in the refrigerator for up to a week. To store them, place them in a plastic bag or container.
Troubleshooting Common Problems
Even with the best care, you might encounter some problems while growing Brussels sprouts indoors. Here are some common issues and how to address them:
* Leggy Plants: If your plants are tall and spindly, they’re probably not getting enough light. Move them closer to the grow lights or provide more natural light.
* Yellowing Leaves: Yellowing leaves can be a sign of overwatering, underwatering, or nutrient deficiency. Check the soil moisture and adjust your watering accordingly. Fertilize the plants if they’re lacking nutrients.
* Small Sprouts: Small sprouts can be caused by insufficient light, water, or nutrients. Make sure your plants are getting enough light, water, and fertilizer.
* Pest Infestations: If you notice pests on your plants, treat them with insecticidal soap or neem oil.
* Disease Problems: If you notice any signs of disease, remove the affected leaves or plants immediately. Make sure to provide good air circulation to prevent fungal diseases.
Extra Tips for Success
Here are a few extra tips to help you succeed in growing Brussels sprouts indoors:
* Rotate Your Crops: Don’t grow Brussels sprouts in the same container year after year. Rotate your crops to prevent soilborne diseases.
* Use Companion Planting: Companion planting can help deter pests and improve the health of your plants. Good companion plants for Brussels sprouts include rosemary, thyme, and sage.
* Keep a Journal: Keep a journal to track your progress and learn from your mistakes. Note the dates of planting, transplanting, and harvesting, as well as any problems you encounter.
* Don’t Give Up: Growing Brussels sprouts indoors can be challenging, but it’s also very rewarding. Don’t give up if you encounter problems. Just keep learning and experimenting, and you’ll eventually succeed.
Growing Brussels sprouts indoors is a fun and rewarding project. With a little bit of effort, you can enjoy fresh, homegrown sprouts all year round. Good luck, and happy gardening!
Conclusion
So, there you have it! Growing Brussels sprouts in your kitchen might seem like a whimsical idea, but it’s a surprisingly rewarding and practical way to enjoy fresh, homegrown vegetables, even without a sprawling garden. This DIY trick isn’t just about saving money; it’s about connecting with your food, understanding its growth cycle, and experiencing the satisfaction of nurturing something from seed to table.
Why is this a must-try? Because it democratizes gardening. It removes the barriers of space, climate, and expertise that often prevent people from growing their own food. Imagine the joy of harvesting your own Brussels sprouts on a cold winter day, knowing you cultivated them right in your kitchen! The flavor is undeniably superior to store-bought varieties, often sweeter and less bitter, especially when harvested fresh. Plus, you control the entire process, ensuring your sprouts are grown without harmful pesticides or chemicals.
But the benefits extend beyond taste and convenience. This indoor gardening project is a fantastic educational opportunity for children, teaching them about plant life, responsibility, and the importance of healthy eating. It’s also a therapeutic activity for adults, offering a calming and mindful escape from the stresses of daily life. Watching your Brussels sprouts thrive is a truly fulfilling experience.
Now, let’s talk variations and suggestions. While this guide focuses on a basic setup, feel free to experiment! Consider using different types of containers, such as repurposed plastic bottles or fabric grow bags. You can also explore different lighting options, from simple fluorescent grow lights to more advanced LED systems. For added nutrients, try supplementing your soil with organic fertilizers or compost tea.
Another exciting variation is to experiment with different Brussels sprouts varieties. Some varieties are more compact and better suited for indoor growing than others. Research dwarf or early-maturing varieties to maximize your yield and minimize the space required. You can also try growing other brassicas alongside your Brussels sprouts, such as kale or collard greens, to create a diverse and productive indoor garden.
Don’t be afraid to get creative with your setup! You can create a vertical garden using stacked planters or hanging baskets to maximize space. You can also incorporate decorative elements, such as trellises or fairy lights, to make your indoor garden a visually appealing addition to your home.
Ultimately, the key to success is to be patient, observant, and willing to learn. Brussels sprouts can be a bit finicky, but with a little care and attention, you’ll be rewarded with a bountiful harvest.
We wholeheartedly encourage you to try this DIY trick and experience the magic of growing Brussels sprouts in your kitchen. It’s a simple, affordable, and incredibly rewarding project that will transform the way you think about food.
And most importantly, we want to hear about your experience! Share your photos, tips, and challenges with us in the comments below. Let’s create a community of indoor gardeners and inspire others to embrace the joy of growing their own food. What are you waiting for? Get those seeds started and embark on your Brussels sprouts adventure today! Let’s make indoor **Brussels sprouts** growing a new trend!
Frequently Asked Questions (FAQ)
1. What kind of Brussels sprouts variety is best for indoor growing?
Choosing the right variety is crucial for success when growing Brussels sprouts indoors. Look for dwarf or early-maturing varieties that are specifically bred for smaller spaces and shorter growing seasons. These varieties tend to be more compact and produce smaller sprouts, making them ideal for container gardening. Some popular choices include ‘Roodnerf’, ‘Long Island Improved’, and ‘Jade Cross’. These varieties are known for their relatively small size and ability to produce a decent yield in a limited space. Always check the seed packet for information on plant size and maturity time before making your selection. Remember, the goal is to find a variety that will thrive in the controlled environment of your kitchen.
2. How much light do Brussels sprouts need when grown indoors?
Light is a critical factor for successful Brussels sprouts cultivation. These plants require a significant amount of light, typically 6-8 hours of direct sunlight per day. However, since indoor environments often lack sufficient natural light, you’ll likely need to supplement with artificial lighting. Full-spectrum LED grow lights are an excellent option, as they provide the necessary wavelengths for photosynthesis and promote healthy growth. Position the lights about 6-12 inches above the plants and adjust as they grow taller. If you’re using fluorescent grow lights, you may need to place them closer to the plants. Observe your plants closely for signs of insufficient light, such as leggy growth or pale leaves. If you notice these symptoms, increase the intensity or duration of the light exposure.
3. What type of soil is best for growing Brussels sprouts in containers?
The ideal soil for container-grown Brussels sprouts should be well-draining, nutrient-rich, and slightly acidic. A good starting point is a high-quality potting mix specifically formulated for vegetables. Avoid using garden soil, as it can be too heavy and compact, hindering root growth. Amend the potting mix with compost or other organic matter to improve drainage, aeration, and nutrient content. You can also add a slow-release fertilizer to provide a steady supply of nutrients throughout the growing season. Ensure the container has adequate drainage holes to prevent waterlogging, which can lead to root rot. A pH level between 6.0 and 7.0 is optimal for Brussels sprouts.
4. How often should I water my indoor Brussels sprouts plants?
Watering frequency depends on several factors, including the size of the container, the type of soil, and the ambient temperature and humidity. As a general rule, water your Brussels sprouts plants when the top inch of soil feels dry to the touch. Water deeply, ensuring that the entire root ball is moistened. Avoid overwatering, as this can lead to root rot. Check the drainage holes to ensure that excess water is draining freely. During hot and dry periods, you may need to water more frequently. Conversely, during cooler or more humid periods, you can reduce the watering frequency. Monitor your plants closely and adjust your watering schedule accordingly.
5. How do I deal with pests and diseases when growing Brussels sprouts indoors?
While indoor environments are generally less prone to pests and diseases than outdoor gardens, it’s still important to be vigilant. Common pests that may affect Brussels sprouts include aphids, spider mites, and whiteflies. Regularly inspect your plants for signs of infestation, such as small insects, webbing, or sticky residue. If you detect pests, try to remove them manually by hand or with a strong spray of water. You can also use insecticidal soap or neem oil to control infestations. To prevent diseases, ensure good air circulation around your plants and avoid overwatering. If you notice any signs of disease, such as yellowing leaves or fungal growth, remove the affected leaves immediately and treat the plant with a fungicide if necessary. Maintaining a clean and healthy growing environment is the best defense against pests and diseases.
6. When and how do I harvest my indoor Brussels sprouts?
Brussels sprouts are typically ready for harvest when the sprouts are firm, green, and about 1-2 inches in diameter. Start harvesting from the bottom of the plant upwards, as the lower sprouts tend to mature first. To harvest, simply twist or snap off the sprouts from the stem. You can also use a sharp knife to cut them off. Harvest regularly to encourage the plant to produce more sprouts. The entire plant can be harvested at once if desired, but harvesting gradually allows you to enjoy fresh sprouts over a longer period. After harvesting, store the sprouts in the refrigerator for up to a week.
7. Can I grow Brussels sprouts indoors year-round?
Yes, with proper care and attention, you can grow Brussels sprouts indoors year-round. However, you may need to adjust your growing conditions to mimic the natural seasons. During the winter months, you may need to provide supplemental lighting and maintain a consistent temperature. During the summer months, you may need to provide shade to protect the plants from excessive heat. By carefully monitoring your plants and adjusting your growing conditions as needed, you can enjoy fresh Brussels sprouts throughout the year.

Leave a Comment