
Grow broccoli indoors? Absolutely! Forget the sprawling garden and unpredictable weather; you can cultivate this nutritional powerhouse right in the comfort of your own home. I know it sounds ambitious, but trust me, with a few clever tricks and a little dedication, you’ll be harvesting fresh, delicious broccoli without ever stepping foot outside.
For centuries, humans have relied on broccoli as a vital source of vitamins and minerals. Originating in Italy, this cruciferous vegetable has become a staple in diets worldwide. But what if I told you that you didn’t need acres of farmland to enjoy its benefits? What if you could bypass the pests, the unpredictable weather, and the limited growing seasons?
That’s where this DIY guide comes in. In today’s fast-paced world, many of us lack the time or space for traditional gardening. Maybe you live in an apartment, or perhaps you simply want to extend your growing season. Whatever your reason, learning how to grow broccoli indoors offers a fantastic solution. I’m going to share some simple, effective techniques that will empower you to enjoy fresh, homegrown broccoli year-round, regardless of your living situation. Get ready to unleash your inner urban farmer!
Growing Broccoli Indoors: Your Comprehensive DIY Guide
Hey garden friends! Do you ever crave fresh broccoli, but the trip to the supermarket is too far or the weather isn’t cooperating? No worries, I’ll show you how to easily grow broccoli right at home—even without a garden! It’s easier than you think and a lot of fun. Let’s get started!
What You Need: The Materials List
Before we begin, here’s a list of everything you’ll need for your indoor broccoli project:
- Broccoli seeds: Choose a variety suitable for growing in containers. There are special “baby” broccoli varieties that work well.
- Seed starting mix: This is lighter and lower in nutrients than regular potting soil and is ideal for germination.
- Pots or seed trays: Small pots or trays for starting the seeds.
- Larger pots: Once the seedlings are bigger, they’ll need more space. Pots with a diameter of at least 20 cm (8 inches) are ideal.
- Potting soil: High-quality potting soil for the larger pots.
- Grow light (optional, but recommended): Broccoli needs a lot of light, especially in winter. A grow light helps compensate for the lack of sunlight.
- Spray bottle: For moistening the soil.
- Watering can: For watering the plants.
- Liquid fertilizer: For vegetables, to provide the plants with enough nutrients.
- Thermometer: To keep an eye on the temperature.
- Moisture meter (optional): Helps control soil moisture levels.
Phase 1: Getting Started – From Seed to Small Plant
Starting the seeds is the first and most important step. This is where we lay the foundation for healthy broccoli plants.
- Prepare the seed trays: Fill the seed trays or small pots with seed starting mix. Press the soil down lightly.
- Sow the seeds: Place 2-3 broccoli seeds in each tray or pot. Cover the seeds with a thin layer of seed starting mix (about 0.5 cm or 1/4 inch).
- Watering: Gently moisten the soil with a spray bottle. The soil should be moist, but not wet.
- Location: Place the seed trays in a warm and bright location. A temperature of 18-24°C (65-75°F) is ideal for germination. If you don’t have a bright windowsill, use a grow light.
- Moisture: Keep the soil moist by spraying it regularly with the spray bottle. Avoid waterlogging.
- Germination: The seeds usually germinate within 5-10 days.
- Thinning: Once the seedlings are a few centimeters tall and have their first true leaves, thin them out. This means leaving only the strongest seedling in each tray or pot. You can gently remove the others.
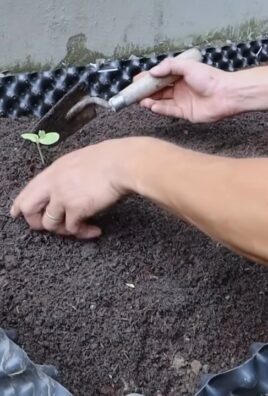
Phase 2: Transplanting – From the Small Pot to the Big One
Once the seedlings are strong enough, they need more space. Now it’s time to transplant them into larger pots.
- Prepare the larger pots: Fill the larger pots (at least 20 cm or 8 inches in diameter) with high-quality potting soil. Leave a few centimeters of space at the top.
- Transplanting: Carefully dig a hole in the soil large enough to accommodate the seedling’s root ball.
- Removing the seedling: Gently loosen the seedling from the seed tray or small pot. Be careful not to damage the roots.
- Planting the seedling: Place the seedling in the hole and fill it with soil. Press the soil down lightly.
- Watering: Gently water the plant with a watering can. The soil should be well-moistened.
- Location: Place the pots in a bright and cool location. Broccoli doesn’t like it too warm. A temperature of 15-20°C (60-68°F) is ideal.
Phase 3: Care – Watering, Fertilizing, Light
Now the real work begins: caring for the broccoli plants. Here are a few tips to keep your plants healthy and happy:
- Watering: Water the plants regularly, but avoid waterlogging. The soil should always be slightly moist. Check the moisture with your finger or a moisture meter.
- Fertilizing: Feed the plants every 2-3 weeks with a liquid fertilizer for vegetables. Follow the instructions on the packaging.
- Light: Broccoli needs a lot of light. If you don’t have a bright windowsill, use a grow light. The grow light should be on for 12-14 hours a day.
- Ventilation: Ensure good air circulation to prevent mold. Open the window regularly or set up a fan.
- Pests: Watch out for pests like aphids or caterpillars. If you spot pests, combat them with natural remedies like neem oil or an insecticidal soap solution.
- Rotating the pots: Rotate the pots regularly so the plants get even light and don’t grow crooked.
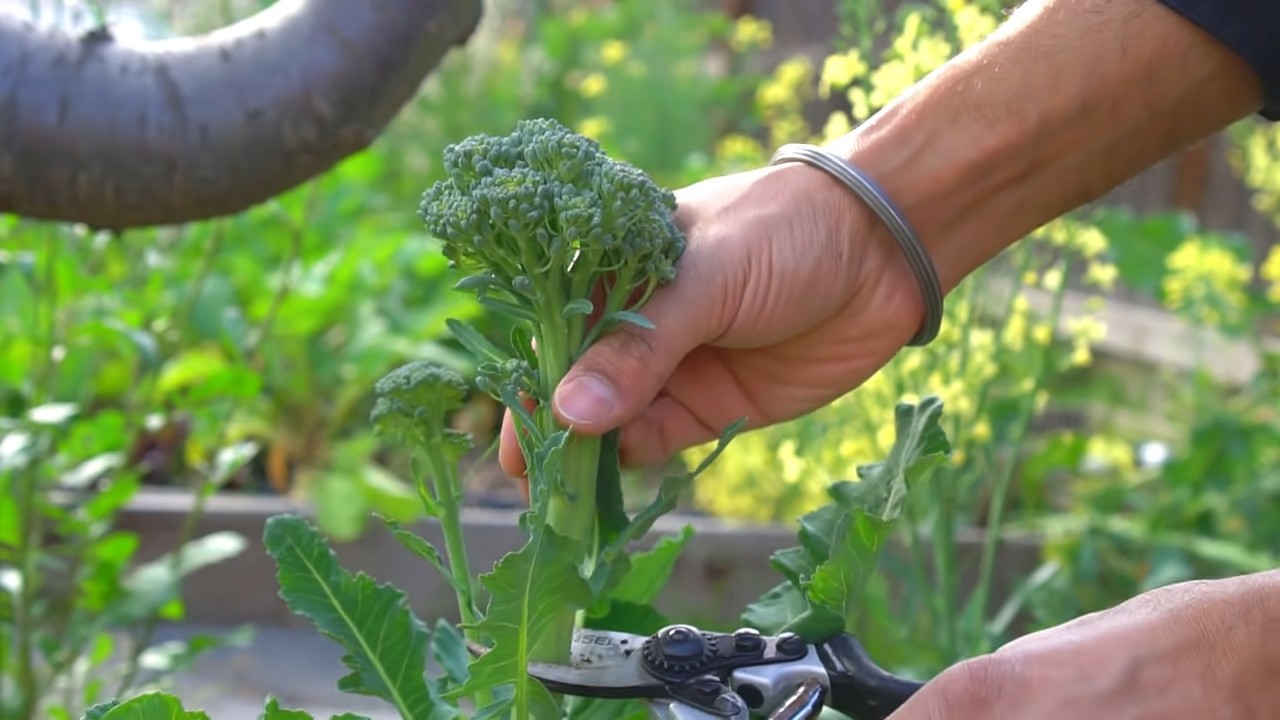
Phase 4: The Harvest – Finally, Broccoli!
After about 60-80 days, you can harvest your homegrown broccoli.
- When to harvest: Harvest the broccoli when the florets are firm and tightly closed. If the florets turn yellow or start to open, it’s too late.
- How to harvest: Cut the main broccoli head with a sharp knife. Leave a few leaves on the plant so it can continue to grow.
- Second harvest: Often, smaller side shoots with broccoli will form after the main harvest. You can harvest these as well.
Additional Tips and Tricks for Indoor Broccoli Growing
- Choose the right variety: Not all broccoli varieties are suitable for growing in pots. Choose a variety that grows compactly and matures early.
- Use high-quality soil: Good soil is the foundation for healthy plants. Use high-quality potting soil that drains well and contains enough nutrients.
- Watch the temperature: Broccoli doesn’t like it too warm. A temperature of 15-20°C (60-68°F) is ideal.
- Avoid waterlogging: Waterlogging can lead to root rot. Make sure excess water can drain away easily.
- Be patient: Growing broccoli takes time and patience. Don’t be discouraged if it doesn’t work out perfectly the first time.
Common Problems and Solutions
Stunted growth: Stunted growth can be caused by too little light or a lack of nutrients. Move the plants to a brighter location and fertilize them.
Yellow leaves: Yellow leaves can be a sign of a nutrient deficiency. Fertilize the plants with a liquid fertilizer.
Mold growth: Mold can be caused by high humidity. Ensure good ventilation.
Aphids: Aphids can be controlled with natural remedies like neem oil or an insecticidal soap solution.

Conclusion
So, there you have it! Growing broccoli indoors might seem like a daunting task at first, but with the right approach and a little patience, you can enjoy fresh, homegrown broccoli even without a sprawling garden. This DIY method is a must-try for several compelling reasons. First and foremost, it offers unparalleled control over the growing environment, shielding your precious broccoli plants from unpredictable weather, pesky pests, and diseases that often plague outdoor crops. Imagine harvesting crisp, vibrant broccoli florets in the dead of winter, a feat simply impossible with traditional gardening.
Beyond the environmental control, growing broccoli indoors allows you to extend the growing season significantly. You’re no longer limited by the constraints of your local climate’s warm months. This means more harvests, more delicious broccoli dishes, and more satisfaction from nurturing your own food source. Plus, let’s be honest, there’s a certain joy and accomplishment that comes from successfully cultivating your own vegetables, especially when you’ve done it yourself, from seed to plate.
But the benefits don’t stop there. This DIY approach is also incredibly adaptable. You can experiment with different broccoli varieties, from the classic Calabrese to the more colorful and unique purple sprouting broccoli. You can also tailor the growing conditions to suit your specific needs and preferences. Want to try hydroponics? Go for it! Prefer a more traditional soil-based approach? That works too! The possibilities are endless.
Consider these variations to further enhance your indoor broccoli growing experience:
* Succession Planting: Plant new seeds every few weeks to ensure a continuous harvest throughout the year.
* Companion Planting: Introduce herbs like rosemary or thyme near your broccoli to deter pests naturally.
* Vertical Gardening: Utilize vertical space with tiered planters or hanging baskets to maximize your growing area, especially if you’re short on space.
* Microgreens: If you’re short on space or time, consider growing broccoli microgreens. They’re packed with nutrients and ready to harvest in just a few days.
We wholeheartedly encourage you to embark on this indoor broccoli growing adventure. It’s a rewarding experience that connects you with nature, provides you with fresh, healthy food, and allows you to hone your gardening skills. Don’t be afraid to experiment, learn from your mistakes, and most importantly, have fun!
Once you’ve tried this DIY trick, we’d love to hear about your experience. Share your tips, tricks, and triumphs in the comments below. Let’s build a community of indoor broccoli growers and learn from each other. Your insights could be invaluable to someone just starting out. So, grab your seeds, prepare your growing medium, and get ready to enjoy the satisfaction of growing your own delicious, homegrown broccoli indoors!
Frequently Asked Questions (FAQ)
What are the best broccoli varieties to grow indoors?
While most broccoli varieties can be grown indoors, some tend to perform better than others due to their size and growth habits. Compact varieties like ‘Waltham 29’ and ‘De Cicco’ are excellent choices as they don’t require as much space as larger varieties. ‘Green Magic’ is another popular option known for its early maturity and uniform heads. Consider your available space and desired harvest size when selecting a variety. Experimenting with different varieties can also help you discover which ones thrive best in your specific indoor environment. Remember to check the seed packet for information on plant size and days to maturity.
How much light does indoor broccoli need?
Broccoli requires a significant amount of light to thrive, ideally 6-8 hours of direct sunlight per day. However, since natural sunlight can be limited indoors, especially during winter months, supplemental lighting is often necessary. LED grow lights are an excellent option as they are energy-efficient and provide the full spectrum of light that broccoli needs for optimal growth. Position the lights a few inches above the plants and adjust as they grow taller. Insufficient light can lead to leggy growth, small heads, and reduced yields.
What type of soil is best for growing broccoli indoors?
Broccoli prefers well-draining, nutrient-rich soil with a slightly acidic to neutral pH (around 6.0-7.0). A good potting mix specifically formulated for vegetables is a great starting point. You can also amend your own soil mix by combining equal parts of compost, peat moss (or coconut coir), and perlite or vermiculite. Compost provides essential nutrients, peat moss or coconut coir helps retain moisture, and perlite or vermiculite improves drainage. Avoid using garden soil as it can be too heavy and may contain pests or diseases.
How often should I water my indoor broccoli plants?
Water your broccoli plants regularly, keeping the soil consistently moist but not waterlogged. Check the soil moisture level daily by sticking your finger about an inch deep into the soil. If it feels dry, it’s time to water. Water deeply, allowing excess water to drain out of the bottom of the pot. Avoid overhead watering as it can increase the risk of fungal diseases. The frequency of watering will depend on factors such as the size of the pot, the type of soil, and the ambient temperature and humidity.
How do I fertilize my indoor broccoli plants?
Broccoli is a heavy feeder and requires regular fertilization to support its growth. Start fertilizing about two weeks after transplanting the seedlings into their final pots. Use a balanced liquid fertilizer (e.g., 10-10-10) diluted to half strength. Fertilize every two to three weeks, following the instructions on the fertilizer label. You can also supplement with organic fertilizers such as compost tea or fish emulsion. Avoid over-fertilizing, as this can lead to excessive foliage growth at the expense of head development.
How do I deal with pests and diseases on my indoor broccoli plants?
While growing broccoli indoors reduces the risk of pests and diseases, it’s still important to be vigilant. Common pests that may affect indoor broccoli include aphids, spider mites, and whiteflies. Regularly inspect your plants for signs of infestation, such as yellowing leaves, sticky residue, or visible pests. Treat infestations promptly with insecticidal soap or neem oil. To prevent diseases, ensure good air circulation, avoid overwatering, and remove any infected leaves immediately.
When is broccoli ready to harvest indoors?
Broccoli is typically ready to harvest when the central head is firm, tight, and a deep green color. The florets should be tightly closed and not starting to open or flower. The size of the head will vary depending on the variety, but generally, it should be about 4-7 inches in diameter. Use a sharp knife to cut the head from the plant, leaving a few inches of stem. After harvesting the central head, the plant may produce smaller side shoots, which can also be harvested.
Can I grow broccoli indoors year-round?
Yes, you can grow broccoli indoors year-round, provided you can provide the necessary growing conditions, including adequate light, temperature, and humidity. Succession planting, as mentioned earlier, is key to ensuring a continuous harvest throughout the year. By starting new seeds every few weeks, you can have a steady supply of fresh broccoli regardless of the season.
What temperature is ideal for growing broccoli indoors?
Broccoli prefers cool temperatures, ideally between 60-70°F (15-21°C). While it can tolerate slightly warmer temperatures, prolonged exposure to high heat can cause the heads to loosen and become bitter. Maintain a consistent temperature by using a thermostat-controlled heater or air conditioner, if necessary. Avoid placing your broccoli plants near heat sources or drafts.
Is growing broccoli indoors worth the effort?
Absolutely! While it requires some initial investment and ongoing care, growing broccoli indoors offers numerous benefits, including fresh, homegrown produce, control over growing conditions, extended growing season, and the satisfaction of nurturing your own food. The taste of freshly harvested, homegrown broccoli is far superior to store-bought varieties. Give it a try, and you might just discover a new passion for indoor gardening!


Leave a Comment