
Grow Broccoli at Home? Absolutely! Imagine stepping into your backyard and harvesting fresh, vibrant broccoli heads, ready to be steamed, roasted, or tossed into a delicious salad. Forget those bland, overpriced supermarket florets – with a few simple tricks, you can cultivate your own thriving broccoli patch, bursting with flavor and nutrients.
For centuries, broccoli has been a culinary staple, tracing its roots back to ancient Roman civilization. The Romans prized this green vegetable for its nutritional value and unique taste, and thankfully, the love for broccoli has endured! But why settle for store-bought when you can experience the unparalleled satisfaction of growing your own?
Let’s face it, we all crave fresh, healthy produce, but the cost and quality at the grocery store can be discouraging. That’s where the magic of home gardening comes in. This DIY guide is your secret weapon to successfully grow broccoli at home, even if you’re a complete beginner. I’ll share my tried-and-true tips and hacks, from seed starting to pest control, ensuring you have a bountiful harvest. Get ready to transform your garden into a broccoli paradise and enjoy the freshest, most flavorful broccoli you’ve ever tasted!
Growing Broccoli at Home: A Beginner’s Guide
Hey there, fellow gardening enthusiasts! Ever dreamt of harvesting your own crisp, green broccoli heads right from your backyard? Well, dream no more! Growing broccoli at home is totally achievable, even for beginners. I’m going to walk you through everything you need to know, from seed to harvest, so you can enjoy fresh, homegrown broccoli in your favorite dishes. Let’s get started!
Choosing Your Broccoli Variety
First things first, let’s talk broccoli varieties. There are tons of options out there, each with its own unique characteristics. Here are a few popular choices:
* Calabrese: This is your classic, standard broccoli. It produces a large central head and often smaller side shoots after the main head is harvested. It’s a reliable choice for most gardens.
* Waltham 29: Another popular variety, known for its cold hardiness. If you live in an area with cooler temperatures or a shorter growing season, this is a great option.
* DiCicco: This variety matures quickly, making it ideal for gardeners who want a faster harvest. It produces smaller heads, but they’re incredibly flavorful.
* Romanesco: If you’re looking for something a little different, try Romanesco broccoli. It has a unique, fractal-like appearance and a slightly nutty flavor.
Consider your climate, growing season length, and personal preferences when choosing your broccoli variety. I personally love Calabrese for its large heads and reliable growth.
Starting Your Broccoli Seeds
Broccoli is a cool-season crop, which means it thrives in cooler temperatures. In most regions, you’ll want to start your seeds indoors about 6-8 weeks before the last expected frost. This gives your seedlings a head start before transplanting them into the garden.
Here’s how to start your broccoli seeds indoors:
1. Gather your supplies: You’ll need seed starting trays or small pots, seed starting mix (a light, well-draining soil), broccoli seeds, a spray bottle, and a heat mat (optional, but helpful).
2. Fill your trays or pots with seed starting mix: Gently fill each cell or pot with the mix, leaving about half an inch of space at the top.
3. Sow your seeds: Place 2-3 broccoli seeds in each cell or pot, about ¼ inch deep.
4. Cover the seeds: Lightly cover the seeds with more seed starting mix.
5. Water gently: Use a spray bottle to moisten the soil. Avoid overwatering, as this can lead to damping off (a fungal disease that can kill seedlings).
6. Provide warmth: Place your seed starting trays or pots on a heat mat, if using. This will help the seeds germinate faster. The ideal soil temperature for broccoli seed germination is around 70-75°F (21-24°C).
7. Provide light: Once the seeds germinate (usually within 5-10 days), remove them from the heat mat and place them under a grow light or in a sunny window. If using a grow light, keep it a few inches above the seedlings.
8. Water regularly: Keep the soil consistently moist, but not soggy. Water when the top inch of soil feels dry to the touch.
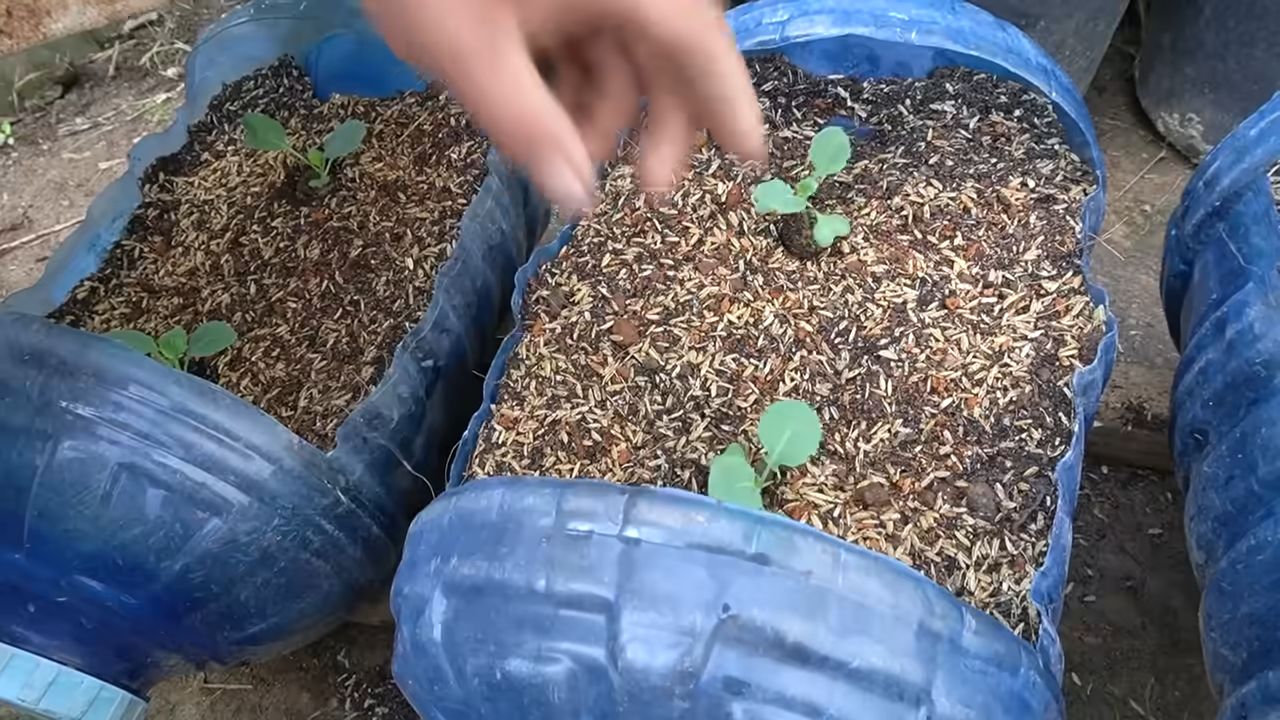
9. Thin the seedlings: Once the seedlings have their first true leaves (the second set of leaves), thin them to one seedling per cell or pot. Choose the strongest, healthiest-looking seedling and snip off the others at the soil line.
Preparing Your Garden Bed
While your broccoli seedlings are growing indoors, it’s time to prepare your garden bed. Broccoli needs well-drained soil that’s rich in organic matter.
Here’s how to prepare your garden bed:
1. Choose a sunny location: Broccoli needs at least 6 hours of sunlight per day.
2. Test your soil: A soil test will tell you the pH level and nutrient content of your soil. Broccoli prefers a slightly acidic soil with a pH of 6.0-7.0.
3. Amend your soil: Based on your soil test results, amend your soil with compost, aged manure, or other organic matter. This will improve drainage, add nutrients, and help retain moisture. I personally love adding compost to my garden beds – it’s like a superfood for plants!
4. Till or dig the soil: Loosen the soil to a depth of at least 12 inches. This will allow the broccoli roots to grow easily.
5. Remove any rocks or debris: Clear the area of any rocks, weeds, or other debris.
6. Create raised beds (optional): Raised beds can improve drainage and warm up the soil faster in the spring.
Transplanting Your Broccoli Seedlings
Once your broccoli seedlings have 4-6 true leaves and the danger of frost has passed, it’s time to transplant them into the garden.
Here’s how to transplant your broccoli seedlings:
1. Harden off the seedlings: Before transplanting, you need to harden off the seedlings. This means gradually exposing them to outdoor conditions over a period of 7-10 days. Start by placing them in a sheltered location outdoors for a few hours each day, gradually increasing the amount of time they spend outside. This will help them adjust to the sun, wind, and temperature changes.
2. Choose a cloudy day: Transplanting on a cloudy day will help prevent the seedlings from getting stressed.
3. Dig holes: Dig holes that are slightly larger than the root balls of the seedlings. Space the holes about 18-24 inches apart.
4. Gently remove the seedlings from their containers: Be careful not to damage the roots. Gently loosen the soil around the roots and lift the seedlings out of their containers.
5. Place the seedlings in the holes: Place the seedlings in the holes, making sure the top of the root ball is level with the surrounding soil.
6. Fill the holes with soil: Gently fill the holes with soil and firm the soil around the seedlings.
7. Water thoroughly: Water the seedlings thoroughly after transplanting.
8. Mulch around the plants: Mulch around the plants with straw, wood chips, or other organic mulch. This will help retain moisture, suppress weeds, and regulate soil temperature.
Caring for Your Broccoli Plants
Once your broccoli plants are in the ground, it’s important to provide them with proper care to ensure a healthy harvest.
Here are some tips for caring for your broccoli plants:
1. Water regularly: Broccoli needs consistent moisture, especially during hot, dry weather. Water deeply and regularly, aiming for about 1-1.5 inches of water per week.
2. Fertilize regularly: Broccoli is a heavy feeder, so it needs regular fertilization. Use a balanced fertilizer or a fertilizer specifically formulated for vegetables. Follow the instructions on the fertilizer label. I like to use a liquid fertilizer every few weeks.
3. Control weeds: Weeds can compete with broccoli plants for nutrients and water. Keep the garden bed free of weeds by hand-pulling or using a hoe. Mulching can also help suppress weeds.
4. Protect from pests: Broccoli is susceptible to several pests, including cabbage worms, aphids, and flea beetles. Inspect your plants regularly for signs of pests and take action if necessary. You can use insecticidal soap, neem oil, or other organic pest control methods. Covering your plants with row covers can also help prevent pest infestations.
5. Watch out for diseases: Broccoli can also be affected by diseases such as clubroot and black rot. Choose disease-resistant varieties and practice good garden hygiene to prevent these diseases.
Harvesting Your Broccoli
The moment you’ve been waiting for! Harvesting your own homegrown broccoli is incredibly rewarding.
Here’s how to harvest your broccoli:
1. Harvest when the head is firm and tight: The broccoli head should be firm and tight, with tightly closed florets. If the florets start to open and turn yellow, it’s time to harvest.
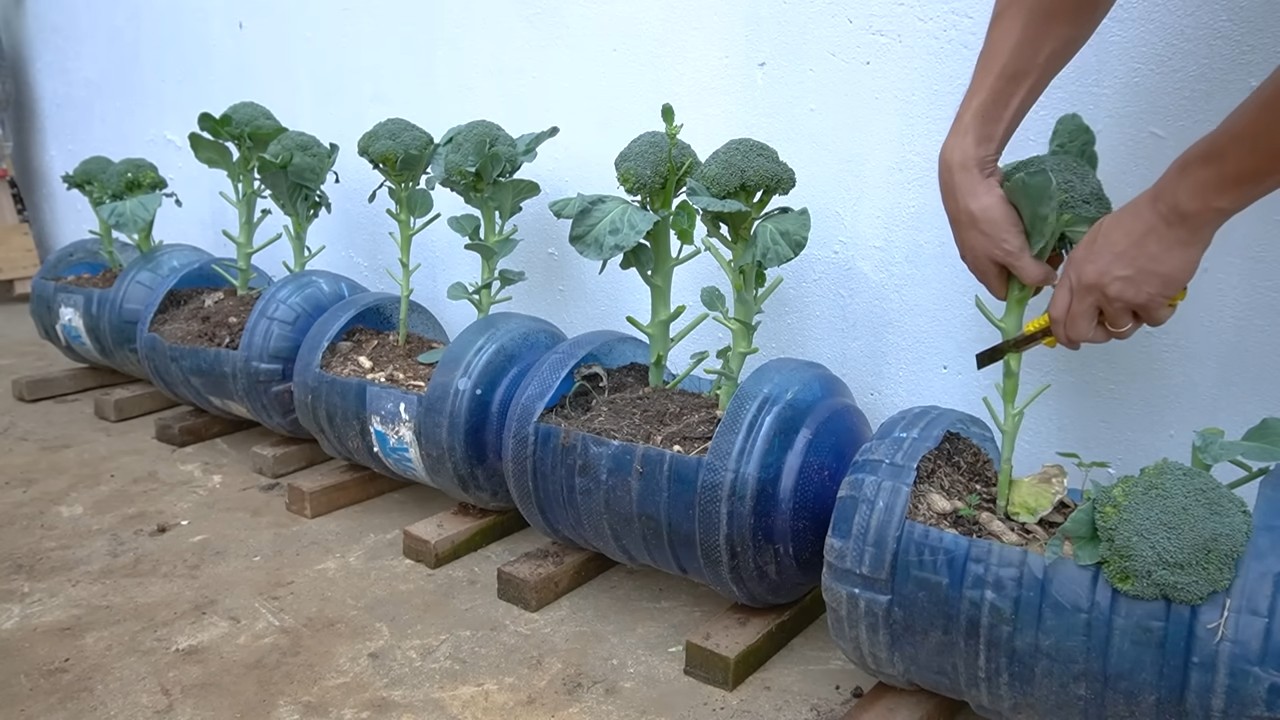
2. Cut the head with a sharp knife: Cut the head off the plant with a sharp knife, leaving about 4-6 inches of stem.
3. Encourage side shoots: After harvesting the main head, the plant will often produce smaller side shoots. You can harvest these as they mature.
4. Store your broccoli: Store your harvested broccoli in the refrigerator for up to a week.
Troubleshooting Common Broccoli Problems
Even with the best care, you might encounter some problems while growing broccoli. Here are a few common issues and how to address them:
* Yellowing leaves: This could be a sign of nutrient deficiency, overwatering, or disease. Check your soil pH and nutrient levels, adjust your watering schedule, and inspect your plants for signs of disease.
* Small heads: This could be due to insufficient sunlight, poor soil, or lack of fertilization. Make sure your plants are
Conclusion
So, there you have it! Growing your own broccoli at home isn’t just a fun gardening project; it’s a pathway to fresher, more flavorful, and potentially more nutritious meals. Forget the limp, store-bought broccoli that’s been sitting on shelves for days. Imagine the satisfaction of harvesting your own vibrant green heads, knowing exactly where they came from and what went into their growth. This DIY trick is a game-changer for anyone who values fresh produce and a connection to their food source.
But why is this a must-try? Beyond the superior taste and freshness, growing your own broccoli offers a level of control you simply can’t achieve with store-bought options. You can choose organic methods, avoiding harmful pesticides and herbicides. You can select varieties that are best suited to your local climate and personal preferences. And, let’s be honest, there’s a certain pride that comes with nurturing a plant from seed to table.
Don’t be afraid to experiment! Try different varieties of broccoli, such as Calabrese, Romanesco, or sprouting broccoli, to discover your favorites. Consider companion planting with herbs like rosemary or thyme to deter pests and enhance the flavor of your broccoli. You can also adjust the timing of your planting to achieve multiple harvests throughout the growing season. If you’re short on space, explore container gardening options. Dwarf broccoli varieties are particularly well-suited for pots and can thrive on a sunny balcony or patio.
Growing broccoli at home is an incredibly rewarding experience. It’s a chance to connect with nature, learn new skills, and enjoy the unparalleled taste of homegrown produce. We encourage you to give this DIY trick a try. Start small, be patient, and don’t be afraid to make mistakes. Gardening is a learning process, and every season brings new opportunities.
We’re confident that once you taste the difference between homegrown broccoli and store-bought, you’ll be hooked. So, grab your seeds, prepare your soil, and get ready to embark on a delicious and fulfilling gardening adventure.
And most importantly, we want to hear about your experiences! Share your tips, successes, and challenges in the comments below. Let’s create a community of home broccoli growers and learn from each other. Happy gardening!
Frequently Asked Questions (FAQ)
What is the best time of year to plant broccoli?
The ideal time to plant broccoli depends on your climate. In regions with mild winters, you can plant broccoli in the fall for a winter or early spring harvest. In colder climates, start seeds indoors 6-8 weeks before the last expected frost and transplant them outdoors in the spring. You can also plant a second crop in late summer for a fall harvest. The key is to avoid planting during the hottest part of the summer, as high temperatures can cause broccoli to bolt (go to seed).
How much sunlight does broccoli need?
Broccoli requires at least 6 hours of direct sunlight per day to thrive. Choose a sunny location in your garden or on your patio for your broccoli plants. If you’re growing broccoli indoors under grow lights, ensure the lights are positioned close to the plants and provide sufficient intensity.
What kind of soil is best for growing broccoli?
Broccoli prefers well-drained, fertile soil with a pH between 6.0 and 7.0. Amend your soil with compost or other organic matter to improve drainage and fertility. Broccoli is a heavy feeder, so it’s important to provide it with plenty of nutrients. Consider adding a slow-release fertilizer at planting time.
How often should I water my broccoli plants?
Broccoli needs consistent moisture to grow properly. Water deeply and regularly, especially during dry periods. Aim to keep the soil consistently moist but not waterlogged. Mulching around your broccoli plants can help retain moisture and suppress weeds.
What are some common pests and diseases that affect broccoli?
Common pests that affect broccoli include cabbage worms, aphids, and flea beetles. Diseases include clubroot, black rot, and downy mildew. Inspect your plants regularly for signs of pests or diseases. Use organic pest control methods, such as insecticidal soap or neem oil, to control pests. Choose disease-resistant varieties and practice crop rotation to prevent diseases.
How do I know when my broccoli is ready to harvest?
Broccoli is ready to harvest when the central head is firm and the flower buds are tight and unopened. If the buds start to open and turn yellow, it’s time to harvest immediately. Cut the central head with a sharp knife, leaving a few inches of stem. Side shoots will often develop after the central head is harvested, providing you with additional broccoli.
Can I grow broccoli in containers?
Yes, you can grow broccoli in containers. Choose a large container (at least 12 inches in diameter) with drainage holes. Use a high-quality potting mix and provide your broccoli plants with plenty of sunlight and water. Dwarf broccoli varieties are particularly well-suited for container gardening.
How can I prevent broccoli from bolting?
Bolting is when the broccoli plant prematurely flowers and goes to seed, making the head bitter and inedible. To prevent bolting, plant broccoli at the right time of year, avoid stress from heat or drought, and choose bolt-resistant varieties.
Is homegrown broccoli more nutritious than store-bought broccoli?
Homegrown broccoli can be more nutritious than store-bought broccoli because it’s harvested at its peak ripeness and consumed soon after. Store-bought broccoli often sits on shelves for days, losing nutrients over time. When you grow your own broccoli, you also have control over the growing methods, ensuring that it’s free from harmful pesticides and herbicides.
What are some creative ways to use homegrown broccoli?
Beyond steaming or roasting, homegrown broccoli can be used in a variety of creative ways. Add it to stir-fries, soups, and salads. Use it as a topping for pizza or pasta. Blend it into smoothies for a nutritional boost. You can even pickle broccoli stems for a tangy snack. The possibilities are endless!

Leave a Comment