
Grow Bok Choy Indoors? Absolutely! Imagine fresh, crisp bok choy, bursting with flavor, ready to harvest right from your windowsill, even in the dead of winter. Forget those sad, wilted greens from the grocery store – we’re talking vibrant, homegrown goodness! For centuries, cultivating vegetables in small spaces has been a vital skill, especially in cultures where access to land was limited. Think of the ancient rooftop gardens of Babylon or the ingenious window box gardens of Victorian England. This tradition continues today, fueled by a desire for fresh, healthy food and a connection to nature, even in urban environments.
But why should you learn to grow bok choy indoors? Well, for starters, it’s incredibly rewarding! There’s nothing quite like nurturing a plant from seed to harvest. Plus, growing your own food gives you complete control over what goes into it – no pesticides, no hidden ingredients, just pure, delicious bok choy. And let’s be honest, with rising grocery prices, a little DIY gardening can save you some serious cash. This article is packed with simple, effective tricks and hacks to help you successfully grow bok choy indoors, regardless of your experience level. So, grab your gardening gloves (or just your favorite mug!), and let’s get started!
Growing Bok Choy Indoors: A Beginner’s Guide
Hey there, fellow plant enthusiasts! Ever thought about growing your own fresh, crisp bok choy right in your kitchen? It’s easier than you might think, and trust me, nothing beats the flavor of homegrown veggies. I’ve been doing it for a while now, and I’m excited to share my secrets to success with you. Let’s dive in!
Choosing the Right Bok Choy Variety
First things first, not all bok choy varieties are created equal, especially when it comes to indoor growing. You’ll want to opt for smaller, faster-maturing types. Here are a few of my favorites:
* Dwarf Bok Choy: As the name suggests, this variety stays compact, making it perfect for containers. It matures quickly, usually within 30-40 days.
* Baby Bok Choy: Another excellent choice for indoor gardens. It has a mild flavor and tender leaves. Expect it to be ready for harvest in about 45 days.
* Joi Choi: This one is a bit larger than the others, but still manageable indoors. It’s known for its crisp texture and slightly sweet taste.
Setting Up Your Indoor Bok Choy Garden
Okay, now that we’ve picked our bok choy, let’s get our indoor garden ready. Here’s what you’ll need:
* Containers: Choose pots that are at least 6 inches deep and wide. Good drainage is crucial, so make sure your containers have drainage holes. I personally love using fabric pots because they allow for excellent aeration and drainage.
* Potting Mix: Don’t use garden soil! It’s too heavy and doesn’t drain well in containers. Opt for a high-quality, well-draining potting mix. I usually mix equal parts of peat moss, perlite, and vermiculite.
* Grow Lights: Bok choy needs at least 6 hours of sunlight per day. If you don’t have a sunny windowsill, invest in a good set of grow lights. LED grow lights are energy-efficient and work wonders.
* Watering Can or Spray Bottle: For gentle watering.
* Fertilizer: A balanced liquid fertilizer, diluted to half strength.
Planting Your Bok Choy Seeds
Now for the fun part – planting! Here’s how I do it:
1. Prepare the Soil: Fill your containers with the potting mix, leaving about an inch of space at the top. Gently pat down the soil.
2. Sow the Seeds: Sprinkle the bok choy seeds evenly over the surface of the soil. You can sow them quite densely, as you’ll thin them out later.
3. Cover the Seeds: Lightly cover the seeds with a thin layer of potting mix, about ¼ inch deep.
4. Water Gently: Use a spray bottle or watering can with a gentle nozzle to moisten the soil. Be careful not to dislodge the seeds.
5. Provide Warmth: Bok choy seeds germinate best in temperatures between 60-70°F (15-21°C). You can use a heat mat to speed up germination.
6. Cover with Plastic Wrap (Optional): To create a humid environment, you can cover the containers with plastic wrap. Remove the plastic wrap once the seedlings emerge.
Caring for Your Bok Choy Seedlings
Once your seedlings pop up (usually within a week), it’s time to give them some extra TLC.
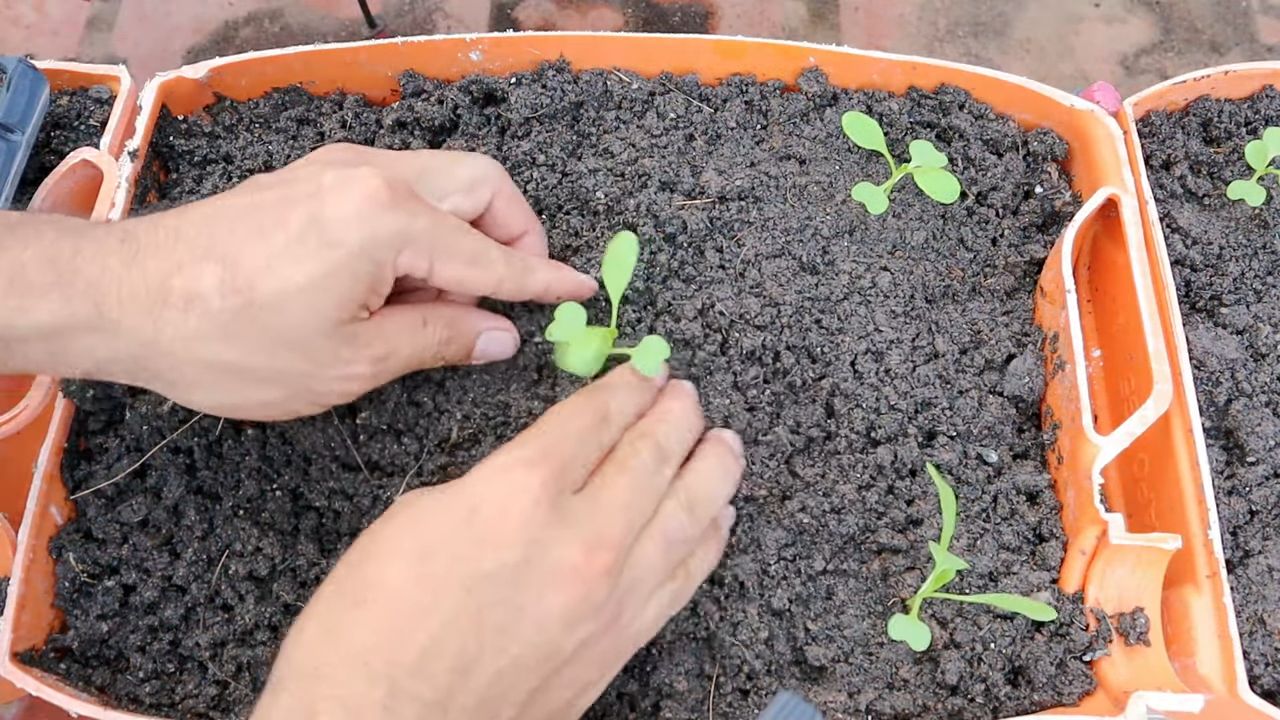
1. Thinning: Once the seedlings have a few true leaves (the second set of leaves that appear after the initial seed leaves), thin them out. This means removing some of the seedlings to give the remaining ones enough space to grow. Aim for about 2-3 inches between plants. Don’t just pull them out! Gently snip them off at the soil line with scissors to avoid disturbing the roots of the other seedlings.
2. Watering: Keep the soil consistently moist, but not soggy. Water when the top inch of soil feels dry to the touch. Avoid overwatering, as this can lead to root rot. I usually water every 2-3 days, but it depends on the humidity and temperature in my house.
3. Lighting: Ensure your bok choy seedlings are getting enough light. If you’re using grow lights, position them about 6-12 inches above the plants. Adjust the height as the plants grow.
4. Fertilizing: Start fertilizing your bok choy seedlings about two weeks after they emerge. Use a balanced liquid fertilizer, diluted to half strength, every two weeks. I like to use a fertilizer that’s specifically formulated for leafy greens.
5. Air Circulation: Good air circulation is essential to prevent fungal diseases. Make sure your plants have enough space around them, and consider using a small fan to circulate the air.
6. Pest Control: Keep an eye out for pests like aphids and spider mites. If you spot any, you can try spraying them with insecticidal soap or neem oil. I prefer to use organic pest control methods whenever possible.
Harvesting Your Bok Choy
The best part! You can start harvesting your bok choy when the leaves are about 4-6 inches long.
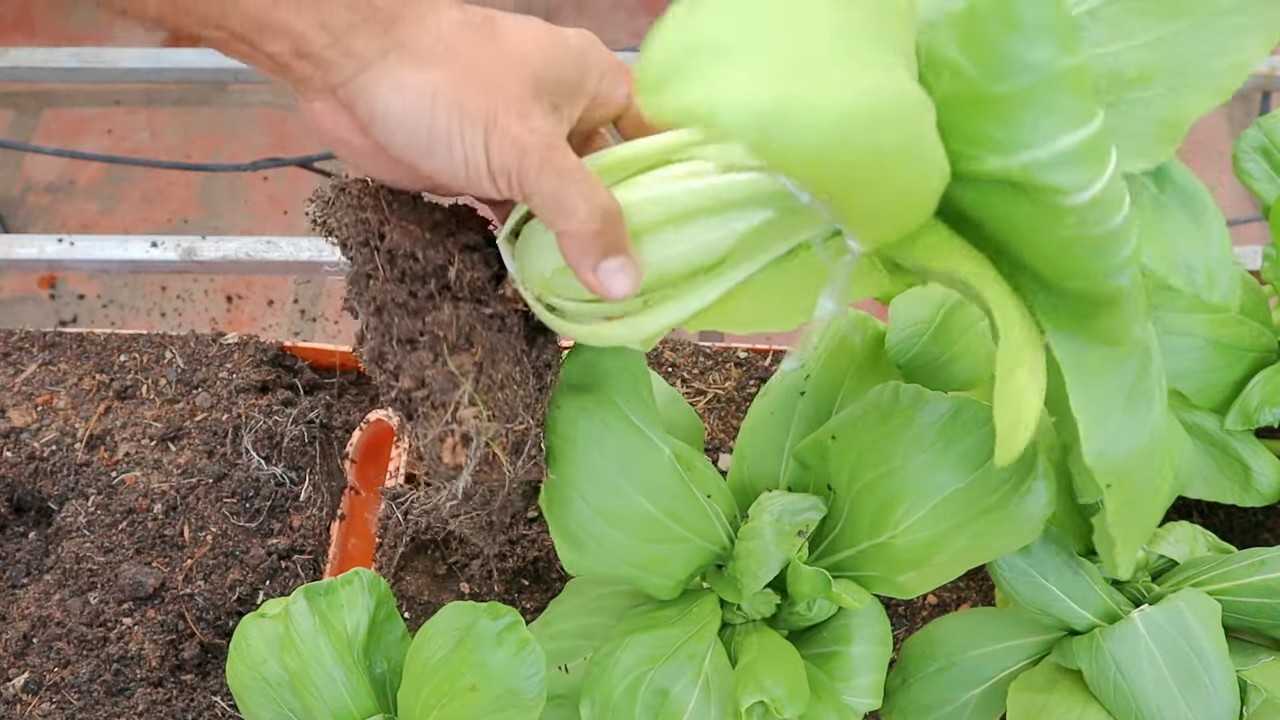
1. Harvesting Individual Leaves: You can harvest individual leaves as needed, starting with the outer ones. This will allow the inner leaves to continue growing.
2. Harvesting the Whole Plant: If you want to harvest the entire plant, simply cut it off at the base with a sharp knife.
3. Succession Planting: To ensure a continuous harvest, sow new seeds every few weeks. This is called succession planting.
Troubleshooting Common Problems
Even with the best care, you might encounter a few challenges along the way. Here are some common problems and how to fix them:
* Yellowing Leaves: This could be a sign of overwatering, underwatering, or nutrient deficiency. Check the soil moisture and adjust your watering accordingly. If the soil is consistently moist, you’re probably overwatering. If it’s dry, you’re underwatering. If the problem persists, try fertilizing your plants.
* Leggy Growth: This means your plants are stretching towards the light. Move them closer to the light source or provide more light.
* Pests: As mentioned earlier, keep an eye out for pests and treat them promptly.
* Bolting: Bolting is when the plant starts to flower prematurely. This can happen if the temperature is too high or if the plant is stressed. Try to keep the temperature consistent and avoid stressing your plants.
Tips for Success
Here are a few extra tips to help you succeed with your indoor bok choy garden:
* Rotate Your Plants: Rotate your plants regularly to ensure they get even light exposure.
* Clean Your Containers: Before planting, clean your containers thoroughly to prevent the spread of diseases.
* Use a Humidity Tray: If your home is dry, you can use a humidity tray to increase the humidity around your plants. Simply fill a tray with pebbles and water, and place your containers on top of the pebbles. Make sure the bottom of the containers doesn’t touch the water.
* Don’t Overcrowd: Give your plants enough space to grow. Overcrowding can lead to poor air circulation and increased risk of disease.
* Enjoy the Process! Growing your own food is a rewarding experience. Don’t be afraid to experiment and learn from your mistakes.
Enjoying Your Homegrown Bok Choy
Now that you’ve harvested your bok choy, it’s time to enjoy the fruits (or rather, vegetables) of your labor! Bok choy is incredibly versatile and can be used in a variety of dishes. Here are a few of my favorite ways to use it:
* Stir-fries: Bok choy is a classic ingredient in stir-fries. It adds a delicious crunch and a mild, slightly sweet flavor.
* Soups: Bok choy is a great addition to soups. It wilts down nicely and adds a boost of nutrients.
* Salads: Baby bok choy can be used in salads. It has a tender texture and a mild flavor that pairs well with other greens.
* Steamed: Steamed bok choy is a simple and healthy side dish.
* Grilled: Grilled bok choy is a delicious and smoky treat.
So there you have it! Everything you need to know to grow your own bok choy indoors. It might seem like a lot of information, but trust me, it’s easier than it looks. With a little bit of care and attention, you’ll be enjoying fresh, homegrown bok choy in no time. Happy gardening!
Conclusion
So, there you have it! Growing bok choy indoors is not only achievable, but it’s also a remarkably rewarding experience. Forget those wilted, overpriced greens at the grocery store. Imagine stepping into your kitchen and harvesting fresh, crisp bok choy whenever you need it. The vibrant green leaves, bursting with flavor and nutrients, are just a few steps away with this simple DIY trick.
Why is this a must-try? Because it puts you in control. You control the growing environment, ensuring your bok choy is free from harmful pesticides and herbicides. You control the harvest, picking only what you need, when you need it, minimizing waste and maximizing freshness. And perhaps most importantly, you experience the sheer joy of nurturing life from seed to table.
But the beauty of this method lies in its adaptability. Feel free to experiment with different varieties of bok choy. Baby bok choy, with its tender leaves and mild flavor, is a fantastic choice for salads. Or try Shanghai bok choy, known for its spoon-shaped leaves and slightly sweeter taste. You can also adjust the lighting and temperature to optimize growth based on your specific indoor environment. Consider using a timer for your grow lights to ensure consistent light exposure, even when you’re away.
Don’t be afraid to get creative with your growing medium. While a standard potting mix works well, you can also incorporate compost or other organic materials to enrich the soil and provide your bok choy with extra nutrients. Hydroponics is another exciting avenue to explore for indoor bok choy cultivation, offering faster growth rates and reduced soil-borne diseases.
This DIY trick for growing bok choy indoors is more than just a gardening project; it’s an investment in your health, your well-being, and your connection to nature. It’s a chance to learn, to experiment, and to reap the delicious rewards of your labor.
We wholeheartedly encourage you to give it a try. Start small, with just a few seeds, and watch them transform into vibrant, edible plants. The satisfaction of harvesting your own bok choy is truly unparalleled.
And once you’ve mastered the art of indoor bok choy cultivation, we’d love to hear about your experience! Share your tips, your challenges, and your successes in the comments below. Let’s build a community of indoor gardeners, sharing our knowledge and inspiring others to embrace the joy of growing their own food. What lighting setup did you find most effective? Did you encounter any pests or diseases, and how did you address them? What are your favorite ways to prepare your homegrown bok choy? Your insights are invaluable and can help others on their own bok choy growing journey.
So, grab your seeds, your potting mix, and your grow lights, and get ready to embark on a delicious adventure. The world of indoor bok choy cultivation awaits! Happy growing!
Frequently Asked Questions (FAQ)
What are the best varieties of bok choy to grow indoors?
While most bok choy varieties can be grown indoors, some are better suited than others due to their size and growth habits. Baby bok choy is a popular choice because it matures quickly and stays relatively small, making it ideal for container gardening. Shanghai bok choy is another excellent option, known for its mild flavor and compact size. Dwarf varieties are also available and are specifically bred for smaller spaces. Experimenting with different varieties can be fun, but starting with baby bok choy or Shanghai bok choy is generally recommended for beginners. Consider the size of your growing space and the amount of light available when selecting your bok choy variety.
How much light does bok choy need when grown indoors?
Bok choy requires at least 6 hours of direct sunlight per day to thrive. However, if you don’t have a sunny windowsill, you can supplement with grow lights. LED grow lights are a great option because they are energy-efficient and provide the full spectrum of light that plants need. Position the grow lights a few inches above the plants and adjust the height as they grow. A timer can be used to ensure consistent light exposure, typically 12-14 hours per day. Insufficient light can lead to leggy growth and reduced yields, so providing adequate light is crucial for successful indoor bok choy cultivation.
What type of soil is best for growing bok choy indoors?
Bok choy prefers well-draining soil that is rich in organic matter. A good quality potting mix is a suitable base, but you can amend it with compost, perlite, or vermiculite to improve drainage and aeration. Avoid using garden soil, as it can be too heavy and may contain pests or diseases. The ideal pH for bok choy is between 6.0 and 7.5. You can test the pH of your soil using a soil testing kit and adjust it accordingly. Regularly adding compost to the soil will help maintain its fertility and provide essential nutrients for healthy bok choy growth.
How often should I water my indoor bok choy plants?
Water your bok choy plants when the top inch of soil feels dry to the touch. Avoid overwatering, as this can lead to root rot. Ensure that your containers have drainage holes to allow excess water to escape. The frequency of watering will depend on factors such as the temperature, humidity, and size of your plants. In general, you may need to water more frequently during warmer months and less frequently during cooler months. Check the soil moisture regularly and adjust your watering schedule accordingly.
What are some common pests and diseases that affect indoor bok choy?
While indoor bok choy is less susceptible to pests and diseases than outdoor plants, it can still be affected by certain issues. Aphids, spider mites, and whiteflies are common pests that can infest bok choy. Regularly inspect your plants for signs of infestation and take action promptly. You can use insecticidal soap or neem oil to control these pests. Fungal diseases such as powdery mildew and downy mildew can also affect bok choy, especially in humid conditions. Ensure good air circulation around your plants and avoid overhead watering to prevent these diseases. If you notice any signs of disease, remove the affected leaves and treat the plants with a fungicide.
How long does it take for bok choy to mature when grown indoors?
The time it takes for bok choy to mature indoors depends on the variety and growing conditions. Baby bok choy typically matures in about 30-45 days, while larger varieties may take 50-60 days. Providing adequate light, water, and nutrients will help accelerate growth. You can harvest bok choy at any stage of maturity, depending on your preference. Baby bok choy can be harvested when the leaves are small and tender, while larger varieties can be harvested when the heads are fully formed. Regular harvesting will encourage continued growth and prolong the harvest period.
Can I grow bok choy from seed indoors?
Yes, growing bok choy from seed indoors is a relatively easy and rewarding process. Start by sowing the seeds in seed trays or small pots filled with seed-starting mix. Keep the soil moist and warm, and the seeds should germinate within a few days. Once the seedlings have developed a few true leaves, you can transplant them into larger containers. Provide adequate light, water, and nutrients, and your bok choy plants will thrive. Starting bok choy from seed allows you to choose from a wider variety of cultivars and gives you complete control over the growing process.
How do I harvest bok choy grown indoors?
You can harvest bok choy grown indoors by either cutting the entire head at the base or by harvesting individual leaves as needed. If you cut the entire head, use a sharp knife to sever it just above the soil line. If you harvest individual leaves, start with the outer leaves and work your way inwards. This will allow the plant to continue producing new leaves. Harvest bok choy in the morning, when the leaves are crisp and hydrated. Store harvested bok choy in the refrigerator for up to a week.
What are some creative ways to use my homegrown bok choy?
Homegrown bok choy is incredibly versatile and can be used in a wide variety of dishes. It’s delicious stir-fried with garlic and ginger, added to soups and stews, or used in salads. You can also grill or roast bok choy for a smoky flavor. The leaves and stems are both edible and nutritious. Experiment with different recipes and find your favorite ways to enjoy your homegrown bok choy. Consider adding it to smoothies for a nutrient boost or using it as a wrap for fillings like rice and vegetables. The possibilities are endless!
Leave a Comment