
Grow Bok Choy at Home and unlock the secrets to fresh, delicious greens right outside your door! Have you ever dreamt of snipping vibrant, crisp bok choy leaves just moments before adding them to your stir-fry? Well, dream no more! This DIY guide is your passport to a thriving home garden, brimming with this nutritious and versatile vegetable.
Bok choy, also known as pak choi, boasts a rich history deeply rooted in Chinese cuisine, dating back over 5,000 years. It’s been a staple in Asian diets for centuries, celebrated not only for its delightful flavor but also for its impressive health benefits. From boosting immunity to aiding digestion, this leafy green is a nutritional powerhouse.
But why should you bother learning to grow bok choy at home? In today’s world, knowing where your food comes from is more important than ever. Store-bought produce can be expensive and often lacks the freshness and flavor of homegrown vegetables. Plus, gardening is incredibly therapeutic! It’s a fantastic way to connect with nature, reduce stress, and enjoy the satisfaction of nurturing something from seed to harvest. I’m excited to share these simple, effective DIY tricks that will have you harvesting your own bok choy in no time, even if you’re a complete beginner!
Growing Rosemary Indoors: A Comprehensive Guide
Hey there, fellow plant enthusiasts! Ever dreamt of having fresh, fragrant rosemary right at your fingertips, no matter the season? Well, you’re in luck! Growing rosemary indoors is totally achievable, and I’m here to guide you through every step. It might seem a little daunting at first, but trust me, with a little patience and the right know-how, you’ll be snipping sprigs of rosemary for your culinary creations in no time.
Choosing the Right Rosemary Variety
Not all rosemary varieties are created equal, especially when it comes to indoor growing. Some are more compact and better suited for containers than others. Here are a few of my favorites:
* ‘Blue Boy’: This is a classic choice, known for its compact growth habit and beautiful blue flowers. It’s relatively easy to care for and adapts well to indoor conditions.
* ‘Roman Beauty’: Another compact variety, ‘Roman Beauty’ boasts a lovely trailing habit, making it perfect for hanging baskets or letting it cascade over the edge of a pot.
* ‘Arp’: If you’re looking for a more cold-hardy rosemary, ‘Arp’ is a great option. While it can still thrive indoors, it’s also more tolerant of cooler temperatures if you want to move it outside during the warmer months.
Essential Supplies You’ll Need
Before we dive into the planting process, let’s gather all the necessary supplies. Having everything on hand will make the whole experience smoother and more enjoyable.
* Rosemary Plant or Cuttings: You can either purchase a small rosemary plant from a local nursery or propagate your own from cuttings (more on that later!).
* Pot with Drainage Holes: Drainage is crucial for rosemary, as it doesn’t like soggy roots. Choose a pot that’s at least 6 inches in diameter and has plenty of drainage holes. Terracotta pots are a great option because they allow the soil to breathe.
* Well-Draining Potting Mix: Regular potting soil can retain too much moisture, so opt for a well-draining mix specifically formulated for herbs or succulents. You can also amend regular potting soil with perlite or sand to improve drainage.
* Grow Light (Optional but Recommended): Rosemary needs plenty of sunlight, and if you don’t have a south-facing window, a grow light can be a lifesaver.
* Watering Can or Spray Bottle: For watering your rosemary.
* Pruning Shears or Scissors: For trimming and harvesting.
* Fertilizer (Optional): A balanced liquid fertilizer can help boost growth, but it’s not essential.
Planting Your Rosemary
Now for the fun part – planting! Whether you’re starting with a small plant or propagating from cuttings, the process is pretty straightforward.
Planting a Rosemary Plant
1. Prepare the Pot: Fill your pot with the well-draining potting mix, leaving about an inch of space at the top.
2. Remove the Rosemary from its Container: Gently loosen the rosemary plant from its original container by squeezing the sides.
3. Plant the Rosemary: Place the rosemary plant in the center of the pot, making sure the top of the root ball is level with the soil surface.
4. Fill in with Soil: Fill in the remaining space around the plant with potting mix, gently pressing down to secure it.
5. Water Thoroughly: Water the rosemary plant thoroughly until water drains out of the drainage holes. This will help settle the soil and hydrate the roots.
Propagating Rosemary from Cuttings
Propagating rosemary from cuttings is a rewarding way to expand your rosemary collection. Here’s how I do it:
1. Take Cuttings: Using clean pruning shears or scissors, take 4-6 inch cuttings from the tips of healthy rosemary stems. Choose stems that are green and flexible, not woody.
2. Remove Lower Leaves: Remove the leaves from the bottom inch or two of each cutting. This will prevent them from rotting when they’re in the soil.
3. Dip in Rooting Hormone (Optional): Dipping the cut ends of the cuttings in rooting hormone can help speed up the rooting process, but it’s not essential.
4. Plant the Cuttings: Fill a small pot with well-draining potting mix and make small holes for the cuttings. Insert the cuttings into the holes, spacing them about an inch apart.
5. Water and Cover: Water the cuttings gently and then cover the pot with a plastic bag or humidity dome to create a humid environment.
6. Provide Light and Warmth: Place the pot in a warm, bright location, but avoid direct sunlight.
7. Check for Roots: After a few weeks, gently tug on the cuttings to see if they’ve rooted. If they resist, they’ve likely developed roots.
8. Transplant: Once the cuttings have established roots, you can transplant them into individual pots.
Caring for Your Indoor Rosemary
Now that your rosemary is planted, it’s time to learn how to keep it happy and healthy indoors. Here are some key care tips:
* Light: Rosemary needs at least 6-8 hours of direct sunlight per day. If you don’t have a sunny window, supplement with a grow light. I’ve found that placing my rosemary under a grow light for 12-14 hours a day really helps it thrive.
* Watering: Rosemary is drought-tolerant and doesn’t like to be overwatered. Water only when the top inch of soil feels dry to the touch. When you do water, water thoroughly until water drains out of the drainage holes. Be sure to empty any excess water that collects in the saucer to prevent root rot.
* Humidity: Rosemary prefers relatively low humidity, so you don’t need to worry about misting it. In fact, too much humidity can lead to fungal problems.
* Temperature: Rosemary prefers temperatures between 60-70°F (15-21°C). Avoid placing it near drafts or heat sources.
* Fertilizing: You can fertilize your rosemary every few weeks during the growing season (spring and summer) with a balanced liquid fertilizer diluted to half strength. However, be careful not to over-fertilize, as this can lead to leggy growth.
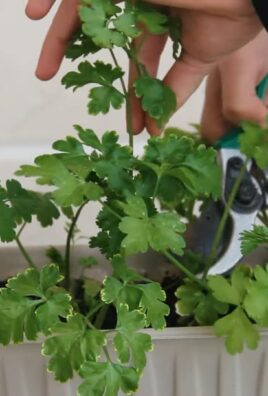
* Pruning: Pruning is essential for keeping your rosemary plant compact and bushy. Regularly trim the tips of the stems to encourage branching. You can also prune to shape the plant and remove any dead or yellowing leaves. Plus, pruning gives you fresh rosemary to use in your cooking!
* Pest Control: Keep an eye out for common pests like spider mites, aphids, and whiteflies. If you notice any pests, treat them with insecticidal soap or neem oil. I always prefer to start with the least toxic option first.
* Repotting: As your rosemary plant grows, it may eventually outgrow its pot. Repot it into a larger pot every year or two, using fresh potting mix.
Troubleshooting Common Problems
Even with the best care, you might encounter some challenges when growing rosemary indoors. Here are some common problems and how to address them:
* Yellowing Leaves: Yellowing leaves can be a sign of overwatering, underwatering, or nutrient deficiency. Check the soil moisture and adjust your watering accordingly. If the soil is consistently dry, water more frequently. If the soil is consistently wet, allow it to dry out more between waterings. You can also try fertilizing with a balanced fertilizer.
* Leggy Growth: Leggy growth, characterized by long, spindly stems with few leaves, is usually caused by insufficient light. Move your rosemary to a sunnier location or supplement with a grow light. Pruning can also help encourage bushier growth.
* Brown Tips: Brown tips on the leaves can be a sign of dry air or salt buildup in the soil. Increase humidity by placing a tray of water near the plant or using a humidifier. You can also flush the soil with water to remove excess salts.
* Root Rot: Root rot is a serious problem that can occur if the soil is consistently waterlogged. Prevent root rot by using well-draining potting mix and avoiding overwatering. If you suspect root rot, repot the plant in fresh potting mix and remove any affected roots.
Harvesting Your Rosemary
One of the best things about growing rosemary indoors is having a constant supply of fresh herbs for cooking. You can start harvesting rosemary once the plant is established and has grown to a reasonable size.
* Harvesting Tips: Use clean pruning shears or scissors to snip off sprigs of rosemary as needed. Avoid cutting more than one-third of the plant at a time, as this can stress it. The best time to harvest rosemary is in the morning, after the dew has dried.
* Using Fresh Rosemary: Fresh rosemary can be used in a variety of dishes, from roasted meats and vegetables to soups and sauces. Simply

Conclusion
So, there you have it! Growing your own bok choy at home is not only achievable, but it’s also incredibly rewarding. Forget those wilted, overpriced heads at the grocery store. Imagine stepping into your garden or onto your balcony and harvesting crisp, vibrant bok choy whenever you need it. The difference in flavor and freshness is simply undeniable.
This DIY trick, starting from seed or even regrowing from a store-bought base, is a game-changer for anyone who loves this versatile vegetable. It’s a fantastic way to connect with your food, reduce your carbon footprint, and save money in the long run. Plus, it’s a surprisingly easy project, even for beginner gardeners.
But the benefits extend beyond just convenience and cost savings. When you grow your own bok choy, you have complete control over what goes into it. You can choose organic seeds, avoid harmful pesticides, and ensure that your bok choy is grown in healthy, nutrient-rich soil. This translates to a healthier and more flavorful vegetable for you and your family.
Don’t be afraid to experiment with different varieties of bok choy. There’s the classic green bok choy, of course, but also baby bok choy, which is perfect for salads and quick stir-fries, and even red bok choy, which adds a beautiful pop of color to your dishes. You can also try growing your bok choy in different containers or garden beds to see what works best for your space and climate. Consider companion planting with herbs like dill or chamomile to deter pests and enhance growth.
And speaking of variations, why not try pickling your homegrown bok choy? Or fermenting it into kimchi? The possibilities are endless! The key is to have fun and embrace the learning process. Even if you encounter a few challenges along the way, don’t give up. Gardening is all about trial and error, and every mistake is an opportunity to learn and grow.
We wholeheartedly encourage you to give this DIY trick a try. It’s a simple, sustainable, and satisfying way to enjoy fresh, delicious bok choy all season long. Once you’ve harvested your first batch, we’d love to hear about your experience. Share your photos, tips, and recipes in the comments below. Let’s build a community of bok choy enthusiasts and inspire others to get their hands dirty! We are confident that you will find that growing bok choy at home is a truly enriching experience. So, grab your seeds, prepare your soil, and get ready to enjoy the fruits (or rather, vegetables) of your labor!
Frequently Asked Questions (FAQ)
What are the best conditions for growing bok choy?
Bok choy thrives in cool weather, ideally between 55°F and 70°F (13°C and 21°C). It prefers full sun, but can tolerate partial shade, especially in hotter climates. The soil should be well-draining and rich in organic matter. Amend your soil with compost or aged manure before planting to provide essential nutrients. Consistent moisture is crucial, so water regularly, especially during dry spells. Avoid overhead watering, as this can lead to fungal diseases. Drip irrigation or soaker hoses are ideal for delivering water directly to the roots.
How long does it take for bok choy to grow?
Bok choy is a relatively fast-growing vegetable. From seed, it typically takes about 45-55 days to reach maturity. Baby bok choy can be harvested even earlier, around 30-40 days. If you’re regrowing bok choy from a base, you should see new growth within a week or two, and you can harvest leaves as they mature. Keep in mind that these are just estimates, and the actual time may vary depending on your climate, soil conditions, and the specific variety of bok choy you’re growing.
What are some common pests and diseases that affect bok choy?
Bok choy can be susceptible to several pests and diseases, including aphids, cabbage worms, flea beetles, and fungal diseases like downy mildew and clubroot. To prevent pest infestations, consider using row covers or netting to protect your plants. Regularly inspect your plants for signs of pests and remove them by hand or with a strong spray of water. For fungal diseases, ensure good air circulation around your plants and avoid overhead watering. If necessary, you can use organic fungicides to control the spread of disease. Crop rotation can also help to prevent soilborne diseases.
Can I grow bok choy in containers?
Yes, bok choy grows very well in containers. Choose a container that is at least 6-8 inches deep and wide to allow enough room for the roots to develop. Use a high-quality potting mix that is well-draining and rich in organic matter. Be sure to water your container-grown bok choy regularly, as containers tend to dry out more quickly than garden beds. You may also need to fertilize your plants more frequently, as the nutrients in the potting mix can be depleted over time.
How do I harvest bok choy?
You can harvest bok choy at any stage of growth, depending on your preference. For baby bok choy, simply cut the entire plant at the base when it reaches the desired size. For mature bok choy, you can either harvest the entire head or harvest individual leaves as needed. To harvest individual leaves, start with the outer leaves and work your way inwards. Be sure to leave the central bud intact so that the plant can continue to produce new leaves.
Is bok choy a cut-and-come-again vegetable?
Yes, bok choy can be grown as a cut-and-come-again vegetable. This means that you can harvest leaves from the plant multiple times over a period of several weeks. To encourage continuous growth, be sure to leave the central bud intact when harvesting leaves. Fertilize your plants regularly to provide them with the nutrients they need to produce new growth.
How do I store harvested bok choy?
To store harvested bok choy, wrap it loosely in a damp paper towel and place it in a plastic bag in the refrigerator. It should keep for up to a week. Avoid washing the bok choy before storing it, as this can promote spoilage. Wash it just before you’re ready to use it.
Can I grow bok choy indoors?
While bok choy prefers outdoor conditions, it can be grown indoors with sufficient light. Place your bok choy near a sunny window or use grow lights to provide at least 6 hours of light per day. Keep the soil consistently moist and provide good air circulation to prevent fungal diseases. Indoor-grown bok choy may not grow as large as outdoor-grown bok choy, but it can still provide you with a steady supply of fresh leaves.
What are some good companion plants for bok choy?
Good companion plants for bok choy include herbs like dill, chamomile, and mint, which can help to deter pests. Other beneficial companion plants include garlic, onions, and marigolds. Avoid planting bok choy near members of the brassica family, such as cabbage, broccoli, and cauliflower, as they can attract the same pests and diseases.
How can I prevent bolting in bok choy?
Bolting, or premature flowering, can occur when bok choy is exposed to high temperatures or long days. To prevent bolting, plant your bok choy in early spring or late summer to avoid the hottest months of the year. Choose bolt-resistant varieties of bok choy. Provide shade during the hottest part of the day. Water your plants regularly to keep the soil cool and moist.

Leave a Comment