
Grow bigger melons than you ever thought possible! Imagine sinking your teeth into a juicy, sweet melon that you nurtured from a tiny seed right in your own backyard. Sounds dreamy, right? Well, it doesn’t have to be just a dream! This article is packed with simple, effective DIY tricks and hacks to help you achieve melon-growing success, even if you’re a complete beginner.
For centuries, melons have been cherished across cultures, from ancient Egypt where they were buried with pharaohs, to the vibrant markets of Asia where they symbolize prosperity and good fortune. But you don’t need royal lineage or a green thumb of legend to enjoy the fruits (or rather, vegetables!) of your labor.
Let’s face it, store-bought melons can be a gamble. Sometimes they’re bland, sometimes they’re mealy, and sometimes they just lack that incredible flavor you crave. That’s where these DIY tricks come in! I’m going to share my secrets to help you grow bigger melons, bursting with flavor, right in your own garden. We’ll cover everything from soil preparation and watering techniques to pruning and pest control, ensuring you get the most out of your melon patch. Get ready to impress your friends and family with your homegrown bounty!
How to Grow HUGE Melons: My Secret DIY Trick!
Hey fellow gardeners! Are you tired of puny, underwhelming melons? I was too! I dreamt of juicy, softball-sized watermelons and cantaloupes that would make my neighbors jealous. After years of experimenting, I’ve finally cracked the code, and I’m so excited to share my DIY trick for growing truly massive melons. It’s all about strategic pruning, targeted feeding, and a little bit of melon TLC. Let’s get started!
Understanding Melon Growth
Before we dive into the DIY magic, it’s important to understand how melons grow. Melons are vigorous vines that produce both male and female flowers. The female flowers, which have a tiny immature melon at their base, need to be pollinated by the male flowers (or by hand) to develop into fruit. The plant puts a lot of energy into producing these vines and multiple fruits, but that energy can be better focused on fewer, larger melons. That’s where our pruning and feeding techniques come in.
Phase 1: Pruning for Power
Pruning is the key to directing the plant’s energy towards fewer, larger fruits. We’re essentially telling the plant, “Hey, focus on these guys!”
Tools You’ll Need:
* Sharp, clean pruning shears or scissors
* Gloves (optional, but recommended to avoid skin irritation from the vines)
When to Prune:
Start pruning when your melon vines are about 3-4 feet long and have started producing several side shoots (also called lateral vines).
Step-by-Step Pruning Guide:
1. Identify the Main Vine: Locate the main vine that originates from the base of the plant. This is your primary energy source.
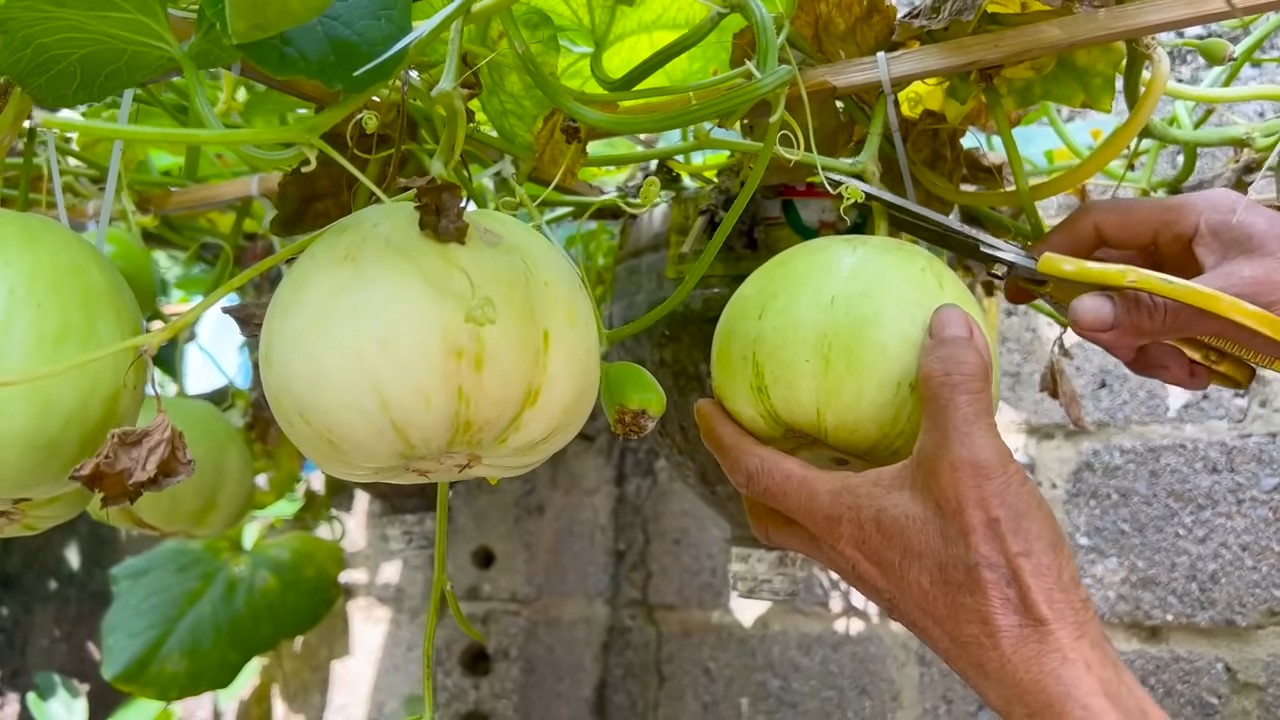
2. Select Your Melons: This is the most crucial step! For each melon plant, I recommend selecting only 1-3 melons to focus on. Look for healthy, well-formed melons that are about the size of a tennis ball or slightly larger. These will be your “chosen ones.” Choose melons that are closest to the main vine for best results.
3. Prune Side Shoots: Once you’ve selected your melons, it’s time to prune the side shoots. Using your sharp pruning shears, cut off all side shoots that *don’t* have a selected melon growing on them. Cut the side shoot back to the main vine. This forces the plant to send all its energy to the remaining melons.
4. Prune Beyond the Selected Melons: Even on the side shoots *with* your selected melons, you’ll want to do some pruning. After the melon, leave about 5-7 leaves on the vine and then prune the rest of the vine off. This helps to concentrate the plant’s energy even further.
5. Remove Extra Flowers: Keep an eye out for any new flowers that develop after you’ve done your initial pruning. Remove any new female flowers that appear. We want the plant to focus on the melons we’ve already selected.
6. Regular Maintenance: Continue to monitor your melon plants and remove any new side shoots or flowers that appear throughout the growing season. This is an ongoing process.
Phase 2: Supercharging with Targeted Feeding
Now that we’ve pruned the plants to focus their energy, we need to provide them with the nutrients they need to grow those melons to their full potential.
Understanding Melon Nutrient Needs:
Melons are heavy feeders, meaning they require a lot of nutrients, especially potassium and phosphorus, to produce large, sweet fruits.
* Potassium: Essential for fruit development, sweetness, and overall plant health.
* Phosphorus: Important for root development and flower production.
* Nitrogen: Needed for leafy growth, but too much nitrogen can result in lush foliage at the expense of fruit production.
DIY Feeding Recipe (My Secret Weapon!):
This is my go-to feeding recipe that has consistently produced amazing results. It’s a combination of organic and readily available ingredients.
* Epsom Salts: Provides magnesium, which helps with nutrient uptake and chlorophyll production.
* Bone Meal: A great source of phosphorus.
* Wood Ash: Rich in potassium and other trace minerals. (Make sure it’s from untreated wood!)
* Compost Tea: A liquid fertilizer made by steeping compost in water. It’s packed with beneficial microbes and nutrients.
Feeding Schedule and Instructions:
1. Initial Feeding (After Pruning):
* Mix 1 tablespoon of Epsom salts, 2 tablespoons of bone meal, and 1/2 cup of wood ash in a gallon of water.
* Water each melon plant thoroughly with this mixture.
* Follow this with a watering of compost tea.
2. Maintenance Feeding (Every 2 Weeks):
* Continue to water with compost tea every two weeks.
* Once the melons start to size up significantly (about the size of a softball), repeat the initial feeding mixture (Epsom salts, bone meal, wood ash) every 4 weeks.
3. Adjust as Needed:
* Monitor your plants closely. If you see signs of nutrient deficiencies (yellowing leaves, stunted growth), adjust your feeding schedule accordingly.
Phase 3: Melon TLC (Tender Loving Care)
Growing giant melons isn’t just about pruning and feeding; it’s also about providing the right environment and protecting your precious fruits.
Sunlight:
Melons need at least 6-8 hours of direct sunlight per day. Make sure your plants are in a sunny location.
Watering:
Melons need consistent watering, especially during fruit development. Water deeply and regularly, but avoid overwatering, which can lead to root rot. Aim for about 1-2 inches of water per week, depending on the weather.
Mulching:
Mulch around your melon plants with straw or other organic material to help retain moisture, suppress weeds, and regulate soil temperature.
Supporting the Melons:
As your melons grow larger, they may need support to prevent them from breaking off the vine. You can use slings made from old t-shirts or pantyhose to support the melons. Tie the slings to a trellis or stake.
Protecting from Pests and Diseases:
Keep an eye out for common melon pests like squash bugs, vine borers, and aphids. Use organic pest control methods, such as insecticidal soap or neem oil, to control these pests. Also, be aware of common melon diseases like powdery mildew and fusarium wilt. Ensure good air circulation around your plants and avoid overhead watering to prevent these diseases.
Turning the Melons:
This might sound a little crazy, but it works! Gently turn your melons every few days to ensure even ripening and prevent flat spots from developing where they rest on the ground.
Harvesting Your Giant Melons
Knowing when to harvest your melons is crucial. Here are some general guidelines:
* Watermelons: Look for a dry tendril closest to the melon, a dull thud when you tap the melon, and a creamy yellow spot on the underside where it rests on the ground.
* Cantaloupes: The melon should easily slip off the vine when it’s ripe. It should also have a fragrant aroma.
Troubleshooting
Even with the best care, you might encounter some challenges. Here are a few common problems and how to address them:
* Poor Pollination: If your melons aren’t setting fruit, it could be due to poor pollination. You can hand-pollinate the female flowers by transferring pollen from the male flowers using a small brush.
* Blossom End Rot: This is caused by a calcium deficiency. Ensure your soil has adequate calcium and water consistently.
* Cracking: This can happen if the melons receive inconsistent watering. Maintain consistent moisture levels.
Final Thoughts
Growing giant melons takes time, effort, and a little bit of patience, but the reward is well worth it. There’s nothing quite like biting into a juicy, homegrown melon that you’ve nurtured from seed to harvest. I hope these tips help you grow the biggest and best melons you’ve ever seen! Happy gardening!
Conclusion
So, there you have it! This simple yet effective DIY trick for encouraging larger melon growth is a game-changer for any home gardener. We’ve explored the science behind it, the straightforward steps involved, and the potential benefits you can reap. But why is this a must-try? It’s simple: it empowers you to take control of your garden’s yield, maximizing the potential of your melon plants and rewarding you with significantly bigger, juicier, and more flavorful fruits. Imagine biting into a perfectly ripe watermelon, cantaloupe, or honeydew, knowing that your own hands helped nurture it to its full, impressive size. That’s the satisfaction this DIY trick offers.
Beyond the core technique, there’s room for experimentation and personalization. Consider adjusting the frequency of your feeding based on your local climate and soil conditions. If you live in a particularly hot and dry area, you might need to water and fertilize more frequently. Conversely, in cooler or wetter climates, you might need to scale back. You can also explore different types of organic fertilizers to find what works best for your soil and your plants. Some gardeners swear by compost tea, while others prefer fish emulsion or bone meal. The key is to observe your plants closely and adjust your approach accordingly.
Another exciting variation is to experiment with different pruning techniques. While we’ve focused on removing excess foliage to direct energy towards fruit development, you can also try pinching off the tips of the vines to encourage branching and more fruit production. Just be careful not to over-prune, as this can stress the plant and reduce its overall yield.
Ultimately, the best way to discover the full potential of this DIY trick is to try it yourself. Don’t be afraid to experiment, adapt, and fine-tune the technique to suit your specific needs and preferences. We’re confident that you’ll be amazed by the results.
We encourage you to embark on this gardening adventure and share your experiences with us. Did you notice a significant increase in the size of your melons? Did you try any variations on the technique? What challenges did you encounter, and how did you overcome them? Your feedback is invaluable, not only to us but also to other gardeners who are eager to learn and improve their own melon-growing skills. Share your photos, tips, and stories in the comments section below. Let’s create a community of passionate gardeners who are dedicated to growing the biggest and best melons possible! Remember, achieving optimal melon size is within your reach with this easy to implement DIY trick.
Frequently Asked Questions (FAQ)
What exactly does this DIY trick do to help melons grow bigger?
This DIY trick primarily focuses on two key aspects of melon growth: nutrient availability and energy allocation. By providing a targeted boost of nutrients, particularly potassium and phosphorus, we’re giving the plant the building blocks it needs to develop larger, more robust fruits. These nutrients are crucial for cell division, sugar production, and overall fruit development. Simultaneously, by strategically pruning excess foliage, we’re redirecting the plant’s energy away from vegetative growth and towards fruit production. Think of it like this: the plant has a limited amount of energy to spend. If it’s spending too much energy on growing leaves and vines, it will have less energy available to develop large, juicy melons. By pruning, we’re essentially telling the plant to focus its resources on the fruits.
How often should I apply the fertilizer solution?
The frequency of fertilizer application depends on several factors, including the type of fertilizer you’re using, the soil conditions, and the climate. As a general guideline, we recommend applying the fertilizer solution every 1-2 weeks during the active growing season, starting when the melons are about the size of a tennis ball. However, it’s crucial to monitor your plants closely and adjust the frequency accordingly. If you notice signs of nutrient deficiency, such as yellowing leaves or stunted growth, you may need to fertilize more frequently. Conversely, if you notice signs of over-fertilization, such as burnt leaf tips or excessive salt buildup in the soil, you should reduce the frequency of application. Always follow the instructions on the fertilizer packaging and err on the side of caution. It’s better to under-fertilize than to over-fertilize.
What kind of fertilizer should I use? Can I use a store-bought fertilizer?
While homemade fertilizer solutions are often preferred for their organic nature and cost-effectiveness, you can certainly use a store-bought fertilizer if you prefer. Look for a fertilizer that is specifically formulated for fruiting plants and has a high potassium and phosphorus content (represented by the numbers in the N-P-K ratio on the fertilizer label). Avoid fertilizers that are high in nitrogen, as nitrogen promotes vegetative growth rather than fruit development. Whether you choose a homemade or store-bought fertilizer, be sure to dilute it properly according to the instructions on the packaging. Over-fertilizing can damage your plants and reduce your yield.
Is pruning really necessary? I’m afraid of hurting my plants.
Pruning is an essential part of this DIY trick, as it helps to redirect the plant’s energy towards fruit production. While it may seem counterintuitive to remove foliage, doing so actually benefits the plant in the long run. By removing excess leaves and vines, you’re reducing the plant’s energy expenditure on vegetative growth and allowing it to focus its resources on developing larger, more flavorful melons. Don’t worry about hurting your plants; melons are surprisingly resilient and can tolerate a fair amount of pruning. Just be sure to use clean, sharp pruning shears to avoid damaging the stems. Start by removing any dead, diseased, or yellowing leaves, as well as any non-fruiting vines. You can also pinch off the tips of the vines to encourage branching and more fruit production.
What if I don’t see results right away? How long does it take to see bigger melons?
Patience is key when it comes to gardening. It can take several weeks or even months to see noticeable results from this DIY trick. The exact timeframe will depend on various factors, including the type of melon you’re growing, the climate, the soil conditions, and the overall health of your plants. Don’t get discouraged if you don’t see bigger melons right away. Just keep following the instructions, monitor your plants closely, and adjust your approach as needed. Remember, gardening is a process of trial and error. The more you experiment and learn, the better you’ll become at growing bigger, more delicious melons.
Can I use this trick for other types of fruits and vegetables?
While this DIY trick is specifically designed for melons, the underlying principles can be applied to other types of fruits and vegetables as well. The key is to understand the specific nutrient requirements of the plant you’re growing and to adjust the fertilizer solution accordingly. For example, tomatoes, peppers, and cucumbers also benefit from a boost of potassium and phosphorus during fruit development. You can also use pruning techniques to redirect the plant’s energy towards fruit production. However, it’s important to research the specific pruning requirements of each plant, as some plants are more sensitive to pruning than others.
What are some common mistakes to avoid when trying this DIY trick?
Here are some common mistakes to avoid when trying this DIY trick:
* **Over-fertilizing:** Too much fertilizer can damage your plants and reduce your yield. Always follow the instructions on the fertilizer packaging and err on the side of caution.
* **Under-fertilizing:** Not enough fertilizer can result in stunted growth and smaller melons. Monitor your plants closely and adjust the frequency of application as needed.
* **Over-pruning:** Removing too much foliage can stress the plant and reduce its overall yield. Start by removing only the dead, diseased, or yellowing leaves, as well as any non-fruiting vines.
* **Using dull pruning shears:** Dull pruning shears can damage the stems and make the plant more susceptible to disease. Always use clean, sharp pruning shears.
* **Ignoring the plant’s needs:** Pay attention to your plants and adjust your approach as needed. If you notice signs of nutrient deficiency or over-fertilization, take action immediately.
How do I know when my melon is ripe and ready to harvest?
Knowing when a melon is ripe and ready to harvest can be tricky, as different types of melons have different indicators of ripeness. Here are some general guidelines:
* **Watermelons:** Look for a dull, rather than shiny, rind. The underside of the melon (where it rests on the ground) should be a creamy yellow color. Thump the melon; a ripe watermelon will have a deep, hollow sound.
* **Cantaloupes:** The melon should have a sweet, musky aroma. The stem should slip easily from the vine with a gentle tug. The rind should be a golden-tan color.
* **Honeydew melons:** The rind should be a creamy yellow color. The blossom end (opposite the stem end) should be slightly soft and springy to the touch. The melon should have a slightly sweet aroma.
Remember, these are just general guidelines. The best way to determine if a melon is ripe is to taste it!

Leave a Comment