
Easy Nutritious Beginner Vegetables: Dreaming of fresh, homegrown salads and flavorful meals bursting with goodness? You’re not alone! For centuries, people have cultivated their own food, connecting with nature and enjoying the unparalleled taste of just-picked produce. From ancient Roman kitchen gardens to the victory gardens of wartime, the desire to grow our own food is deeply ingrained in us.
But let’s be honest, the thought of starting a vegetable garden can feel overwhelming, especially if you’re a beginner. Where do you even begin? What if you don’t have a green thumb? That’s where this DIY guide comes in! I’m here to show you that growing your own easy nutritious beginner vegetables is not only possible but also incredibly rewarding.
In this article, I’ll share my favorite tried-and-true tricks and hacks to help you cultivate a thriving garden, even if you’ve never planted a seed before. We’ll cover everything from choosing the right vegetables to simple soil preparation and easy pest control. Get ready to ditch the grocery store produce aisle and embrace the joy of harvesting your own delicious, healthy food. Let’s get growing!

Growing Your Own Salad Garden: A Beginner’s Guide to Easy, Nutritious Vegetables
Hey there, fellow garden enthusiast! Ever dreamt of stepping outside and snipping fresh, vibrant greens for your salad? Well, dream no more! I’m going to walk you through creating your very own salad garden, packed with easy-to-grow, nutritious vegetables. This guide is perfect for beginners, even if you’ve never touched a trowel before. We’ll focus on vegetables that are relatively low-maintenance and deliver a big impact on your plate.
Choosing Your Vegetables
Before we get our hands dirty, let’s decide what to grow. Here are some fantastic options for a beginner-friendly salad garden:
* Lettuce (Loose-leaf varieties): These are incredibly easy to grow and you can harvest leaves as needed, rather than waiting for a whole head to mature. Think ‘Black Seeded Simpson’ or ‘Red Sails’.
* Spinach: Another leafy green powerhouse, spinach thrives in cooler weather and is packed with vitamins.
* Radishes: These little guys are super speedy, often ready to harvest in just a few weeks. They add a peppery kick to your salads.
* Arugula (Rocket): Arugula has a distinctive peppery flavor that adds a gourmet touch to your salads. It’s also quick to grow.
* Cherry Tomatoes: While technically a fruit, cherry tomatoes are a salad staple. Choose a compact variety if you’re short on space.
* Green Onions (Scallions): Easy to grow from seed or even from the root ends of store-bought green onions!
* Mesclun Mix: This is a blend of various leafy greens, often including lettuce, arugula, and spinach. You can buy a pre-mixed seed packet for convenience.
Planning Your Garden Space
Now, let’s think about where your salad garden will live.
* Sunlight: Most salad vegetables need at least 6 hours of sunlight per day. Observe your yard to see where the sun shines the longest.
* Soil: Salad vegetables prefer well-drained soil that’s rich in organic matter. If your soil is heavy clay or sandy, you’ll need to amend it.
* Space: Consider how much space you have available. You can grow a salad garden in a raised bed, containers, or even directly in the ground.
* Water Source: Make sure your garden is easily accessible to a water source, like a hose or watering can.
Preparing the Soil
Good soil is the foundation of a healthy garden. Here’s how to get yours ready:
1. Clear the Area: Remove any grass, weeds, rocks, or debris from the area where you’ll be planting.
2. Amend the Soil: This is crucial, especially if your soil isn’t ideal. Add plenty of compost, aged manure, or other organic matter to improve drainage and fertility. Work it into the top 6-8 inches of soil.
3. Loosen the Soil: Use a garden fork or tiller to loosen the soil. This will make it easier for roots to grow.
4. Rake it Smooth: Rake the soil to create a smooth, even surface for planting.
Planting Your Salad Garden
Alright, let’s get planting!
1. Starting Seeds Indoors (Optional): For some vegetables, like tomatoes, you might want to start them indoors a few weeks before the last expected frost. This gives them a head start. Follow the instructions on your seed packet for specific timing and planting depth. I usually start my tomatoes indoors about 6-8 weeks before the last frost.
2. Direct Sowing: Most salad greens can be directly sown into the garden. Check your seed packets for the recommended planting depth and spacing.
3. Planting Lettuce, Spinach, Arugula, and Radishes: Sow these seeds thinly in rows or broadcast them over a prepared bed. Cover them lightly with soil and gently water.
4. Planting Cherry Tomatoes: If you started your tomatoes indoors, harden them off by gradually exposing them to outdoor conditions for a week before transplanting. Dig a hole slightly larger than the root ball, place the tomato plant in the hole, and backfill with soil. Space tomato plants about 18-24 inches apart.
5. Planting Green Onions: You can plant green onion sets (small bulbs) or sow seeds directly. Space them about 1-2 inches apart. You can also regrow green onions from the root ends of store-bought ones! Just place the root end in a glass of water until roots appear, then plant it in the soil.
6. Watering: Water your newly planted seeds and seedlings gently but thoroughly. Keep the soil consistently moist, but not soggy.
Caring for Your Salad Garden
Now that your garden is planted, it’s time to nurture it.
1. Watering: Water regularly, especially during dry spells. Aim to keep the soil consistently moist, but avoid overwatering, which can lead to root rot. Water in the morning to allow the foliage to dry before nightfall, which can help prevent fungal diseases.
2. Weeding: Keep your garden free of weeds, which compete with your vegetables for nutrients and water. Hand-pull weeds regularly or use a hoe to cultivate the soil.
3. Thinning: Once your seedlings have emerged, you may need to thin them out to provide adequate spacing. This is especially important for lettuce, spinach, and radishes. Follow the spacing recommendations on your seed packets.
4. Fertilizing: Salad vegetables benefit from regular feeding. Use a balanced organic fertilizer or compost tea every few weeks.
5. Pest Control: Keep an eye out for pests, such as aphids, slugs, and snails. Hand-pick pests off plants or use organic pest control methods, such as insecticidal soap or diatomaceous earth.
6. Succession Planting: To ensure a continuous harvest, plant new seeds every few weeks. This is especially important for fast-growing vegetables like lettuce and radishes.
Harvesting Your Salad Garden
The best part!
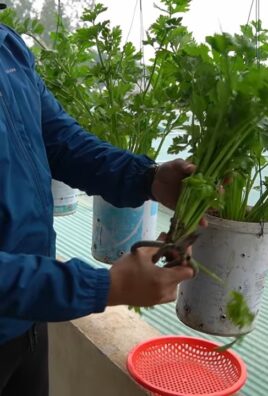
1. Harvesting Lettuce, Spinach, and Arugula: You can start harvesting these leafy greens when they reach a usable size. Simply snip off the outer leaves, leaving the inner leaves to continue growing. This is called “cut-and-come-again” harvesting.
2. Harvesting Radishes: Radishes are ready to harvest when they reach about 1 inch in diameter. Gently pull them from the soil.
3. Harvesting Cherry Tomatoes: Cherry tomatoes are ready to harvest when they are fully colored and slightly soft to the touch.
4. Harvesting Green Onions: You can harvest green onions when they reach about 6-8 inches tall. Simply pull them from the soil.
Troubleshooting Common Problems
Even with the best planning, you might encounter a few challenges. Here are some common problems and how to address them:
* Slugs and Snails: These pests love to munch on leafy greens. Use beer traps, copper tape, or diatomaceous earth to control them. I’ve found that beer traps work wonders!
* Aphids: These tiny insects can suck the sap from your plants. Spray them with insecticidal soap or blast them off with a strong stream of water.
* Bolting: Bolting is when plants prematurely flower and go to seed. This can happen when the weather gets too hot. To prevent bolting, choose heat-tolerant varieties and provide shade during the hottest part of the day.
* Yellowing Leaves: Yellowing leaves can be a sign of nutrient deficiency. Fertilize your plants with a balanced organic fertilizer.
* Poor Germination: Poor germination can be caused by several factors, including old seeds, poor soil, and improper watering. Use fresh seeds, prepare the soil properly, and keep the soil consistently moist.
Extending Your Growing Season
Want to enjoy fresh salads for as long as possible? Here are some tips for extending your growing season:
* Start Seeds Indoors: As mentioned earlier, starting seeds indoors gives you a head start on the growing season.
* Use Cold Frames or Row Covers: These structures can protect your plants from frost and extend the growing season by several weeks.
* Choose Cold-Hardy Varieties: Some varieties of lettuce, spinach, and other salad greens are more tolerant of cold weather.
* Plant a Fall Garden: You can plant a second crop of salad greens in the fall for a late-season harvest.
Enjoying Your Harvest
Now that you’ve grown your own salad garden, it’s time to enjoy the fruits (and vegetables!) of your labor. There’s nothing quite like the taste of fresh, homegrown produce. Experiment with different salad combinations and dressings to find your favorites. You can also use your homegrown vegetables in other dishes, such as soups, stir-fries, and sandwiches.
Growing your own salad garden is a rewarding

Conclusion
So, there you have it! Mastering the art of preparing **easy nutritious beginner vegetables** doesn’t have to be a daunting task. This simple DIY trick transforms ordinary vegetables into culinary delights, making them appealing even to the pickiest eaters. We’ve shown you how to unlock the natural sweetness and vibrant flavors hidden within these nutritional powerhouses, all while ensuring they retain their essential vitamins and minerals.
But why is this DIY approach a must-try? Because it’s more than just a recipe; it’s a gateway to a healthier, more enjoyable relationship with vegetables. It empowers you to take control of your diet, experiment with flavors, and discover new ways to incorporate these vital foods into your daily meals. It’s about making healthy eating accessible, affordable, and, most importantly, delicious.
Think about the possibilities! You can adapt this method to suit your own preferences and dietary needs. For instance, if you’re following a low-carb diet, consider using cauliflower rice as a base and adding roasted broccoli and bell peppers. Or, if you’re looking for a protein boost, toss in some grilled chicken or chickpeas. The beauty of this DIY trick lies in its versatility.
Consider these variations to elevate your vegetable game:
* **Spice it up:** Add a pinch of red pepper flakes or a dash of chili powder for a fiery kick.
* **Go Mediterranean:** Incorporate olives, feta cheese, and a drizzle of olive oil for a taste of the Mediterranean.
* **Asian Fusion:** Use soy sauce, ginger, and sesame oil for an Asian-inspired flavor profile.
* **Herb Infusion:** Experiment with fresh herbs like thyme, rosemary, or oregano to add depth and complexity.
* **Sweet and Savory:** A touch of maple syrup or honey can balance the savory flavors and create a delightful sweet and savory combination.
Don’t be afraid to get creative and experiment with different combinations of vegetables, spices, and seasonings. The key is to find what works best for you and your family. Remember, the goal is to make eating vegetables an enjoyable experience, not a chore.
We are confident that once you try this DIY trick, you’ll be amazed at how easy and delicious it is to prepare **easy nutritious beginner vegetables**. It’s a game-changer for anyone looking to improve their diet and embrace a healthier lifestyle.
So, what are you waiting for? Grab your favorite vegetables, follow our simple steps, and prepare to be amazed. We encourage you to try this DIY trick today and share your experience with us. Let us know what variations you tried, what flavors you discovered, and how it transformed your relationship with vegetables. Share your photos and stories on social media using our hashtag [Insert Your Hashtag Here]. We can’t wait to see what culinary creations you come up with!
This is more than just a recipe; it’s an invitation to join a community of food lovers who are passionate about healthy eating and delicious flavors. Let’s inspire each other to make vegetables the star of our plates and celebrate the joy of cooking.
Frequently Asked Questions (FAQ)
Q: What are the best vegetables to use for this DIY trick?
A: The beauty of this method is its versatility! You can use almost any vegetable, but some of the best options for beginners include broccoli, cauliflower, carrots, bell peppers, zucchini, and green beans. These vegetables are readily available, easy to prepare, and offer a wide range of flavors and textures. Root vegetables like sweet potatoes and parsnips also work well, especially when roasted. Leafy greens like spinach and kale can be incorporated, but they require a shorter cooking time to prevent them from becoming wilted. Experiment with different combinations to find your favorites!
Q: How do I ensure my vegetables don’t become soggy?
A: Soggy vegetables are a common concern, but there are several ways to prevent this. First, avoid overcrowding the pan or baking sheet. Overcrowding traps steam and prevents the vegetables from browning properly. Second, make sure your vegetables are dry before cooking. Pat them dry with a paper towel to remove any excess moisture. Third, use a high enough heat. Roasting at a higher temperature (around 400°F or 200°C) helps to caramelize the vegetables and prevent them from becoming soggy. Finally, if you’re steaming or boiling, don’t overcook them. They should be tender-crisp, not mushy.
Q: Can I prepare the vegetables in advance?
A: Yes, you can definitely prepare the vegetables in advance to save time. You can chop and wash the vegetables a day or two ahead of time and store them in an airtight container in the refrigerator. However, it’s best to wait until just before cooking to add any seasonings or sauces, as they can draw moisture out of the vegetables. If you’re roasting vegetables, you can also preheat your oven and prepare your baking sheet in advance.
Q: What are some healthy ways to add flavor without adding too many calories?
A: There are plenty of healthy ways to add flavor to your vegetables without adding excessive calories. Fresh herbs are a fantastic option, as they are packed with flavor and nutrients. Spices like garlic powder, onion powder, paprika, cumin, and chili powder can also add depth and complexity. Lemon juice or vinegar can brighten up the flavors and add a touch of acidity. A small amount of olive oil or avocado oil can provide healthy fats and enhance the flavor of the vegetables. You can also use low-sodium broth or vegetable stock to add moisture and flavor.
Q: How can I get my kids to eat more vegetables using this DIY trick?
A: Getting kids to eat their vegetables can be a challenge, but this DIY trick can help. First, involve them in the preparation process. Let them help wash, chop, and season the vegetables. Second, offer a variety of vegetables and let them choose which ones they want to try. Third, make the vegetables visually appealing. Cut them into fun shapes or arrange them in a colorful pattern on the plate. Fourth, offer dips like hummus, yogurt, or guacamole to make the vegetables more appealing. Finally, don’t give up! It may take several tries before your kids start to enjoy vegetables. Be patient, persistent, and positive, and eventually, they will come around. Remember to focus on making **easy nutritious beginner vegetables** fun and accessible for them.
Q: Can I use frozen vegetables for this DIY trick?
A: Yes, frozen vegetables are a convenient and nutritious option. They are often picked at their peak ripeness and frozen immediately, preserving their vitamins and minerals. When using frozen vegetables, there’s no need to thaw them before cooking. Simply add them directly to the pan or baking sheet. However, keep in mind that frozen vegetables may release more moisture than fresh vegetables, so you may need to adjust the cooking time accordingly. Also, avoid using frozen vegetables that have been pre-seasoned or sauced, as they may contain added sodium or sugar.
Q: How long will the cooked vegetables last in the refrigerator?
A: Cooked vegetables can be stored in an airtight container in the refrigerator for up to 3-4 days. Be sure to cool them completely before storing them to prevent bacterial growth. When reheating, you can microwave them, sauté them in a pan, or roast them in the oven. However, keep in mind that reheated vegetables may not be as crisp as freshly cooked vegetables.


Leave a Comment