
DIY Natural Cleaning Products: Ready to ditch those harsh chemicals and embrace a sparkling clean home the eco-friendly way? I’m so excited to share some amazing DIY natural cleaning product recipes that are not only effective but also gentle on your family, pets, and the planet!
For generations, our grandmothers relied on simple, natural ingredients like vinegar, baking soda, and lemon to keep their homes spotless. Before the advent of commercially produced cleaners, these were the go-to solutions, passed down through families and cultures. Think about it – these time-tested methods are a testament to the power of nature’s cleaning agents.
In today’s world, we’re increasingly aware of the potential health risks associated with the chemicals found in conventional cleaning products. From skin irritations to respiratory problems, the list of concerns is long. That’s why learning how to make your own DIY natural cleaning products is more important than ever. Not only will you be reducing your exposure to harmful substances, but you’ll also be saving money and reducing plastic waste. It’s a win-win!
This article is packed with easy-to-follow recipes and tips for creating everything from all-purpose cleaners to laundry detergents, all using ingredients you probably already have in your pantry. Let’s dive in and discover the joy of a clean, healthy, and naturally fresh home!
DIY Natural Cleaning Products: A Guide to a Sparkling Home, Naturally!
Hey there, fellow cleaning enthusiasts! I’m so excited to share my favorite DIY natural cleaning product recipes with you. Ditch those harsh chemicals and embrace the power of simple, natural ingredients. Not only are these recipes better for your health and the environment, but they’re also incredibly effective and budget-friendly. Let’s get started!
All-Purpose Cleaner: Your Go-To for Everything!
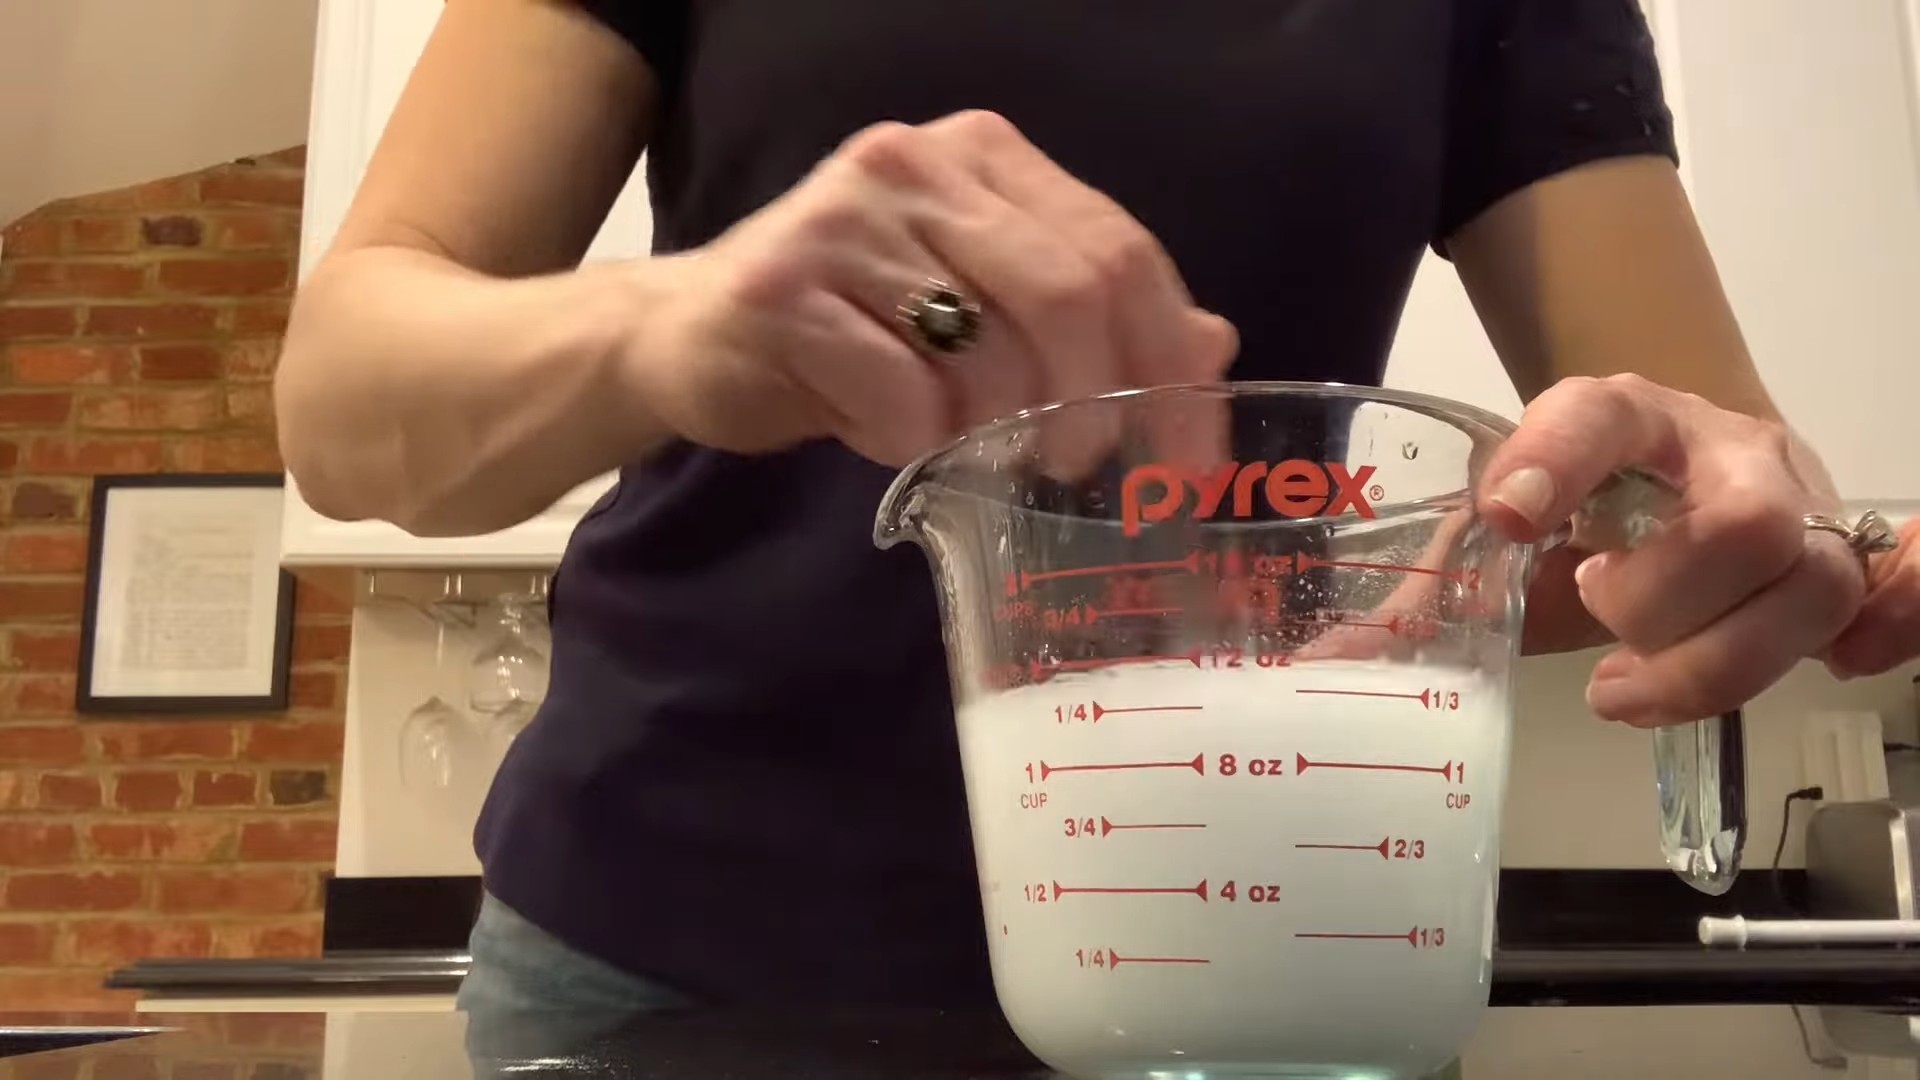
This all-purpose cleaner is a workhorse. I use it on countertops, sinks, appliances, and even floors (with a little dilution, of course!). It’s gentle yet powerful, leaving a fresh, clean scent.
Ingredients:
* 1/2 cup white vinegar
* 1/4 cup baking soda
* 1/2 gallon (8 cups) hot water
* 10-15 drops essential oil (lemon, lavender, tea tree, or eucalyptus are great choices)
* Spray bottle
Instructions:
1. Combine Ingredients: In a large bucket or bowl, dissolve the baking soda in the hot water. This prevents clumping and ensures a smooth mixture. Be patient; it might fizz a bit!
2. Add Vinegar: Slowly pour in the white vinegar. It will react with the baking soda, creating more fizz. Don’t worry; this is normal!
3. Incorporate Essential Oils: Add your chosen essential oils. These not only provide a pleasant scent but also offer additional cleaning and disinfecting properties. Lemon is fantastic for cutting grease, tea tree is a natural antiseptic, and lavender adds a calming aroma.
4. Transfer to Spray Bottle: Carefully pour the mixture into a spray bottle. A funnel can be helpful to avoid spills.
5. Use and Store: Spray the cleaner onto surfaces and wipe clean with a cloth or sponge. Store the remaining cleaner in the spray bottle for future use. It has a long shelf life, thanks to the vinegar.
Tips and Tricks:
* For extra stubborn grime, let the cleaner sit on the surface for a few minutes before wiping.
* Avoid using this cleaner on marble or granite surfaces, as the vinegar can etch them over time.
* Experiment with different essential oil combinations to find your favorite scent.
Glass Cleaner: Streak-Free Shine Guaranteed!
Say goodbye to streaks and hello to sparkling clean windows and mirrors with this simple glass cleaner. I promise, it’s even better than the store-bought stuff!
Ingredients:
* 2 cups water
* 1/4 cup white vinegar
* 1/2 teaspoon liquid dish soap (natural and unscented is best)
* Spray bottle
* Microfiber cloth
Instructions:
1. Mix Ingredients: In a spray bottle, combine the water, white vinegar, and dish soap.
2. Shake Well: Gently shake the bottle to ensure the ingredients are thoroughly mixed.
3. Spray and Wipe: Spray the cleaner onto the glass surface and wipe clean with a microfiber cloth. Microfiber cloths are key to achieving a streak-free finish.
4. Buff (Optional): For an extra shine, buff the glass with a clean, dry microfiber cloth after wiping.
Tips and Tricks:
* Use distilled water for the best results, as it contains fewer minerals that can cause streaks.
* Avoid cleaning windows on a hot, sunny day, as the cleaner can dry too quickly and leave streaks.
* Newspaper can also be used to wipe the glass, but be careful as the ink can sometimes transfer.
Toilet Bowl Cleaner: Naturally Fresh and Clean
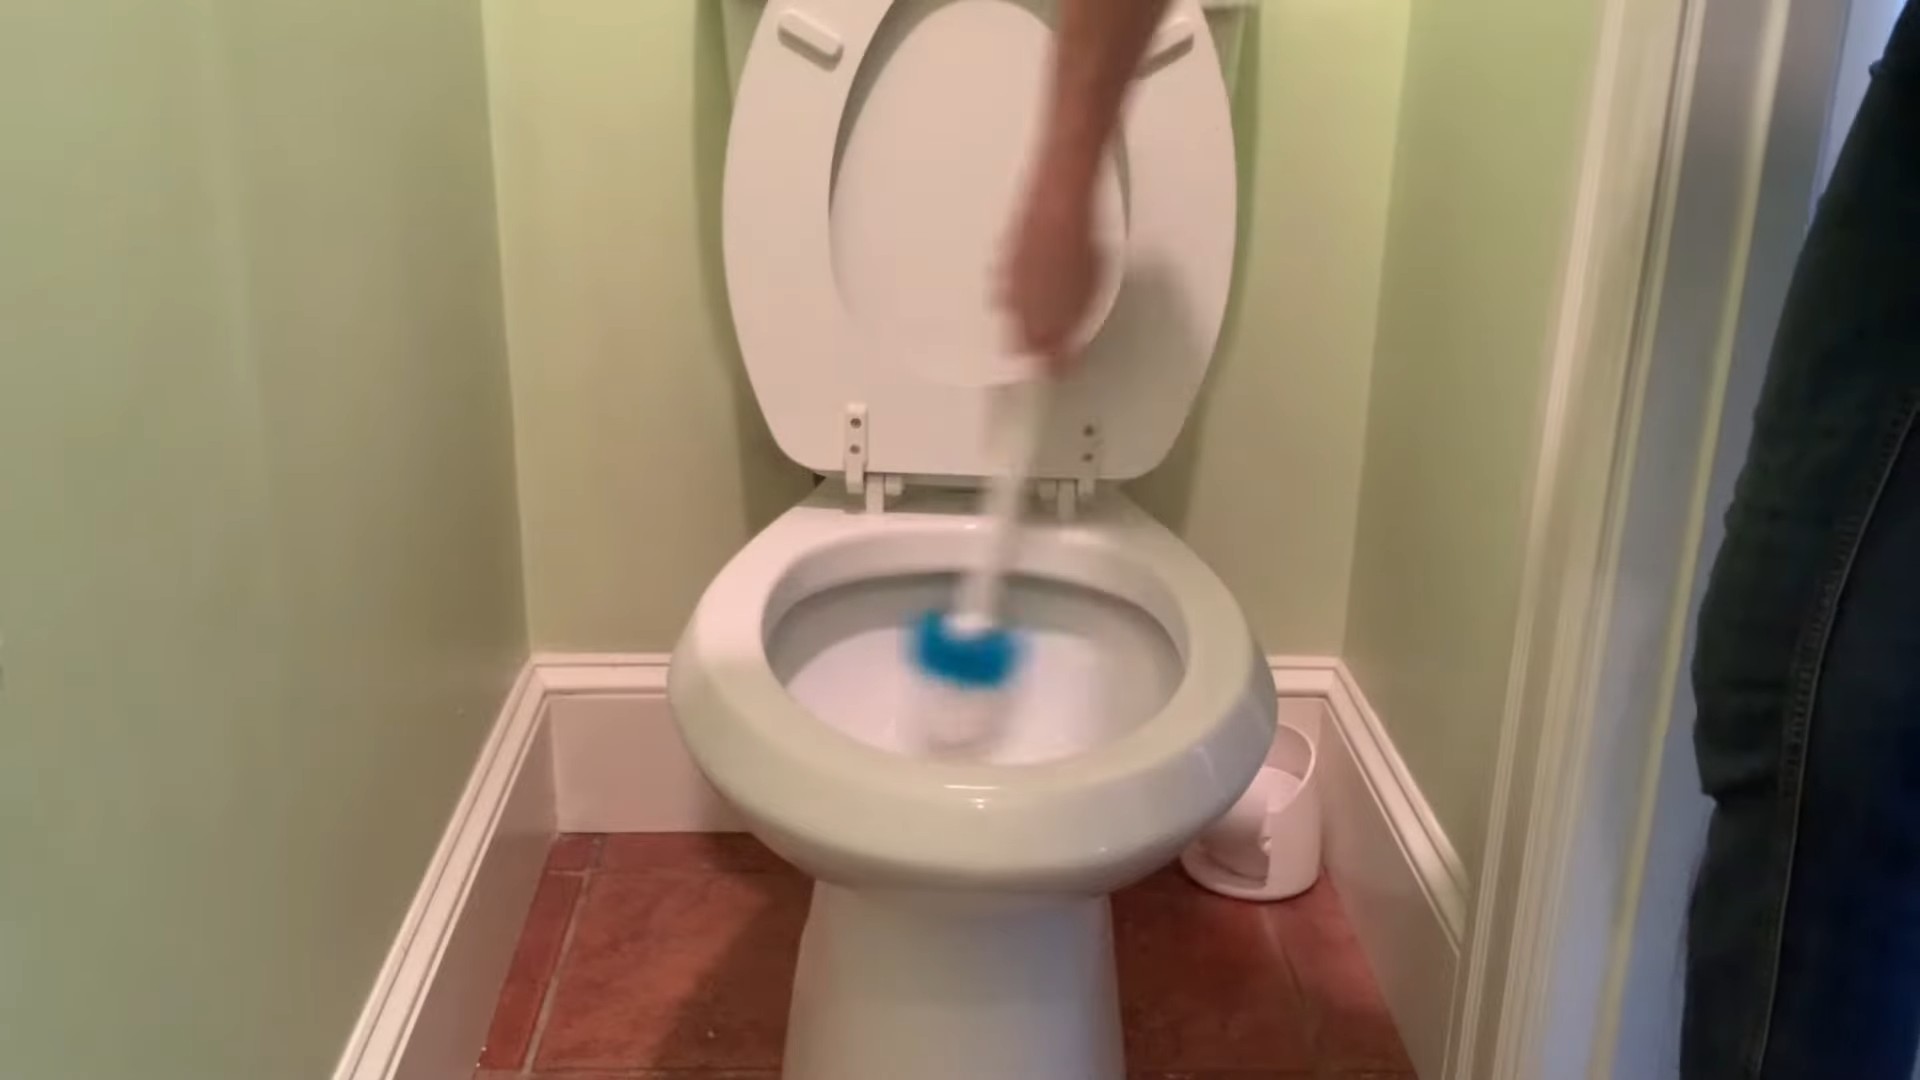
Keeping your toilet bowl clean doesn’t have to involve harsh chemicals. This natural toilet bowl cleaner is effective, safe, and easy to make.
Ingredients:
* 1 cup baking soda
* 1/2 cup white vinegar
* 5-10 drops tea tree essential oil (optional, for extra disinfecting power)
Instructions:
1. Sprinkle Baking Soda: Sprinkle the baking soda evenly around the inside of the toilet bowl.
2. Pour Vinegar: Slowly pour the white vinegar over the baking soda. It will fizz and bubble.
3. Add Essential Oil (Optional): Add the tea tree essential oil, if using.
4. Let it Sit: Allow the mixture to sit for at least 30 minutes, or even overnight for a deeper clean.
5. Scrub and Flush: Scrub the toilet bowl with a toilet brush and then flush.
Tips and Tricks:
* For tough stains, let the mixture sit overnight.
* You can also use a toilet bowl cleaner tablet made from baking soda, citric acid, and essential oils for regular maintenance.
* Regular cleaning will prevent the buildup of stains and odors.
Oven Cleaner: Tackling Baked-On Grease Naturally
Cleaning the oven is often a dreaded task, but this natural oven cleaner makes it much easier and safer. No more harsh fumes!
Ingredients:
* 1/2 cup baking soda
* Water
* Spray bottle
* Scrub brush or sponge
Instructions:
1. Remove Oven Racks: Remove the oven racks and set them aside.
2. Make a Paste: In a bowl, mix the baking soda with enough water to form a thick paste.
3. Coat the Oven: Spread the paste evenly over the interior surfaces of the oven, avoiding the heating elements.
4. Let it Sit: Allow the paste to sit for at least 12 hours, or overnight. The longer it sits, the easier it will be to remove the grime.
5. Spray with Water: After the paste has sat, spray the interior of the oven with water to moisten the dried baking soda.
6. Scrub and Wipe: Scrub the oven with a scrub brush or sponge to loosen the grime.
7. Wipe Clean: Wipe the oven clean with a damp cloth. You may need to rinse the cloth several times to remove all the baking soda residue.
8. Clean Oven Racks: Soak the oven racks in hot, soapy water and scrub them clean.
9. Replace Racks: Replace the oven racks.
Tips and Tricks:
* For extra stubborn grease, add a few drops of dish soap to the baking soda paste.
* Wear gloves to protect your hands.
* If you have a self-cleaning oven, you can still use this method for a more natural clean. Just be sure to remove all the baking soda residue before running the self-cleaning cycle.
Laundry Detergent: Clean Clothes, Naturally Scented
Making your own laundry detergent is surprisingly easy and cost-effective. Plus, you can customize the scent to your liking!
Ingredients:
* 1 cup washing soda (sodium carbonate)
* 1 cup borax (sodium borate)
* 1 bar of castile soap (such as Dr. Bronner’s), grated
* 10-15 drops essential oil (lavender, lemon, or tea tree are great choices)
Instructions:
1. Grate the Soap: Grate the castile soap using a cheese grater or food processor.
2. Combine Ingredients: In a large bowl, combine the washing soda, borax, and grated castile soap.
3. Add Essential Oil: Add your chosen essential oil.
4. Mix Well: Mix the ingredients thoroughly until well combined.
5. Store: Store the laundry detergent in an airtight container.
6. Use: Use 1-2 tablespoons of laundry detergent per load, depending on the size and soil level of the load.
Tips and Tricks:
* Washing soda and borax can be found in the laundry aisle of most grocery stores.
* Castile soap is a gentle, natural soap that is available in bar or liquid form.
* For extra stain-fighting power, add 1/2 cup of baking soda to the wash.
* This recipe is safe for both HE (high-efficiency) and standard washing machines.
Furniture Polish: Revive Your Wood Furniture
Give your wood furniture a new lease on life with this simple and effective furniture polish. It’s made with just two ingredients!
Ingredients:
* 1/4 cup olive oil
* 1 tablespoon lemon juice
* Soft cloth
Instructions:
1. Combine Ingredients: In a small bowl, combine the olive oil and lemon juice.
2. Apply to Furniture: Dip a soft cloth into the mixture and apply it to the wood furniture in a circular motion.
3. Buff: Buff the furniture with a clean, dry cloth to remove any excess polish and reveal a beautiful shine.
Tips and Tricks:
* Test the polish on an inconspicuous area of the furniture first to ensure it doesn’t damage the finish.
* Use a clean cloth each time you apply the polish to
Conclusion
So, there you have it! A simple, effective, and eco-friendly way to revolutionize your cleaning routine. Ditching harsh chemicals and embracing these DIY natural cleaning products isn’t just a trend; it’s a conscious choice for a healthier home, a healthier planet, and a healthier you. We’ve walked you through creating powerful solutions using ingredients you likely already have in your pantry. From tackling stubborn grime to freshening up your living spaces, these recipes offer a sustainable and cost-effective alternative to conventional cleaners.
But why is this a must-try? Beyond the environmental benefits and cost savings, these DIY cleaners are incredibly versatile. You control the ingredients, allowing you to tailor the scents and strengths to your specific needs and preferences. Sensitive to strong fragrances? Simply omit the essential oils or use a milder blend. Need extra scrubbing power? Add a bit more baking soda to your paste. The possibilities are truly endless.
Consider these variations to further personalize your cleaning experience:
* **Citrus Infusion:** Infuse your vinegar with citrus peels (lemon, orange, grapefruit) for a brighter, more refreshing scent. Simply soak the peels in vinegar for a few weeks, then strain before using. This adds a natural degreasing boost as well.
* **Herb Power:** Experiment with adding dried herbs like lavender, rosemary, or thyme to your cleaning solutions. These herbs not only impart a pleasant aroma but also possess natural antibacterial properties.
* **Essential Oil Blends:** Create your signature scent by blending different essential oils. Lavender and tea tree oil offer antibacterial and calming properties, while lemon and eucalyptus are invigorating and uplifting. Always research the safety of essential oils, especially around pets and children.
* **Castile Soap Swaps:** While we’ve focused on specific recipes, feel free to experiment with different types of castile soap. Unscented is always a safe bet, but you can also find varieties infused with essential oils for added convenience.
* DIY Natural Cleaning Products for Specific Surfaces: Remember to always test your DIY cleaner on an inconspicuous area first, especially on delicate surfaces like wood or marble. For granite countertops, avoid using vinegar as it can etch the stone. Instead, opt for a mild solution of castile soap and water. For stainless steel, a mixture of olive oil and lemon juice can help remove fingerprints and leave a streak-free shine.
We truly believe that once you experience the effectiveness and simplicity of these DIY natural cleaning products, you’ll never go back to store-bought alternatives. The peace of mind knowing exactly what you’re using in your home, coupled with the positive impact on the environment, is simply invaluable.
So, what are you waiting for? Gather your ingredients, put on your favorite music, and get ready to transform your cleaning routine. We’re confident that you’ll be amazed by the results.
And most importantly, we want to hear from you! Share your experiences, variations, and tips in the comments below. Let’s build a community of eco-conscious cleaners and inspire others to embrace a more sustainable lifestyle. Did you discover a particularly effective combination of essential oils? Did you find a creative way to repurpose old cleaning bottles? We’re eager to learn from your successes and help troubleshoot any challenges you may encounter. Together, we can make a difference, one DIY cleaning product at a time. Let us know how your journey with DIY natural cleaning products goes!
Frequently Asked Questions (FAQ)
What are the benefits of using DIY natural cleaning products?
DIY natural cleaning products offer a multitude of benefits. Firstly, they are significantly more environmentally friendly than conventional cleaners, which often contain harsh chemicals that can pollute waterways and harm aquatic life. By using natural ingredients like vinegar, baking soda, and essential oils, you reduce your environmental footprint and contribute to a healthier planet. Secondly, DIY cleaners are often much cheaper than store-bought alternatives. The ingredients are readily available and affordable, allowing you to save money while still achieving a sparkling clean home. Thirdly, you have complete control over the ingredients, which is particularly important for individuals with allergies or sensitivities to certain chemicals. You can tailor the recipes to your specific needs and preferences, ensuring that your cleaning products are safe and effective for your family and pets. Finally, making your own cleaning products can be a fun and rewarding experience. It’s a great way to get creative and experiment with different scents and combinations.
Are DIY natural cleaning products as effective as store-bought cleaners?
Yes, in many cases, DIY natural cleaning products can be just as effective as store-bought cleaners, and sometimes even more so. While they may not contain the same harsh chemicals, natural ingredients like vinegar and baking soda possess powerful cleaning properties. Vinegar is a natural disinfectant and degreaser, while baking soda is a mild abrasive that can effectively scrub away dirt and grime. Essential oils, such as tea tree oil and lavender oil, have antibacterial and antifungal properties, further enhancing the cleaning power of these DIY solutions. The key is to use the right ingredients for the specific cleaning task. For example, vinegar is excellent for cleaning glass and removing hard water stains, while baking soda is ideal for scrubbing sinks and ovens. With a little experimentation, you can create a range of DIY cleaners that are just as effective as their store-bought counterparts.
What are some essential ingredients for making DIY natural cleaning products?
A few key ingredients will form the foundation of your DIY cleaning arsenal. White vinegar is a must-have for its disinfecting and degreasing properties. Baking soda is another essential ingredient, acting as a gentle abrasive and deodorizer. Castile soap, a vegetable-based soap, is a versatile cleaner that can be used for a variety of tasks. Essential oils, such as lemon, lavender, and tea tree oil, add fragrance and antibacterial properties. Water is, of course, a necessary component for diluting the other ingredients. Other useful ingredients include borax (use with caution and research safety), washing soda, and citric acid. Having these ingredients on hand will allow you to create a wide range of DIY cleaning products for your entire home.
How should I store my DIY natural cleaning products?
Proper storage is crucial for maintaining the effectiveness and safety of your DIY natural cleaning products. Always store your cleaners in clean, airtight containers, preferably glass or BPA-free plastic. Label each container clearly with the name of the product and the date it was made. This will help you keep track of what’s inside and ensure that you use the products before they expire. Store your cleaners in a cool, dark place away from direct sunlight and heat, which can degrade the ingredients. Keep them out of reach of children and pets, just as you would with store-bought cleaners. For spray bottles, make sure the nozzle is securely tightened to prevent leaks. If you’re using essential oils, store your cleaners in dark-colored bottles to protect them from light exposure.
Are there any surfaces I should avoid using DIY natural cleaning products on?
While DIY natural cleaning products are generally safe for most surfaces, there are a few exceptions. Avoid using vinegar on natural stone surfaces like marble and granite, as it can etch the stone and dull its finish. Similarly, avoid using abrasive cleaners like baking soda on delicate surfaces like polished wood or painted walls, as they can scratch or damage the finish. When cleaning electronics, always use a dry or slightly damp cloth and avoid spraying any liquids directly onto the device. Before using any DIY cleaner on a new surface, it’s always a good idea to test it on an inconspicuous area first to ensure that it doesn’t cause any damage or discoloration. Always research the specific needs of your surfaces before cleaning.
Can I use essential oils safely around pets and children?
Essential oils can be a wonderful addition to DIY natural cleaning products, but it’s important to use them safely around pets and children. Some essential oils can be toxic to pets, so it’s crucial to research the safety of each oil before using it in your home. Common essential oils that are toxic to pets include tea tree oil, peppermint oil, and cinnamon oil. When using essential oils around children, dilute them properly and avoid using them on infants under six months old. Always store essential oils out of reach of children and pets. If you’re unsure about the safety of a particular essential oil, consult with a veterinarian or aromatherapist.
How long do DIY natural cleaning products last?
The shelf life of DIY natural cleaning products varies depending on the ingredients used. Cleaners made with water and vinegar typically last for several months, while those containing essential oils may last longer due to the oils’ preservative properties. Cleaners made with fresh ingredients, such as lemon juice, may have a shorter shelf life. To maximize the shelf life of your DIY cleaners, store them properly in airtight containers in a cool, dark place. If you notice any changes in color, odor, or consistency, discard the product. It’s always best to make small batches of DIY cleaners and use them within a reasonable timeframe to ensure their effectiveness.
Leave a Comment