
DIY cleaning blends: who knew creating a sparkling clean home could be so much fun, affordable, and eco-friendly? I’m so excited to share some of my favorite homemade cleaning recipes that will not only leave your house smelling divine but also save you a ton of money and reduce your reliance on harsh chemicals.
For generations, resourceful homemakers have relied on simple, natural ingredients to keep their homes clean. Think about it – before the advent of mass-produced cleaning products, vinegar, baking soda, and essential oils were the go-to solutions for everything from scrubbing floors to disinfecting surfaces. This tradition is not just about saving money; it’s about connecting with a more sustainable and healthier way of living.
In today’s world, we’re bombarded with cleaning products promising miraculous results, but often filled with ingredients we can’t even pronounce. Many of us are becoming increasingly aware of the potential health risks associated with these chemicals, and that’s where DIY cleaning blends come in. Imagine knowing exactly what’s in your cleaning solutions, avoiding harmful toxins, and creating a fresh, inviting home environment all at the same time. This article is your guide to unlocking the power of natural cleaning, with easy-to-follow recipes and tips that will transform your cleaning routine. Get ready to ditch the store-bought stuff and embrace the joy of creating your own effective and eco-friendly cleaning solutions!
DIY Cleaning Blends: Natural Solutions for a Sparkling Home
Hey there, fellow cleaning enthusiasts! I’m so excited to share some of my favorite DIY cleaning blends with you. I’ve been experimenting with natural cleaning solutions for years, and I’ve found that they’re not only effective but also much gentler on my family, my pets, and the environment. Plus, they’re often cheaper than store-bought cleaners! So, let’s dive in and create some amazing cleaning blends together.
All-Purpose Cleaner: Your Go-To for Everyday Messes
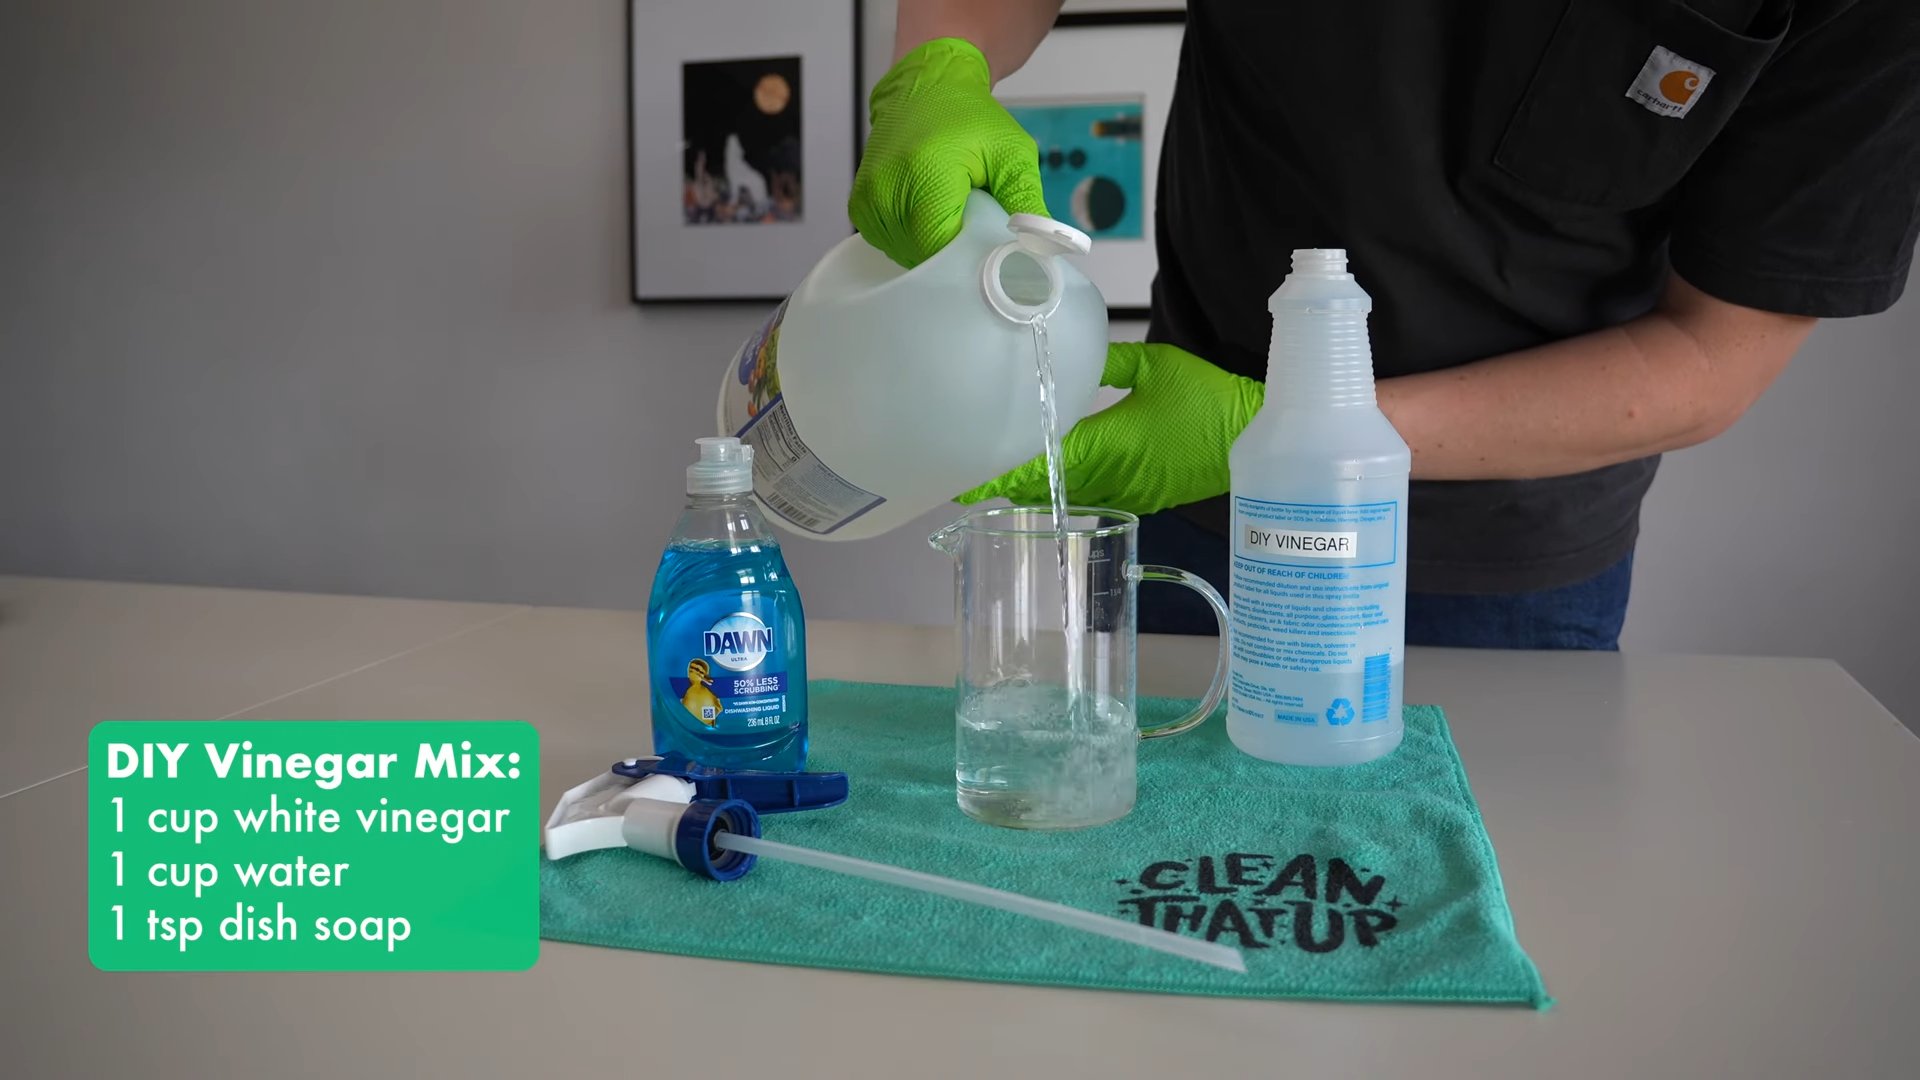
This all-purpose cleaner is my absolute workhorse. I use it on countertops, sinks, appliances, and even floors (with a little modification, which I’ll explain later). It’s simple, effective, and smells fantastic!
Ingredients You’ll Need:
* 1/2 cup white vinegar
* 2 cups water
* 10-20 drops of your favorite essential oil (I love lemon, lavender, tea tree, or a blend!)
* Spray bottle
Step-by-Step Instructions:
1. Gather Your Supplies: First things first, grab your white vinegar, water, essential oil, and a clean spray bottle. Make sure the spray bottle is thoroughly cleaned and dried to avoid any contamination.
2. Combine Vinegar and Water: In a measuring cup or directly into the spray bottle, pour in 1/2 cup of white vinegar and 2 cups of water. The vinegar acts as a disinfectant and helps to cut through grease and grime.
3. Add Essential Oils: Now for the fun part! Add 10-20 drops of your chosen essential oil. Essential oils not only provide a pleasant scent but also offer additional cleaning and antibacterial properties. Lemon is great for degreasing, lavender is calming and antiseptic, and tea tree is a powerful disinfectant.
4. Shake Well: Secure the spray nozzle onto the bottle and shake the mixture vigorously to ensure the ingredients are well combined.
5. Test Before Use: Before spraying liberally on any surface, it’s always a good idea to test the cleaner in an inconspicuous area to make sure it doesn’t damage or discolor the material.
6. Spray and Wipe: Spray the cleaner onto the surface you want to clean and let it sit for a few seconds. Then, wipe it away with a clean cloth or sponge. For tougher messes, you might need to let the cleaner sit for a minute or two before wiping.
Tips and Tricks:
* Vinegar Smell: If you’re not a fan of the vinegar smell, don’t worry! The essential oils will help to mask it, and the vinegar scent dissipates quickly as it dries.
* Floor Cleaning: To use this cleaner on floors, simply add 1/4 cup of the all-purpose cleaner to a bucket of warm water. Mop as usual. Avoid using vinegar on natural stone floors like marble or granite, as it can etch the surface.
* Essential Oil Blends: Get creative with your essential oil blends! Try combining lemon and eucalyptus for a refreshing and invigorating scent, or lavender and chamomile for a calming and relaxing aroma.
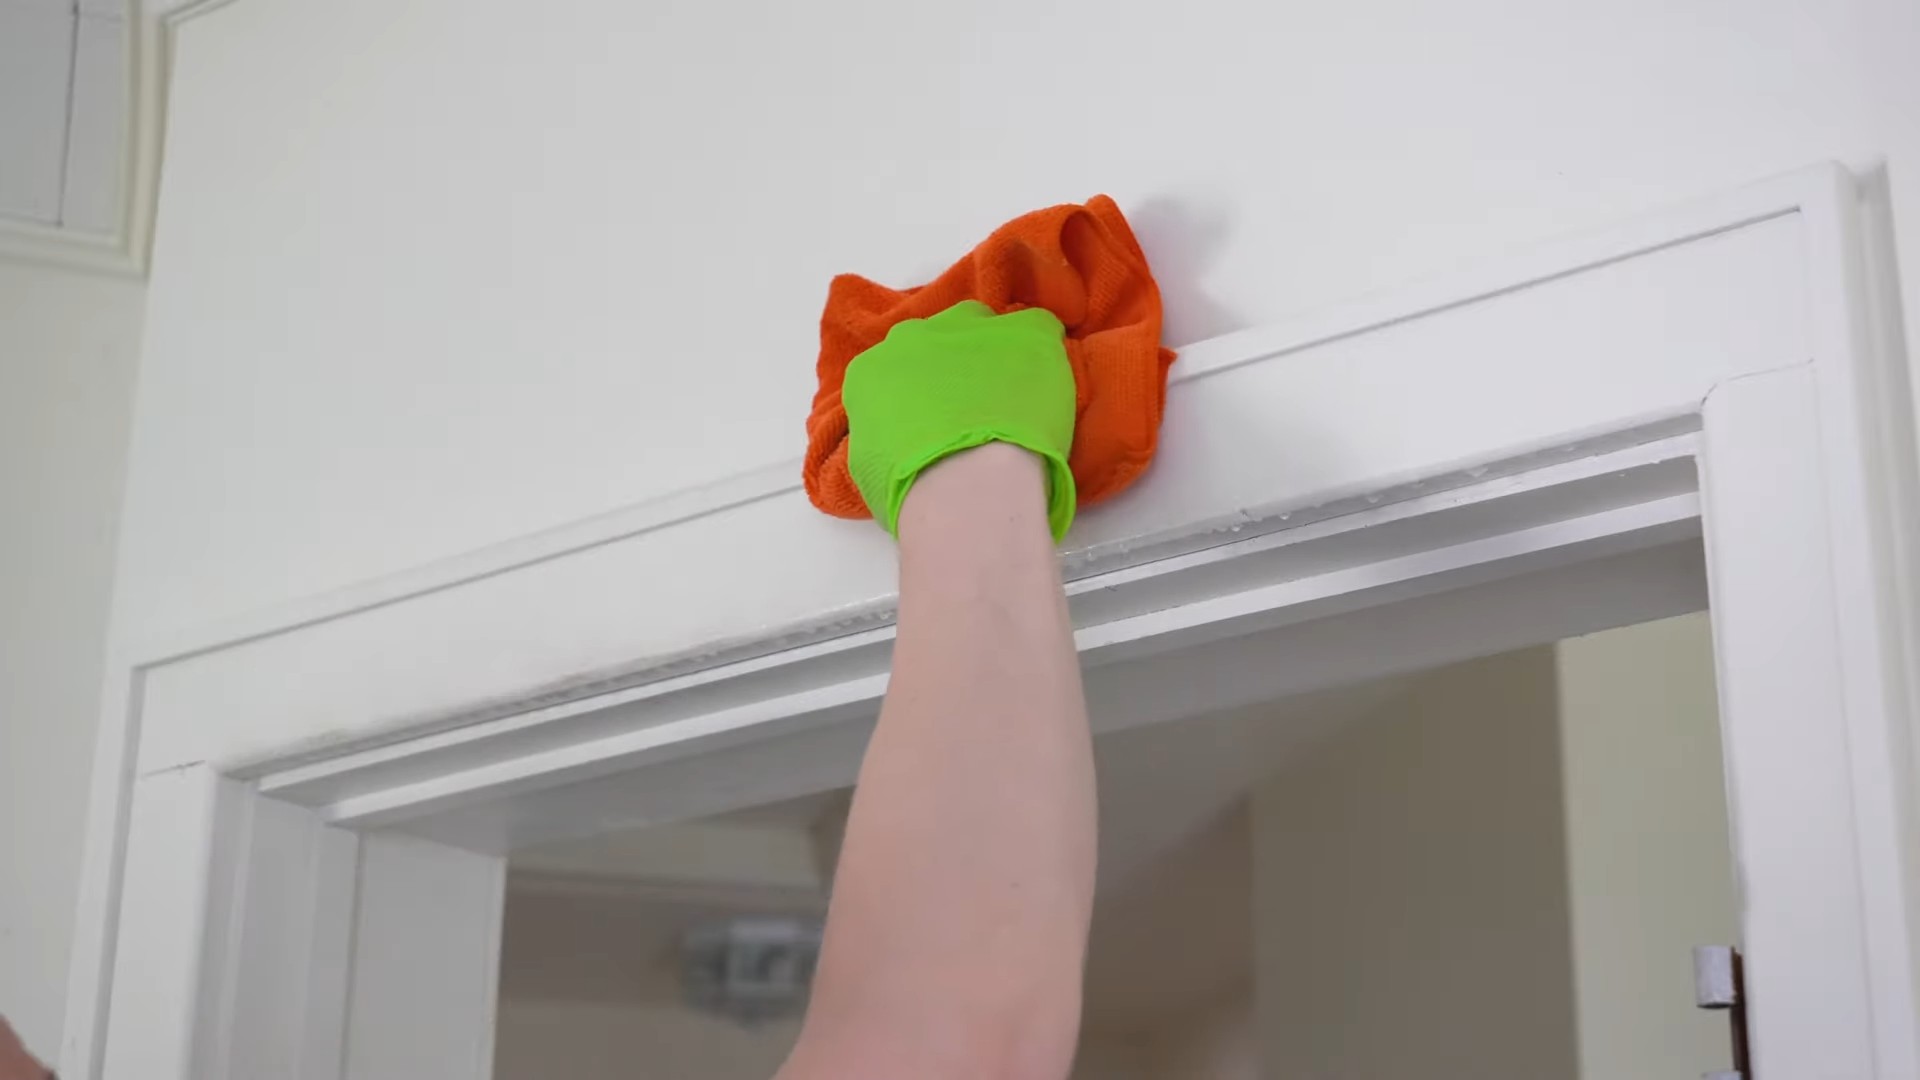
Glass Cleaner: Streak-Free Shine Every Time
Say goodbye to streaks and smudges with this simple yet effective glass cleaner. It’s perfect for windows, mirrors, and glass shower doors.
Ingredients You’ll Need:
* 1/4 cup white vinegar
* 2 cups water
* Spray bottle
* Microfiber cloth
Step-by-Step Instructions:
1. Gather Your Supplies: Grab your white vinegar, water, a clean spray bottle, and a microfiber cloth. Microfiber cloths are essential for streak-free cleaning.
2. Combine Vinegar and Water: In the spray bottle, mix 1/4 cup of white vinegar with 2 cups of water.
3. Shake Well: Secure the spray nozzle and shake the bottle well to combine the ingredients.
4. Spray and Wipe: Spray the cleaner onto the glass surface and immediately wipe it clean with a microfiber cloth. Use a clean, dry section of the cloth to buff the glass for a sparkling shine.
Tips and Tricks:
* Newspaper Alternative: If you don’t have a microfiber cloth, you can use crumpled newspaper to clean glass. It works surprisingly well and leaves a streak-free finish.
* Hard Water Spots: For stubborn hard water spots, try pre-treating the area with a paste of baking soda and water before using the glass cleaner.
* Outdoor Windows: For outdoor windows, consider cleaning them on a cloudy day. Direct sunlight can cause the cleaner to dry too quickly, leaving streaks.
Toilet Bowl Cleaner: Naturally Fresh and Clean
This toilet bowl cleaner uses the power of baking soda and vinegar to effectively clean and deodorize your toilet.
Ingredients You’ll Need:
* 1 cup baking soda
* 1/2 cup white vinegar
* Toilet brush
Step-by-Step Instructions:
1. Sprinkle Baking Soda: Sprinkle 1 cup of baking soda into the toilet bowl, making sure to coat the entire surface.
2. Pour Vinegar: Slowly pour 1/2 cup of white vinegar into the bowl. The mixture will fizz, which is perfectly normal and helps to loosen dirt and grime.
3. Let it Sit: Allow the mixture to sit for at least 15-20 minutes, or even longer for tougher stains.
4. Scrub and Flush: Use a toilet brush to scrub the bowl thoroughly, paying attention to any stains or buildup.
5. Flush: Flush the toilet to rinse away the cleaner and any remaining debris.
Tips and Tricks:
* Essential Oil Boost: For an extra boost of freshness, add a few drops of tea tree or eucalyptus essential oil to the baking soda before adding the vinegar.
* Overnight Treatment: For heavily soiled toilets, you can let the baking soda and vinegar mixture sit overnight before scrubbing and flushing.
* Preventative Maintenance: To keep your toilet bowl clean and fresh, try adding 1/2 cup of baking soda to the bowl once a week and letting it sit for a few minutes before flushing.
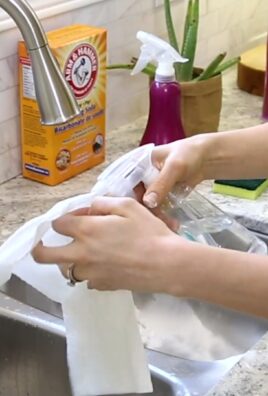
Oven Cleaner: Tackling Baked-On Grease and Grime
Cleaning the oven is often a dreaded task, but this DIY oven cleaner makes it much easier and less toxic.
Ingredients You’ll Need:
* 1/2 cup baking soda
* Water
* Spray bottle
* Spatula or scraper
* Vinegar (optional)
Step-by-Step Instructions:
1. Remove Oven Racks: Remove the oven racks and set them aside. You can clean them separately in a sink filled with hot, soapy water.
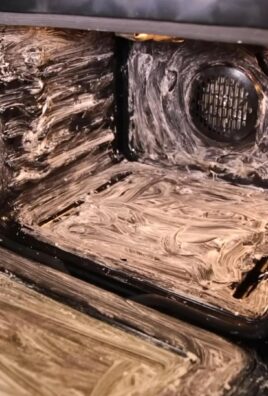
2. Make a Baking Soda Paste: In a bowl, mix 1/2 cup of baking soda with enough water to form a thick paste.
3. Coat the Oven: Using your hands or a spatula, spread the baking soda paste evenly over the interior surfaces of the oven, avoiding the heating elements. Be sure to coat the sides, bottom, and top of the oven.
4. Let it Sit: Allow the baking soda paste to sit for at least 12 hours, or even overnight. This will give the baking soda time to loosen the baked-on grease and grime.
5. Scrape and Wipe: After the baking soda has sat, use a spatula or scraper to remove as much of the paste as possible. Then, use a damp cloth to wipe away any remaining residue.
6. Vinegar Rinse (Optional): If there are any stubborn spots, spray them with a little vinegar and let it sit for a few minutes before wiping them away. The vinegar will react with the baking soda to help dissolve any remaining grime.
7. Replace Oven Racks: Once the oven is clean and dry, replace the oven racks.
Tips and Tricks:
* Protective Gear: Wear gloves when applying the baking soda paste to protect your hands.
* Ventilation: Open a window or turn on the oven fan to ventilate the area while cleaning.
* Self-Cleaning Ovens: While this method is
Hey there, fellow cleaning enthusiasts! I’m so excited to share some of my favorite DIY cleaning blends with you. I’ve been experimenting with natural cleaning solutions for years, and I’ve found that they’re not only effective but also much gentler on my family, my pets, and the environment. Plus, they’re often cheaper than store-bought cleaners! So, let’s dive in and create some amazing cleaning blends together.
All-Purpose Cleaner: Your Go-To for Everyday Messes
This all-purpose cleaner is my absolute workhorse. I use it on countertops, sinks, appliances, and even floors (with a little modification, which I’ll explain later). It’s simple, effective, and smells fantastic!
Ingredients You’ll Need:
* 1/2 cup white vinegar
* 2 cups water
* 10-20 drops of your favorite essential oil (I love lemon, lavender, tea tree, or a blend!)
* Spray bottle
Step-by-Step Instructions:
1. Gather Your Supplies: First things first, grab your white vinegar, water, essential oil, and a clean spray bottle. Make sure the spray bottle is thoroughly cleaned and dried to avoid any contamination.
2. Combine Vinegar and Water: In a measuring cup or directly into the spray bottle, pour in 1/2 cup of white vinegar and 2 cups of water. The vinegar acts as a disinfectant and helps to cut through grease and grime.
3. Add Essential Oils: Now for the fun part! Add 10-20 drops of your chosen essential oil. Essential oils not only provide a pleasant scent but also offer additional cleaning and antibacterial properties. Lemon is great for degreasing, lavender is calming and antiseptic, and tea tree is a powerful disinfectant.
4. Shake Well: Secure the spray nozzle onto the bottle and shake the mixture vigorously to ensure the ingredients are well combined.
5. Test Before Use: Before spraying liberally on any surface, it’s always a good idea to test the cleaner in an inconspicuous area to make sure it doesn’t damage or discolor the material.
6. Spray and Wipe: Spray the cleaner onto the surface you want to clean and let it sit for a few seconds. Then, wipe it away with a clean cloth or sponge. For tougher messes, you might need to let the cleaner sit for a minute or two before wiping.
Tips and Tricks:
* Vinegar Smell: If you’re not a fan of the vinegar smell, don’t worry! The essential oils will help to mask it, and the vinegar scent dissipates quickly as it dries.
* Floor Cleaning: To use this cleaner on floors, simply add 1/4 cup of the all-purpose cleaner to a bucket of warm water. Mop as usual. Avoid using vinegar on natural stone floors like marble or granite, as it can etch the surface.
* Essential Oil Blends: Get creative with your essential oil blends! Try combining lemon and eucalyptus for a refreshing and invigorating scent, or lavender and chamomile for a calming and relaxing aroma.
Glass Cleaner: Streak-Free Shine Every Time
Say goodbye to streaks and smudges with this simple yet effective glass cleaner. It’s perfect for windows, mirrors, and glass shower doors.
Ingredients You’ll Need:
* 1/4 cup white vinegar
* 2 cups water
* Spray bottle
* Microfiber cloth
Step-by-Step Instructions:
1. Gather Your Supplies: Grab your white vinegar, water, a clean spray bottle, and a microfiber cloth. Microfiber cloths are essential for streak-free cleaning.
2. Combine Vinegar and Water: In the spray bottle, mix 1/4 cup of white vinegar with 2 cups of water.
3. Shake Well: Secure the spray nozzle and shake the bottle well to combine the ingredients.
4. Spray and Wipe: Spray the cleaner onto the glass surface and immediately wipe it clean with a microfiber cloth. Use a clean, dry section of the cloth to buff the glass for a sparkling shine.
Tips and Tricks:
* Newspaper Alternative: If you don’t have a microfiber cloth, you can use crumpled newspaper to clean glass. It works surprisingly well and leaves a streak-free finish.
* Hard Water Spots: For stubborn hard water spots, try pre-treating the area with a paste of baking soda and water before using the glass cleaner.
* Outdoor Windows: For outdoor windows, consider cleaning them on a cloudy day. Direct sunlight can cause the cleaner to dry too quickly, leaving streaks.
Toilet Bowl Cleaner: Naturally Fresh and Clean
This toilet bowl cleaner uses the power of baking soda and vinegar to effectively clean and deodorize your toilet.
Ingredients You’ll Need:
* 1 cup baking soda
* 1/2 cup white vinegar
* Toilet brush
Step-by-Step Instructions:
1. Sprinkle Baking Soda: Sprinkle 1 cup of baking soda into the toilet bowl, making sure to coat the entire surface.
2. Pour Vinegar: Slowly pour 1/2 cup of white vinegar into the bowl. The mixture will fizz, which is perfectly normal and helps to loosen dirt and grime.
3. Let it Sit: Allow the mixture to sit for at least 15-20 minutes, or even longer for tougher stains.
4. Scrub and Flush: Use a toilet brush to scrub the bowl thoroughly, paying attention to any stains or buildup.
5. Flush: Flush the toilet to rinse away the cleaner and any remaining debris.
Tips and Tricks:
* Essential Oil Boost: For an extra boost of freshness, add a few drops of tea tree or eucalyptus essential oil to the baking soda before adding the vinegar.
* Overnight Treatment: For heavily soiled toilets, you can let the baking soda and vinegar mixture sit overnight before scrubbing and flushing.
* Preventative Maintenance: To keep your toilet bowl clean and fresh, try adding 1/2 cup of baking soda to the bowl once a week and letting it sit for a few minutes before flushing.
Oven Cleaner: Tackling Baked-On Grease and Grime
Cleaning the oven is often a dreaded task, but this DIY oven cleaner makes it much easier and less toxic.
Ingredients You’ll Need:
* 1/2 cup baking soda
* Water
* Spray bottle
* Spatula or scraper
* Vinegar (optional)
Step-by-Step Instructions:
1. Remove Oven Racks: Remove the oven racks and set them aside. You can clean them separately in a sink filled with hot, soapy water.
2. Make a Baking Soda Paste: In a bowl, mix 1/2 cup of baking soda with enough water to form a thick paste.
3. Coat the Oven: Using your hands or a spatula, spread the baking soda paste evenly over the interior surfaces of the oven, avoiding the heating elements. Be sure to coat the sides, bottom, and top of the oven.
4. Let it Sit: Allow the baking soda paste to sit for at least 12 hours, or even overnight. This will give the baking soda time to loosen the baked-on grease and grime.
5. Scrape and Wipe: After the baking soda has sat, use a spatula or scraper to remove as much of the paste as possible. Then, use a damp cloth to wipe away any remaining residue.
6. Vinegar Rinse (Optional): If there are any stubborn spots, spray them with a little vinegar and let it sit for a few minutes before wiping them away. The vinegar will react with the baking soda to help dissolve any remaining grime.
7. Replace Oven Racks: Once the oven is clean and dry, replace the oven racks.
Tips and Tricks:
* Protective Gear: Wear gloves when applying the baking soda paste to protect your hands.
* Ventilation: Open a window or turn on the oven fan to ventilate the area while cleaning.
* Self-Cleaning Ovens: While this method is great for regular ovens, it’s generally not recommended for self-cleaning ovens, as it can damage the self-cleaning mechanism. Always consult your oven’s manual before using any cleaning products.
Furniture Polish: Revive and Protect Your Wood Furniture
This DIY furniture polish is a simple and natural way to revive and protect your wood furniture.
Ingredients You’ll Need:
* 1/4 cup olive oil
* 1/4 cup white vinegar or lemon juice
* Soft cloth
Step-by-Step Instructions:
1. Combine Ingredients: In a small bowl, combine 1/4 cup of olive oil and 1/4 cup of white vinegar or lemon juice. The olive oil will moisturize the wood, while the vinegar or lemon juice will help
Conclusion
So, there you have it! Ditching harsh chemicals and embracing the power of DIY cleaning blends isn’t just a trend; it’s a smarter, healthier, and often more effective way to keep your home sparkling. We’ve explored how simple ingredients, readily available in your pantry, can be transformed into potent cleaning solutions that tackle everything from stubborn grime to lingering odors. The beauty of these blends lies not only in their eco-friendliness and cost-effectiveness but also in their adaptability.
Why is this a must-try? Because you’re taking control of what you bring into your home. You’re eliminating the mystery ingredients and potential health hazards associated with commercial cleaners. You’re saving money, reducing plastic waste, and creating a safer environment for your family and pets. Plus, there’s a certain satisfaction that comes from knowing you crafted a powerful cleaning solution yourself!
But the journey doesn’t end here. Feel free to experiment with different essential oils to customize your cleaning blends with your favorite scents. Lavender, lemon, tea tree, and eucalyptus are all excellent choices, each offering unique antibacterial and antifungal properties. For tougher stains, consider adding a bit of borax to your blend, but always remember to handle it with care and keep it out of reach of children and pets. You can also adjust the ratios of ingredients to suit your specific cleaning needs. A little more vinegar for grease, a little more baking soda for scrubbing – the possibilities are endless!
Don’t be afraid to get creative! Try infusing your vinegar with citrus peels for a naturally scented and extra-powerful cleaning agent. Or, create a multi-purpose spray by combining equal parts water, vinegar, and rubbing alcohol, adding a few drops of your favorite essential oil for a pleasant aroma. The key is to start with a basic recipe and then tweak it to perfection based on your own experiences and preferences.
We wholeheartedly encourage you to give these DIY cleaning blends a try. Start with one or two recipes and see the difference they can make in your home. You’ll be amazed at how effective and enjoyable cleaning can be when you’re using natural, homemade solutions.
And most importantly, we want to hear about your experiences! Share your favorite DIY cleaning blend recipes, tips, and tricks in the comments below. Let us know what worked best for you, what challenges you encountered, and any variations you discovered along the way. Together, we can build a community of eco-conscious cleaners who are passionate about creating a healthier and more sustainable home. So, grab your ingredients, roll up your sleeves, and get ready to experience the magic of DIY cleaning! Let’s revolutionize the way we clean, one homemade blend at a time.
Frequently Asked Questions (FAQ)
What are the benefits of using DIY cleaning blends compared to commercial cleaners?
DIY cleaning blends offer a multitude of advantages over their commercially produced counterparts. Firstly, they are significantly more cost-effective. The ingredients used in DIY blends, such as vinegar, baking soda, and essential oils, are generally inexpensive and readily available. Secondly, they are environmentally friendly. By using natural ingredients, you reduce your reliance on harsh chemicals that can pollute waterways and harm ecosystems. Thirdly, DIY blends are safer for your health. They eliminate the risk of exposure to toxic chemicals that can cause respiratory problems, skin irritations, and other health issues. Finally, they are customizable. You can tailor the ingredients and scents to your specific needs and preferences.
Are DIY cleaning blends as effective as commercial cleaners?
In many cases, yes! While some heavy-duty cleaning tasks might require a specialized commercial product, DIY cleaning blends are surprisingly effective for everyday cleaning. Vinegar, for example, is a powerful disinfectant and degreaser. Baking soda is an excellent abrasive cleaner and deodorizer. Essential oils possess antibacterial and antifungal properties. When combined correctly, these ingredients can tackle a wide range of cleaning challenges, from removing grime and grease to disinfecting surfaces and eliminating odors. The key is to use the right blend for the right task and to allow sufficient contact time for the ingredients to work their magic.
What are some essential ingredients for making DIY cleaning blends?
A few key ingredients form the foundation of most DIY cleaning blends:
* **White Vinegar:** A natural disinfectant, degreaser, and deodorizer.
* **Baking Soda:** A mild abrasive cleaner, deodorizer, and pH regulator.
* **Essential Oils:** Provide fragrance and possess antibacterial, antifungal, and antiviral properties. Popular choices include lemon, lavender, tea tree, and eucalyptus.
* **Water:** Used as a base for many cleaning solutions. Distilled water is preferred to avoid mineral buildup.
* **Castile Soap:** A gentle, plant-based soap that effectively removes dirt and grime.
* **Borax (Sodium Borate):** A natural mineral that acts as a disinfectant, deodorizer, and cleaning booster. Use with caution and keep out of reach of children and pets.
* **Rubbing Alcohol (Isopropyl Alcohol):** A powerful disinfectant and degreaser.
How should I store my DIY cleaning blends?
Proper storage is essential to maintain the effectiveness and safety of your DIY cleaning blends. Always store your blends in clean, airtight containers. Glass bottles are ideal, especially for blends containing essential oils, as they won’t react with the oils. Label each container clearly with the name of the blend and the date it was made. Store your blends in a cool, dark place away from direct sunlight and heat. Keep them out of reach of children and pets. For spray bottles, ensure the nozzle is securely tightened to prevent leaks.
Are there any surfaces that I should avoid cleaning with certain DIY blends?
Yes, certain DIY cleaning blends are not suitable for all surfaces. For example, vinegar can damage natural stone surfaces like marble and granite. Avoid using vinegar-based cleaners on these surfaces. Baking soda can scratch delicate surfaces like glass and polished wood. Test any new cleaning blend on an inconspicuous area before applying it to the entire surface. Always check the manufacturer’s recommendations for cleaning specific materials.
Can I use any essential oil in my DIY cleaning blends?
While many essential oils possess cleaning properties, some are more effective and safer to use than others. Popular choices for cleaning include lemon, lavender, tea tree, eucalyptus, peppermint, and orange. Research the properties of each essential oil before using it in your blends. Some essential oils can be irritating to the skin or respiratory system, so use them in moderation and ensure proper ventilation. Avoid using essential oils that are known to be toxic to pets.
How long do DIY cleaning blends last?
The shelf life of DIY cleaning blends varies depending on the ingredients used. Blends containing water are more susceptible to bacterial growth and should be used within a few weeks. Blends containing vinegar or alcohol have a longer shelf life, typically several months. Essential oils can also help to preserve the blends. If you notice any changes in color, odor, or consistency, discard the blend.
What safety precautions should I take when making and using DIY cleaning blends?
Safety should always be a top priority when making and using DIY cleaning blends. Wear gloves to protect your skin from irritation. Avoid inhaling the fumes of strong ingredients like vinegar and rubbing alcohol. Work in a well-ventilated area. Keep all ingredients and blends out of reach of children and pets. Never mix bleach with other cleaning agents, as this can create toxic fumes. If you experience any adverse reactions, such as skin irritation or respiratory problems, discontinue use and consult a healthcare professional.
Can I use DIY cleaning blends to clean my laundry?
Yes, many DIY cleaning blends can be used to clean laundry. Vinegar can be used as a natural fabric softener and odor eliminator. Baking soda can be added to the wash to boost cleaning power and brighten whites. Essential oils can be used to add fragrance to your laundry. However, always test the blend on a small, inconspicuous area of fabric before using it on the entire load. Avoid using harsh ingredients like borax on delicate fabrics.
What if my DIY cleaning blend doesn’t work as expected?
Don’t be discouraged if your DIY cleaning blend doesn’t work perfectly the first time. Experiment with different ratios of ingredients to find what works best for your specific needs. For stubborn stains, try pre-treating the area with a concentrated solution before cleaning. Allow the blend to sit on the surface for a few minutes to allow the ingredients to penetrate. If all else fails, consider using a specialized commercial cleaner for particularly challenging tasks. Remember, the key is to be patient and persistent.
Leave a Comment