
Clean Wood Cutting Board: Are you tired of your beautiful wooden cutting board looking more like a petri dish than a kitchen essential? I know I was! That’s why I dove headfirst into the world of DIY cleaning solutions, and let me tell you, the results are astounding. Forget harsh chemicals and expensive cleaners; I’m going to share some simple, effective, and all-natural tricks to keep your wood cutting board sparkling and safe.
Wood cutting boards have been a kitchen staple for centuries, dating back to a time when they were often hand-carved from locally sourced timber. They represent a connection to simpler times, a tangible link to the art of preparing food from scratch. But with that history comes the responsibility of proper care. A well-maintained wood cutting board isn’t just aesthetically pleasing; it’s crucial for preventing the spread of bacteria and ensuring food safety.
Let’s face it, no one wants to chop vegetables on a surface teeming with germs. And while regular washing is important, it often isn’t enough to truly clean wood cutting board effectively. This DIY guide will provide you with easy-to-follow steps and readily available ingredients to deep clean, sanitize, and protect your beloved wood cutting board. Say goodbye to lingering odors and unsightly stains, and hello to a fresh, hygienic surface that’s ready for your next culinary adventure! I’m excited to share these tips with you, so let’s get started!
DIY Wood Cutting Board Cleaning and Restoration
Hey there, fellow DIY enthusiasts! I’m so excited to share my go-to method for cleaning and restoring wood cutting boards. Let’s face it, our cutting boards take a beating. They’re constantly exposed to moisture, food particles, and knife marks. Over time, they can become stained, smelly, and even harbor bacteria. But don’t worry, you don’t need to toss them out and buy new ones! With a little elbow grease and some common household ingredients, you can bring your wood cutting boards back to life.
What You’ll Need
Before we dive in, let’s gather our supplies. This is a pretty simple project, so you probably already have most of these items on hand.
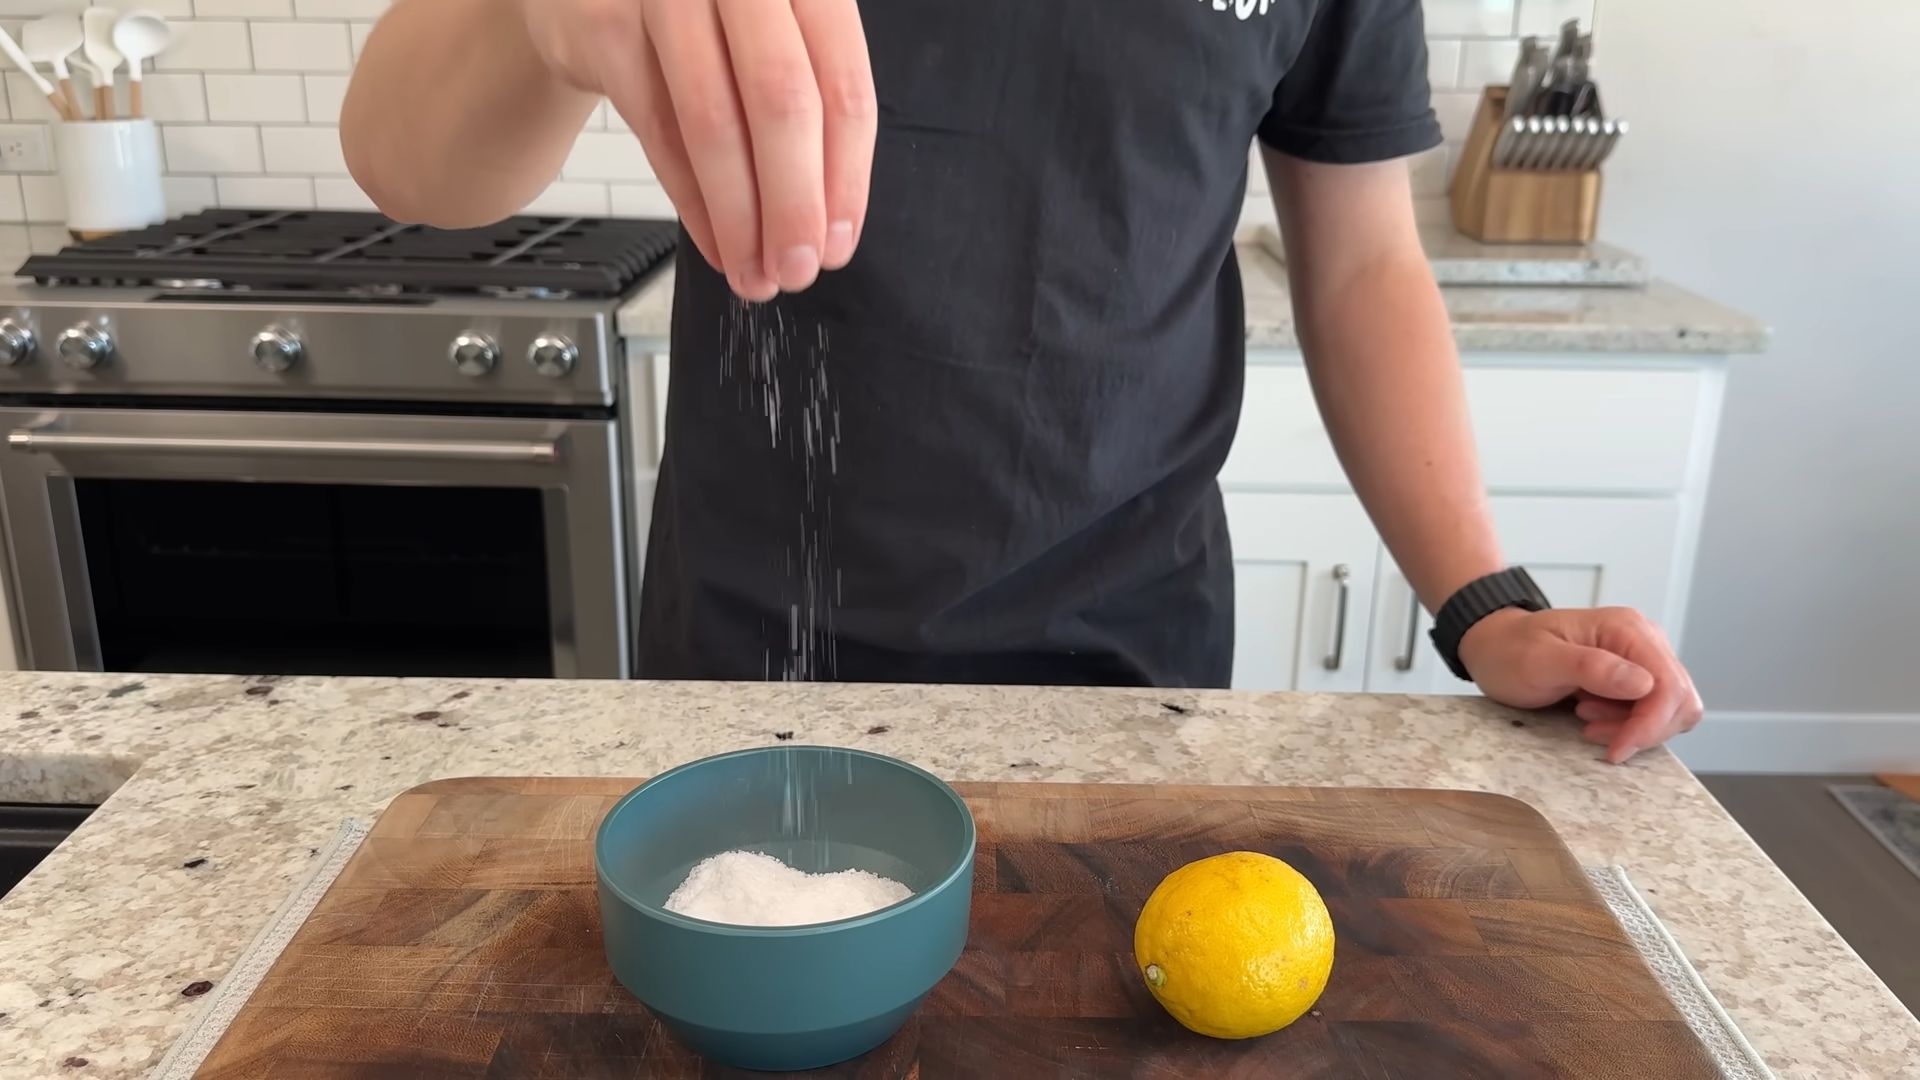
* Coarse Salt: I prefer kosher salt or sea salt for its abrasive texture.
* Lemon: A fresh lemon, cut in half. The acidity helps disinfect and deodorize.
* White Vinegar: A natural disinfectant and cleaner.
* Baking Soda: For extra cleaning power and odor removal.
* Food-Grade Mineral Oil: This is crucial for rehydrating and protecting the wood.
* Beeswax (Optional): To create a cutting board conditioner for added protection.
* Clean Rags or Paper Towels: For wiping and cleaning.
* Scrub Brush or Sponge: To scrub away stubborn stains.
* Fine-Grit Sandpaper (220-grit or higher): For smoothing out knife marks and rough spots.
* Bowl: For mixing solutions.
* Gloves (Optional): To protect your hands.
Phase 1: Deep Cleaning and Disinfecting
This is where we tackle the grime and bacteria that have built up on your cutting board. We’re going to use a combination of natural ingredients to clean, disinfect, and deodorize.
Step 1: Initial Rinse
Start by rinsing your cutting board under warm water to remove any loose food particles. Don’t soak the board, as excessive water can damage the wood.
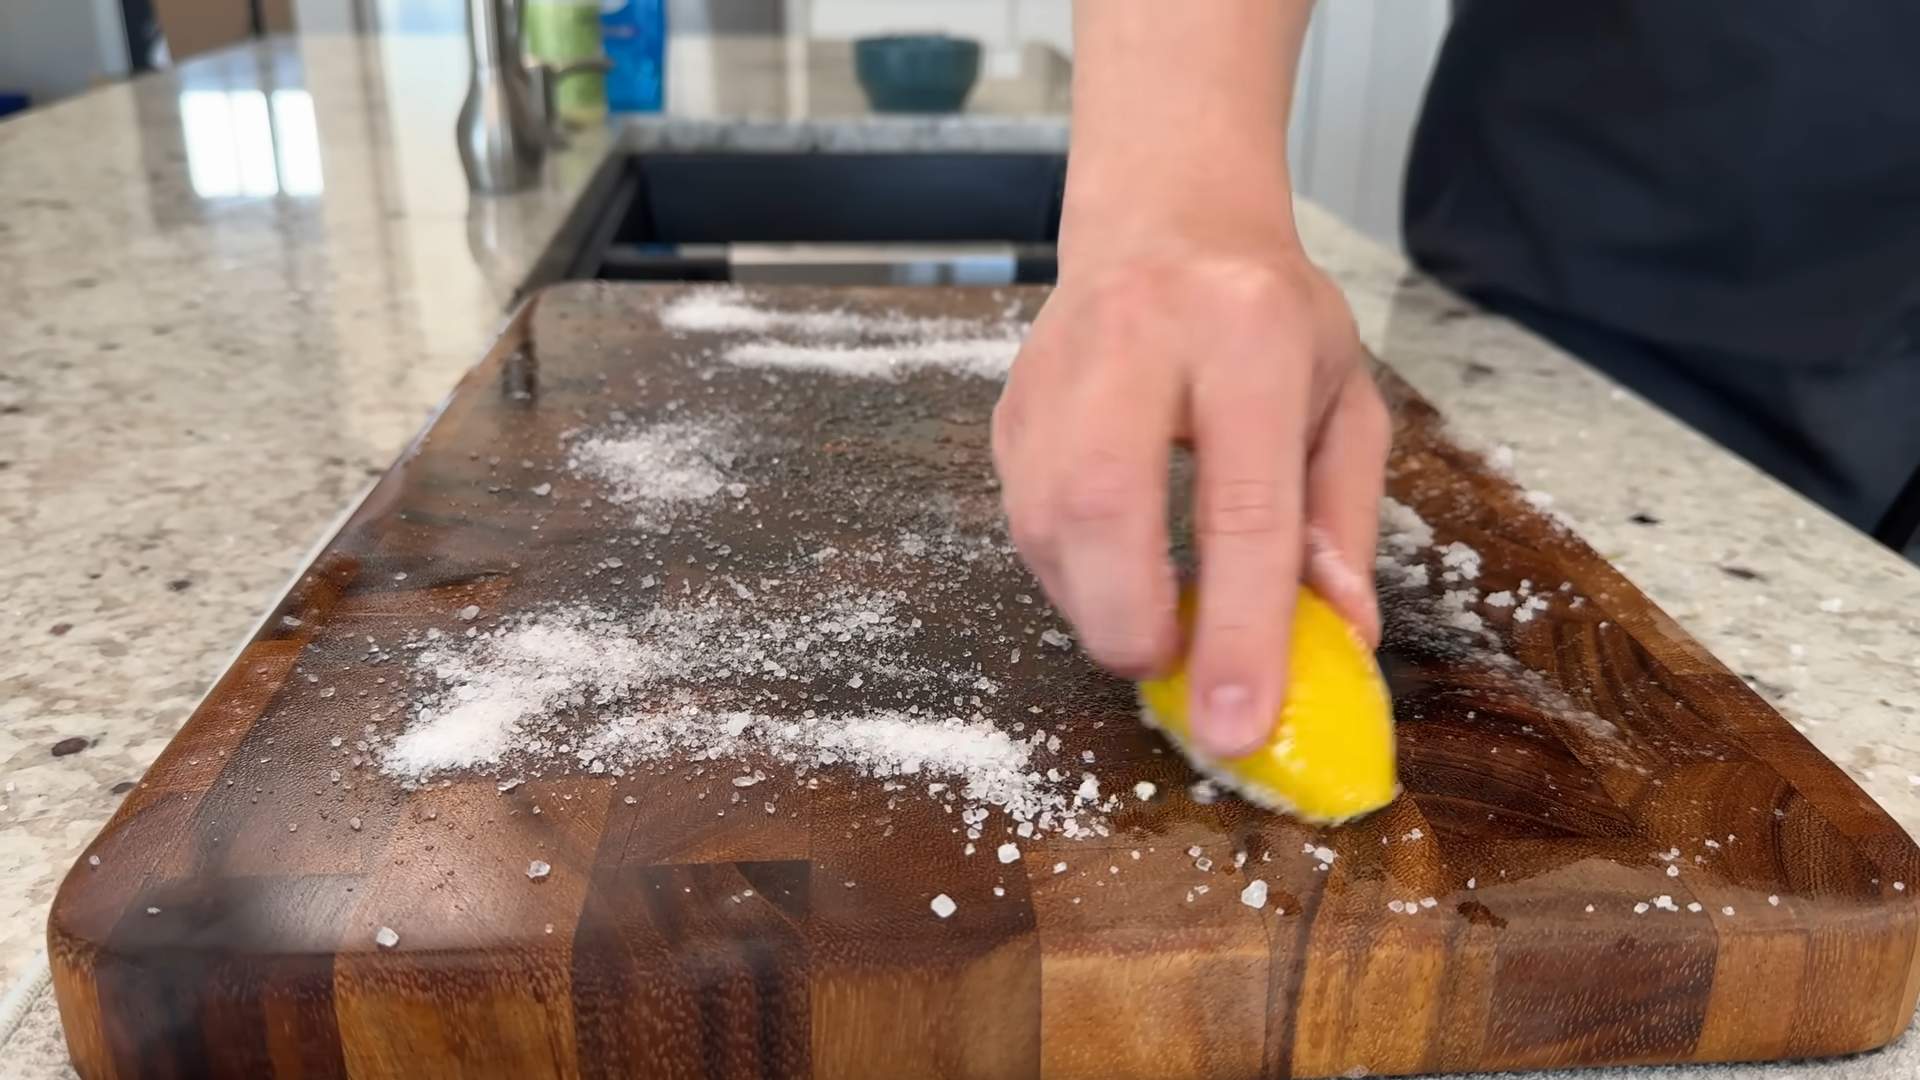
Step 2: Salt and Lemon Scrub
This is my favorite part! Sprinkle a generous amount of coarse salt all over the surface of the cutting board. Then, take one half of the lemon and use it to scrub the salt into the wood. Apply firm pressure and work in circular motions. The salt acts as an abrasive, while the lemon juice disinfects and helps to lift stains. I usually spend a good 5-10 minutes on this step, focusing on areas with visible stains or knife marks.
Step 3: Vinegar Rinse
After scrubbing with salt and lemon, rinse the cutting board thoroughly with white vinegar. The vinegar will help to further disinfect the wood and neutralize any lingering odors. Let the vinegar sit on the board for a minute or two before rinsing it off with warm water.
Step 4: Baking Soda Paste (For Stubborn Stains)
If you have particularly stubborn stains or odors, you can make a baking soda paste. Mix baking soda with a small amount of water to form a thick paste. Apply the paste to the affected areas and let it sit for 15-20 minutes. Then, scrub with a brush or sponge and rinse thoroughly with warm water.
Step 5: Final Rinse and Drying
Give the cutting board one final rinse with warm water. Then, dry it thoroughly with a clean rag or paper towels. Make sure to get into all the nooks and crannies. It’s important to dry the board completely to prevent mold and mildew growth. I usually let mine air dry for a few hours after wiping it down.
Phase 2: Sanding and Smoothing (If Necessary)
If your cutting board has deep knife marks or rough spots, you may need to sand it down. This will help to smooth the surface and remove any trapped food particles.
Step 1: Prepare Your Sanding Area
Find a well-ventilated area to do your sanding. You’ll want to protect your work surface with a drop cloth or newspaper.
Step 2: Choose Your Sandpaper
I recommend starting with a medium-grit sandpaper (around 120-grit) if your cutting board has deep scratches. If it’s just a little rough, you can start with a fine-grit sandpaper (220-grit or higher).
Step 3: Sand the Cutting Board
Sand the cutting board in the direction of the wood grain. Apply even pressure and work your way across the entire surface. Don’t press too hard, as you don’t want to remove too much wood. If you started with a medium-grit sandpaper, switch to a fine-grit sandpaper to smooth out the surface.
Step 4: Remove Sanding Dust
After sanding, wipe the cutting board thoroughly with a damp cloth to remove all the sanding dust. Let the board dry completely before moving on to the next step.
Phase 3: Oiling and Conditioning
This is the most important step for protecting and preserving your wood cutting board. Oiling the board helps to rehydrate the wood, prevent it from drying out and cracking, and create a barrier against moisture and bacteria.
Step 1: Apply Food-Grade Mineral Oil
Pour a generous amount of food-grade mineral oil onto the cutting board. Use a clean rag or paper towel to spread the oil evenly over the entire surface, including the edges and bottom.
Step 2: Let the Oil Soak In
Allow the oil to soak into the wood for at least 2-4 hours, or even overnight. The longer you let it soak, the better. You’ll notice that the wood will absorb the oil and become darker and richer in color.
Step 3: Wipe Off Excess Oil
After the oil has soaked in, wipe off any excess oil with a clean rag or paper towel. You don’t want the surface to be sticky or greasy.
Step 4: Apply Beeswax Conditioner (Optional)
For added protection and a smoother finish, you can apply a beeswax conditioner. You can either buy a pre-made conditioner or make your own by melting beeswax and mineral oil together in a double boiler. Apply a thin layer of the conditioner to the cutting board and buff it with a clean rag.
Maintaining Your Cutting Board
Now that you’ve restored your cutting board, it’s important to maintain it properly to keep it in good condition.
* Wash After Each Use: Wash your cutting board with warm, soapy water after each use. Dry it thoroughly with a clean rag or paper towel.
* Avoid Dishwashers: Never put your wood cutting board in the dishwasher. The high heat and harsh detergents can damage the wood.
* Oil Regularly: Oil your cutting board every few weeks, or whenever it starts to look dry.
* Disinfect Regularly: Disinfect your cutting board regularly with a solution of white vinegar and water.
* Store Properly: Store your cutting board in a dry place, away from direct sunlight and heat.
Troubleshooting
* Mold or Mildew: If you find mold or mildew on your cutting board, scrub it with a solution of bleach and water (1 tablespoon of bleach per gallon of water). Rinse thoroughly and dry completely.
* Cracks: If your cutting board has cracks, you can try filling them with wood glue. Clamp the board together until the glue dries.
* Warping: If your cutting board is warped, you can try placing it under a heavy object to flatten it out.
I hope this guide has been helpful! With a little care and attention, you can keep your wood cutting boards looking and performing their best for years to come. Happy cleaning!
Conclusion
So, there you have it! A simple, effective, and surprisingly satisfying method for keeping your wood cutting board pristine. We’ve walked you through the process of cleaning your wood cutting board, highlighting the importance of regular maintenance and the pitfalls of harsh chemicals. This isn’t just about aesthetics; it’s about food safety and extending the life of your beloved kitchen workhorse.
Why is this DIY trick a must-try? Because it’s a natural, cost-effective alternative to commercial cleaners that can sometimes leave behind unwanted residues. It’s gentle on the wood, preventing it from drying out and cracking, which is crucial for long-term durability. Plus, let’s be honest, there’s a certain satisfaction in knowing you’re using ingredients you likely already have in your pantry to achieve professional-level results.
But don’t stop there! Feel free to experiment with variations. For a deeper clean, consider adding a tablespoon of baking soda to the salt and lemon mixture. The baking soda acts as a mild abrasive, helping to lift stubborn stains and odors. If you’re dealing with particularly strong smells, like garlic or onions, you can let the lemon and salt mixture sit on the board for a bit longer – perhaps 15-20 minutes – before scrubbing.
Another variation involves the type of oil you use for conditioning. While mineral oil is the standard recommendation, you can also use food-grade beeswax or a combination of beeswax and mineral oil for a more protective finish. Beeswax creates a water-resistant barrier, further preventing moisture absorption and bacterial growth. Just be sure to choose an oil that is specifically labeled as food-safe.
Remember, consistency is key. Cleaning your wood cutting board after each use, even with just a quick wipe down with soap and water, will significantly reduce the buildup of bacteria and prevent stains from setting in. And don’t forget to oil your board regularly – at least once a month, or more frequently if you notice it starting to look dry.
We’re confident that this DIY method will become a staple in your kitchen routine. It’s a simple, sustainable, and effective way to keep your wood cutting board clean, safe, and looking its best.
Now, we want to hear from you! Give this DIY trick a try and share your experience in the comments below. Did you find it easy to follow? Did you notice a significant improvement in the cleanliness of your board? Do you have any tips or variations of your own to share? We’re eager to learn from your experiences and build a community of wood cutting board enthusiasts! Let us know how this method helped you to properly clean your wood cutting board.
Frequently Asked Questions
What type of salt should I use?
The best type of salt to use for cleaning your wood cutting board is coarse sea salt or kosher salt. The larger granules provide a gentle abrasive action that helps to scrub away food particles and stains without being too harsh on the wood. Avoid using table salt, as it is too fine and may dissolve too quickly to be effective.
Can I use vinegar instead of lemon?
Yes, you can use white vinegar as a substitute for lemon juice. Vinegar is a natural disinfectant and has similar cleaning properties to lemon juice. However, vinegar has a stronger odor than lemon, so you may want to rinse the board thoroughly after cleaning to remove any lingering smell. Use equal parts vinegar and water for cleaning.
How often should I clean my wood cutting board?
You should clean your wood cutting board after each use with warm, soapy water. For a deeper clean, using the salt and lemon (or vinegar) method, aim to do this at least once a week, or more frequently if you’ve been cutting raw meat or poultry. Regular cleaning is essential for preventing the growth of bacteria and maintaining a safe food preparation surface.
How do I know when my cutting board needs to be oiled?
A dry, dull appearance is a telltale sign that your wood cutting board needs to be oiled. You might also notice that the wood feels rough or that water no longer beads up on the surface. As a general rule, oil your board at least once a month, or more frequently if you use it heavily or live in a dry climate.
What type of oil should I use to condition my wood cutting board?
The best type of oil to use for conditioning your wood cutting board is food-grade mineral oil. Mineral oil is non-toxic, odorless, and tasteless, and it won’t go rancid. You can also use food-grade beeswax or a combination of beeswax and mineral oil for a more protective finish. Avoid using vegetable oils, such as olive oil or canola oil, as they can go rancid and leave a sticky residue.
How do I properly oil my wood cutting board?
To properly oil your wood cutting board, first make sure it is clean and dry. Pour a generous amount of mineral oil onto the board and use a clean cloth or paper towel to spread it evenly over the entire surface, including the edges and bottom. Let the oil soak in for several hours, or overnight if possible. Then, wipe off any excess oil with a clean cloth. Repeat this process as needed until the wood is saturated and no longer absorbs the oil.
Can I put my wood cutting board in the dishwasher?
No, you should never put your wood cutting board in the dishwasher. The high heat and harsh detergents can damage the wood, causing it to warp, crack, and dry out. Always hand wash your wood cutting board with warm, soapy water and dry it thoroughly.
How do I remove stubborn stains from my wood cutting board?
For stubborn stains, you can try making a paste of baking soda and water and applying it to the stained area. Let the paste sit for a few minutes, then scrub gently with a soft cloth or sponge. You can also try using a mixture of lemon juice and salt, as described in the main article. For particularly tough stains, you may need to sand the board lightly with fine-grit sandpaper.
How do I get rid of odors from my wood cutting board?
To get rid of odors, try rubbing the board with a cut lemon or a paste of baking soda and water. You can also sprinkle baking soda directly onto the board and let it sit overnight before wiping it off. Another option is to soak a clean cloth in white vinegar and place it on the board for a few hours.
Is it safe to use the same wood cutting board for raw meat and vegetables?
It is generally recommended to use separate cutting boards for raw meat and vegetables to prevent cross-contamination. If you only have one cutting board, be sure to thoroughly clean and disinfect it after cutting raw meat before using it for vegetables or other foods. Consider using a plastic cutting board for raw meat and a wood cutting board for vegetables.


Leave a Comment