
Chili plant propagation might sound intimidating, but trust me, it’s easier than you think! Have you ever admired a friend’s thriving chili plant, overflowing with fiery peppers, and wished you could have the same bounty? Or perhaps you’re looking to expand your chili collection without breaking the bank? Well, you’re in the right place! This DIY guide will unlock the secrets to successfully propagating your own chili plants, allowing you to enjoy a continuous harvest of your favorite spicy treats.
The history of chili peppers is rich and fascinating, dating back over 6,000 years in South America. From ancient civilizations using them for medicinal purposes to their integral role in global cuisine today, chilies have always held a special place in human culture. Now, you can become a part of that history by learning to propagate your own plants!
Why is chili plant propagation so important? Because it’s a sustainable and cost-effective way to grow your own food! Instead of constantly buying new plants, you can simply take cuttings or use seeds from your existing ones to create new generations. Plus, it’s incredibly rewarding to nurture a plant from a small cutting to a mature, pepper-producing powerhouse. In this article, I’ll share my favorite DIY tricks and hacks for successful chili plant propagation, ensuring you’ll have a thriving chili garden in no time. Let’s get started!
Propagating Chili Plants from Cuttings: A Beginner’s Guide
Hey there, fellow chili enthusiasts! Ever wished you could clone your prize-winning chili plant? Well, good news! Propagating chili plants from cuttings is totally doable, and I’m here to walk you through the process. It’s a fantastic way to expand your chili garden without spending a fortune on new seeds or seedlings. Plus, you’ll get genetically identical copies of your favorite plant, ensuring you get those same amazing peppers year after year.
Why Propagate from Cuttings?
Before we dive in, let’s quickly touch on why propagating from cuttings is so cool:
* Genetic Consistency: You get an exact replica of the parent plant. If you have a chili plant with exceptional flavor, heat, or disease resistance, this is the way to go!
* Faster Fruiting: Cuttings often mature and produce fruit faster than plants grown from seed.
* Cost-Effective: It’s a budget-friendly way to expand your chili collection.
* Fun and Rewarding: There’s something incredibly satisfying about creating new plants from existing ones.
What You’ll Need
Alright, let’s gather our supplies. Here’s what you’ll need to successfully propagate chili plants from cuttings:
* A Healthy Chili Plant: Choose a healthy, vigorous plant as your source. Avoid plants showing signs of disease or stress.
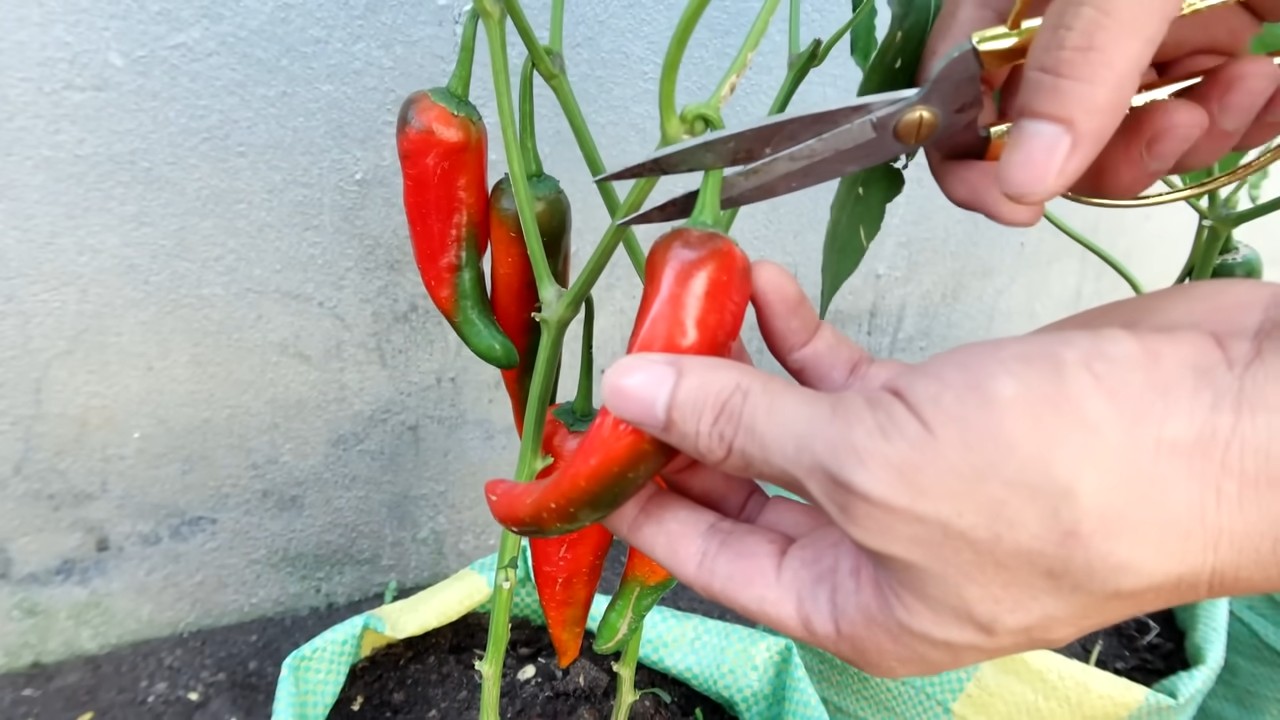
* Sharp, Clean Cutting Tool: A sharp knife, razor blade, or pruning shears are essential. Make sure they’re sterilized with rubbing alcohol to prevent disease transmission.
* Rooting Hormone (Optional but Recommended): Rooting hormone helps stimulate root growth and increases your chances of success. You can find it in powder or gel form.
* Rooting Medium: You have a few options here:
* Seed Starting Mix: A fine-textured mix that drains well.
* Perlite or Vermiculite: These provide excellent aeration and drainage.
* Coco Coir: A sustainable alternative to peat moss.
* Water: You can even root chili cuttings in water, although the success rate might be slightly lower.
* Small Pots or Containers: Choose pots that are large enough to accommodate the cuttings.
* Clear Plastic Bag or Humidity Dome: This will help maintain high humidity around the cuttings, which is crucial for root development.
* Spray Bottle: For misting the cuttings.
* Warm, Bright Location: Indirect sunlight is ideal. Avoid direct sunlight, which can scorch the cuttings.
Taking the Cuttings
This is where the magic begins! Follow these steps carefully to take healthy cuttings from your chili plant:
1. Choose the Right Stems: Select healthy, non-flowering stems that are about 4-6 inches long. Look for stems with several leaf nodes (the points where leaves emerge).
2. Make the Cut: Using your sterilized cutting tool, make a clean, angled cut just below a leaf node. An angled cut increases the surface area for root formation.
3. Remove Lower Leaves: Remove the leaves from the bottom 1-2 inches of the cutting. This prevents the leaves from rotting in the rooting medium and encourages root growth.
4. Prepare the Cutting (Optional): Some people gently scrape the outer layer of the stem near the bottom to encourage root formation. I’ve had success both with and without this step.
5. Apply Rooting Hormone (Optional): If using rooting hormone, dip the cut end of the stem into the hormone powder or gel, tapping off any excess.
Rooting the Cuttings
Now that you have your cuttings, it’s time to get them rooted!
1. Prepare the Rooting Medium: Moisten your chosen rooting medium with water. It should be damp but not soggy.
2. Plant the Cuttings: Make a small hole in the rooting medium with a pencil or your finger. Gently insert the cut end of the stem into the hole, being careful not to rub off the rooting hormone (if used).
3. Firm the Soil: Gently firm the rooting medium around the base of the cutting to provide support.
4. Water the Cuttings: Lightly water the cuttings to settle the soil.
5. Create a Humid Environment: Place the pots or containers inside a clear plastic bag or humidity dome. This will help maintain high humidity, which is essential for root development. If using a plastic bag, make a few small holes for ventilation.
6. Provide Warmth and Light: Place the cuttings in a warm, bright location with indirect sunlight. Avoid direct sunlight, which can scorch the cuttings.
7. Maintain Humidity: Mist the cuttings with water regularly to keep the humidity high. Check the rooting medium regularly and water as needed to keep it moist but not soggy.
8. Be Patient: Rooting can take anywhere from 2-6 weeks, depending on the variety of chili and the environmental conditions.
Caring for Your Cuttings
During the rooting process, it’s important to provide the right care to ensure success.
* Monitor Humidity: Keep an eye on the humidity levels inside the plastic bag or humidity dome. If condensation is excessive, open the bag or dome for a short period each day to allow for ventilation.
* Check for Mold: Inspect the cuttings regularly for signs of mold or fungal growth. If you see any, remove the affected leaves or cuttings immediately.
* Avoid Overwatering: Overwatering can lead to root rot, so be careful not to overwater the cuttings. The rooting medium should be moist but not soggy.
* Provide Gentle Air Circulation: Once the cuttings start to develop roots, you can gradually increase the amount of air circulation by opening the plastic bag or humidity dome for longer periods each day.
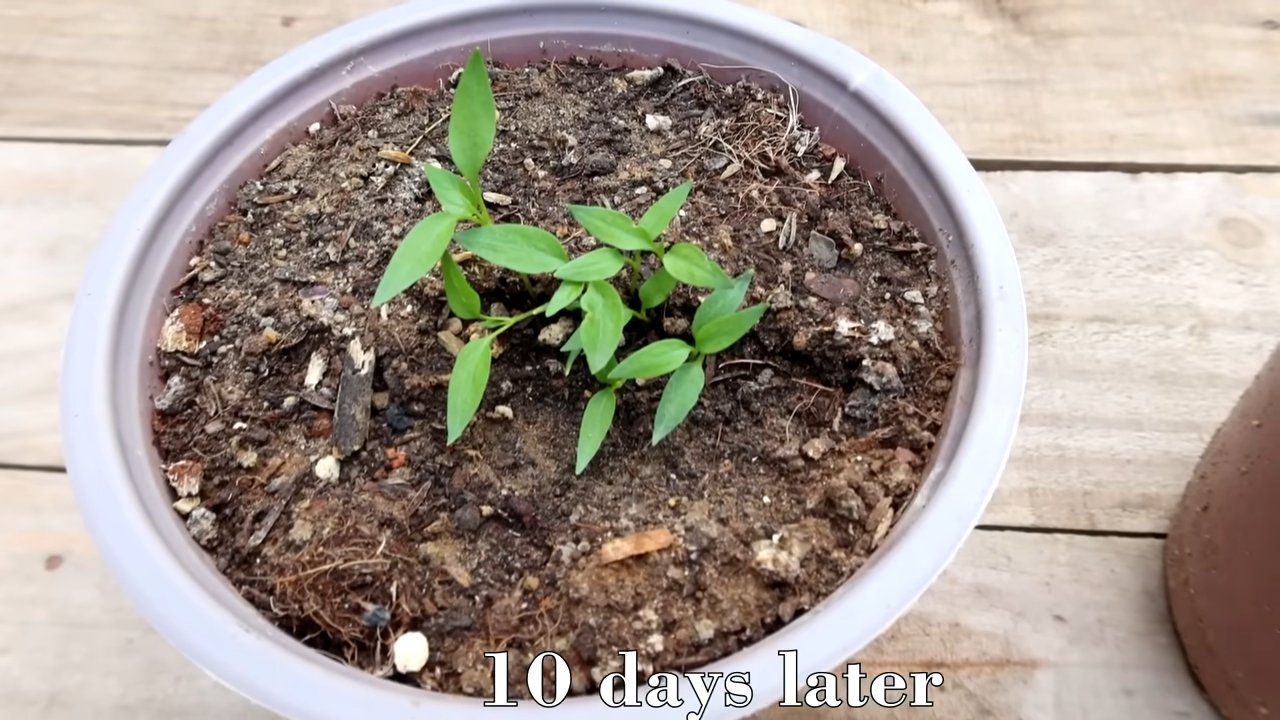
Transplanting Your Rooted Cuttings
Once your cuttings have developed a healthy root system (you should see roots emerging from the drainage holes of the pot), it’s time to transplant them into larger pots or directly into your garden.
1. Prepare the Potting Mix: Choose a well-draining potting mix that is suitable for chili plants.
2. Gently Remove the Cuttings: Carefully remove the rooted cuttings from their small pots or containers. Be gentle to avoid damaging the roots.
3. Plant the Cuttings: Plant the cuttings in the larger pots or in your garden, making sure the top of the root ball is level with the soil surface.
4. Water Thoroughly: Water the newly transplanted cuttings thoroughly to settle the soil.
5. Provide Support (Optional): If the cuttings are tall or leggy, you may want to provide support with a stake or trellis.
6. Acclimatize to Outdoor Conditions (If Transplanting Outdoors): If you’re transplanting the cuttings outdoors, gradually acclimatize them to outdoor conditions over a period of 1-2 weeks. Start by placing them in a sheltered location for a few hours each day, gradually increasing the amount of time they spend outdoors.
Troubleshooting
Sometimes, things don’t go as planned. Here are a few common problems you might encounter when propagating chili plants from cuttings and how to address them:
* Cuttings Rotting: This is usually caused by overwatering or poor drainage. Make sure the rooting medium is well-draining and avoid overwatering. Remove any rotting leaves or cuttings immediately.
* Cuttings Wilting: This can be caused by low humidity or insufficient watering. Make sure the cuttings are kept in a humid environment and water them regularly to keep the rooting medium moist.
* No Root Development: This can be caused by a variety of factors, including poor cutting selection, lack of rooting hormone, or unfavorable environmental conditions. Try taking cuttings from a different part of the plant, using rooting hormone, and ensuring the cuttings are kept in a warm, bright location with high humidity.
Tips for Success
Here are a few extra tips to help you succeed in propagating chili plants from cuttings:
* Take Cuttings in the Morning: The best time to take cuttings is in the morning when the plant is well-hydrated.
* Use a Heat Mat: A heat mat can help speed up root development by providing bottom heat.
* Experiment with Different Rooting Mediums: Try different rooting mediums to see which one works best for you.
* Don’t Give Up: Propagation can be tricky, so don’t be discouraged if you don’t succeed on your first try. Keep experimenting and learning, and you’ll eventually get the hang of it!
And there you have it! Propagating chili plants from cuttings is a rewarding and cost-effective way to expand your chili garden. With a little patience and care, you can create new plants from your favorite varieties and enjoy a bountiful harvest of delicious peppers. Happy growing!
Conclusion
So, there you have it! Mastering chili plant propagation isn’t just about saving money; it’s about connecting with the life cycle of your favorite fiery friends and gaining a deeper understanding of the gardening process. It’s about taking control and ensuring you always have a supply of your preferred chili varieties, regardless of what the garden centers offer.
This method, whether you choose to propagate from cuttings or seeds, offers a rewarding experience that extends far beyond the simple act of growing a plant. It’s about nurturing life, experimenting with different techniques, and ultimately, creating a thriving chili garden that reflects your personal touch.
Think of the possibilities! Imagine propagating your most prolific chili plant to share with friends and family, spreading the joy of homegrown heat. Or perhaps you’ll experiment with different rooting mediums, comparing the success rates of perlite versus vermiculite. You could even try grafting different chili varieties onto a single rootstock for a truly unique and productive plant.
Don’t be afraid to experiment with variations. For example, if you’re propagating from cuttings, try dipping the cut end in rooting hormone to encourage faster root development. If you’re starting from seeds, consider using a heat mat to maintain a consistent soil temperature, which can significantly improve germination rates. You can also experiment with different types of containers, from small seedling trays to repurposed yogurt cups. The key is to observe, learn, and adapt your approach based on your own experiences and the specific needs of your chili plants.
This DIY trick is a must-try for any chili enthusiast, from the seasoned gardener to the curious beginner. It’s an accessible, affordable, and incredibly satisfying way to expand your chili collection and deepen your connection with the natural world. Plus, it’s a fantastic way to reduce waste by utilizing cuttings that would otherwise be discarded.
We wholeheartedly encourage you to give chili plant propagation a try. It’s easier than you might think, and the rewards are well worth the effort. And once you’ve successfully propagated your own chili plants, we’d love to hear about your experience! Share your tips, tricks, and triumphs in the comments below. Let’s build a community of chili-growing enthusiasts who are passionate about sharing their knowledge and helping each other succeed. Your insights could be invaluable to someone just starting out on their chili propagation journey.
So, grab your gardening gloves, gather your supplies, and get ready to embark on a rewarding adventure in chili plant propagation. You’ll be amazed at what you can achieve with a little patience, dedication, and a love for all things spicy! Happy growing!
FAQ
What is the best time of year to propagate chili plants?
The ideal time to propagate chili plants is during the spring or early summer. This is when the plants are actively growing and have the most energy to dedicate to root development. The warmer temperatures and longer daylight hours also contribute to a higher success rate. However, with the right indoor conditions, such as supplemental lighting and a controlled temperature, you can propagate chili plants year-round. Just be aware that the process might be slightly slower during the colder months.
Can I propagate chili plants from store-bought chilies?
Yes, you can propagate chili plants from the seeds inside store-bought chilies, but there are a few things to keep in mind. First, the chilies must be ripe. Look for chilies that are fully colored and slightly soft to the touch. Second, the chilies should be organically grown, as non-organic chilies may have been treated with chemicals that can inhibit germination. Finally, be aware that the resulting plants may not be true to type, meaning they might not produce chilies that are exactly the same as the parent chili. This is because many commercially grown chilies are hybrids. However, it’s still a fun experiment, and you might end up with a unique and delicious variety!
How long does it take for chili plant cuttings to root?
The time it takes for chili plant cuttings to root can vary depending on several factors, including the variety of chili, the rooting medium, the temperature, and the humidity. Generally, you can expect to see roots developing within 2-4 weeks. To speed up the process, ensure the cuttings are kept in a warm, humid environment and consider using a rooting hormone. You’ll know the cuttings have rooted when you see new growth emerging from the top of the plant.
What is the best rooting medium for chili plant cuttings?
There are several suitable rooting mediums for chili plant cuttings, each with its own advantages. Some popular options include:
* **Perlite:** Perlite is a lightweight, porous material that provides excellent drainage and aeration. It’s also sterile, which helps to prevent fungal diseases.
* **Vermiculite:** Vermiculite is another lightweight material that retains moisture well. It’s also rich in minerals, which can benefit the developing roots.
* **Coco coir:** Coco coir is a sustainable alternative to peat moss. It’s made from coconut husks and provides good drainage and aeration.
* **Seed starting mix:** A commercial seed starting mix is a blend of peat moss, perlite, and vermiculite. It’s specifically formulated to provide the ideal conditions for seed germination and root development.
* **Water:** You can even root chili plant cuttings in water. Simply place the cuttings in a glass of water, ensuring that the leaves are above the waterline. Change the water every few days to prevent the growth of algae.
Ultimately, the best rooting medium is the one that works best for you and your growing conditions. Experiment with different options to see which one yields the best results.
How often should I water chili plant cuttings?
It’s important to keep the rooting medium consistently moist, but not waterlogged. Overwatering can lead to root rot, which can kill the cuttings. Check the moisture level of the rooting medium daily and water as needed. A good rule of thumb is to water when the top inch of the rooting medium feels dry to the touch. If you’re rooting the cuttings in water, change the water every few days to prevent the growth of algae and bacteria.
What kind of light do chili plant cuttings need?
Chili plant cuttings need bright, indirect light. Avoid placing them in direct sunlight, as this can scorch the leaves. A north-facing window is often a good option. If you don’t have access to a bright, indirect light source, you can use a grow light. Place the grow light a few inches above the cuttings and provide 12-16 hours of light per day.
How do I transplant the rooted chili plant cuttings?
Once the chili plant cuttings have developed a healthy root system, they’re ready to be transplanted into individual pots. Choose pots that are at least 4 inches in diameter and fill them with a well-draining potting mix. Gently remove the cuttings from the rooting medium and plant them in the pots. Water the plants thoroughly and place them in a bright, indirect light location. Gradually acclimate the plants to outdoor conditions before transplanting them into the garden.
My chili plant cuttings are wilting. What should I do?
Wilting can be a sign that the cuttings are not getting enough moisture or that they are experiencing too much stress. Check the moisture level of the rooting medium and water as needed. You can also try increasing the humidity around the cuttings by placing a plastic bag over them or using a humidity dome. If the wilting persists, try moving the cuttings to a cooler location or providing them with more shade.
Can I use rooting hormone on chili plant cuttings?
Yes, using rooting hormone can significantly increase the success rate of chili plant propagation from cuttings. Rooting hormone contains auxins, which are plant hormones that stimulate root development. To use rooting hormone, simply dip the cut end of the cutting in the hormone powder or liquid before planting it in the rooting medium. Be sure to follow the instructions on the rooting hormone package.

Leave a Comment