
Bag Tying Ideas: Are you tired of struggling with flimsy knots that come undone, leaving your precious garden goodies spilling everywhere? I know I am! We’ve all been there – wrestling with produce bags at the farmer’s market, trying to secure potting soil, or desperately attempting to keep birdseed from scattering across the garage floor. It’s frustrating, time-consuming, and honestly, a little embarrassing.
But fear not, fellow gardeners and DIY enthusiasts! This isn’t just about tying a bag; it’s about mastering a skill that has been passed down through generations. Think about it – from ancient farmers securing their harvests to modern-day homesteaders preserving their bounty, the art of the perfect bag tie has always been essential. It’s a small detail that makes a big difference.
In this article, I’m going to share some incredibly clever and surprisingly simple bag tying ideas that will revolutionize the way you handle everything from garden waste to homemade gifts. These aren’t your grandma’s basic knots (though we might touch on a classic or two!). We’re talking about techniques that are secure, efficient, and even a little bit stylish. So, ditch the frustration and get ready to become a bag-tying ninja! Let’s dive in and discover the secrets to a perfectly secured bag, every single time.
DIY: Mastering the Art of Bag Tying – Beyond the Basic Knot!
Hey there, fellow DIY enthusiasts! Let’s face it, we all deal with bags – grocery bags, trash bags, garden waste bags, you name it. And while a simple overhand knot gets the job done sometimes, it’s not always the most secure, efficient, or even aesthetically pleasing solution. So, I’m going to share some of my favorite bag-tying hacks that will not only keep your bags securely closed but also make your life a little easier. Get ready to level up your bag-tying game!
The Problem with the Standard Knot (and Why We Need Better Solutions)
Before we dive into the fun stuff, let’s acknowledge the shortcomings of the basic overhand knot. It’s often difficult to untie, especially when the bag is tightly packed. It can also create a bulky knot that takes up valuable space, and sometimes, it just plain slips open, leading to spills and messes. That’s why I’ve been on a quest to find better, more reliable, and sometimes even reusable bag-tying methods.
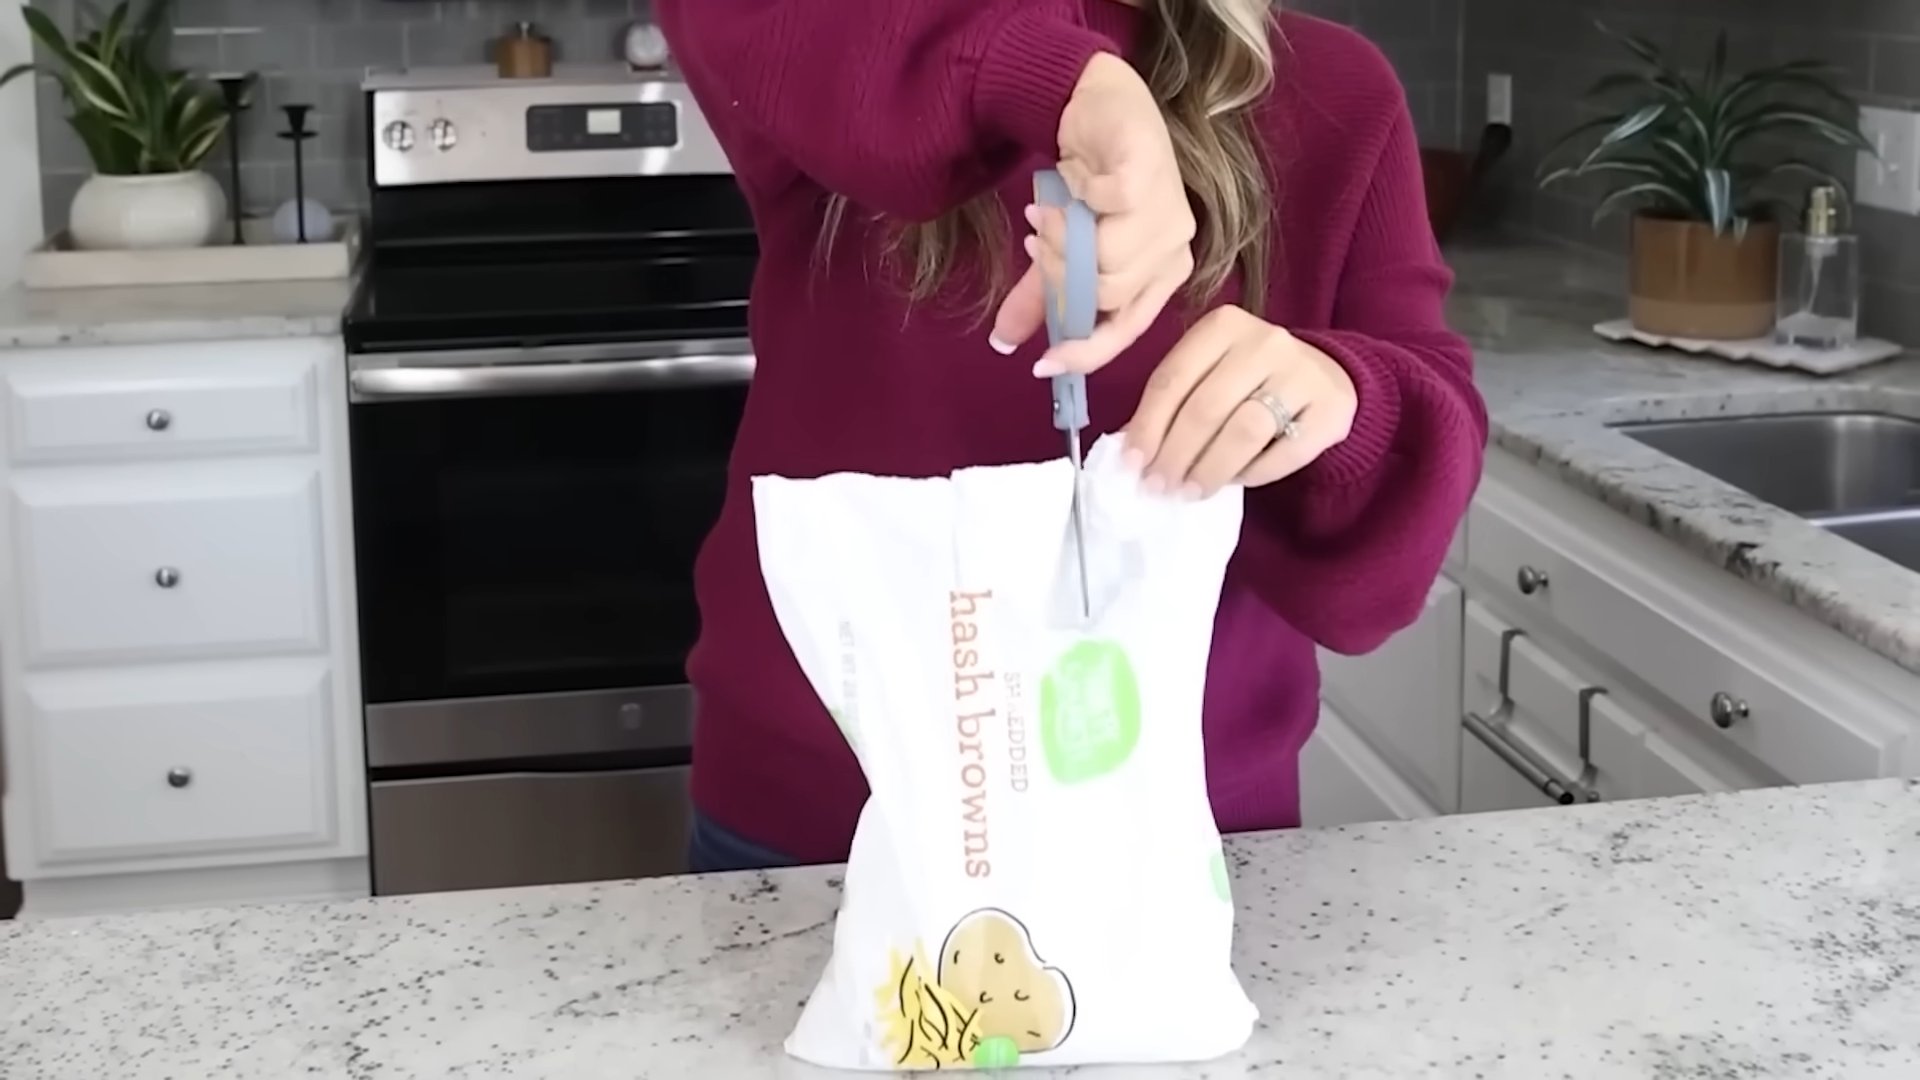
Method 1: The “Ears” Knot – Simple, Secure, and Easy to Untie
This is my go-to method for most everyday bags, especially those I might need to open again. It’s quick, creates a handle, and is surprisingly strong.
What you’ll need:
* The bag you want to tie.
Step-by-step instructions:
1. Gather the Bag Opening: First, gather the opening of your bag, just like you would for a regular knot. Make sure you have enough excess bag material to work with – about 6-8 inches is ideal.
2. Create the First Loop (Ear): Now, instead of making a simple knot, create a loop with the gathered bag opening. Think of it like you’re starting to tie a shoelace. Hold the loop in place with one hand.
3. Create the Second Loop (Ear): With the remaining bag opening, create a second loop, mirroring the first one. You should now have two loops, or “ears,” side by side.
4. Tie the Loops Together: Take both loops and tie them together in a simple overhand knot. Make sure the knot is snug but not overly tight. You want to be able to untie it later.
5. Tighten and Adjust: Gently pull on the loops to tighten the knot. Adjust the size of the loops to your liking. You can make them smaller for a more compact knot or larger for a more substantial handle.
6. Enjoy Your Secure Bag: That’s it! You now have a bag securely closed with an “Ears” knot. The loops act as a handle, making it easy to carry, and the knot is relatively easy to untie when you need to access the contents of the bag.
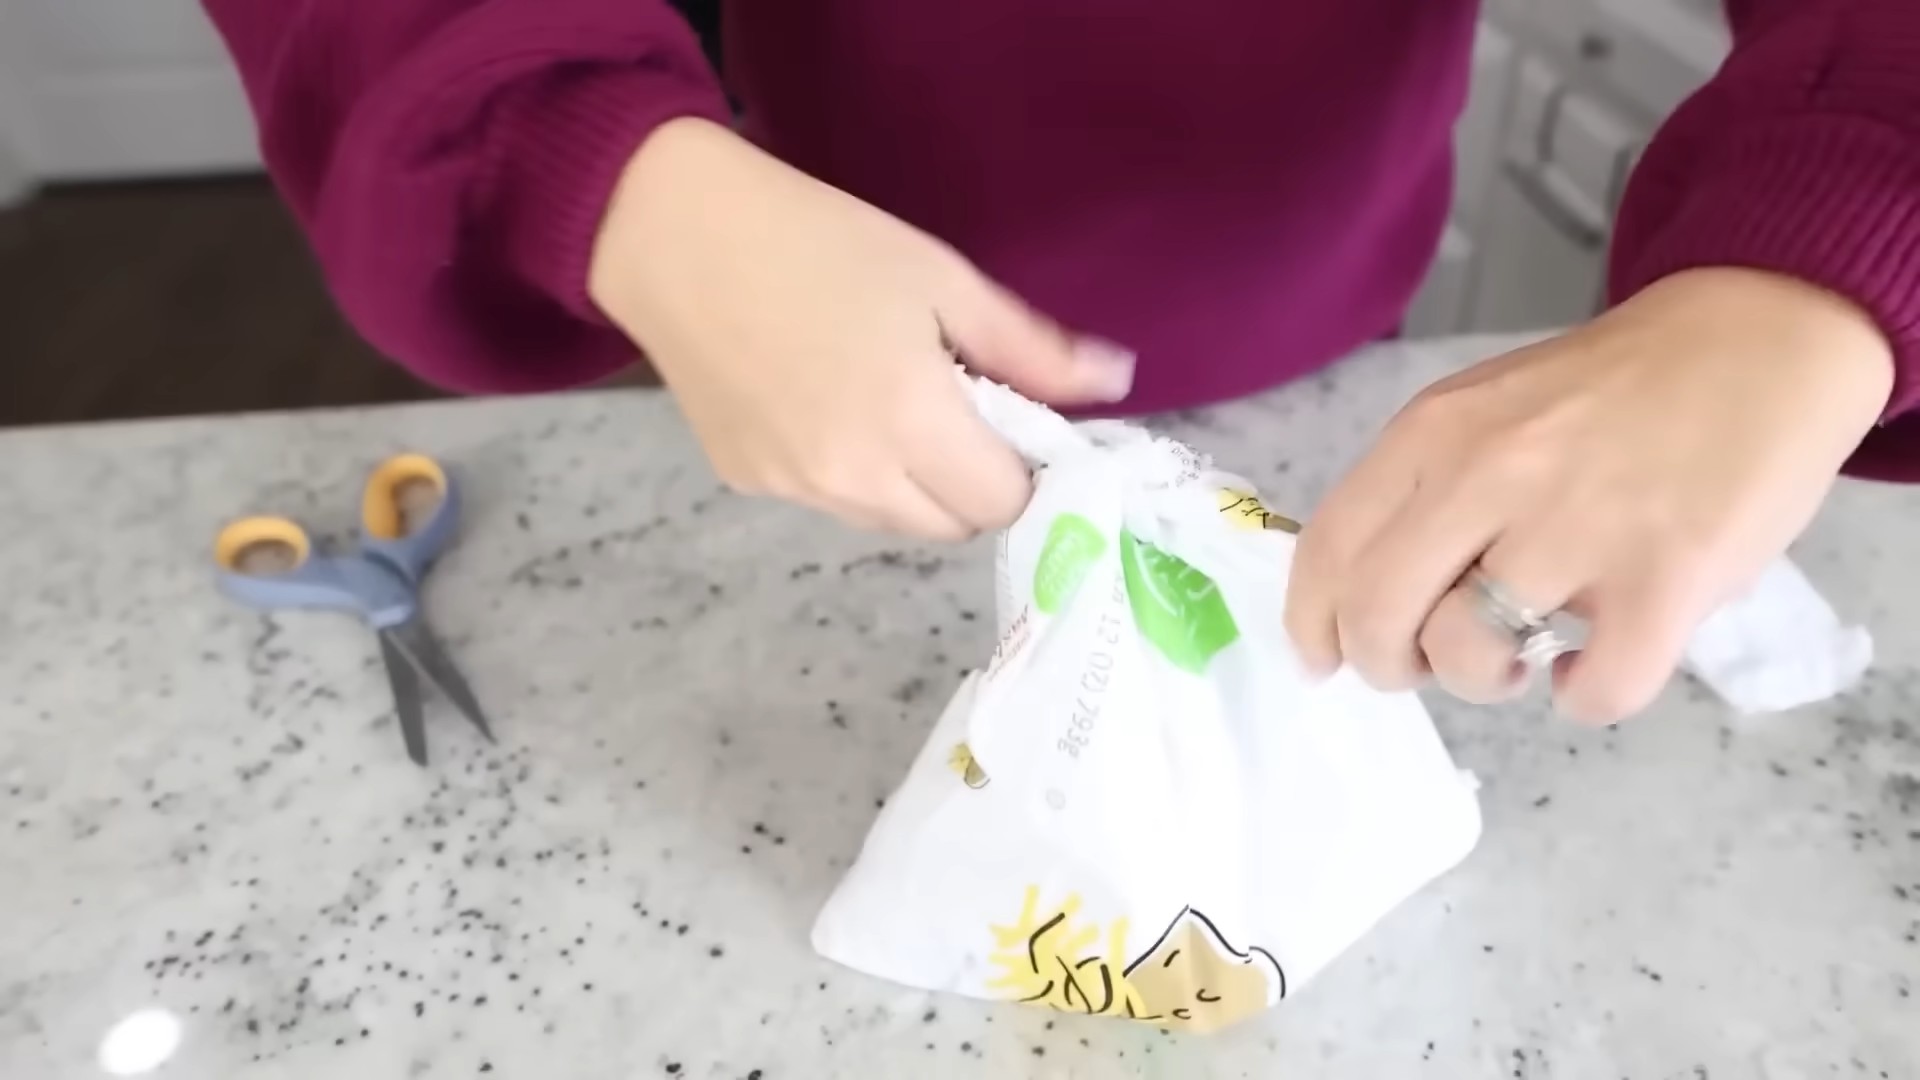
Method 2: The “Twist and Tuck” – Perfect for Bread Bags and Produce
This method is fantastic for closing bread bags, produce bags, or any other lightweight bag where you want a clean and secure closure. It’s also reusable, which is a big plus!
What you’ll need:
* The bag you want to tie.
Step-by-step instructions:
1. Twist the Bag Opening: Start by twisting the opening of the bag tightly. The tighter the twist, the more secure the closure will be.
2. Fold the Twist: Fold the twisted portion of the bag in half, creating a loop.
3. Tuck the End Through the Loop: Take the end of the twisted portion and tuck it through the loop you just created.
4. Pull Tight: Gently pull on the end of the twisted portion to tighten the closure. The tucked end will act as a stopper, preventing the bag from unraveling.
5. Adjust and Reuse: Adjust the tightness of the closure as needed. To open the bag, simply untuck the end and untwist. You can reuse this method over and over again!
Method 3: The “Surgeon’s Knot” – Extra Security for Heavy Bags
When you need a super-secure knot for heavy bags, like those filled with yard waste or construction debris, the surgeon’s knot is your best friend. It’s similar to a regular overhand knot, but with an extra twist for added grip.
What you’ll need:
* The bag you want to tie.
Step-by-step instructions:
1. Gather the Bag Opening: As with the other methods, start by gathering the opening of the bag.
2. Create the First Loop: Form a loop with the gathered bag opening, just like you’re starting a regular overhand knot.
3. Pass the End Through the Loop TWICE: This is the key to the surgeon’s knot. Instead of passing the end of the bag opening through the loop once, pass it through twice.
4. Tighten the Knot: Pull on both ends of the bag opening to tighten the knot. The extra twist will create more friction, making the knot much less likely to slip.
5. Double Check: Make sure the knot is snug and secure. This knot is designed for heavy loads, so you want to be confident that it will hold.
Method 4: The “Baler’s Knot” – For Bundling and Securing Large Items
This knot is a bit more advanced, but it’s incredibly useful for bundling items together, like newspapers, cardboard, or even branches. It creates a strong, self-tightening loop that won’t easily come undone. I use this all the time in my garden.
What you’ll need:
* Strong twine or rope (jute twine works well).
* The items you want to bundle.
Step-by-step instructions:
1. Wrap the Twine Around the Bundle: Start by wrapping the twine around the items you want to bundle. Leave a generous tail of twine at one end.
2. Create a Loop: Bring the long end of the twine back towards the tail, forming a loop around the bundle.
3. Pass the Long End Through the Loop: Pass the long end of the twine through the loop you just created.
4. Twist the Loop: Twist the loop several times, creating a tighter, more secure connection.
5. Pass the Long End Through the Twisted Loop: Pass the long end of the twine through the twisted loop.
6. Pull Tight: Pull on both ends of the twine to tighten the knot. As you pull, the loop will tighten around the bundle, creating a secure hold.
7. Secure the Ends: Tie the ends of the twine together with a square knot or another secure knot.
8. Trim Excess Twine: Trim any excess twine, leaving a neat and tidy bundle.
Method 5: Using Bag Clips or Ties – The Reusable Option
Okay, this isn’t technically a knot, but it’s such a useful and reusable option that I had to include it. Bag clips and ties are perfect for closing bags of chips, cereal, coffee, or anything else you want to keep fresh.
What you’ll need:
* Bag clips or ties (you can find these at most grocery stores or online).
* The bag you want to close.
Step-by-step instructions:
1. Gather the Bag Opening: Gather the opening of the bag, just like you would for a knot.
2. Fold Over the Opening: Fold over the opening of the bag several times to create a tight seal.
3. Attach the Clip or Tie: Attach the bag clip or tie to the folded-over portion of the bag. Make sure it’s securely fastened.
4. Enjoy Your Fresh Food: That’s it! Your bag is now closed and your food will stay fresh for longer.
Method 6: The “Rubber Band Wrap” – Quick and Easy for Small Bags
This is a super simple method that’s perfect for closing small bags, like snack bags or sandwich bags. All you need is a rubber band!
What you’ll need:
* A rubber band.
* The bag you want to close.
Step-by-step instructions:
1. Gather the Bag Opening: Gather the opening of the bag.
2. Fold Over the Opening: Fold over the opening of the bag several times to create a tight seal.
3. Wrap the Rubber Band: Wrap the rubber band tightly around the folded-over portion of the bag.
4. Secure the Ends: Tuck the ends of the rubber band under the wrapped portion to secure it in place.
Tips for Choosing the Right Bag-Tying Method
* Consider the Weight of the Bag: For heavy bags, you’ll need a stronger knot, like the surgeon’
Conclusion
So, there you have it! Mastering these simple yet effective bag tying ideas can truly revolutionize your kitchen organization, food storage, and even your on-the-go lifestyle. No more struggling with flimsy knots that come undone, spilled contents, or wasted plastic. These aren’t just bag tying ideas; they’re solutions to everyday frustrations.
Why is this a must-try? Because it’s practical, cost-effective, and reduces waste. Think about it: how many times have you thrown away a perfectly good bag simply because you couldn’t properly seal it? These techniques extend the life of your bags, saving you money and contributing to a more sustainable lifestyle. Plus, a well-tied bag is a happy bag – and a happy bag means less mess and more peace of mind.
But don’t stop there! Experiment with different variations to find what works best for you. For example, if you’re dealing with particularly delicate items, try the “overhand knot with a twist” for extra security. Or, if you’re looking for a super quick solution for bread bags, the “folded top and clip” method is your best bet. Consider using reusable bag ties or even decorative ribbons for a touch of flair. The possibilities are endless!
We’ve covered several methods, from the basic overhand knot to the more secure surgeon’s knot and even some creative folding techniques. Each method has its own advantages, so choose the one that best suits the type of bag you’re using and the contents you’re storing. Remember, practice makes perfect! Don’t be discouraged if your first few attempts aren’t flawless. Keep experimenting, and you’ll soon be tying bags like a pro.
Ultimately, these bag tying ideas are about more than just closing a bag; they’re about efficiency, organization, and resourcefulness. They’re about taking control of your kitchen and your life, one perfectly tied bag at a time.
So, what are you waiting for? Grab a bag, pick a technique, and give it a try! We’re confident that you’ll be amazed at how much of a difference these simple methods can make. And most importantly, we want to hear about your experience! Share your favorite bag tying ideas, tips, and tricks in the comments below. Let’s create a community of bag-tying enthusiasts and help each other master the art of the perfect seal. Tell us which method worked best for you, any variations you discovered, or any challenges you encountered. Your feedback is invaluable and will help us continue to improve and refine these techniques. Let’s tie it all together!
FAQ
What are the benefits of learning different bag tying techniques?
Learning various bag tying techniques offers a multitude of benefits. Firstly, it enhances food preservation by creating airtight seals, preventing spoilage and extending the shelf life of your groceries. Secondly, it promotes better organization in your kitchen and pantry, reducing clutter and making it easier to find what you need. Thirdly, it minimizes waste by allowing you to reuse bags multiple times, contributing to a more sustainable lifestyle. Finally, it saves you money by reducing food waste and the need to constantly purchase new bags. Beyond the kitchen, these skills are useful for securing items during travel, organizing craft supplies, and even for outdoor activities like camping and hiking.
Which bag tying method is best for keeping food fresh?
For optimal food freshness, the “surgeon’s knot” or a tightly folded top secured with a clip are excellent choices. The surgeon’s knot creates a very secure and airtight seal, preventing air from entering the bag and causing food to spoil. The folded top method, when combined with a clip or rubber band, also provides a good barrier against air and moisture. For particularly delicate items or those prone to freezer burn, consider double-bagging and using one of these secure tying methods. Remember to squeeze out any excess air before sealing the bag to further enhance freshness.
Can these bag tying ideas be used for things other than food storage?
Absolutely! These bag tying ideas are incredibly versatile and can be applied to a wide range of situations beyond food storage. They’re perfect for organizing craft supplies like beads, buttons, and yarn. You can use them to secure small parts and components in your workshop or garage. They’re also handy for packing toiletries and other essentials when traveling. Outdoors, these techniques can be used to secure garbage bags, bundle firewood, or even create makeshift repairs in a pinch. The possibilities are truly endless!
What if I’m having trouble getting the knots tight enough?
If you’re struggling to get the knots tight enough, there are a few things you can try. First, make sure you’re using the correct technique for the type of bag you’re working with. Thinner bags may require a more delicate touch, while thicker bags can withstand a tighter pull. Second, practice your knot-tying skills regularly. The more you practice, the better you’ll become at judging the right amount of tension. Third, consider using a tool like a small clamp or pliers to help you tighten the knot. Finally, if all else fails, try a different bag tying method that you find easier to execute.
Are there any eco-friendly alternatives to using plastic bags?
Yes, there are many eco-friendly alternatives to using plastic bags. Reusable cloth bags are a great option for grocery shopping and other errands. Silicone food storage bags are durable, washable, and can be used in the freezer and microwave. Beeswax wraps are a natural and biodegradable alternative to plastic wrap. Glass containers with airtight lids are also an excellent choice for storing food in the refrigerator or pantry. By making small changes to your habits, you can significantly reduce your reliance on plastic bags and contribute to a more sustainable future.
How can I prevent bags from tearing when tying them?
To prevent bags from tearing when tying them, avoid pulling too hard on the bag material, especially with thinner plastic bags. Distribute the pressure evenly when creating the knot. If the bag is already damaged or weakened, reinforce the area around the knot with tape or a small piece of cloth. Consider using a bag tying method that doesn’t require excessive pulling or twisting, such as the folded top method with a clip. Also, be mindful of the contents of the bag. Sharp or heavy items can put extra stress on the bag material, increasing the risk of tearing.
What are some creative ways to decorate tied bags?
Decorating tied bags can add a personal touch and make them more visually appealing. Use colorful ribbons or twine to tie the bags instead of plain plastic ties. Add decorative tags or labels with handwritten messages or fun designs. Use stamps or stencils to create patterns on the bags. You can even use fabric markers to draw directly on the bags. For special occasions, consider using themed decorations like holiday-themed ribbons or stickers. Get creative and let your personality shine through!


Leave a Comment