
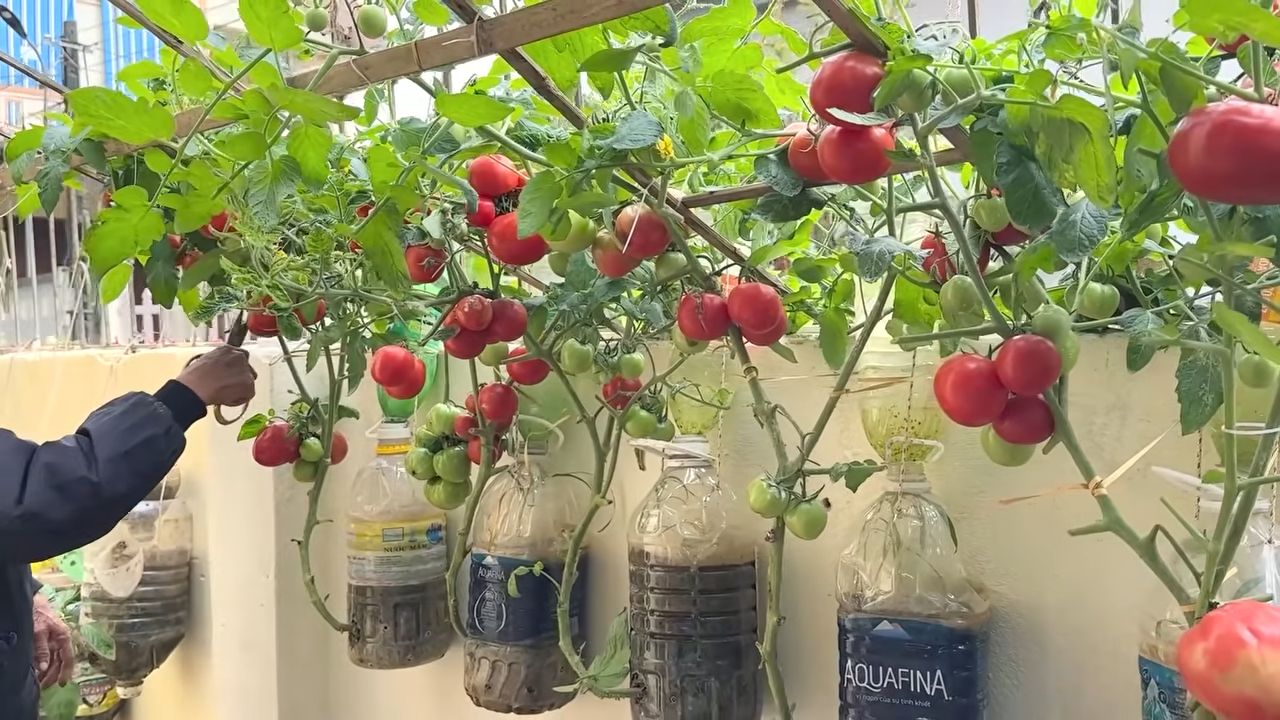
Non Stop Tomato Harvest – imagine baskets overflowing with juicy, sun-ripened tomatoes all season long! Sounds like a dream, right? Well, it doesn’t have to be! For centuries, gardeners have sought the secret to bountiful harvests, and while there’s no magic wand, I’m here to share some incredible DIY tricks and hacks that will help you achieve exactly that: a non stop tomato harvest.
From ancient Incan terraces to modern-day urban gardens, the tomato has held a special place in our hearts (and our stomachs!). But let’s face it, sometimes our tomato plants are a little… temperamental. They might give us a few fruits and then decide they’re done for the year. That’s where these DIY solutions come in.
Are you tired of seeing your neighbor’s tomato plants bursting with fruit while yours are struggling? Do you dream of making homemade sauces and salsas with your own homegrown tomatoes, but never seem to have enough? This article is for you! I’m going to reveal simple, effective, and budget-friendly techniques that will transform your tomato-growing game. Get ready to enjoy a continuous supply of delicious tomatoes, all thanks to these easy DIY tricks!
DIY Non-Stop Tomato Harvest: My Secret to Bumper Crops All Season Long!
Hey fellow gardeners! Are you tired of the tomato harvest rollercoaster – a burst of red, then weeks of waiting? I was too! That’s why I developed this system for a truly non-stop tomato harvest. It’s a combination of techniques, timing, and a little bit of tomato-loving magic. Get ready to be overwhelmed with delicious, juicy tomatoes all season long!
Choosing the Right Tomato Varieties
Before we even think about planting, let’s talk varieties. This is crucial for a continuous harvest. You can’t just plant one type and expect it to produce forever. We need a strategic mix!
* Early Season Varieties: These are your sprinters. They’ll give you that first taste of summer. Think ‘Early Girl’, ‘Sungold’ (my absolute favorite!), or ‘Bush Early Girl’.
* Mid-Season Varieties: These are your reliable workhorses. They’ll keep the tomatoes coming after the early birds have slowed down. ‘Celebrity’, ‘Better Boy’, and ‘Roma’ are great choices.
* Late Season Varieties: These are the marathon runners. They’ll produce right up until frost. ‘Brandywine’, ‘San Marzano’, and ‘Cherokee Purple’ are excellent options.
I usually plant at least two of each type to ensure a steady supply. Don’t be afraid to experiment and find what grows best in your area!
Starting Your Tomato Seeds (or Buying Seedlings)
Okay, you have your varieties picked out. Now it’s time to get those little seeds started! I prefer to start my own seeds indoors, but buying healthy seedlings from a reputable nursery is perfectly fine too.
Starting Seeds Indoors (My Preferred Method)
This gives you a head start and allows you to control the growing environment.
1. Gather Your Supplies: You’ll need seed starting trays or small pots, seed starting mix (not regular potting soil!), a spray bottle, a heat mat (optional but helpful), and a grow light.
2. Sow the Seeds: Moisten the seed starting mix and fill your trays or pots. Plant 2-3 seeds per cell, about ¼ inch deep. Gently cover with more mix.
3. Water and Warmth: Mist the soil with the spray bottle to keep it moist. Place the trays on a heat mat (if using) and under a grow light. The ideal temperature is around 70-75°F.
4. Keep Moist and Wait: Keep the soil consistently moist, but not soggy. Seeds should germinate in 5-10 days.
5. Thin Seedlings: Once the seedlings have their first true leaves (the second set of leaves), thin them to one seedling per cell. Choose the strongest, healthiest-looking one.
6. Harden Off: About a week before you plan to transplant them outdoors, you need to “harden off” the seedlings. This means gradually exposing them to outdoor conditions. Start by placing them outside for an hour or two each day, increasing the time each day. This will help them adjust to the sun, wind, and temperature changes.
Buying Seedlings
If you’re buying seedlings, look for healthy plants with sturdy stems and green leaves. Avoid plants that are leggy, yellowed, or have spots on their leaves.
Preparing Your Garden Bed
Tomatoes are heavy feeders, so preparing your garden bed properly is essential for a bountiful harvest.
1. Choose a Sunny Location: Tomatoes need at least 6-8 hours of sunlight per day.
2. Amend the Soil: Tomatoes thrive in well-drained, fertile soil. Amend your soil with plenty of compost, aged manure, or other organic matter. This will improve drainage, aeration, and nutrient content.
3. Check the pH: Tomatoes prefer a soil pH of 6.0-6.8. You can test your soil pH with a soil testing kit. If your soil is too acidic, add lime. If it’s too alkaline, add sulfur.
4. Add Fertilizer: Incorporate a slow-release fertilizer formulated for tomatoes into the soil. This will provide a steady supply of nutrients throughout the growing season. I like to use one with a good balance of nitrogen, phosphorus, and potassium.
Transplanting Your Tomato Plants
Now for the exciting part – getting those tomato plants in the ground!
1. Wait for Warm Weather: Don’t transplant your tomatoes until the danger of frost has passed and the soil has warmed up.
2. Dig Holes: Dig holes that are slightly larger than the root ball of your tomato plants. Space the plants according to the variety. Determinate (bush) varieties can be planted closer together than indeterminate (vining) varieties. Check the plant tag for specific spacing recommendations.
3. Plant Deep: This is a trick I swear by! Plant your tomato plants deep, burying the stem up to the first set of leaves. Tomatoes can grow roots along their stems, which will result in a stronger, healthier plant.
4. Remove Lower Leaves: Before planting, remove the lower leaves from the stem that will be buried.
5. Add a Handful of Bone Meal: Place a handful of bone meal in the bottom of each hole. Bone meal is a good source of phosphorus, which promotes root development.
6. Water Thoroughly: After planting, water the tomato plants thoroughly.
Staggered Planting: The Key to a Continuous Harvest
This is where the magic really happens! We’re not just planting all our tomatoes at once. We’re staggering the planting to ensure a continuous supply.
1. First Planting: Plant your early season varieties as soon as the weather allows.
2. Second Planting: Two to three weeks later, plant your mid-season varieties.
3. Third Planting: Two to three weeks after that, plant your late-season varieties.
This staggered planting schedule will ensure that you have tomatoes ripening throughout the entire growing season.
Supporting Your Tomato Plants
Tomato plants, especially indeterminate varieties, need support to keep them off the ground and prevent disease.
* Staking: This is the simplest method. Drive a sturdy stake into the ground next to each plant and tie the main stem to the stake with soft twine.
* Caging: Tomato cages are a good option for determinate varieties. Place the cage over the plant when you transplant it.
* Trellising: This is a more elaborate method, but it can be very effective for indeterminate varieties. Build a trellis and train the tomato plants to grow up it.
I personally prefer using a combination of staking and caging, depending on the variety.
Watering and Fertilizing
Consistent watering and fertilizing are essential for a healthy tomato crop.
* Watering: Water deeply and regularly, especially during hot, dry weather. Avoid overhead watering, which can promote disease. Aim for watering at the base of the plant.
* Fertilizing: Fertilize your tomato plants every 2-3 weeks with a balanced fertilizer. You can also use a liquid fertilizer, such as fish emulsion or seaweed extract.
Pruning Your Tomato Plants
Pruning can help improve air circulation, reduce disease, and encourage fruit production.
* Suckers: Remove the suckers that grow in the crotch between the main stem and the branches. These suckers will steal energy from the plant and reduce fruit production.
* Lower Leaves: Remove any yellowed or diseased leaves from the bottom of the plant.
I usually prune my tomato plants every week or two.
Pest and Disease Control
Tomatoes are susceptible to a variety of pests and diseases. Here are some common problems and how to deal with them:
* Aphids: Spray with insecticidal soap.
* Tomato Hornworms: Handpick them off the plants.
* Blossom End Rot: This is caused by a calcium deficiency. Add calcium to the soil or spray the plants with a calcium solution.
* Early Blight: Remove infected leaves and spray with a fungicide.
The best way to prevent pests and diseases is to keep your plants healthy and provide good air circulation.
Succession Planting for Even More Tomatoes!
To *really* maximize your tomato harvest, consider succession planting. This means planting a second round of early and mid-season varieties a few weeks after your initial planting. This will give you another wave of tomatoes later in the season. I usually start my second round of seeds indoors about 4-6 weeks after my first planting.
Harvesting Your Tomatoes
Finally, the moment we’ve all been waiting for – harvesting those delicious tomatoes!
* Pick When Ripe: Tomatoes are ripe when they are fully colored and slightly soft to the touch.
* Gently Twist: Gently twist the tomato off the vine.
* Enjoy! Eat them fresh, make sauce, can them, or share them with your friends and neighbors.
Extending the Season
Conclusion
If you’re tired of bland, store-bought tomatoes and dream of a garden overflowing with juicy, flavorful fruit, then this DIY trick for a non stop tomato harvest is an absolute game-changer. We’ve explored a simple yet incredibly effective method to maximize your tomato production, ensuring you’re enjoying fresh, homegrown tomatoes throughout the entire growing season. This isn’t just about getting more tomatoes; it’s about experiencing the unparalleled taste and satisfaction that comes from nurturing your own food.
The beauty of this technique lies in its adaptability. Feel free to experiment with different tomato varieties to discover which ones thrive best in your local climate and soil conditions. Consider using companion planting strategies, such as basil or marigolds, to further enhance the health and productivity of your tomato plants. You can also adjust the frequency of feeding based on the specific needs of your chosen tomato variety. Some gardeners have even found success using diluted seaweed extract as a foliar spray to boost overall plant vigor and fruit production.
Beyond the core method, think about optimizing your watering schedule. Consistent, deep watering is crucial, especially during fruit development. Avoid overhead watering, which can lead to fungal diseases. Instead, focus on watering at the base of the plant, ensuring the roots receive adequate moisture. Mulching around your tomato plants is another excellent way to retain moisture, suppress weeds, and regulate soil temperature.
This DIY approach isn’t just about following a set of instructions; it’s about understanding the fundamental principles of tomato cultivation and tailoring them to your specific garden environment. Observe your plants closely, pay attention to their needs, and don’t be afraid to experiment. The more you learn about your tomato plants, the more successful you’ll be in achieving a bountiful harvest.
We are confident that by implementing this DIY trick, you’ll be amazed by the increase in your tomato yield. Imagine the possibilities: fresh tomato salads, homemade sauces, delicious sandwiches, and so much more, all made with tomatoes you grew yourself.
So, what are you waiting for? Grab your gardening gloves, gather your supplies, and get ready to transform your tomato patch into a thriving oasis. We encourage you to try this DIY trick for a non stop tomato harvest and share your experiences with us. Let us know what worked best for you, any variations you tried, and the incredible results you achieved. Your insights could help other gardeners unlock the secrets to a truly abundant tomato harvest. Share your photos and stories in the comments below – we can’t wait to hear from you! Let’s cultivate a community of thriving tomato growers!
Frequently Asked Questions (FAQ)
Q: What type of tomatoes work best with this DIY method for a non stop tomato harvest?
A: While this method can benefit most tomato varieties, indeterminate tomatoes (those that continue to grow and produce fruit throughout the season) tend to respond particularly well. These include popular choices like cherry tomatoes, grape tomatoes, beefsteak tomatoes, and Roma tomatoes. Determinate tomatoes (those that grow to a certain size and produce all their fruit at once) can also benefit, but you may need to stagger your planting times to ensure a continuous harvest. Experimenting with different varieties is always a good idea to see what thrives best in your specific garden conditions. Heirloom varieties, known for their unique flavors and colors, can also be excellent choices.
Q: How often should I fertilize my tomato plants to achieve a non stop tomato harvest?
A: The frequency of fertilization depends on the type of fertilizer you’re using and the specific needs of your tomato plants. As a general guideline, fertilize every 2-3 weeks with a balanced fertilizer that’s specifically formulated for tomatoes. Look for a fertilizer with a higher phosphorus content (the middle number in the N-P-K ratio), as phosphorus is essential for fruit development. Organic options like compost tea or fish emulsion can also be used. Avoid over-fertilizing, as this can lead to excessive foliage growth at the expense of fruit production. Monitor your plants closely and adjust your fertilization schedule accordingly. Yellowing leaves can indicate a nutrient deficiency, while excessive green growth with little fruit can indicate over-fertilization.
Q: What are some common tomato plant problems and how can I prevent them?
A: Tomato plants are susceptible to several common problems, including blossom end rot, early blight, and tomato hornworms. Blossom end rot, characterized by a dark, leathery spot on the bottom of the tomato, is caused by a calcium deficiency. To prevent it, ensure consistent watering and consider adding calcium to the soil. Early blight is a fungal disease that causes dark spots on the leaves. To prevent it, avoid overhead watering, provide good air circulation, and remove any infected leaves promptly. Tomato hornworms are large green caterpillars that can quickly defoliate your tomato plants. Handpicking them off the plants is usually the most effective control method. Regularly inspect your plants for signs of pests and diseases and take action promptly to prevent them from spreading.
Q: Can I use this DIY method for a non stop tomato harvest in containers?
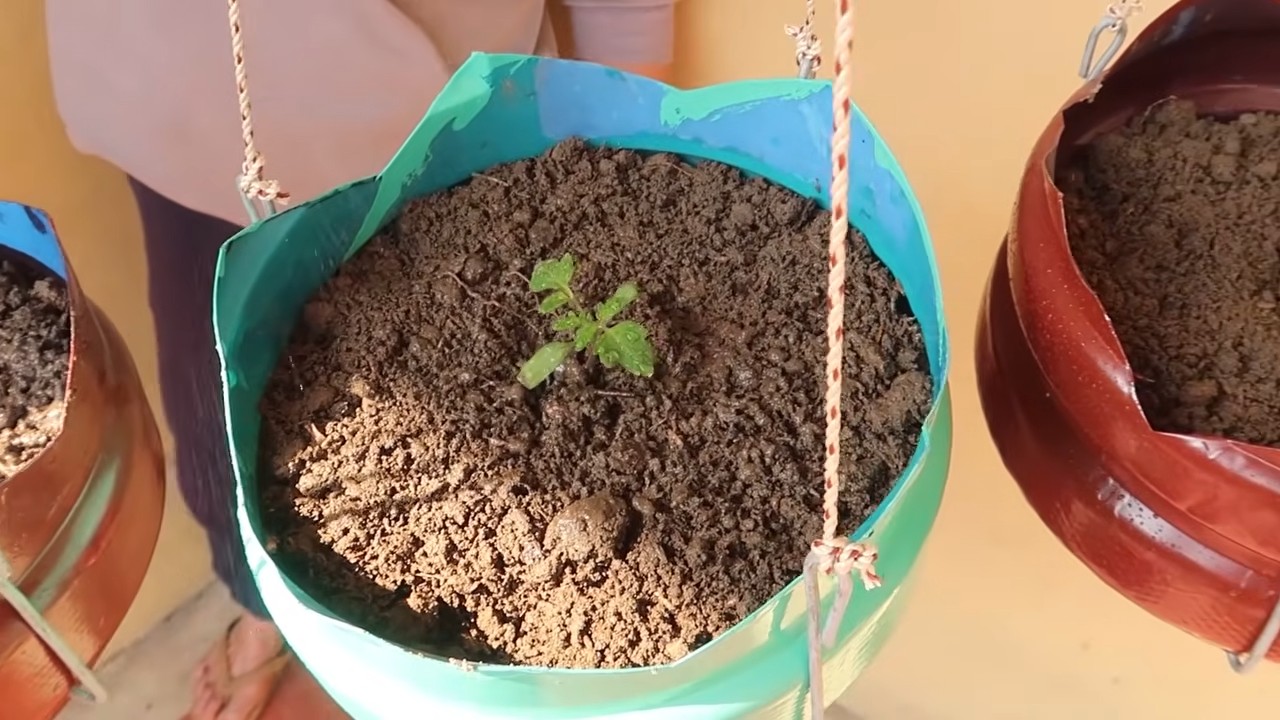
A: Yes, this method can be adapted for container gardening. Choose large containers (at least 15-20 gallons) to provide adequate space for the roots to grow. Use a high-quality potting mix that drains well. Container-grown tomatoes tend to dry out more quickly than those grown in the ground, so be sure to water them regularly, especially during hot weather. You may also need to fertilize them more frequently, as nutrients can leach out of the soil more easily in containers. Select compact or dwarf tomato varieties that are well-suited for container gardening. Providing support for your tomato plants, such as a stake or cage, is also essential, especially for taller varieties.
Q: How important is pruning for achieving a non stop tomato harvest?
A: Pruning is an important aspect of tomato plant care, especially for indeterminate varieties. Pruning helps to improve air circulation, reduce disease risk, and encourage fruit production. Remove suckers (the small shoots that grow between the main stem and the branches) to direct the plant’s energy towards fruit development. You can also prune away any yellowing or diseased leaves. Avoid over-pruning, as this can reduce the plant’s ability to photosynthesize and produce energy. The goal is to create an open, airy structure that allows sunlight to penetrate the plant and promotes healthy growth.
Q: What are some good companion plants for tomatoes?
A: Companion planting can be a beneficial strategy for improving the health and productivity of your tomato plants. Basil is a classic companion plant for tomatoes, as it repels pests and is believed to improve the flavor of the tomatoes. Marigolds are another excellent choice, as they deter nematodes and other soil pests. Other good companion plants for tomatoes include onions, garlic, carrots, and parsley. Avoid planting tomatoes near brassicas (such as cabbage, broccoli, and cauliflower), as they can compete for nutrients.
Q: How do I know when my tomatoes are ripe and ready to harvest?
A: The color of the tomato is the best indicator of ripeness. Tomatoes should be fully colored and slightly soft to the touch when they are ripe. Gently twist the tomato off the vine, being careful not to damage the plant. The tomato should come off easily when it’s ripe. The aroma of the tomato can also be a good indicator of ripeness. Ripe tomatoes will have a sweet, fragrant smell. Avoid harvesting tomatoes that are still green or hard, as they will not ripen properly off the vine.
Leave a Comment