
Plastic Bottle Cabbage Garden: Ever dreamed of harvesting your own crisp, delicious cabbage but thought you didn’t have the space? Or maybe you’re battling pesky garden critters that seem to have a particular fondness for your leafy greens? Well, get ready to ditch those garden woes because I’m about to share a game-changing DIY trick that will revolutionize your gardening game!
Growing cabbage has been a staple in gardens for centuries, dating back to ancient times. Different cultures have cherished it for its nutritional value and versatility in cooking. But let’s face it, traditional cabbage gardening can be challenging, especially with limited space or persistent pests. That’s where the magic of upcycling comes in!
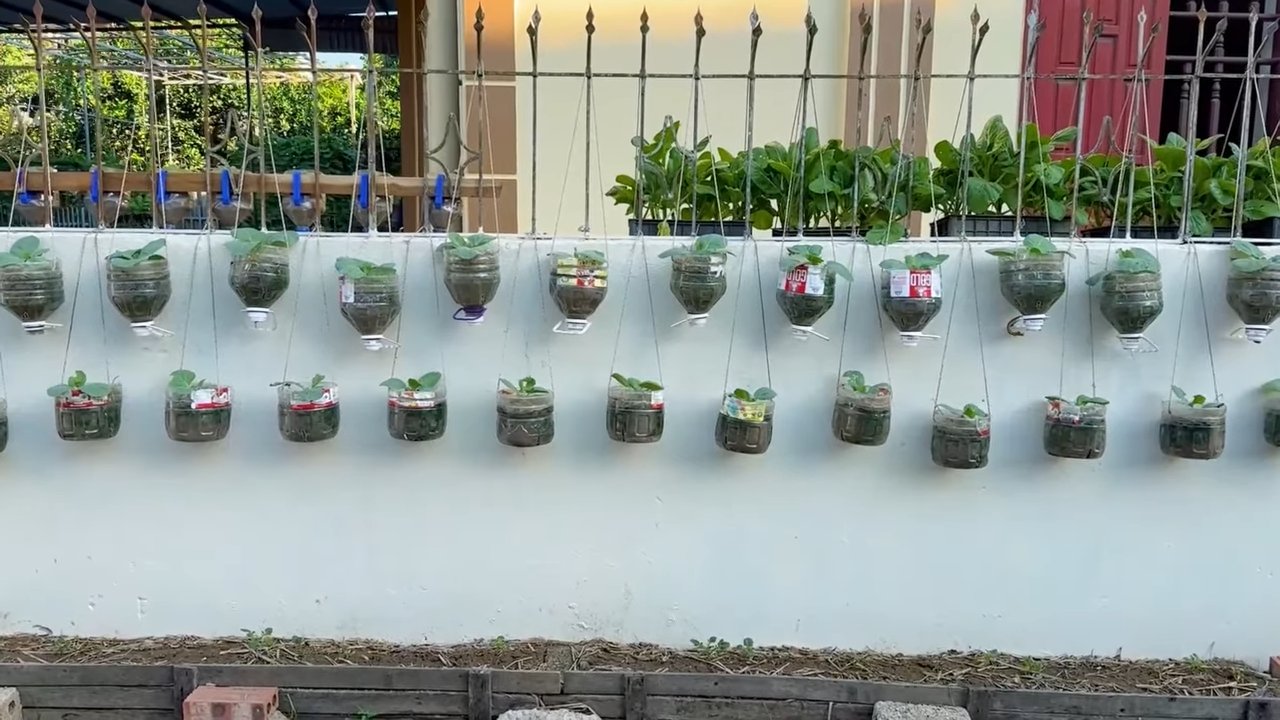
This DIY project isn’t just about growing cabbage; it’s about embracing sustainability and resourcefulness. We’re talking about transforming ordinary plastic bottles into miniature cabbage havens. Imagine a vertical garden bursting with vibrant green cabbages, all thanks to a few repurposed bottles. Not only does this method save space, making it perfect for balconies, patios, or small yards, but it also offers a protective barrier against common cabbage pests like cabbage worms and slugs. Plus, it’s incredibly budget-friendly! So, if you’re ready to embark on a fun, eco-conscious, and ultimately rewarding gardening adventure, let’s dive into creating your very own plastic bottle cabbage garden!
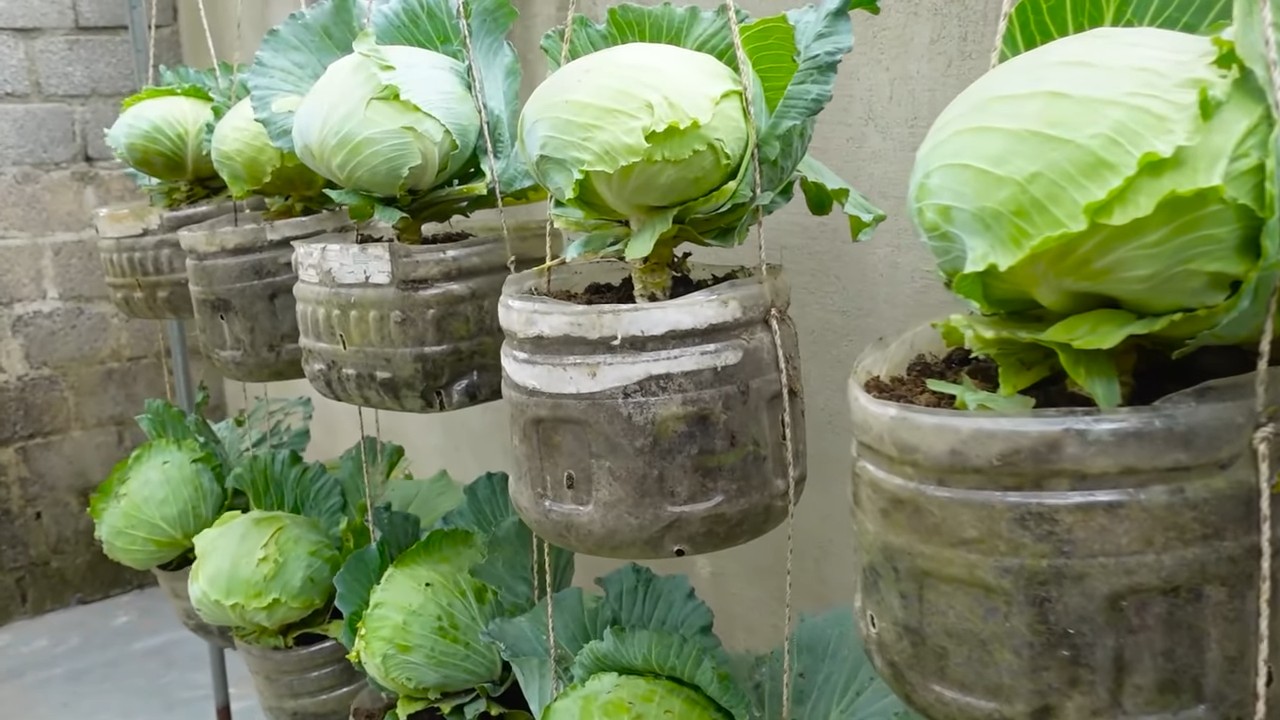
DIY Vertical Cabbage Garden from Plastic Bottles
Hey there, fellow gardening enthusiasts! Are you short on space but dreaming of a bountiful cabbage harvest? Well, you’ve come to the right place! I’m going to show you how to create a fantastic vertical cabbage garden using recycled plastic bottles. This project is not only eco-friendly but also a super fun and rewarding way to grow your own delicious veggies. Let’s get started!
What You’ll Need
Before we dive in, let’s gather all the necessary materials. Trust me, having everything ready beforehand will make the process much smoother.
* Plastic Bottles: Lots of them! The number depends on how big you want your vertical garden to be. I recommend using bottles of similar size for a more uniform look. Think about those 2-liter soda bottles or even larger water bottles.
* Potting Soil: Good quality potting soil is crucial for healthy cabbage growth. Avoid using garden soil directly, as it can be too dense and not provide adequate drainage.
* Cabbage Seedlings: You can either start your own cabbage seedlings or purchase them from a local nursery. Choose varieties that are well-suited to your climate.
* Scissors or Utility Knife: For cutting the plastic bottles. Be careful and always use appropriate safety measures.
* Drill or Awl: To create drainage holes in the bottles.
* Strong Rope or Twine: For hanging the bottles. Make sure it’s durable enough to support the weight of the soil and plants.
* Measuring Tape or Ruler: To ensure consistent spacing between the bottles.
* Gloves: To protect your hands while working with soil and plastic.
* Watering Can or Hose: For watering your cabbage plants.
* Optional: Spray Paint: If you want to add a splash of color to your vertical garden, grab some spray paint suitable for plastic.
Preparing the Plastic Bottles
This is a crucial step, so pay close attention! We need to transform those bottles into suitable containers for our cabbage plants.
1. Clean the Bottles: Thoroughly wash all the plastic bottles with soap and water to remove any residue. Rinse them well and let them dry completely. This will help prevent any contamination of the soil.
2. Cut the Bottles: This is where the scissors or utility knife comes in. There are a couple of ways you can cut the bottles, depending on the look you’re going for.
* Option 1: Horizontal Cut: Cut each bottle horizontally, about two-thirds of the way up from the bottom. This will create a larger opening for planting. You can discard the top portion or save it for other projects.
* Option 2: Vertical Cut: Cut a rectangular opening on one side of the bottle, leaving the rest of the bottle intact. This method is good if you want to retain more of the bottle’s structure.
Important Safety Tip: Always cut away from yourself and use a stable surface. If using a utility knife, be extra cautious as the blades are very sharp.
3. Drill Drainage Holes: Use a drill or awl to create several drainage holes in the bottom of each bottle. This is essential to prevent waterlogging, which can lead to root rot. I usually make about 4-5 holes, depending on the size of the bottle.
4. Optional: Paint the Bottles: If you want to add some color to your vertical garden, now is the time to spray paint the bottles. Choose colors that complement your garden or create a vibrant, eye-catching display. Make sure to use spray paint that is specifically designed for plastic and apply it in a well-ventilated area. Let the paint dry completely before moving on to the next step.
Assembling the Vertical Garden
Now comes the fun part – putting everything together! This is where your creativity can really shine.
1. Decide on Your Hanging Method: There are several ways you can hang your plastic bottle garden. Here are a couple of popular options:
* Option 1: Vertical Stringing: This involves stringing the bottles together vertically, one above the other. This is a simple and effective method, especially if you have a sturdy support structure like a fence or wall.
* Option 2: Horizontal Hanging: This involves hanging the bottles horizontally, side by side. This method is good if you want to create a wider, more sprawling garden.
2. Prepare the Rope or Twine: Cut the rope or twine into appropriate lengths, depending on the height of your desired vertical garden and the hanging method you’ve chosen. Make sure to leave enough extra length for tying knots and securing the bottles.
3. String the Bottles (Vertical Stringing): If you’re going with the vertical stringing method, thread the rope or twine through the drainage holes in the bottom of each bottle. Tie a knot below each bottle to secure it in place. Make sure the bottles are spaced evenly apart. I usually aim for about 6-8 inches between bottles.
4. Hang the Bottles (Horizontal Hanging): For the horizontal hanging method, you’ll need to create a support structure for the bottles. You can use a piece of wood, a metal rod, or even a sturdy branch. Attach the bottles to the support structure using rope or twine, making sure they are securely fastened.
5. Secure the Top: Once all the bottles are in place, secure the top of the rope or twine to your chosen support structure. Make sure the structure is strong enough to support the weight of the entire garden.
Planting the Cabbage Seedlings
Alright, we’re almost there! Now it’s time to get those cabbage seedlings into their new homes.
1. Fill the Bottles with Potting Soil: Carefully fill each bottle with good quality potting soil. Leave about an inch of space at the top of the bottle to prevent the soil from spilling out when you water.
2. Plant the Cabbage Seedlings: Gently remove the cabbage seedlings from their containers. Loosen the roots slightly and plant each seedling in the center of a bottle. Make sure the top of the root ball is level with the surface of the soil.
3. Water Thoroughly: After planting, water the cabbage seedlings thoroughly. This will help settle the soil and encourage root growth.
Caring for Your Vertical Cabbage Garden
Congratulations! You’ve successfully created your own vertical cabbage garden. Now, let’s talk about how to keep those cabbages happy and healthy.
1. Watering: Cabbages need consistent moisture, so water your vertical garden regularly, especially during hot and dry weather. Check the soil moisture by sticking your finger into the soil. If it feels dry, it’s time to water. Avoid overwatering, as this can lead to root rot.
2. Sunlight: Cabbages need at least 6 hours of sunlight per day. Choose a location for your vertical garden that receives plenty of sunlight. If you live in a particularly hot climate, you may need to provide some afternoon shade to prevent the plants from getting scorched.
3. Fertilizing: Cabbages are heavy feeders, so they need regular fertilization. Use a balanced fertilizer specifically formulated for vegetables. Follow the instructions on the fertilizer package. I like to use a slow-release fertilizer at planting time and then supplement with a liquid fertilizer every few weeks.
4. Pest Control: Keep an eye out for common cabbage pests like cabbage worms, aphids, and slugs. There are several ways to control these pests, including hand-picking, using insecticidal soap, or applying Bacillus thuringiensis (Bt), a natural bacterium that is effective against cabbage worms.
5. Weeding: Regularly remove any weeds that may pop up in your vertical garden. Weeds compete with your cabbage plants for nutrients and water.
6. Harvesting: Cabbages are typically ready to harvest in 60-80 days, depending on the variety. To harvest, simply cut the cabbage head from the stem using a sharp knife.
Troubleshooting
Even with the best care, you might encounter some challenges along the way. Here are a few common problems and how to address them:
* Yellowing Leaves: This could be a sign of nutrient deficiency. Try fertilizing with a balanced fertilizer.
* Slow Growth: This could be due to insufficient sunlight or poor soil. Make sure your plants are getting enough sunlight and that the soil is well-draining and nutrient-rich.
* Pest Infestation: As mentioned earlier, keep an eye out for pests and take action promptly.
* Root Rot: This is caused by overwatering. Make sure your bottles have adequate drainage and avoid watering too frequently.
And there you have it! A complete guide to creating your own vertical cabbage garden from plastic bottles. I hope you found this tutorial helpful and inspiring. Happy gardening!
Conclusion
So, there you have it! Transforming discarded plastic bottles into a thriving cabbage garden is not just a clever upcycling project; it’s a sustainable solution that offers a multitude of benefits. From saving space and water to protecting your precious cabbages from pests and diseases, this DIY trick is a game-changer for both novice and experienced gardeners alike.
But why is this method a must-try? Beyond the obvious environmental advantages of reducing plastic waste, the plastic bottle cabbage garden offers unparalleled control over your growing environment. The individual bottles act as mini-greenhouses, warming the soil and promoting faster growth, especially during cooler seasons. The enclosed environment also minimizes the risk of slug and snail infestations, common culprits that can decimate a cabbage patch overnight. Furthermore, the vertical nature of the garden makes it ideal for small spaces, balconies, or even indoor gardening with proper lighting.
Consider these variations to personalize your plastic bottle cabbage garden:
* Tiered Towers: Stack multiple bottles on top of each other, creating a visually stunning and space-efficient tiered garden. Secure the bottles with strong adhesive or zip ties for added stability.
* Herb Combinations: Plant companion herbs like rosemary, thyme, or sage alongside your cabbages. These herbs not only enhance the flavor of your cabbages but also act as natural pest repellents.
* Colored Bottles: Experiment with different colored plastic bottles. While clear bottles are ideal for maximizing sunlight exposure, colored bottles can add a decorative touch to your garden. Be mindful that darker colors might absorb more heat.
* Hydroponic Adaptation: Adapt the plastic bottle system for hydroponic cabbage growing. Use a nutrient-rich water solution instead of soil and ensure proper drainage.
* Winter Protection: During harsh winter months, consider moving your plastic bottle cabbage garden indoors or covering it with a protective layer of horticultural fleece to shield your cabbages from frost.
The possibilities are truly endless! This DIY project is not only cost-effective and environmentally friendly but also incredibly rewarding. Imagine harvesting fresh, crisp cabbages from your own upcycled garden, knowing that you’ve contributed to a more sustainable future.
We wholeheartedly encourage you to try this plastic bottle cabbage garden trick. It’s a fun, engaging, and educational project that the whole family can enjoy. Don’t be afraid to experiment, adapt, and personalize the method to suit your specific needs and preferences.
Once you’ve created your own plastic bottle cabbage garden, we’d love to hear about your experience! Share your photos, tips, and challenges in the comments below. Let’s build a community of sustainable gardeners and inspire others to embrace the power of upcycling. Happy gardening!
Frequently Asked Questions (FAQ)
What type of plastic bottles are best for a plastic bottle cabbage garden?
Ideally, you should use clear, food-grade plastic bottles. These allow maximum sunlight penetration, which is crucial for cabbage growth. Avoid using bottles that have contained harmful chemicals or pesticides. Thoroughly clean and rinse the bottles before planting. Bottles that are 1-2 liters in size are generally a good starting point, but you can experiment with larger or smaller bottles depending on the size of your cabbage varieties. Ensure the plastic is sturdy enough to hold the weight of the soil and plant.
How do I prepare the plastic bottles for planting?
First, thoroughly clean the bottles with soap and water to remove any residue. Then, cut a large opening in the side of each bottle, large enough to accommodate the cabbage seedling and allow for easy watering. Drill or poke drainage holes in the bottom of the bottle to prevent waterlogging. You can also create a small lip or edge around the opening to help retain soil. If you’re planning on hanging the bottles, create holes near the top for attaching string or wire.
What type of soil should I use for my plastic bottle cabbage garden?
Use a well-draining potting mix that is rich in organic matter. A mixture of compost, peat moss, and perlite is ideal. Avoid using garden soil, as it can be too heavy and compact, hindering drainage and root growth. You can also add slow-release fertilizer to the soil to provide essential nutrients to your cabbages. Ensure the soil pH is slightly acidic, around 6.0 to 6.5, for optimal cabbage growth.
How often should I water my plastic bottle cabbage garden?
Water your cabbages regularly, especially during hot and dry weather. Check the soil moisture level daily by sticking your finger into the soil. If the top inch feels dry, it’s time to water. Water deeply, ensuring that the water drains out of the drainage holes. Avoid overwatering, as this can lead to root rot. Consider using a watering can with a gentle nozzle to avoid disturbing the soil.
How much sunlight do cabbages need in a plastic bottle garden?
Cabbages need at least 6 hours of direct sunlight per day to thrive. Place your plastic bottle cabbage garden in a sunny location that receives ample sunlight. If you’re growing your cabbages indoors, use grow lights to supplement natural sunlight. Rotate the bottles regularly to ensure even sunlight exposure on all sides of the plants.
How do I protect my cabbages from pests in a plastic bottle garden?
The enclosed environment of the plastic bottles can help protect your cabbages from some pests, but it’s still important to take precautions. Regularly inspect your plants for signs of pests, such as aphids, cabbage worms, or slugs. Handpick any pests you find. You can also use organic pest control methods, such as neem oil or insecticidal soap. Consider planting companion herbs like rosemary or thyme, which can help repel pests naturally.
Can I grow different varieties of cabbages in a plastic bottle garden?
Yes, you can grow different varieties of cabbages in a plastic bottle garden. Choose varieties that are well-suited for container gardening and have a compact growth habit. Consider planting different colored cabbages for a visually appealing garden. Be sure to label each bottle with the variety of cabbage you’ve planted.
How do I fertilize my cabbages in a plastic bottle garden?
Cabbages are heavy feeders and require regular fertilization. Use a balanced fertilizer that is specifically formulated for vegetables. Follow the instructions on the fertilizer package. You can also use organic fertilizers, such as compost tea or fish emulsion. Fertilize your cabbages every 2-3 weeks during the growing season.
How do I know when my cabbages are ready to harvest from a plastic bottle garden?
Cabbages are typically ready to harvest when the heads are firm and compact. The size of the head will vary depending on the variety. Gently squeeze the head to check for firmness. If the head feels solid, it’s ready to harvest. Use a sharp knife to cut the cabbage head from the stem.
What are some other plants I can grow in plastic bottles besides cabbages?
The plastic bottle gardening method is versatile and can be used to grow a variety of other plants, including lettuce, spinach, herbs, strawberries, and even some smaller varieties of tomatoes and peppers. Choose plants that have shallow root systems and don’t require a lot of space. Be sure to provide adequate support for vining plants.

Leave a Comment