
Indoor Sprout Growing System: Unlock the secrets to fresh, homegrown goodness right in your kitchen! Have you ever dreamt of enjoying crisp, nutrient-packed sprouts year-round, regardless of the weather outside? Well, dream no more! This DIY guide will walk you through creating your very own indoor sprout growing system, a simple and rewarding project that brings the vibrancy of nature indoors.
Sprouting, in its essence, is an ancient practice. Cultures around the globe, from the Far East to the Mediterranean, have long recognized the incredible nutritional power packed within these tiny seedlings. Think of the mung bean sprouts in your favorite stir-fry or the alfalfa sprouts adding a crunchy texture to your salad – these are just glimpses into the vast world of sprouting. For centuries, it’s been a way to access fresh, vital food, especially during lean seasons.
But why should *you* build an indoor sprout growing system? In today’s fast-paced world, we often sacrifice fresh, healthy food for convenience. Store-bought sprouts can be expensive and, let’s be honest, sometimes lack that vibrant freshness. With this DIY project, you’ll not only save money but also gain complete control over the quality and cleanliness of your sprouts. Plus, it’s incredibly satisfying to watch these little powerhouses of nutrition come to life right before your eyes. I’m excited to show you how easy it is to create your own thriving indoor garden, one sprout at a time!
DIY Indoor Sprossen-Anzuchtsystem: Dein eigener kleiner Garten in der Küche
Hey Leute! Habt ihr auch genug von labbrigen Salatblättern aus dem Supermarkt? Oder wollt ihr einfach nur frische, gesunde Sprossen das ganze Jahr über genießen, ohne dafür ein Vermögen auszugeben? Dann seid ihr hier genau richtig! Ich zeige euch, wie ihr ganz einfach euer eigenes Indoor-Sprossen-Anzuchtsystem baut. Es ist super easy, kostengünstig und macht richtig Spaß!
Was du brauchst: Die Materialliste
Bevor wir loslegen, hier eine Liste mit allen Materialien, die du für dein Sprossen-Paradies benötigst:
* Einmachgläser: Am besten eignen sich breite Einmachgläser (z.B. 1 Liter). Je mehr Gläser, desto mehr verschiedene Sprossen kannst du gleichzeitig ziehen. Ich empfehle mindestens 3-4 Gläser.
* Sprossendeckel oder Gaze: Du kannst spezielle Sprossendeckel kaufen, die ein feines Netz haben, oder einfach ein Stück Gaze (z.B. aus dem Bastelladen) verwenden. Wichtig ist, dass die Löcher klein genug sind, damit die Sprossen nicht durchfallen, aber groß genug, damit Luft und Wasser durchkommen.
* Gummiringe: Wenn du Gaze verwendest, brauchst du Gummiringe, um sie am Glas zu befestigen.
* Abtropfgestell oder Schüssel: Irgendetwas, worauf du die Gläser schräg stellen kannst, damit das Wasser gut abtropfen kann. Ein Abtropfgestell für Geschirr ist ideal, aber eine einfache Schüssel tut es auch.
* Sprossensamen: Hier kannst du dich austoben! Es gibt unzählige Sorten, von Alfalfa über Brokkoli bis hin zu Radieschen. Achte darauf, dass du spezielle Sprossensamen kaufst, die für den Verzehr geeignet sind.
* Wasser: Am besten gefiltertes Wasser oder abgekochtes, abgekühltes Wasser.
* Essig (optional): Ein Schuss Essig im Spülwasser hilft, Bakterien abzutöten.
Schritt-für-Schritt-Anleitung: So baust du dein Sprossen-System
Jetzt geht’s ans Eingemachte! Folge diesen Schritten, um dein eigenes Sprossen-Anzuchtsystem zu bauen:
1. Gläser vorbereiten: Reinige die Einmachgläser gründlich mit heißem Wasser und Spülmittel. Spüle sie anschließend gut aus, um alle Spülmittelreste zu entfernen. Du kannst auch einen Schuss Essig ins Spülwasser geben, um Bakterien abzutöten.
2. Sprossendeckel vorbereiten oder Gaze zuschneiden: Wenn du Sprossendeckel verwendest, kannst du diesen Schritt überspringen. Wenn du Gaze verwendest, schneide ein Stück zu, das etwas größer ist als die Öffnung des Glases.
3. Gaze befestigen: Lege die Gaze über die Öffnung des Glases und befestige sie mit einem Gummiring. Achte darauf, dass die Gaze straff sitzt, damit die Sprossen nicht durchfallen.
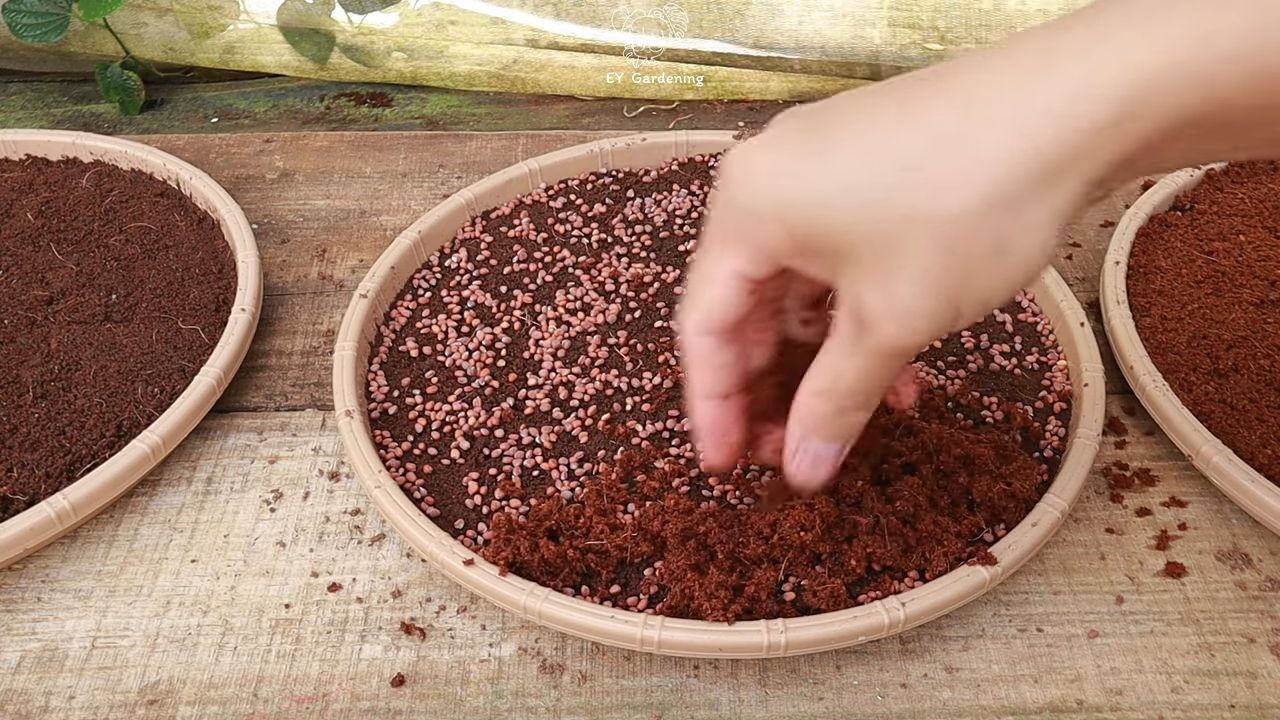
4. Samen einweichen: Gib die Sprossensamen in ein Glas und fülle es mit Wasser. Die Menge der Samen hängt von der Sorte ab. Als Faustregel gilt: Beginne mit 1-2 Esslöffeln Samen pro Glas. Lass die Samen je nach Sorte 4-12 Stunden einweichen. Die genaue Einweichzeit findest du auf der Samenpackung. Das Einweichen aktiviert die Keimung.
5. Wasser abgießen: Gieße das Einweichwasser ab. Spüle die Samen gründlich mit frischem Wasser durch den Sprossendeckel oder die Gaze.
6. Gläser schräg stellen: Stelle die Gläser schräg auf das Abtropfgestell oder in die Schüssel. So kann überschüssiges Wasser abtropfen und die Sprossen bekommen ausreichend Luft.
7. Spülen: Spüle die Sprossen 2-3 Mal täglich mit frischem Wasser. Achte darauf, dass das Wasser gut abläuft. Das Spülen verhindert Schimmelbildung und hält die Sprossen feucht.
8. Warten und beobachten: Nach einigen Tagen beginnen die Sprossen zu keimen. Beobachte sie genau und spüle sie weiterhin regelmäßig.
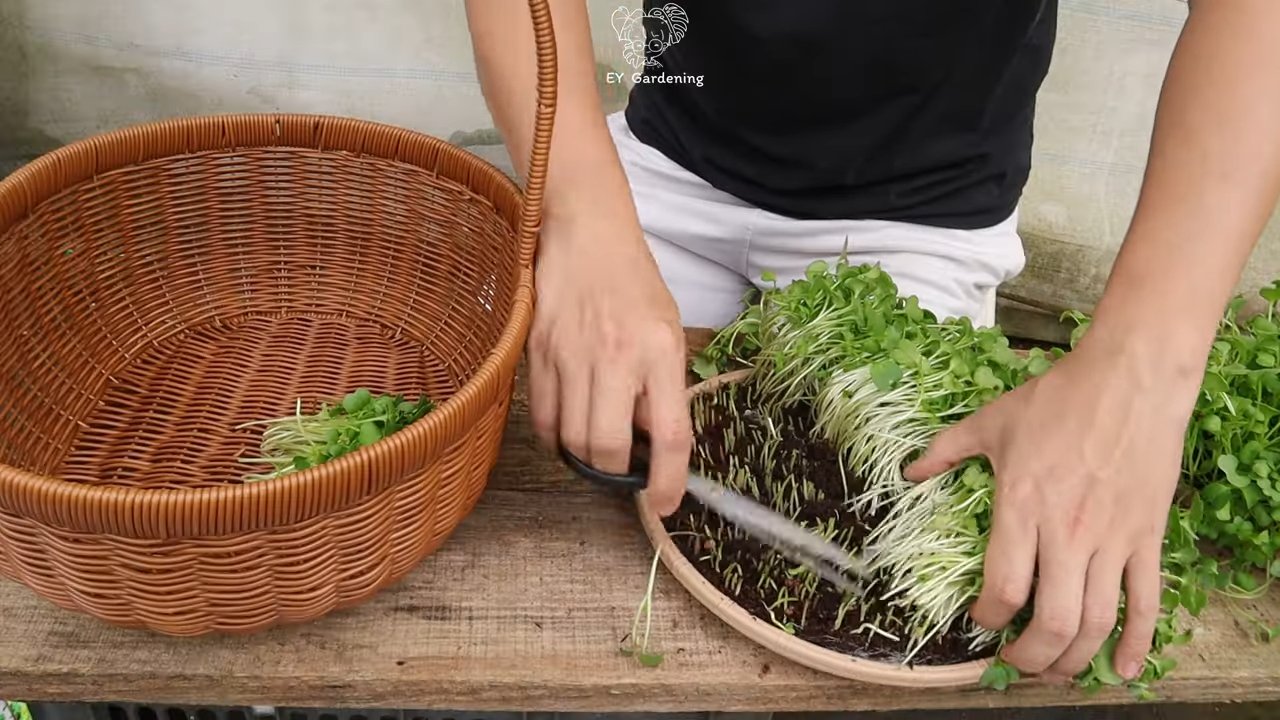
9. Ernten: Je nach Sorte sind die Sprossen nach 3-7 Tagen erntereif. Sie sollten knackig und saftig sein.
10. Lagern: Spüle die Sprossen vor dem Verzehr noch einmal gründlich ab. Du kannst sie im Kühlschrank in einem luftdichten Behälter bis zu einer Woche aufbewahren.
Tipps und Tricks für erfolgreiche Sprossenanzucht
Hier sind noch ein paar Tipps, die dir helfen werden, deine Sprossenanzucht zu optimieren:
* Hygiene ist das A und O: Achte auf absolute Sauberkeit, um Schimmelbildung zu vermeiden. Reinige die Gläser und Sprossendeckel regelmäßig mit heißem Wasser und Spülmittel.
* Die richtige Temperatur: Sprossen mögen es warm, aber nicht zu heiß. Eine Temperatur zwischen 18 und 22 Grad Celsius ist ideal.
* Licht: Sprossen brauchen Licht, aber keine direkte Sonneneinstrahlung. Stelle die Gläser an einen hellen Ort, aber nicht in die pralle Sonne.
* Belüftung: Achte auf eine gute Belüftung, um Schimmelbildung zu vermeiden. Stelle die Gläser nicht zu eng nebeneinander.
* Samenqualität: Verwende nur hochwertige Sprossensamen, die speziell für den Verzehr geeignet sind.
* Verschiedene Sorten: Probiere verschiedene Sorten aus, um deinen Favoriten zu finden. Alfalfa, Brokkoli, Radieschen, Mungbohnen und Linsen sind nur einige Beispiele.
* Schimmelbildung erkennen: Wenn du Schimmelbildung bemerkst, entsorge die betroffenen Sprossen sofort. Reinige das Glas gründlich und starte von vorne.
* Bittere Sprossen: Manchmal können Sprossen bitter schmecken. Das liegt oft an der Sorte oder an zu wenig Licht. Versuche, die Sprossen etwas länger im Licht zu lassen oder eine andere Sorte zu verwenden.
* Regelmäßiges Spülen: Das regelmäßige Spülen ist entscheidend, um Schimmelbildung zu vermeiden und die Sprossen feucht zu halten.
* Geduld: Die Sprossenanzucht braucht etwas Geduld. Gib nicht auf, wenn es beim ersten Mal nicht klappt. Mit etwas Übung wirst du bald deine eigenen, frischen Sprossen ernten können.
Häufige Probleme und Lösungen
Auch beim Sprossen ziehen kann es mal zu Problemen kommen. Hier sind einige häufige Probleme und ihre Lösungen:
* Schimmelbildung:
* **Ursache:** Mangelnde Hygiene, zu wenig Belüftung, zu hohe Luftfeuchtigkeit.
* **Lösung:** Reinige die Gläser und Sprossendeckel gründlich. Achte auf eine gute Belüftung. Spüle die Sprossen häufiger.
* Keine Keimung:
* **Ursache:** Alte Samen, falsche Temperatur, zu wenig Feuchtigkeit.
* **Lösung:** Verwende frische Samen. Achte auf die richtige Temperatur. Spüle die Sprossen regelmäßig.
* Bitterer Geschmack:
* **Ursache:** Sorte, zu wenig Licht.
* **Lösung:** Versuche eine andere Sorte. Stelle die Sprossen etwas länger ins Licht.
* Verfaulte Sprossen:
* **Ursache:** Zu viel Feuchtigkeit, mangelnde Belüftung.
* **Lösung:** Achte darauf, dass das Wasser gut abläuft. Stelle die Gläser nicht zu eng nebeneinander.
Sprossen in der Küche: Vielseitige Verwendungsmöglichkeiten
Sprossen sind nicht nur gesund, sondern auch unglaublich vielseitig in der Küche. Hier sind ein paar Ideen, wie du deine selbst gezogenen Sprossen verwenden kannst:
* Salate: Sprossen sind eine tolle Ergänzung zu jedem Salat. Sie bringen Frische und Knackigkeit.
* Sandwiches und Wraps: Sprossen peppen jedes Sandwich und jeden Wrap auf.
* Suppen: Sprossen können als Topping für Suppen verwendet werden.
* Pfannengerichte: Sprossen passen hervorragend zu Pfannengerichten.
* Smoothies: Sprossen können Smoothies eine extra Portion Nährstoffe verleihen.
Conclusion
So, there you have it! Creating your own indoor sprout growing system isn’t just a fun project; it’s a gateway to a healthier, more sustainable lifestyle. Forget those expensive, store-bought sprouts that often lack flavor and freshness. With this simple DIY approach, you’re in complete control, ensuring you get the most nutritious and delicious sprouts possible, right from your own kitchen.
Why is this a must-try? Because it’s economical, environmentally friendly, and incredibly rewarding. You’ll save money by avoiding pre-packaged sprouts, reduce plastic waste, and experience the satisfaction of nurturing your own food from seed to sprout. Plus, the taste difference is undeniable. Homegrown sprouts are bursting with flavor and vitality that you simply can’t find in store-bought varieties.
But the beauty of this DIY project lies in its adaptability. Feel free to experiment with different types of seeds. Broccoli, alfalfa, radish, mung beans, lentils – the possibilities are endless! Each seed offers a unique flavor profile and nutritional benefit, allowing you to customize your sprout mix to perfectly suit your taste and dietary needs.
Consider adding a touch of creativity to your system. Instead of using mason jars, explore other containers like repurposed plastic containers (thoroughly cleaned, of course!) or even ceramic pots. Just ensure they have adequate drainage and ventilation. You can also experiment with different sprouting mediums, such as hemp mats or coconut coir, to see which works best for you.
For those looking to take their sprouting game to the next level, consider investing in a multi-tiered sprouting system. This allows you to grow multiple varieties of sprouts simultaneously, maximizing your yield and ensuring a constant supply of fresh greens. You can even automate the watering process with a simple timer and a small pump, making your sprouting system even more hands-off.
And don’t forget the power of sunlight! While sprouts don’t need direct sunlight, a little indirect light can significantly enhance their chlorophyll production, resulting in greener, more nutritious sprouts. Just be careful not to expose them to too much direct sunlight, as this can cause them to dry out and become bitter.
Ultimately, this DIY indoor sprout growing system is more than just a project; it’s an investment in your health, your wallet, and the environment. It’s a simple, yet powerful way to connect with nature and enjoy the freshest, most nutritious food possible.
We wholeheartedly encourage you to give this DIY trick a try. It’s easier than you think, and the rewards are well worth the effort. Once you’ve experienced the joy of growing your own sprouts, you’ll never go back to store-bought again.
So, gather your supplies, choose your favorite seeds, and get sprouting! And most importantly, don’t forget to share your experience with us. We’d love to hear about your successes, your challenges, and any creative variations you come up with. Share your photos and stories on social media using [Your Hashtag] and let’s inspire others to embrace the wonderful world of home sprouting! Let’s all get growing with our own indoor sprout growing system!
Frequently Asked Questions (FAQ)
What types of seeds are best for sprouting?
The best seeds for sprouting are those specifically labeled for sprouting or microgreens. These seeds have been tested for pathogens and are safe to eat raw. Popular choices include alfalfa, broccoli, radish, clover, mung beans, lentils, and sunflower seeds. Avoid using seeds intended for planting in the garden, as they may be treated with chemicals that are not safe for consumption. Always purchase your seeds from a reputable source to ensure their quality and safety.
How often should I water my sprouts?
Sprouts need to be rinsed and drained at least twice a day, and ideally three times a day, to keep them moist and prevent mold growth. The frequency may need to be adjusted depending on the humidity and temperature of your environment. In drier climates, you may need to rinse them more often. The key is to keep them consistently moist but not waterlogged. After rinsing, ensure that all excess water is drained away to prevent the sprouts from sitting in standing water.
How long does it take for sprouts to be ready to eat?
The sprouting time varies depending on the type of seed. Some sprouts, like alfalfa and radish, are ready to eat in as little as 3-5 days. Others, like mung beans and lentils, may take 5-7 days. The best way to determine if your sprouts are ready is to taste them. They should be crisp and flavorful, with a slightly nutty or peppery taste. Avoid eating sprouts that are slimy, moldy, or have an off-putting odor.
How do I prevent mold growth in my sprouting system?
Mold growth is a common concern when sprouting, but it can be easily prevented with proper hygiene and ventilation. Always start with clean seeds and a sanitized sprouting container. Rinse the sprouts thoroughly at least twice a day, ensuring that all excess water is drained away. Provide adequate ventilation by keeping the sprouting container in a well-ventilated area. Avoid overcrowding the container with too many seeds, as this can restrict airflow and promote mold growth. If you notice any signs of mold, discard the entire batch of sprouts immediately.
Can I sprout seeds that I already have in my pantry?
While you can technically sprout some seeds from your pantry, it’s generally not recommended unless they are specifically labeled for sprouting. Seeds intended for cooking or baking may not have been tested for pathogens and could potentially harbor harmful bacteria. Additionally, some seeds may have been treated with chemicals that are not safe for consumption. To be on the safe side, always use seeds that are specifically labeled for sprouting or microgreens.
How do I store my sprouts after they are ready to eat?
Once your sprouts are ready to eat, rinse them thoroughly and drain them well. Store them in a clean, airtight container in the refrigerator. They will typically last for up to a week, but it’s best to consume them as soon as possible for optimal flavor and nutrition. Check them regularly for any signs of spoilage, such as sliminess or an off-putting odor.
What are the nutritional benefits of eating sprouts?
Sprouts are a nutritional powerhouse, packed with vitamins, minerals, enzymes, and antioxidants. They are a good source of protein, fiber, and essential fatty acids. Sprouting increases the bioavailability of nutrients, making them easier for your body to absorb. Different types of sprouts offer different nutritional benefits. For example, broccoli sprouts are rich in sulforaphane, a potent antioxidant with anti-cancer properties. Alfalfa sprouts are a good source of vitamin K, which is important for blood clotting and bone health.
Can I use tap water for sprouting?
It’s generally safe to use tap water for sprouting, as long as your tap water is safe to drink. However, if you have concerns about the quality of your tap water, you can use filtered or bottled water instead. Avoid using distilled water, as it lacks the minerals that sprouts need to grow.
What if my sprouts don’t seem to be growing?
If your sprouts aren’t growing, there could be several reasons why. First, make sure that you are using fresh, viable seeds. Old or damaged seeds may not germinate properly. Second, ensure that the sprouts are being rinsed and drained regularly. They need consistent moisture to grow. Third, check the temperature of your environment. Sprouts grow best in a cool, dark place. If the temperature is too hot or too cold, it can inhibit their growth. Finally, make sure that the sprouts are not being exposed to direct sunlight, as this can cause them to dry out and become bitter.
Is it safe to eat the roots of sprouts?
Yes, it is generally safe to eat the roots of sprouts. The roots are a nutritious part of the sprout and contain many of the same vitamins and minerals as the rest of the plant. However, some people may find the roots to be slightly bitter or tough. If you prefer, you can trim the roots off before eating the sprouts.
Leave a Comment