
Mushroom Growing in Plastic Bottles: Unlock the secrets to cultivating your own delicious fungi right in your home! Have you ever looked at those empty plastic bottles piling up and thought, “There *must* be a better use for these?” Well, I’m here to tell you there is! We’re diving into the fascinating world of home mycology, transforming discarded plastic into thriving mushroom farms.
For centuries, mushrooms have held a revered place in various cultures, from ancient medicinal practices to culinary delicacies. In some Eastern traditions, they symbolize longevity and prosperity. Now, you can tap into this ancient wisdom and bring the magic of mushroom cultivation into your own space, all while being eco-conscious!
Why should you learn this DIY trick? Because fresh, flavorful mushrooms shouldn’t be a luxury! Store-bought mushrooms can be expensive and often lack the vibrant taste of homegrown varieties. Plus, the satisfaction of nurturing your own food from start to finish is incredibly rewarding. This method of mushroom growing in plastic bottles is not only cost-effective and environmentally friendly, but it’s also surprisingly easy to master. I’m going to guide you through each step, ensuring you can enjoy a bountiful harvest of homegrown goodness in no time. Get ready to turn trash into treasure and become a mushroom-growing pro!
Pilzzucht im Plastikflaschen-Upcycling: Dein DIY-Guide für zu Hause
Hey Pilzfreunde! Habt ihr euch jemals gefragt, wie ihr eure eigenen köstlichen Pilze zu Hause züchten könnt, ohne viel Platz oder teure Ausrüstung zu benötigen? Dann seid ihr hier genau richtig! Ich zeige euch, wie ihr aus einfachen Plastikflaschen eine kleine Pilzzucht-Oase zaubern könnt. Das ist nicht nur super nachhaltig, sondern macht auch richtig Spaß und belohnt euch mit frischen, selbst gezogenen Pilzen. Los geht’s!
Was du brauchst: Die Materialliste
Bevor wir loslegen, hier eine Liste aller Materialien, die du für dein Pilzzucht-Projekt benötigst:
* Plastikflaschen: Am besten eignen sich 1,5-Liter- oder 2-Liter-Flaschen. Je mehr, desto mehr Pilze! Achtet darauf, dass sie sauber und leer sind.
* Pilzbrut: Das ist das “Saatgut” für eure Pilze. Ihr könnt verschiedene Sorten wählen, je nachdem, was euch schmeckt. Austernpilze sind besonders anfängerfreundlich. Die Brut bekommt ihr online oder im Fachhandel.
* Substrat: Das ist die Nährgrundlage für eure Pilze. Stroh, Kaffeesatz, Sägespäne oder eine Mischung daraus eignen sich gut. Wichtig ist, dass das Substrat sterilisiert wird, um Schimmelbildung zu vermeiden.
* Sprühflasche: Zum Befeuchten des Substrats und der Pilze.
* Bohrer oder Messer: Zum Anbringen von Belüftungslöchern in den Flaschen.
* Klebeband oder Heißkleber: Zum Abdichten der Flaschen, falls nötig.
* Handschuhe: Um das Substrat und die Pilzbrut sauber zu halten.
* Desinfektionsmittel: Zum Reinigen der Arbeitsfläche und der Flaschen.
* Optional: Ein dunkler, kühler Raum oder Schrank für die Inkubationsphase.
Vorbereitung ist alles: Die Flaschen und das Substrat
Bevor wir mit dem eigentlichen Ansetzen der Pilzzucht beginnen, müssen wir die Flaschen vorbereiten und das Substrat sterilisieren. Das ist ein wichtiger Schritt, um sicherzustellen, dass eure Pilze gesund wachsen und nicht von Schimmel befallen werden.
Flaschen reinigen und vorbereiten
1. Reinigung: Spült die Plastikflaschen gründlich mit heißem Wasser und Spülmittel aus. Achtet darauf, alle Rückstände zu entfernen.
2. Desinfektion: Desinfiziert die Flaschen anschließend mit einem Desinfektionsmittel. Das tötet eventuelle Keime ab.
3. Belüftungslöcher: Bohrt oder schneidet kleine Löcher (ca. 5-10 mm Durchmesser) in die Seiten der Flaschen. Diese Löcher dienen der Belüftung und ermöglichen den Pilzen, zu atmen. Verteilt die Löcher gleichmäßig über die Flasche.
4. Optional: Wenn ihr wollt, könnt ihr die Flaschen von außen mit dunkler Folie oder Farbe abdecken. Das schützt die Pilze vor zu viel Licht.
Substrat sterilisieren
Die Sterilisation des Substrats ist entscheidend, um Schimmelbildung zu verhindern. Hier sind zwei gängige Methoden:
1. Kochen: Gebt das Substrat in einen großen Topf und bedeckt es mit Wasser. Bringt das Wasser zum Kochen und lasst das Substrat für mindestens 1 Stunde köcheln. Das tötet die meisten Schimmelsporen ab. Lasst das Substrat anschließend abkühlen und gut abtropfen. Es sollte feucht, aber nicht nass sein.
2. Mikrowelle: Gebt das Substrat in einen mikrowellengeeigneten Behälter und fügt etwas Wasser hinzu. Erhitzt das Substrat in der Mikrowelle für ca. 10-15 Minuten. Achtet darauf, dass es nicht zu trocken wird. Lasst das Substrat anschließend abkühlen.
Wichtig: Egal welche Methode ihr wählt, achtet darauf, dass das Substrat nach der Sterilisation nicht mehr mit unsauberen Oberflächen in Berührung kommt.
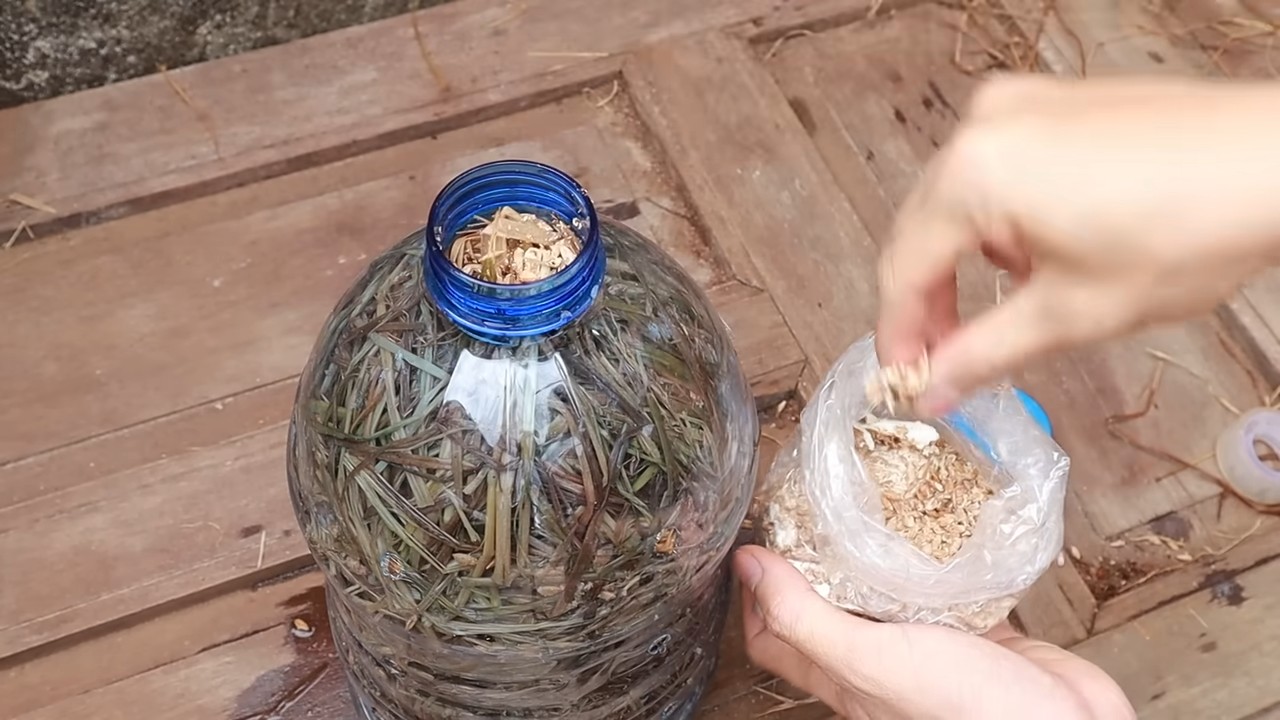
Pilze ansetzen: Schicht für Schicht zum Erfolg
Jetzt kommt der spannende Teil: Wir befüllen die Flaschen mit dem Substrat und der Pilzbrut und legen so den Grundstein für unsere Pilzzucht.
1. Handschuhe anziehen: Zieht euch saubere Handschuhe an, um das Substrat und die Pilzbrut nicht zu verunreinigen.
2. Schichtweise befüllen: Beginnt damit, eine Schicht Substrat in die Flasche zu füllen (ca. 5-10 cm hoch).
3. Pilzbrut hinzufügen: Verteilt eine dünne Schicht Pilzbrut auf dem Substrat.
4. Wiederholen: Wiederholt die Schritte 2 und 3, bis die Flasche fast voll ist. Lasst oben noch etwas Platz.
5. Abschlussschicht: Schließt die Flasche mit einer Schicht Substrat ab.
6. Befeuchten: Befeuchtet das Substrat mit einer Sprühflasche. Es sollte feucht, aber nicht nass sein.
7. Verschließen: Verschließt die Flasche mit einem Deckel oder Klebeband. Achtet darauf, dass die Belüftungslöcher frei bleiben.
Inkubationsphase: Geduld ist gefragt
Nachdem wir die Flaschen befüllt haben, beginnt die Inkubationsphase. In dieser Zeit wächst das Myzel (das Pilzgeflecht) durch das Substrat.
1. Dunkler, kühler Ort: Stellt die Flaschen an einen dunklen, kühlen Ort (ca. 18-24°C). Ein Keller, Schrank oder eine dunkle Ecke im Zimmer eignen sich gut.
2. Regelmäßige Kontrolle: Kontrolliert die Flaschen regelmäßig auf Schimmelbildung. Wenn ihr Schimmel entdeckt, entfernt die betroffene Flasche sofort, um eine Ausbreitung zu verhindern.
3. Geduld: Die Inkubationsphase dauert in der Regel 2-4 Wochen. In dieser Zeit sollte das Myzel das gesamte Substrat durchwachsen haben. Ihr erkennt das daran, dass das Substrat weißlich wird.
Fruiting Phase: Die Pilze sprießen
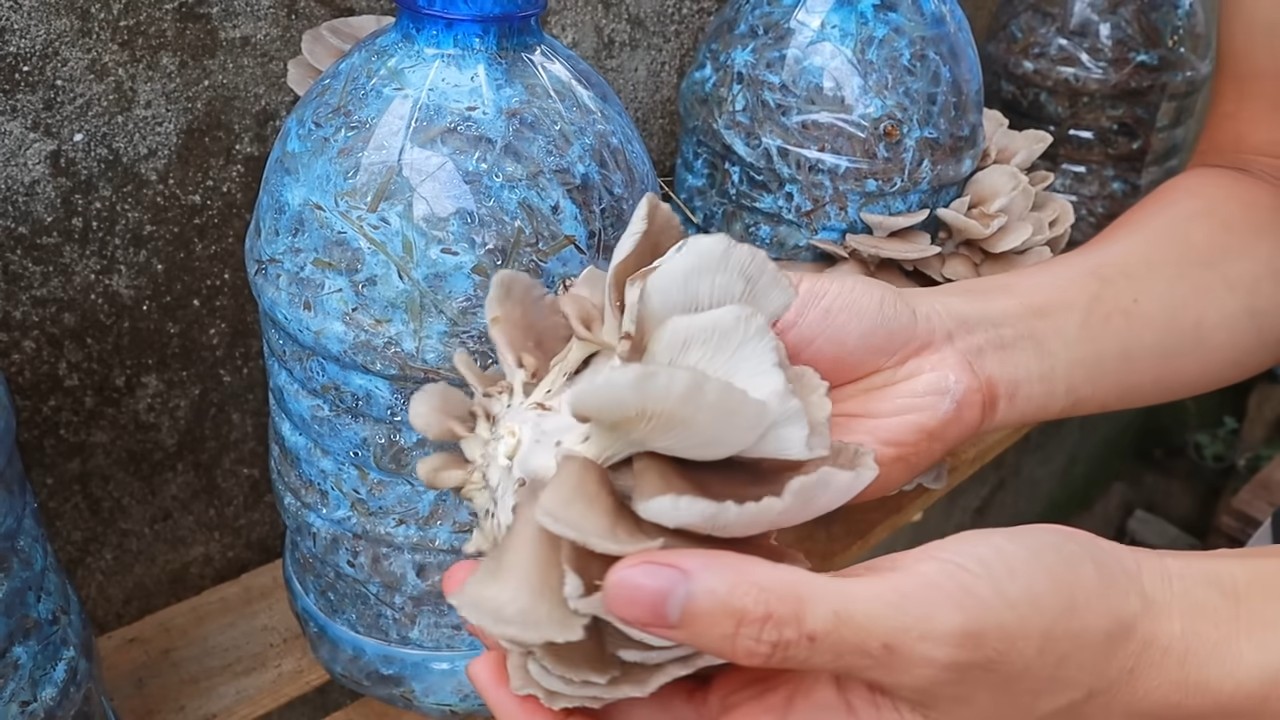
Sobald das Substrat vollständig vom Myzel durchwachsen ist, beginnt die Fruiting Phase. Jetzt können wir die ersten Pilze ernten!
1. Licht und Feuchtigkeit: Stellt die Flaschen an einen helleren Ort, aber vermeidet direkte Sonneneinstrahlung. Die Pilze brauchen Licht, um zu wachsen.
2. Regelmäßiges Befeuchten: Befeuchtet die Pilze und das Substrat regelmäßig mit einer Sprühflasche. Die Luftfeuchtigkeit sollte hoch sein (ca. 80-90%).
3. Belüftung: Sorgt für eine gute Belüftung, um Schimmelbildung zu vermeiden.
4. Ernte: Die Pilze sind erntereif, wenn sie ihre volle Größe erreicht haben und die Hüte sich leicht nach oben biegen. Dreht die Pilze vorsichtig ab oder schneidet sie mit einem Messer ab.
Nach der Ernte: Der zweite Schub
Nach der ersten Ernte könnt ihr in der Regel noch einen zweiten oder sogar dritten Schub Pilze ernten.
1. Ruhephase: Lasst das Substrat nach der Ernte für einige Tage ruhen.
2. Befeuchten: Befeuchtet das Substrat erneut gründlich.
3. Wiederholung: Wiederholt die Schritte der Fruiting Phase.
Tipps und Tricks für eine erfolgreiche Pilzzucht
* Sauberkeit ist das A und O: Achtet auf absolute Sauberkeit bei allen Schritten, um Schimmelbildung zu vermeiden.
* Die richtige Temperatur: Die Temperatur ist entscheidend für das Wachstum der Pilze. Informiert euch über die optimalen Temperaturen für die jeweilige Pilzsorte.
* Luftfeuchtigkeit: Eine hohe Luftfeuchtigkeit ist wichtig für die Fruiting Phase. Ihr könnt die Luftfeuchtigkeit erhöhen, indem ihr die Flaschen mit einer Plastiktüte abdeckt oder einen Luftbefeuchter verwendet.
* Experimentieren: Probiert verschiedene Substrate und Pilzsorten aus, um herauszufinden, was am besten funktioniert.
* Nicht aufgeben: Auch wenn es beim ersten Mal nicht klappt, lasst euch nicht entmutigen
Conclusion
So, there you have it! Transforming humble plastic bottles into thriving mushroom farms is not just a quirky DIY project; it’s a sustainable, cost-effective, and incredibly rewarding way to cultivate your own delicious fungi. We’ve walked you through the process, highlighting the simplicity and accessibility of this method. Forget expensive kits and complicated setups. With a few readily available materials and a little patience, you can unlock the magic of mushroom cultivation right in your own home.
But why is this DIY trick a must-try? Beyond the obvious benefit of fresh, homegrown mushrooms, this project offers a unique connection to the food you eat. You’ll witness the entire life cycle of these fascinating organisms, from spore to fruiting body, gaining a deeper appreciation for the natural world. Furthermore, you’re actively participating in a sustainable practice by repurposing plastic waste and reducing your reliance on commercially grown mushrooms, which often involve significant transportation and packaging.
The possibilities are endless when it comes to variations. Experiment with different mushroom species to discover your favorites. Oyster mushrooms are a great starting point due to their resilience and rapid growth, but don’t be afraid to venture into the world of shiitake, lion’s mane, or even wine cap mushrooms once you’ve gained some experience. You can also adjust the substrate mix to suit the specific needs of your chosen species. Adding coffee grounds, straw, or even cardboard can enrich the substrate and provide additional nutrients.
Consider the aesthetic appeal as well. Decorate your plastic bottle farms with paint, twine, or other embellishments to create a visually appealing display. Group them together to form a vertical garden or scatter them throughout your existing indoor plants for a touch of whimsical charm. This project is not just about growing mushrooms; it’s about adding a unique and sustainable element to your living space.
Don’t be intimidated by the process. Mushroom cultivation may seem daunting at first, but this method is designed to be beginner-friendly. The key is to maintain a clean environment, provide adequate moisture, and be patient. Remember to sanitize your bottles and tools thoroughly to prevent contamination, and monitor your mushrooms closely for any signs of mold or disease.
We are confident that you’ll find this DIY mushroom growing project to be both enjoyable and rewarding. The satisfaction of harvesting your own fresh mushrooms, knowing that you’ve contributed to a more sustainable lifestyle, is truly unparalleled.
So, what are you waiting for? Gather your plastic bottles, prepare your substrate, and embark on this exciting journey into the world of mycology. We encourage you to try this fantastic mushroom growing method and share your experiences with us! Post photos of your mushroom farms on social media using #DIYMushroomFarm and tag us so we can see your amazing creations. We can’t wait to see what you grow! Let’s cultivate a community of mushroom enthusiasts and inspire others to embrace sustainable living.
Frequently Asked Questions (FAQ)
What type of mushrooms are best for growing in plastic bottles?
Oyster mushrooms (Pleurotus species) are generally considered the easiest and most forgiving for beginners. They are fast-growing, relatively resistant to contamination, and produce abundant yields. Other suitable options include shiitake (Lentinula edodes), which requires a bit more patience and specific substrate, and lion’s mane (Hericium erinaceus), known for its unique texture and health benefits. Experimentation is key to finding what works best in your environment.
What is the best substrate to use for growing mushrooms in plastic bottles?
A common and effective substrate mix consists of pasteurized straw, coffee grounds, and sawdust. The straw provides bulk and carbon, while the coffee grounds add nitrogen and other nutrients. Sawdust helps to retain moisture and create a favorable environment for mycelial growth. You can also use other materials like cardboard, wood chips, or even shredded paper, depending on the mushroom species you’re growing. Remember to pasteurize the substrate to kill any competing organisms before introducing the mushroom spawn.
How do I pasteurize the substrate?
Pasteurization involves heating the substrate to a temperature that kills harmful microorganisms without destroying beneficial ones. A simple method is to soak the substrate in hot water (around 160-180°F or 71-82°C) for 1-2 hours. You can use a large pot or container and a thermometer to monitor the temperature. After pasteurization, allow the substrate to cool completely before inoculating it with mushroom spawn.
How much light do mushrooms need?
Mushrooms don’t require direct sunlight, but they do need some light to fruit properly. Indirect sunlight or ambient light from a nearby window is usually sufficient. Avoid placing your mushroom farms in dark or completely unlit areas. A few hours of light per day will encourage healthy mushroom development.
How often should I water my mushroom farm?
Maintaining adequate moisture is crucial for mushroom growth. The substrate should be consistently moist but not waterlogged. Mist the inside of the plastic bottle and the substrate surface with water 1-2 times per day, or as needed, to maintain humidity. Avoid overwatering, as this can lead to mold growth and other problems.
How long does it take for mushrooms to grow in plastic bottles?
The time it takes for mushrooms to fruit depends on the species, substrate, and environmental conditions. Oyster mushrooms typically fruit within 1-2 weeks after inoculation, while shiitake mushrooms may take several weeks or even months. Be patient and monitor your mushroom farm regularly. Once you see small mushroom pins forming, they will usually grow rapidly to full size within a few days.
What if I see mold growing in my mushroom farm?
Mold contamination is a common problem in mushroom cultivation. If you see mold, it’s important to address it quickly to prevent it from spreading. Remove any affected areas of the substrate and spray the remaining substrate with a diluted hydrogen peroxide solution. Improve ventilation and reduce humidity to discourage further mold growth. In severe cases, you may need to discard the entire mushroom farm and start over.
Can I reuse the plastic bottles after harvesting the mushrooms?
Yes, you can reuse the plastic bottles for multiple mushroom growing cycles. After harvesting, remove any remaining mushroom stems and debris from the substrate. You can then re-pasteurize the substrate and re-inoculate it with fresh mushroom spawn. Alternatively, you can compost the spent substrate and use the plastic bottles for other purposes, such as planting herbs or flowers.
Are there any safety precautions I should take when growing mushrooms?
Always wash your hands thoroughly before and after handling mushroom spawn and substrate. Wear gloves to prevent contamination. Avoid inhaling mushroom spores, as some people may be allergic to them. Cook mushrooms thoroughly before eating them to kill any harmful bacteria or toxins. If you are unsure about the edibility of a particular mushroom species, consult with a mycologist or experienced mushroom grower.
What can I do with the spent substrate after harvesting mushrooms?
The spent substrate is a valuable resource that can be used in a variety of ways. It is an excellent soil amendment for gardens and potted plants, providing nutrients and improving soil structure. You can also compost the spent substrate to create nutrient-rich compost for your garden. Additionally, some people use spent mushroom substrate as animal feed or as a substrate for growing other types of plants.

Leave a Comment