
Growing celery on rocks for profit? Sounds a little out there, right? But trust me, this ingenious DIY trick is about to revolutionize your approach to home gardening and potentially line your pockets! For centuries, humans have cultivated celery in soil, relying on traditional methods. But what if I told you there’s a simpler, more sustainable, and potentially more lucrative way to enjoy this crisp, refreshing vegetable?
This isn’t just some fleeting internet trend; it’s a clever adaptation of hydroponics, a technique that’s been around for ages but is now gaining serious traction in the home gardening world. Imagine harvesting fresh, vibrant celery right from your kitchen counter, without the hassle of weeding, tilling, or battling soil-borne pests.
In today’s world, where space is a premium and the desire for fresh, locally sourced food is growing, this DIY hack is a game-changer. Not only does growing celery on rocks save space and water, but it also offers a faster growth cycle and potentially higher yields. Plus, the satisfaction of creating your own mini-celery farm is simply unmatched! So, if you’re ready to ditch the dirt and embrace a new era of home gardening, keep reading – I’m about to share all the secrets to successfully growing celery on rocks and potentially turning your green thumb into a profitable venture!
Sellerie auf Steinen ziehen: Ein DIY-Experiment für den Küchengarten
Hallo liebe Gartenfreunde! Habt ihr euch jemals gefragt, ob man Sellerie einfach so auf Steinen ziehen kann? Die Antwort ist: Ja, das geht! Und es ist ein super spannendes und einfaches DIY-Projekt, das nicht nur Spaß macht, sondern euch auch mit frischem Sellerie versorgt. Ich zeige euch, wie ihr mit ein paar einfachen Schritten und Materialien aus eurem Küchenabfall neuen Sellerie ziehen könnt. Los geht’s!
Was ihr braucht:
* Sellerie-Strunk: Der untere Teil des Selleries, den ihr normalerweise wegwerfen würdet. Achtet darauf, dass er fest und gesund aussieht.
* Flaches Gefäß: Eine Schale, ein Teller oder ein flacher Behälter.
* Steine: Kleine bis mittelgroße Steine, Kiesel oder Zierkies. Sie dienen als Stütze und sorgen für eine gute Belüftung.
* Wasser: Leitungswasser ist völlig ausreichend.
* Sonniger Standort: Ein Fensterbrett oder ein anderer heller Platz.
* Geduld: Sellerie braucht Zeit, um zu wachsen.
Schritt-für-Schritt-Anleitung:
1. Sellerie-Strunk vorbereiten:
* Schneidet den Sellerie-Strunk etwa 5-7 cm vom unteren Ende ab. Achtet darauf, dass die Wurzelbasis intakt ist.
* Entfernt die äußeren, welken oder beschädigten Stiele. Lasst die inneren, frischen Stiele stehen.
* Spült den Strunk gründlich unter fließendem Wasser ab, um Erde oder Schmutz zu entfernen.
2. Gefäß vorbereiten:
* Reinigt das Gefäß gründlich mit Wasser und Spülmittel.
* Füllt das Gefäß mit einer Schicht Steinen. Die Steine sollten den Boden bedecken und eine stabile Basis bilden.
* Gießt Wasser über die Steine, bis sie etwa zur Hälfte bedeckt sind. Das Wasser sollte den Sellerie-Strunk später nicht vollständig bedecken, um Fäulnis zu vermeiden.
3. Sellerie platzieren:
* Platziert den Sellerie-Strunk mit der Schnittfläche nach unten auf den Steinen.
* Achtet darauf, dass die Wurzelbasis Kontakt mit dem Wasser hat, aber der Strunk selbst nicht im Wasser steht. Die Steine dienen als Abstandshalter.
* Arrangiert die Steine so, dass der Sellerie-Strunk stabil steht und nicht umkippt.
4. Standort wählen:
* Stellt das Gefäß an einen hellen, sonnigen Standort. Ein Fensterbrett ist ideal.
* Sellerie benötigt viel Licht, um zu wachsen. Direkte Sonneneinstrahlung ist in den ersten Tagen jedoch zu vermeiden, um den Strunk nicht zu verbrennen.
5. Wasserstand kontrollieren:
* Überprüft den Wasserstand regelmäßig und füllt bei Bedarf Wasser nach. Die Steine sollten immer feucht sein, aber der Sellerie-Strunk sollte nicht im Wasser stehen.
* Wechselt das Wasser alle paar Tage, um Algenbildung und Fäulnis zu vermeiden.
6. Geduld haben:
* Nach einigen Tagen (ca. 5-7) solltet ihr erste Anzeichen von Wachstum sehen. Kleine, grüne Blätter werden aus der Mitte des Strunks sprießen.
* Habt Geduld! Es kann einige Wochen dauern, bis der Sellerie ausreichend gewachsen ist.
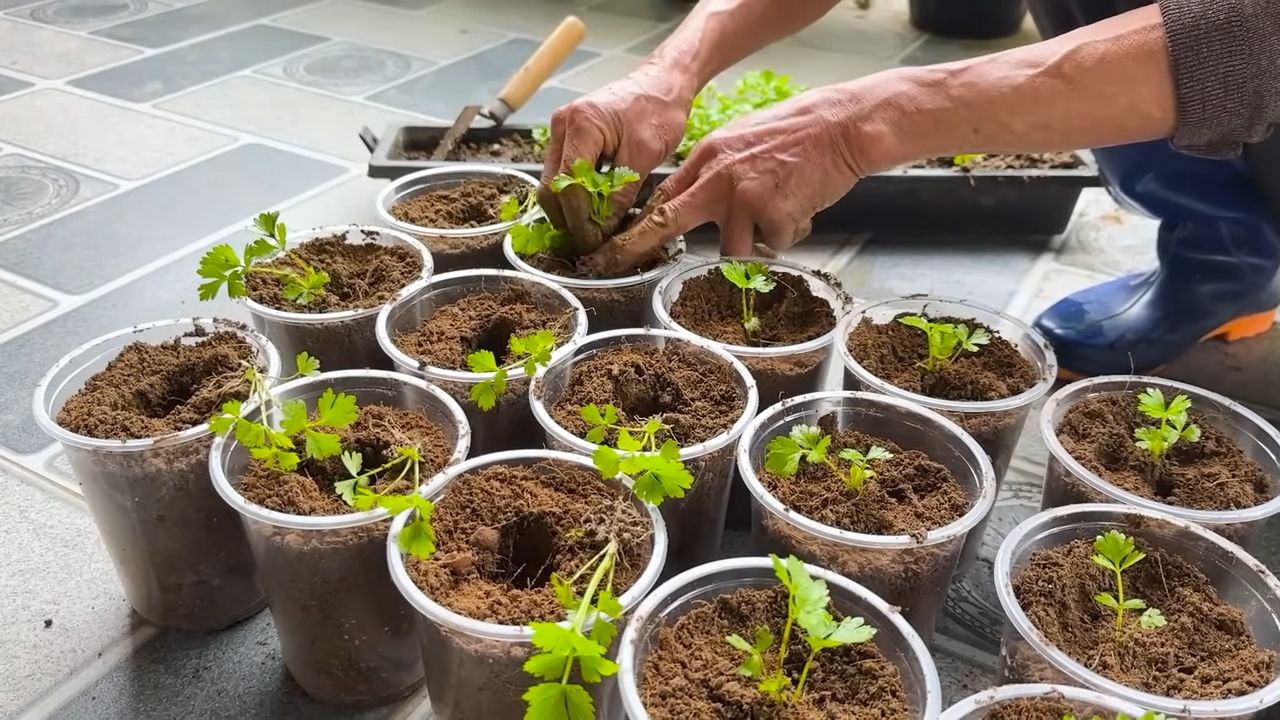
Umpflanzen in Erde (optional):
Wenn der Sellerie ausreichend Wurzeln gebildet hat und die Blätter kräftig gewachsen sind, könnt ihr ihn in Erde umpflanzen. Dies ist optional, aber es fördert das Wachstum und die Entwicklung des Selleries.
1. Vorbereitung:
* Wählt einen Topf mit ausreichend Platz für die Wurzeln.
* Füllt den Topf mit hochwertiger Blumenerde.
* Gießt die Erde leicht an.
2. Umpflanzen:
* Hebt den Sellerie-Strunk vorsichtig aus dem Gefäß mit den Steinen.
* Macht ein Loch in die Erde im Topf.
* Setzt den Sellerie-Strunk in das Loch und bedeckt die Wurzeln mit Erde.
* Drückt die Erde leicht an.
3. Pflege:
* Gießt den Sellerie regelmäßig, aber vermeidet Staunässe.
* Stellt den Topf an einen sonnigen Standort.
* Düngt den Sellerie bei Bedarf mit einem organischen Dünger.
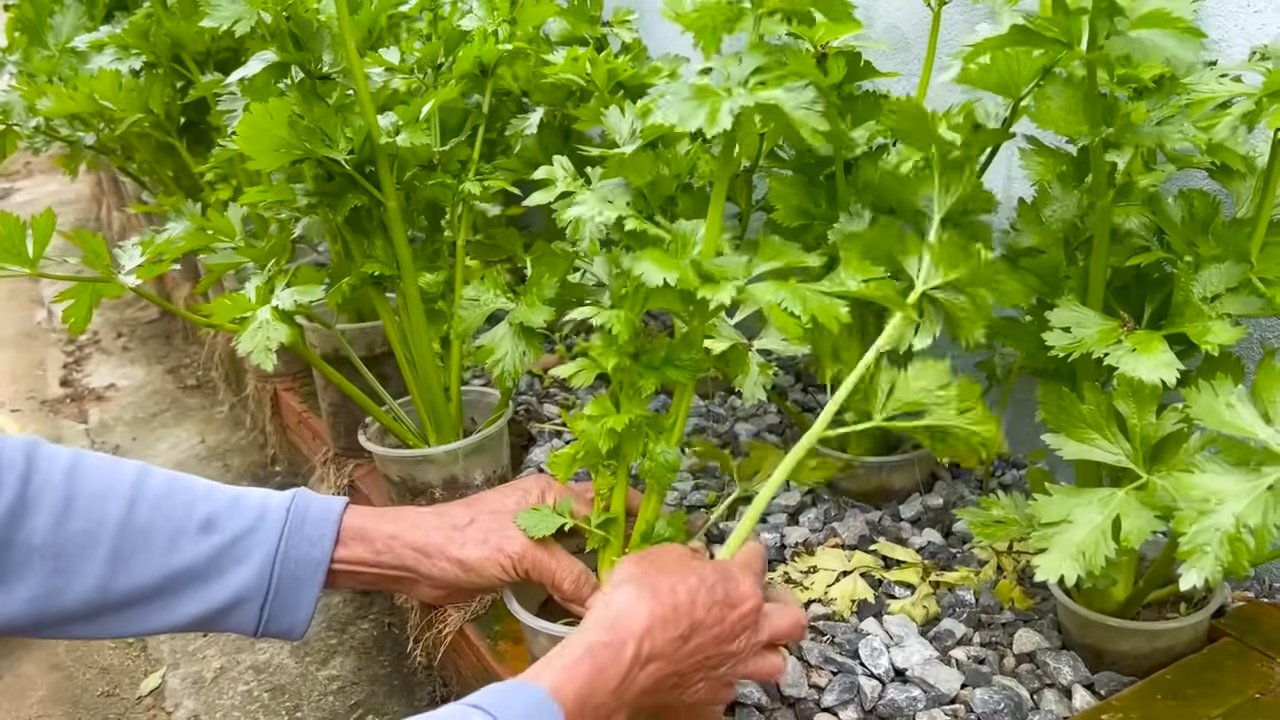
Ernte:
Ihr könnt die äußeren Stiele des Selleries ernten, sobald sie ausreichend groß sind. Schneidet die Stiele einfach am unteren Ende ab. Der Sellerie wird weiterwachsen und neue Stiele produzieren.
Häufige Probleme und Lösungen:
* Fäulnis: Wenn der Sellerie-Strunk fault, ist er wahrscheinlich zu feucht. Reduziert die Wassermenge und wechselt das Wasser häufiger. Achtet darauf, dass der Strunk nicht im Wasser steht.
* Kein Wachstum: Wenn der Sellerie nicht wächst, erhält er möglicherweise nicht genügend Licht. Stellt ihn an einen helleren Standort.
* Gelbe Blätter: Gelbe Blätter können ein Zeichen für Nährstoffmangel sein. Düngt den Sellerie bei Bedarf.
* Schädlinge: Sellerie kann von Blattläusen oder anderen Schädlingen befallen werden. Kontrolliert die Pflanze regelmäßig und behandelt sie bei Bedarf mit einem geeigneten Pflanzenschutzmittel.
Zusätzliche Tipps:
* Selleriesorte: Nicht alle Selleriesorten eignen sich gleich gut für die Vermehrung auf Steinen. Stangensellerie funktioniert in der Regel besser als Knollensellerie.
* Luftfeuchtigkeit: Eine höhere Luftfeuchtigkeit fördert das Wachstum des Selleries. Ihr könnt die Luftfeuchtigkeit erhöhen, indem ihr das Gefäß mit einer Plastiktüte abdeckt (achtet aber auf ausreichende Belüftung, um Schimmelbildung zu vermeiden).
* Experimentieren: Probiert verschiedene Arten von Steinen und Gefäßen aus, um herauszufinden, was am besten funktioniert.
* Dokumentation: Macht Fotos von eurem Projekt, um den Fortschritt zu dokumentieren und eure Erfahrungen mit anderen zu teilen.
Warum Sellerie auf Steinen ziehen?
Es gibt viele Gründe, warum es Spaß macht, Sellerie auf Steinen zu ziehen:
* Nachhaltigkeit: Ihr verwertet Küchenabfälle und reduziert euren ökologischen Fußabdruck.
* Frische Kräuter: Ihr habt immer frischen Sellerie zur Hand, um eure Gerichte zu verfeinern.
* Dekoration: Der wachsende Sellerie ist ein schöner Blickfang in eurer Küche.
* Lernen: Ihr lernt etwas über Pflanzenwachstum und die Kreisläufe der Natur.
* Spaß: Es macht einfach Spaß, zu sehen, wie aus einem vermeintlichen Abfallprodukt etwas Neues entsteht.
Noch ein paar Worte zum Schluss:
Ich hoffe, diese Anleitung hat euch inspiriert, euer eigenes Sellerie-Experiment zu starten. Es ist ein einfaches und lohnendes Projekt, das euch mit frischem Sellerie versorgt und gleichzeitig euren grünen Daumen trainiert. Also, worauf wartet ihr noch? Schnappt euch einen Sellerie-Strunk, ein paar Steine und los geht’s! Ich bin gespannt auf eure Ergebnisse! Teilt eure Erfahrungen und Fotos gerne mit mir. Viel Erfolg und viel Spaß beim Gärtnern!
Die Vorteile des Anbaus von Sellerie auf Steinen im Detail:
* Platzsparend: Ideal für kleine Wohnungen oder Balkone, da kein großer Garten erforderlich ist.
* Geringer Aufwand: Benötigt wenig Pflege und Aufmerksamkeit im Vergleich zum traditionellen Anbau im Garten.
* Kostengünstig: Verwendet Küchenabfälle und recycelte Materialien, wodurch die Kosten minimiert werden.
* Lehrreich: Bietet eine praktische Möglichkeit, Kindern und Erwachsenen etwas über Pflanzenwachstum und Nachhaltigkeit beizubringen.
* Dekorativ: Der wachsende Sellerie kann als dekoratives Element in der Küche oder im Wohnzimmer dienen.
* Nachhaltig: Reduziert Lebensmittelverschwendung und fördert einen umweltfreundlicheren Lebensstil.
* Gesund: Bietet Zugang zu fr
Conclusion
So, there you have it! Growing celery on rocks, a seemingly simple yet incredibly rewarding DIY trick, offers a sustainable and space-saving solution for enjoying fresh celery right from your kitchen. This method isn’t just about convenience; it’s about minimizing waste, maximizing resources, and connecting with the natural world in a tangible way. Think about it: instead of tossing those celery bases into the compost bin, you’re giving them a second life, transforming them into vibrant, leafy stalks ready to be enjoyed in your favorite recipes.
Why is this a must-try? Because it’s easy, economical, and environmentally friendly. You don’t need a green thumb or acres of land to succeed. All you need is a celery base, some water, a sunny spot, and a little patience. The satisfaction of watching those roots sprout and the leaves unfurl is truly unmatched. Plus, it’s a fantastic educational opportunity for kids, teaching them about plant life cycles and the importance of reducing food waste.
But the beauty of this DIY trick lies in its adaptability. Feel free to experiment with different containers – mason jars, repurposed plastic containers, even decorative bowls can work wonders. Consider adding a diluted liquid fertilizer every few weeks to boost growth and nutrient content. For a fun twist, try growing different varieties of celery, such as Pascal celery or red celery, to add a splash of color to your kitchen garden. You can even try growing other vegetables from scraps using similar methods, expanding your indoor garden and further reducing waste.
Don’t be afraid to get creative and personalize your celery-growing experience. The possibilities are endless!
We wholeheartedly encourage you to give this DIY trick a try. It’s a simple yet profound way to connect with nature, reduce waste, and enjoy fresh, homegrown celery. Once you’ve experienced the joy of growing your own celery on rocks, we’re confident you’ll be hooked.
And most importantly, we want to hear about your experiences! Share your photos, tips, and challenges in the comments below. Let’s create a community of celery-growing enthusiasts and inspire others to embrace this sustainable and rewarding practice. Your insights could be invaluable to someone just starting out, and together, we can make a real difference in reducing food waste and promoting a more sustainable lifestyle. So, grab a celery base, find a sunny spot, and get growing! Let the adventure begin!
Frequently Asked Questions (FAQ)
1. What kind of celery works best for regrowing on rocks?
Any type of celery you buy from the grocery store will work, as long as the base is intact and healthy. Look for celery stalks with a firm, tightly packed base that shows no signs of rot or decay. Organic celery is a great option, but conventional celery will work just as well. The key is to ensure the base has a good amount of the root end still attached.
2. How long does it take for celery to regrow using this method?
The time it takes for celery to regrow can vary depending on several factors, including the variety of celery, the amount of sunlight it receives, and the temperature. Generally, you can expect to see new growth within a few days to a week. Within 2-3 weeks, you should have a noticeable amount of new leaves. However, it’s important to remember that you won’t get a full-sized celery stalk using this method. You’ll primarily be harvesting the leaves, which are perfect for adding flavor to soups, salads, and other dishes.
3. What kind of water should I use?
Tap water is generally fine for regrowing celery on rocks. However, if your tap water is heavily chlorinated, it’s best to let it sit out for 24 hours before using it to allow the chlorine to dissipate. Filtered water or rainwater are also excellent options. Avoid using distilled water, as it lacks the minerals that plants need to thrive. Change the water every 1-2 days to prevent bacterial growth and keep the celery base healthy.
4. How much sunlight does the celery need?
Celery needs plenty of sunlight to thrive. Aim for at least 6 hours of direct sunlight per day. A south-facing windowsill is usually the best option. If you don’t have a sunny windowsill, you can supplement with a grow light. Place the grow light a few inches above the celery base and leave it on for 12-14 hours per day.
5. Can I plant the regrown celery in soil?
Yes, absolutely! Once the celery base has developed a good root system, you can transplant it into a pot filled with well-draining potting soil. This will give the celery plant more room to grow and potentially produce a larger harvest. When transplanting, be careful not to damage the roots. Dig a hole in the soil that’s large enough to accommodate the root ball, gently place the celery plant in the hole, and backfill with soil. Water thoroughly after transplanting.
6. How often should I fertilize the celery?
While celery can grow without fertilizer, adding a diluted liquid fertilizer every few weeks can help boost growth and nutrient content. Use a balanced fertilizer, such as a 10-10-10 or a 20-20-20, and dilute it to half strength. Apply the fertilizer to the water in the container, following the instructions on the fertilizer package. Avoid over-fertilizing, as this can damage the celery plant.
7. What are some common problems I might encounter, and how can I fix them?
One common problem is rot, which can occur if the celery base is kept too wet or if the water is not changed frequently enough. To prevent rot, make sure to change the water every 1-2 days and avoid letting the celery base sit in standing water. If you notice any signs of rot, such as a slimy or discolored base, remove the affected area with a sharp knife and replace the water. Another common problem is yellowing leaves, which can be caused by a lack of sunlight or nutrients. To fix this, move the celery to a sunnier location or add a diluted liquid fertilizer.
8. Can I eat the celery leaves that grow from the base?
Yes, absolutely! The celery leaves that grow from the base are perfectly edible and have a delicious, celery-like flavor. They’re great for adding to soups, salads, stir-fries, and other dishes. You can harvest the leaves as needed, snipping them off with scissors or a knife.
9. Will I get a full celery stalk from regrowing it on rocks?
No, you likely won’t get a full-sized celery stalk using this method. The primary purpose of regrowing celery on rocks is to harvest the leaves, which are perfect for adding flavor to your cooking. While the celery base may produce some small stalks, they won’t be as large or as substantial as the ones you buy at the store.
10. How can I encourage more growth?
To encourage more growth, make sure the celery base is receiving plenty of sunlight, is being watered regularly, and is being fertilized every few weeks. You can also try pinching off any flower stalks that appear, as this will encourage the plant to focus its energy on producing more leaves. Additionally, make sure the celery base is not overcrowded. If you’re growing multiple celery bases in the same container, give them enough space to grow and avoid overcrowding.


Leave a Comment