
Grow Pineapple on Terrace: Imagine plucking a juicy, sun-ripened pineapple straight from your own terrace garden! Sounds like a tropical dream, right? Well, it doesn’t have to be just a dream. I’m here to tell you that with a little know-how and some simple DIY techniques, you can absolutely cultivate your own pineapple paradise, even if you live in an apartment.
Pineapples, originally native to South America, have a rich history, symbolizing hospitality and warmth. Think about it – a pineapple was once a prized possession, a luxurious gift to offer guests! While we might not be offering them to royalty anymore, the joy of sharing a homegrown pineapple is just as special.
But why should you bother with this DIY project? Let’s be honest, store-bought pineapples can be expensive and sometimes lack that intense, fresh flavor. Plus, there’s something incredibly rewarding about nurturing a plant from start to finish and enjoying the fruits (literally!) of your labor. This article will guide you through every step, from selecting the right pineapple top to providing the ideal growing conditions, ensuring you can successfully grow pineapple on terrace. Get ready to impress your friends and family with your green thumb and enjoy the sweet taste of success!
Ananas auf der Terrasse ziehen: Dein tropisches DIY-Projekt
Hey Leute! Habt ihr euch jemals vorgestellt, eure eigene Ananas auf der Terrasse zu ziehen? Klingt verrückt, oder? Aber ich kann euch sagen, es ist nicht nur möglich, sondern auch super befriedigend! Ich habe es selbst ausprobiert und bin total begeistert. In diesem Artikel zeige ich euch Schritt für Schritt, wie ihr eure eigene kleine Ananasplantage starten könnt. Keine Angst, es ist einfacher als ihr denkt!
Was du brauchst: Die Zutaten für dein tropisches Abenteuer
Bevor wir loslegen, hier eine Liste mit allem, was du für dein Ananas-Projekt benötigst:
* Eine reife Ananas: Am besten eine aus dem Supermarkt, die schon leicht duftet und grüne, gesunde Blätter hat.
* Ein scharfes Messer: Für saubere Schnitte.
* Ein Glas Wasser: Zum Bewurzeln des Ananaskopfes.
* Ein Pflanzgefäß: Mit einem Durchmesser von mindestens 20 cm.
* Hochwertige Blumenerde: Am besten eine Mischung aus Blumenerde, Sand und etwas Kompost.
* Optional: Wurzelhormon: Kann den Bewurzelungsprozess beschleunigen.
* Geduld: Ananas brauchen Zeit, um zu wachsen!
Ananaskopf vorbereiten: Der Startschuss für dein Projekt
Dieser Schritt ist entscheidend für den Erfolg deines Ananas-Projekts. Wir müssen den Ananaskopf so vorbereiten, dass er optimal Wurzeln schlagen kann.
1. Ananaskopf abschneiden: Nimm dein scharfes Messer und schneide den Ananaskopf etwa 2-3 cm unterhalb der Blätter ab. Achte darauf, einen sauberen Schnitt zu machen.
2. Fruchtfleisch entfernen: Entferne vorsichtig das restliche Fruchtfleisch vom Ananaskopf. Fruchtfleischreste können zu Fäulnis führen und den Bewurzelungsprozess behindern.
3. Blätter entfernen: Entferne die untersten Blätter des Ananaskopfes, etwa 2-3 cm hoch. Dadurch werden die Wurzelansätze freigelegt.
4. Trocknen lassen: Lasse den Ananaskopf 2-3 Tage an einem trockenen, gut belüfteten Ort trocknen. Dies hilft, die Schnittfläche zu versiegeln und Fäulnis vorzubeugen.
Ananaskopf bewurzeln: Geduld ist gefragt!
Jetzt kommt der spannende Teil: Wir bringen den Ananaskopf dazu, Wurzeln zu schlagen!
1. Ananaskopf ins Wasser stellen: Fülle ein Glas mit Wasser und stelle den Ananaskopf so hinein, dass nur der untere Teil, wo du die Blätter entfernt hast, im Wasser steht. Die Blätter sollten nicht im Wasser sein.
2. Standort wählen: Stelle das Glas an einen hellen, warmen Ort, aber nicht in direktes Sonnenlicht.
3. Wasser wechseln: Wechsle das Wasser alle 2-3 Tage, um Fäulnis vorzubeugen.
4. Wurzeln beobachten: Nach einigen Wochen (es kann 4-8 Wochen dauern) solltest du die ersten Wurzeln sehen. Sei geduldig!
5. Optional: Wurzelhormon verwenden: Wenn du möchtest, kannst du den Ananaskopf vor dem Einsetzen ins Wasser in Wurzelhormon tauchen. Dies kann den Bewurzelungsprozess beschleunigen.
Ananas einpflanzen: Ab in die Erde!
Sobald die Wurzeln etwa 2-3 cm lang sind, ist es Zeit, die Ananas einzupflanzen.
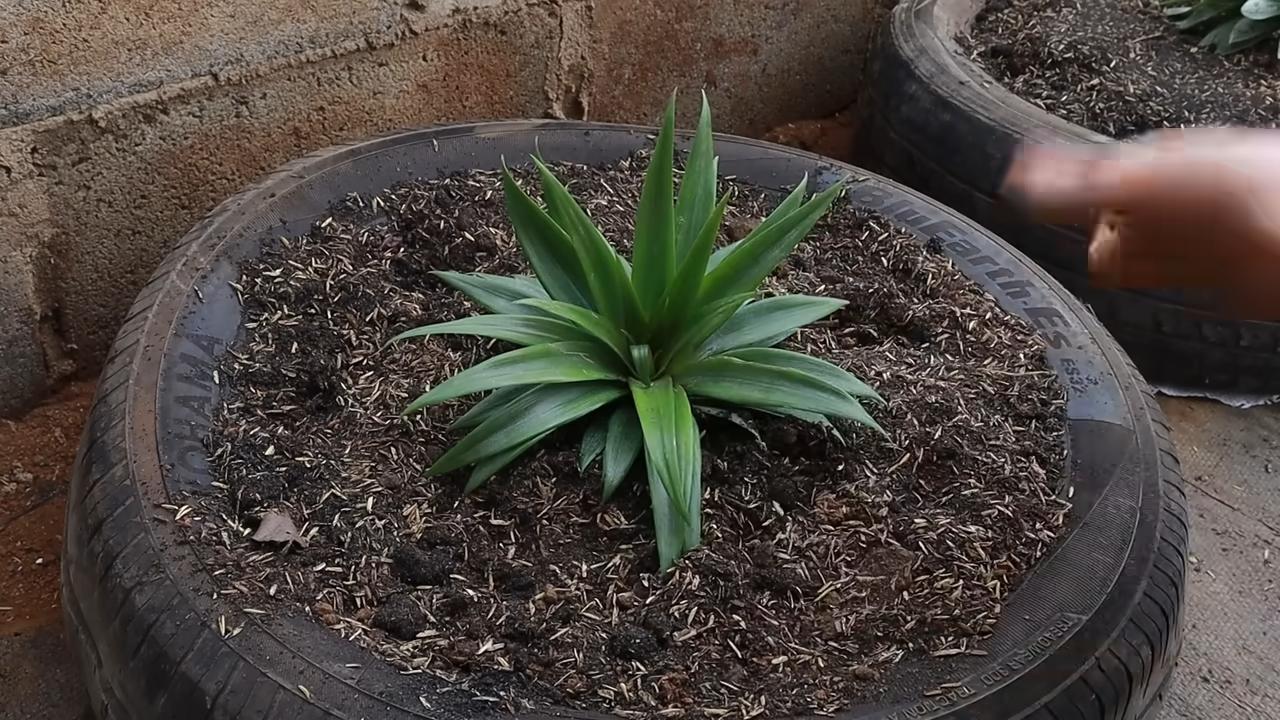
1. Pflanzgefäß vorbereiten: Fülle dein Pflanzgefäß mit der vorbereiteten Blumenerde. Achte darauf, dass das Gefäß Drainagelöcher hat, damit überschüssiges Wasser ablaufen kann.
2. Ananaskopf einpflanzen: Grabe ein kleines Loch in die Erde und setze den Ananaskopf vorsichtig hinein. Die Wurzeln sollten gut mit Erde bedeckt sein.
3. Angießen: Gieße die Ananas nach dem Einpflanzen gut an.
4. Standort wählen: Stelle das Pflanzgefäß an einen hellen, warmen Ort mit viel Sonnenlicht. Ananas lieben die Sonne!
Ananas pflegen: So bleibt deine Pflanze glücklich
Die richtige Pflege ist entscheidend, damit deine Ananas gut wächst und vielleicht sogar Früchte trägt.
1. Gießen: Gieße die Ananas regelmäßig, aber vermeide Staunässe. Die Erde sollte immer leicht feucht sein.
2. Düngen: Dünge die Ananas während der Wachstumsperiode (Frühling und Sommer) alle 2-3 Wochen mit einem Flüssigdünger für Obstpflanzen.
3. Temperatur: Ananas lieben Wärme. Die ideale Temperatur liegt zwischen 20 und 30 Grad Celsius. Im Winter solltest du die Ananas an einen kühleren Ort stellen, aber nicht unter 15 Grad Celsius.
4. Luftfeuchtigkeit: Ananas mögen eine hohe Luftfeuchtigkeit. Du kannst die Luftfeuchtigkeit erhöhen, indem du die Blätter regelmäßig mit Wasser besprühst.
5. Umpflanzen: Wenn die Ananas zu groß für ihr Pflanzgefäß wird, solltest du sie in ein größeres Gefäß umpflanzen.
6. Schädlinge und Krankheiten: Achte auf Schädlinge wie Spinnmilben oder Wollläuse. Bei Bedarf kannst du die Ananas mit einem geeigneten Pflanzenschutzmittel behandeln.
Wann trägt die Ananas Früchte? Die große Frage!
Das ist die Frage, die sich jeder stellt! Es kann 1-3 Jahre dauern, bis eine Ananas Früchte trägt. Die Wartezeit hängt von verschiedenen Faktoren ab, wie z.B. der Sorte, den Wachstumsbedingungen und der Pflege.
Wie du die Fruchtbildung anregen kannst:
Es gibt ein paar Tricks, mit denen du die Fruchtbildung anregen kannst:
* Ethylen-Gas: Stelle einen Apfel neben die Ananaspflanze. Äpfel produzieren Ethylen-Gas, das die Fruchtbildung anregen kann.
* Magnesiumsulfat (Bittersalz): Gieße die Ananas gelegentlich mit einer Lösung aus Magnesiumsulfat (1 Teelöffel pro Liter Wasser).
* Geduld: Manchmal braucht es einfach Zeit!
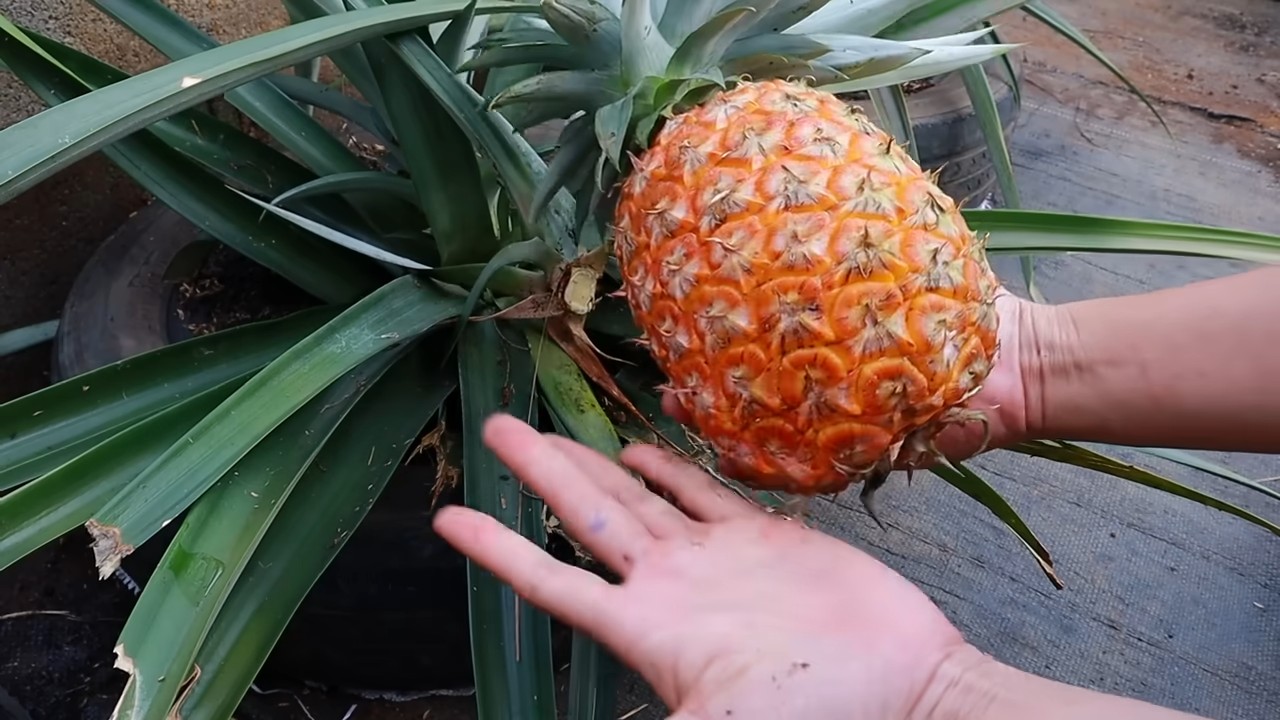
Ananas ernten: Der Lohn deiner Mühe
Wenn die Ananas reif ist, verströmt sie einen süßen Duft und die Schale wird gelb-orange. Schneide die Ananas vorsichtig vom Strunk ab und genieße deine selbstgezogene tropische Frucht!
Häufige Probleme und Lösungen: Damit nichts schiefgeht
Auch beim Ananas-Anbau können Probleme auftreten. Hier sind einige häufige Probleme und wie du sie lösen kannst:
* Blätter werden braun: Das kann verschiedene Ursachen haben, wie z.B. zu wenig Wasser, zu viel Sonne oder Nährstoffmangel. Überprüfe deine Pflege und passe sie gegebenenfalls an.
* Keine Wurzeln: Geduld! Es kann dauern, bis die Ananas Wurzeln schlägt. Stelle sicher, dass der Ananaskopf an einem warmen, hellen Ort steht und das Wasser regelmäßig gewechselt wird.
* Fäulnis: Fäulnis entsteht durch zu viel Feuchtigkeit. Achte darauf, dass die Erde gut drainiert ist und vermeide Staunässe. Entferne befallene Blätter oder Teile der Pflanze.
* Schädlinge: Kontrolliere die Ananas regelmäßig auf Schädlinge und behandle sie bei Bedarf mit einem geeigneten Pflanzenschutzmittel.
Ich hoffe, dieser Artikel hat dir geholfen, dein eigenes Ananas-Projekt zu starten. Es ist ein spannendes und lohnendes DIY-Projekt, das dir viel Freude bereiten wird. Viel Erfolg und viel Spaß beim Ananas-Anbau!
Conclusion
So, there you have it! Growing your own pineapple on your terrace isn’t just a fun project; it’s a rewarding experience that brings a touch of the tropics right to your doorstep. Imagine the satisfaction of harvesting a sweet, juicy pineapple that you nurtured from start to finish. Forget those bland, store-bought pineapples that lack the vibrant flavor of a homegrown fruit. This DIY trick is a must-try for anyone with a sunny terrace, a little patience, and a desire to connect with nature.
The beauty of this method lies in its simplicity and accessibility. You don’t need acres of land or specialized equipment. A pot, some soil, and a pineapple top are all you need to embark on this exciting gardening adventure. Plus, it’s an excellent way to reduce food waste by repurposing the top of a pineapple you’ve already enjoyed.
But don’t stop there! Feel free to experiment with different varieties of pineapples. Try growing a ‘Smooth Cayenne’ for its classic sweetness or a ‘Sugarloaf’ for its exceptionally low acidity. You can also explore different potting mixes to find what works best for your climate and growing conditions. Consider adding slow-release fertilizer to provide your pineapple plant with a steady supply of nutrients.
For those living in colder climates, consider bringing your potted pineapple indoors during the winter months. A sunny windowsill or a grow light can help ensure your plant continues to thrive even when the weather outside is less than ideal. You can also experiment with different mulches to help retain moisture and suppress weeds.
The key to success with this DIY trick is patience. It takes time for a pineapple plant to mature and produce fruit, but the wait is well worth it. As you watch your plant grow and develop, you’ll gain a deeper appreciation for the natural world and the miracle of life.
We encourage you to give this DIY trick a try and share your experience with us. Post photos of your pineapple plants on social media using #TerracePineapple and let us know how it’s going. We’d love to see your progress and learn from your successes (and even your challenges!). Together, we can create a community of urban gardeners who are passionate about growing their own food and bringing a little bit of paradise to their homes. So, grab a pineapple, get your hands dirty, and start growing your own tropical treat today! You’ll be amazed at what you can accomplish with a little bit of effort and a whole lot of love. This method of **growing pineapple on terrace** is not only sustainable but also adds a unique charm to your living space.
Frequently Asked Questions (FAQ)
1. What kind of pineapple should I use to start my plant?
The best type of pineapple to use is a fresh, ripe pineapple from the grocery store. Look for one with healthy, green leaves and no signs of rot or damage. Avoid pineapples that have been refrigerated for an extended period, as this can reduce their chances of rooting successfully. ‘Smooth Cayenne’ is a popular and readily available variety that works well for this purpose. You can also try other varieties, but make sure they are fresh and healthy.
2. How do I prepare the pineapple top for planting?
Preparing the pineapple top is crucial for successful rooting. First, carefully twist or cut off the top of the pineapple, leaving about an inch of fruit attached. Then, remove the bottom few layers of leaves to expose the stem. This will encourage root growth. Allow the pineapple top to dry for a few days in a cool, dry place. This helps to prevent rot. Some people also recommend dipping the cut end in rooting hormone to further promote root development, but this is optional.
3. What kind of soil should I use?
Pineapples prefer well-draining soil that is slightly acidic. A good potting mix for pineapples is a combination of equal parts peat moss, perlite, and vermiculite. You can also add some compost to provide extra nutrients. Avoid using heavy clay soil, as this can lead to root rot. Make sure the pot you use has drainage holes to prevent waterlogging.
4. How often should I water my pineapple plant?
Water your pineapple plant regularly, but avoid overwatering. Allow the soil to dry out slightly between waterings. During the growing season (spring and summer), you may need to water more frequently than during the dormant season (fall and winter). A good rule of thumb is to water when the top inch of soil feels dry to the touch. Be sure to water thoroughly, allowing the water to drain out of the bottom of the pot.
5. How much sunlight does a pineapple plant need?
Pineapple plants need plenty of sunlight to thrive. Aim for at least six hours of direct sunlight per day. If you are growing your pineapple plant indoors, place it near a sunny window or use a grow light to supplement natural light. Insufficient sunlight can lead to slow growth and reduced fruit production.
6. How long does it take for a pineapple plant to produce fruit?
It can take anywhere from 1 to 3 years for a pineapple plant to produce fruit, depending on the variety, growing conditions, and care. Be patient and continue to provide your plant with the proper care, and eventually, you will be rewarded with a delicious, homegrown pineapple.
7. How do I know when my pineapple is ripe?
A ripe pineapple will have a sweet aroma and a slightly golden color. The eyes (the individual segments of the pineapple) will also be flatter and more developed. You can also gently tug on one of the leaves; if it comes off easily, the pineapple is likely ripe.
8. Can I grow a pineapple plant indoors?
Yes, you can grow a pineapple plant indoors, especially if you live in a colder climate. However, you will need to provide it with plenty of sunlight or a grow light. Make sure to choose a pot that is large enough to accommodate the plant’s root system.
9. What are some common problems that pineapple plants face?
Some common problems that pineapple plants face include root rot, mealybugs, and scale. Root rot is caused by overwatering, so be sure to allow the soil to dry out slightly between waterings. Mealybugs and scale are pests that can be controlled with insecticidal soap or neem oil.
10. Can I fertilize my pineapple plant?
Yes, fertilizing your pineapple plant can help to promote healthy growth and fruit production. Use a balanced fertilizer that is specifically formulated for tropical plants. Follow the instructions on the fertilizer label for application rates and frequency. You can also use a slow-release fertilizer to provide your plant with a steady supply of nutrients.

Leave a Comment