
Growing coriander in a plastic bottle? Absolutely! I know it sounds a little unconventional, but trust me, this simple DIY trick can transform your kitchen windowsill into a thriving herb garden. Forget those wilting supermarket bunches – imagine having fresh, fragrant coriander at your fingertips whenever you need it!
Coriander, also known as cilantro, has a rich history, dating back thousands of years. It’s been used in cuisines across the globe, from ancient Egypt to modern-day Mexico, adding a vibrant zest to countless dishes. But let’s be honest, buying coriander from the store can be frustrating. It often goes bad quickly, and you’re left with a soggy, unusable mess. That’s where this clever plastic bottle hack comes in!
This DIY project isn’t just about saving money; it’s about convenience and sustainability. By repurposing a plastic bottle, you’re reducing waste and creating a self-contained ecosystem for your coriander to flourish. Plus, it’s incredibly easy to set up, even if you don’t have a green thumb. I’m going to show you how to create your own mini-coriander farm, ensuring you always have a fresh supply of this essential herb. So, grab a plastic bottle, some soil, and let’s get started on growing coriander in a plastic bottle – you’ll be amazed at the results!
Koriander Anbauen in einer Plastikflasche: Ein DIY-Gartenprojekt für Jedermann
Hey Gartenfreunde! Habt ihr auch manchmal das Problem, dass ihr frischen Koriander braucht, aber im Supermarkt nur riesige Bunde findet, von denen die Hälfte dann im Kühlschrank vergammelt? Oder habt ihr einfach keinen Platz für ein riesiges Kräuterbeet? Keine Sorge, ich habe die perfekte Lösung für euch: Korianderanbau in einer Plastikflasche! Das ist nicht nur super einfach und platzsparend, sondern auch eine tolle Möglichkeit, Plastikmüll zu recyceln. Lasst uns loslegen!
Was du brauchst:
* Eine leere Plastikflasche (am besten eine 1,5-Liter-Flasche oder größer)
* Ein scharfes Messer oder eine Schere
* Erde (am besten Kräutererde oder Anzuchterde)
* Koriandersamen (gibt es im Gartencenter oder online)
* Optional: Blähton oder Kies für die Drainage
* Optional: Sprühflasche mit Wasser
Die Vorbereitung: Die Basis für deinen Koriandergarten
Bevor wir mit dem eigentlichen Anpflanzen beginnen, müssen wir die Plastikflasche vorbereiten. Das ist aber wirklich kinderleicht!
1. Flasche reinigen: Zuerst spülst du die Plastikflasche gründlich mit warmem Wasser und etwas Spülmittel aus. So entfernst du alle Rückstände und sorgst für eine saubere Umgebung für deine Koriandersamen.
2. Schneiden der Flasche: Jetzt kommt der spannende Teil: das Schneiden der Flasche. Du hast zwei Möglichkeiten:
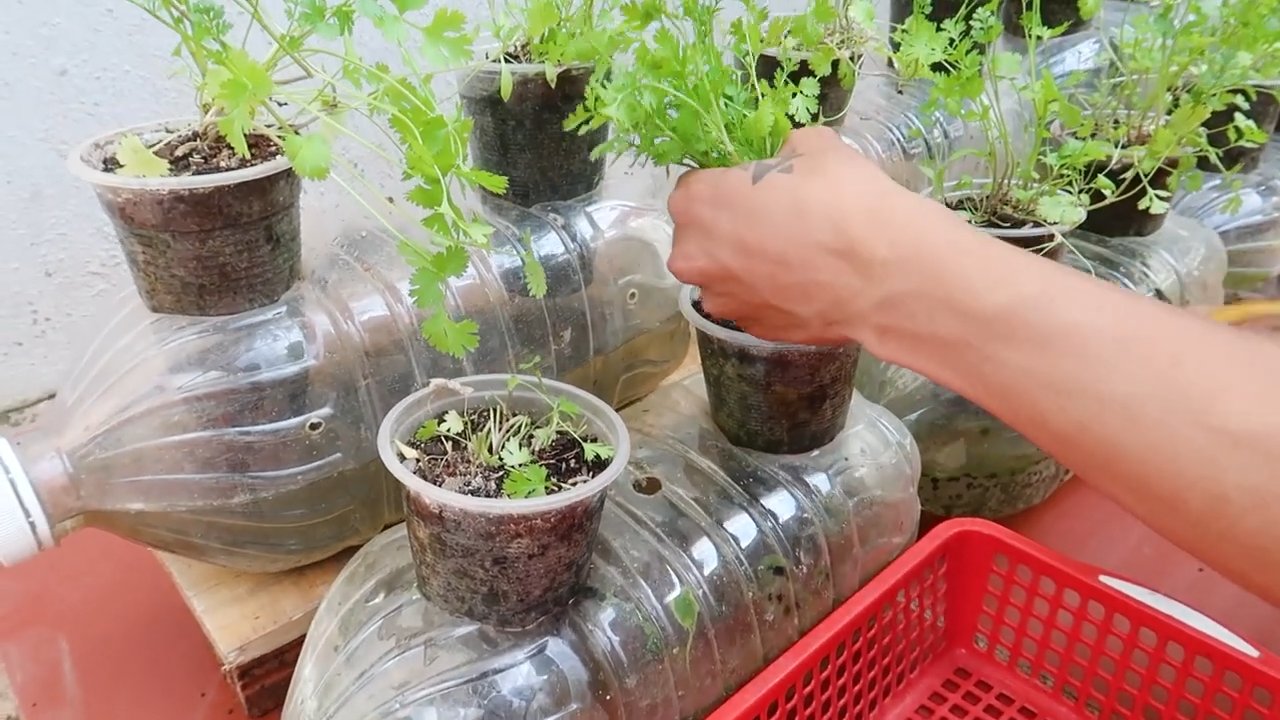
* Variante 1 (Hängender Garten): Schneide die Flasche etwa 10-15 cm unterhalb des Flaschenhalses durch. Den oberen Teil (mit dem Flaschenhals) kannst du später umgedreht in den unteren Teil stecken. So entsteht eine Art Mini-Gewächshaus.
* Variante 2 (Stehender Topf): Schneide die Flasche horizontal in der Mitte durch. Du erhältst zwei gleich große Teile, die du als separate Töpfe verwenden kannst.
Ich persönlich bevorzuge die erste Variante, weil sie platzsparender ist und man die Flasche aufhängen kann. Aber entscheide selbst, was dir besser gefällt!
3. Drainagelöcher bohren: Egal für welche Variante du dich entscheidest, du musst unbedingt Drainagelöcher in den Boden der Flasche bohren oder schneiden. Das ist wichtig, damit überschüssiges Wasser ablaufen kann und die Wurzeln nicht faulen. Ich nehme dafür einfach ein Messer und steche ein paar Löcher in den Boden. Sei vorsichtig, dass du dich nicht verletzt!
4. Optional: Drainage vorbereiten: Wenn du möchtest, kannst du jetzt eine Schicht Blähton oder Kies auf den Boden der Flasche geben. Das verbessert die Drainage zusätzlich und verhindert Staunässe.
Das Anpflanzen: Koriander zum Leben erwecken
Jetzt kommt der spaßigste Teil: das Anpflanzen der Koriandersamen!
1. Erde einfüllen: Fülle die vorbereitete Flasche mit Erde. Lass dabei etwa 2-3 cm Platz bis zum Rand. Die Erde sollte locker und luftig sein, damit die Wurzeln gut wachsen können.
2. Samen aussäen: Verteile die Koriandersamen gleichmäßig auf der Erde. Achte darauf, dass sie nicht zu dicht beieinander liegen, damit die Pflanzen genügend Platz zum Wachsen haben. Ich säe meistens so 5-10 Samen pro Flasche.
3. Samen bedecken: Bedecke die Samen mit einer dünnen Schicht Erde (ca. 0,5 cm). Drücke die Erde leicht an.
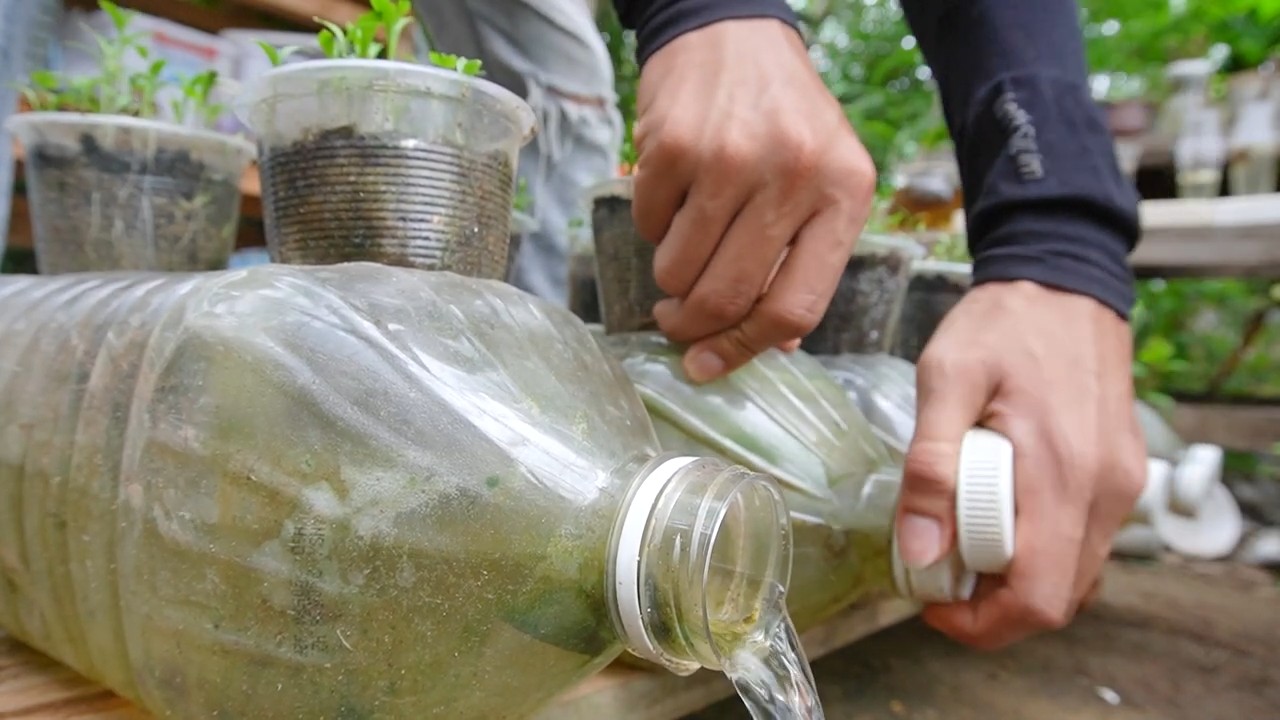
4. Gießen: Gieße die Erde vorsichtig an. Am besten verwendest du dafür eine Sprühflasche, damit die Samen nicht weggeschwemmt werden. Die Erde sollte feucht, aber nicht nass sein.
Die Pflege: Damit dein Koriander prächtig gedeiht
Nach dem Anpflanzen ist es wichtig, dass du deinen Koriander gut pflegst, damit er prächtig gedeiht.
1. Standort: Stelle die Flasche an einen hellen und sonnigen Standort. Koriander braucht viel Licht, um gut zu wachsen. Ein Fensterbrett oder ein Balkon sind ideal.
2. Gießen: Gieße die Erde regelmäßig, aber nicht zu viel. Die Erde sollte immer leicht feucht sein, aber nicht nass. Am besten überprüfst du die Feuchtigkeit mit dem Finger. Wenn sich die Erde trocken anfühlt, ist es Zeit zum Gießen.
3. Düngen: Koriander braucht nicht viel Dünger. Wenn du möchtest, kannst du ihn aber alle paar Wochen mit einem milden Kräuterdünger düngen. Achte darauf, die Dosierungsanleitung auf der Verpackung zu beachten.
4. Ernten: Nach etwa 4-6 Wochen kannst du deinen Koriander das erste Mal ernten. Schneide die Blätter einfach mit einer Schere ab. Achte darauf, die Pflanze nicht zu stark zu beschneiden, damit sie weiterwachsen kann. Am besten erntest du immer nur die äußeren Blätter.
5. Blütenbildung verhindern: Koriander neigt dazu, schnell zu blühen. Wenn er blüht, werden die Blätter bitter. Um die Blütenbildung zu verhindern, solltest du die Pflanze regelmäßig beschneiden. Wenn du trotzdem Blüten entdeckst, schneide sie einfach ab.
Zusätzliche Tipps und Tricks: Für noch mehr Korianderglück
Hier sind noch ein paar zusätzliche Tipps und Tricks, die dir helfen können, deinen Koriander noch besser anzubauen:
* Verschiedene Sorten: Es gibt verschiedene Koriandersorten. Einige sind robuster als andere. Informiere dich im Gartencenter, welche Sorte für deine Region am besten geeignet ist.
* Schädlinge: Koriander ist relativ resistent gegen Schädlinge. Wenn du trotzdem Schädlinge entdeckst, kannst du sie mit einem natürlichen Schädlingsbekämpfungsmittel bekämpfen.
* Umtopfen: Wenn dein Koriander zu groß für die Plastikflasche wird, kannst du ihn in einen größeren Topf umtopfen.
* Koriandersamen gewinnen: Wenn dein Koriander blüht und Samen bildet, kannst du die Samen ernten und für die nächste Aussaat aufbewahren. Lass die Samen einfach an der Pflanze trocknen und sammle sie dann ein.
* Koriander einfrieren: Wenn du zu viel Koriander geerntet hast, kannst du ihn einfrieren. Hacke den Koriander einfach klein und friere ihn in Eiswürfelbehältern ein. So hast du immer frischen Koriander zur Hand.
Häufige Probleme und Lösungen: Was tun, wenn etwas schief geht?
Auch beim Korianderanbau in der Plastikflasche kann es mal zu Problemen kommen. Hier sind ein paar häufige Probleme und ihre Lösungen:
* Problem: Die Samen keimen nicht.
* Lösung: Stelle sicher, dass die Erde feucht genug ist und die Temperatur stimmt. Koriander keimt am besten bei Temperaturen zwischen 18 und 25 Grad Celsius.
* Problem: Die Blätter werden gelb.
* Lösung: Das kann verschiedene Ursachen haben. Entweder bekommt die Pflanze zu wenig Licht, zu viel Wasser oder zu wenig Nährstoffe. Überprüfe die Standortbedingungen und passe die Bewässerung und Düngung an.
* Problem: Die Pflanze blüht zu schnell.
* Lösung: Beschneide die Pflanze regelmäßig und entferne die Blüten.
* Problem: Die Pflanze wird von Schädlingen befallen.
* Lösung: Bekämpfe die Schädlinge mit einem natürlichen Schädlingsbekämpfungsmittel.
Ich hoffe, diese Anleitung hilft dir dabei, deinen eigenen Koriander in einer Plastikflasche anzubauen. Es ist wirklich ein tolles Projekt, das nicht nur Spaß macht, sondern auch noch leckeren Koriander liefert. Viel Erfolg und happy gardening!
Conclusion
So, there you have it! Transforming a simple plastic bottle into a thriving coriander garden is not just a fun project; it’s a sustainable, space-saving, and incredibly rewarding way to enjoy fresh herbs right at your fingertips. We’ve walked you through the process, highlighting the ease and efficiency of this DIY method. Forget those expensive, pre-packaged herbs from the supermarket that wilt within days. With this simple trick, you’ll have a constant supply of fragrant, flavorful coriander ready to elevate your culinary creations.
But why is this DIY trick a must-try? Beyond the obvious cost savings and environmental benefits, growing your own coriander in a plastic bottle offers unparalleled control over the growing environment. You can easily monitor the soil moisture, adjust sunlight exposure, and protect your precious plants from pests and harsh weather conditions. This level of control translates to healthier, more vibrant coriander with a more intense flavor profile.
And the best part? This method is incredibly versatile. While we’ve focused on coriander, you can easily adapt this technique to grow other herbs like parsley, basil, or even small vegetables like lettuce or spinach. Experiment with different types of plastic bottles – larger bottles can accommodate more plants, while smaller bottles are perfect for compact spaces. You can also get creative with the design, painting the bottles to add a touch of personality to your mini-garden or grouping them together to create a stunning vertical display.
Consider adding a slow-release fertilizer to the soil mix for sustained nutrient delivery. You can also experiment with different soil types to see which one yields the best results for your specific climate and growing conditions. For those living in colder climates, consider bringing your bottle garden indoors during the winter months to ensure a year-round supply of fresh coriander.
Don’t be afraid to experiment and personalize this DIY project to suit your needs and preferences. The possibilities are endless!
We truly believe that this DIY coriander growing method is a game-changer for anyone who loves fresh herbs and wants to embrace a more sustainable lifestyle. It’s a simple, effective, and incredibly satisfying way to connect with nature and enjoy the fruits (or rather, herbs) of your labor.
So, what are you waiting for? Gather your supplies, follow our step-by-step guide, and embark on your own coriander-growing adventure. We’re confident that you’ll be amazed by the results.
We encourage you to try this DIY trick and share your experience with us! Post photos of your bottle gardens on social media using #DIYCorianderGarden and tag us so we can see your amazing creations. We’d love to hear your tips, tricks, and any variations you’ve come up with. Let’s inspire others to embrace the joy of growing their own fresh herbs!
Frequently Asked Questions (FAQ)
1. What type of plastic bottle is best for growing coriander?
The best type of plastic bottle for growing coriander is a clear or translucent bottle that has been thoroughly cleaned. Avoid using bottles that have contained harsh chemicals or pesticides. A 2-liter soda bottle or a similar-sized water bottle works well, providing enough space for the coriander roots to develop. Make sure the bottle is sturdy enough to hold the soil and water without collapsing. You can also use larger bottles for bigger yields or smaller bottles for individual plants. Remember to recycle responsibly once the bottle is no longer usable.
2. What kind of soil should I use for growing coriander in a plastic bottle?
A well-draining potting mix is ideal for growing coriander in a plastic bottle. Avoid using garden soil, as it can be too heavy and compact, hindering root growth and drainage. A good potting mix will provide the necessary nutrients and aeration for healthy coriander plants. You can also amend the potting mix with perlite or vermiculite to improve drainage and aeration further. Consider adding a slow-release fertilizer to the soil mix to provide a steady supply of nutrients over time.
3. How much sunlight does coriander need when grown in a plastic bottle?
Coriander thrives in full sun to partial shade. Aim for at least 6 hours of direct sunlight per day. If you’re growing your coriander indoors, place the bottle near a sunny window or use a grow light to supplement natural light. Insufficient sunlight can lead to leggy growth and reduced flavor. Monitor your plants closely and adjust their position as needed to ensure they receive adequate sunlight.
4. How often should I water my coriander plants in a plastic bottle?
Water your coriander plants regularly, keeping the soil consistently moist but not waterlogged. Check the soil moisture by inserting your finger about an inch deep. If the soil feels dry, it’s time to water. Avoid overwatering, as this can lead to root rot. The frequency of watering will depend on factors such as temperature, humidity, and the size of the bottle. In hotter weather, you may need to water more frequently. Ensure the bottle has drainage holes to prevent water from accumulating at the bottom.
5. How do I prevent pests and diseases from affecting my coriander plants in a plastic bottle?
To prevent pests and diseases, start with healthy soil and seeds. Regularly inspect your plants for any signs of infestation or disease. Common pests that can affect coriander include aphids, spider mites, and whiteflies. You can control these pests by spraying your plants with insecticidal soap or neem oil. Ensure good air circulation around your plants to prevent fungal diseases. Remove any dead or diseased leaves promptly to prevent the spread of infection.
6. How long does it take for coriander to grow in a plastic bottle?
Coriander typically germinates within 7-14 days. You can start harvesting leaves in about 4-6 weeks after planting. The exact time will depend on factors such as temperature, sunlight, and soil fertility. Regular harvesting will encourage the plant to produce more leaves. Be sure to harvest the leaves before the plant starts to bolt (flower), as this can affect the flavor of the leaves.
7. Can I grow coriander indoors in a plastic bottle?
Yes, you can absolutely grow coriander indoors in a plastic bottle. Ensure that your plants receive adequate sunlight or use a grow light to supplement natural light. Maintain a consistent temperature and humidity level. Water your plants regularly and monitor them for any signs of pests or diseases. Growing coriander indoors allows you to enjoy fresh herbs year-round, regardless of the weather conditions outside.
8. How do I harvest coriander from a plastic bottle?
Harvest coriander leaves by snipping them off with scissors or pinching them off with your fingers. Start harvesting from the outer leaves first, allowing the inner leaves to continue growing. Avoid harvesting more than one-third of the plant at a time, as this can stress the plant and reduce its productivity. Harvest the leaves before the plant starts to bolt (flower) for the best flavor.
9. What are some variations I can try with this DIY coriander growing method?
There are many variations you can try with this DIY coriander growing method. You can experiment with different types of plastic bottles, such as larger bottles for bigger yields or smaller bottles for individual plants. You can also try growing other herbs in plastic bottles, such as parsley, basil, or mint. Get creative with the design by painting the bottles or grouping them together to create a vertical garden. You can also add a self-watering system to the bottle to reduce the frequency of watering.
10. How do I deal with bolting (flowering) in my coriander plants?
Bolting, or flowering, is a natural process that occurs when coriander plants are exposed to high temperatures or stress. Once the plant starts to bolt, the flavor of the leaves can become bitter. To prevent bolting, try to keep your plants in a cool, shaded location during hot weather. Water your plants regularly and avoid letting the soil dry out. You can also pinch off the flower buds as soon as they appear to encourage the plant to produce more leaves. If your plant does bolt, you can still harvest the seeds, which can be used as a spice or to grow new plants.

Leave a Comment