
Grow Purple Kohlrabi Easily and unlock a world of vibrant color and delicious flavor right in your own backyard! Have you ever dreamed of adding a unique and eye-catching vegetable to your garden and your dinner plate? Well, dream no more! This DIY guide will walk you through simple, effective tricks to cultivate beautiful purple kohlrabi, even if you’re a complete beginner.
Kohlrabi, often called a “German turnip,” has a fascinating history, dating back to the Roman Empire. While green kohlrabi is more common, the purple variety adds a touch of regal elegance to any garden. For centuries, this humble vegetable has been a staple in European cuisine, prized for its crisp texture and mild, slightly sweet flavor.
But why should you bother to grow purple kohlrabi easily? In today’s world, we’re all looking for ways to eat healthier, save money, and connect with nature. Growing your own vegetables ticks all those boxes! Plus, store-bought kohlrabi can sometimes be bland or tough. When you grow your own, you control the quality and harvest it at peak freshness. This guide will provide you with the knowledge and simple hacks to ensure a bountiful harvest of tender, flavorful purple kohlrabi that will impress your friends and family. I’m excited to share these tips with you, so let’s get started!
Lila Kohlrabi einfach selbst anbauen: Dein DIY-Guide für eine farbenfrohe Ernte
Hey Gartenfreunde! Habt ihr Lust auf etwas Farbe in eurem Gemüsebeet? Dann lasst uns gemeinsam lila Kohlrabi anbauen! Ich zeige euch, wie ihr mit einfachen Mitteln und ein bisschen Geduld eine reiche Ernte dieser wunderschönen und leckeren Knollen erzielen könnt. Keine Angst, es ist einfacher als ihr denkt!
Was du brauchst: Die Vorbereitung
Bevor wir loslegen, brauchen wir natürlich das richtige Equipment und die passenden Materialien. Hier eine Liste, damit ihr nichts vergesst:
* Kohlrabisamen (lila Sorte): Achtet auf eine hochwertige Sorte, die für eure Region geeignet ist. “Purple Vienna” oder “Azur Star” sind beliebte Optionen.
* Anzuchterde: Diese ist nährstoffarm und locker, ideal für die Keimung.
* Anzuchttöpfe oder -schalen: Kleine Behälter, in denen die Samen vorgezogen werden.
* Pikierstab oder Bleistift: Zum Vereinzeln der Sämlinge.
* Gartenerde: Für das Beet, in dem der Kohlrabi später wachsen soll.
* Kompost oder organischer Dünger: Um den Boden anzureichern.
* Gießkanne oder Sprühflasche: Für die Bewässerung.
* Gartenwerkzeug: Spaten, Harke, eventuell eine Pflanzkelle.
* Schneckenkorn (optional): Zum Schutz vor Schneckenfraß.
* Vlies (optional): Zum Schutz vor Schädlingen und Kälte.
Die Aussaat: Der Start in ein farbenfrohes Gemüseleben
Die Aussaat ist der erste wichtige Schritt. Ich empfehle, Kohlrabi vorzuziehen, da dies die Erntezeit verlängert und die Pflanzen widerstandsfähiger macht.
1. Anzuchtgefäße vorbereiten: Füllt die Anzuchttöpfe oder -schalen mit Anzuchterde. Drückt die Erde leicht an.
2. Samen aussäen: Legt in jeden Topf oder jede Schale 2-3 Samen. Bedeckt sie mit einer dünnen Schicht Erde (ca. 0,5 cm).
3. Bewässern: Befeuchtet die Erde vorsichtig mit einer Sprühflasche oder Gießkanne. Achtet darauf, dass die Erde nicht zu nass wird.
4. Warm stellen: Stellt die Anzuchtgefäße an einen warmen, hellen Ort (ca. 18-20°C). Ein Mini-Gewächshaus oder eine Fensterbank sind ideal.
5. Feucht halten: Haltet die Erde gleichmäßig feucht, aber nicht nass. Lüftet das Mini-Gewächshaus regelmäßig, um Schimmelbildung zu vermeiden.
6. Keimung abwarten: Nach etwa einer Woche sollten die ersten Keimlinge erscheinen.
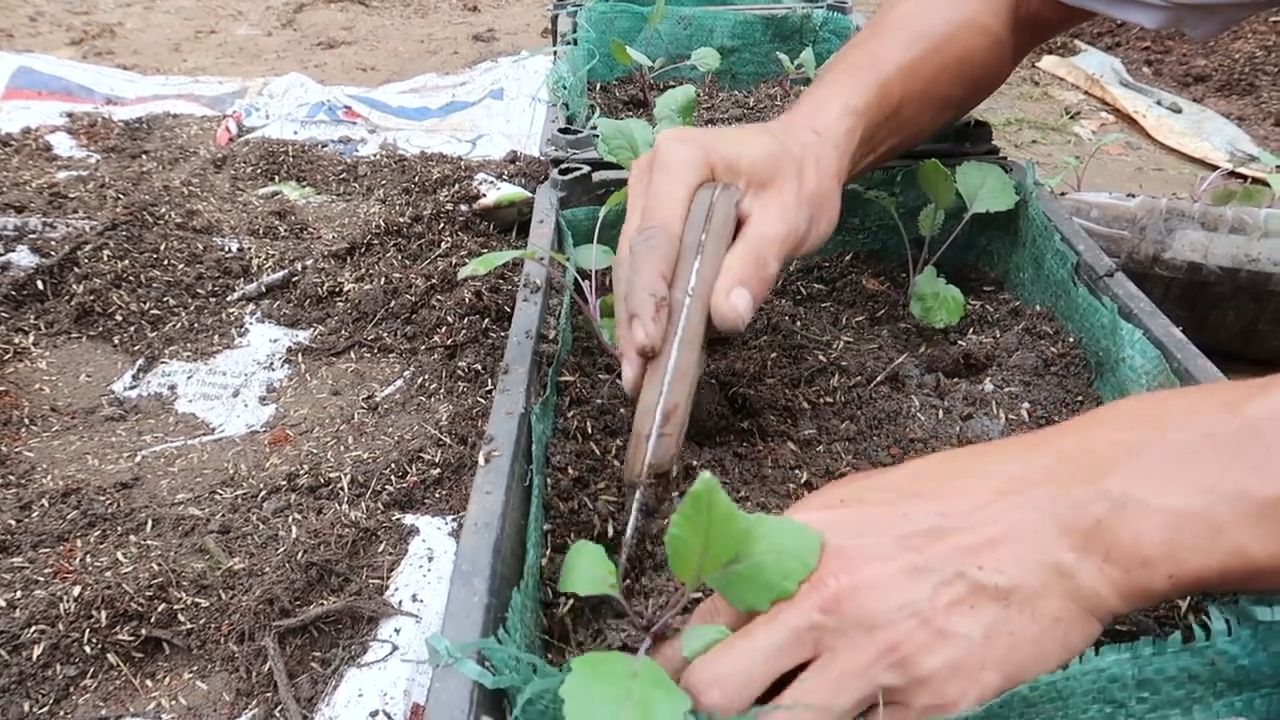
Das Pikieren: Den kleinen Pflänzchen mehr Raum geben
Sobald die Sämlinge ihre ersten richtigen Blätter (nach den Keimblättern) entwickelt haben, ist es Zeit zum Pikieren. Das bedeutet, dass wir die kleinen Pflänzchen vereinzeln und in größere Töpfe umsetzen.
1. Vorbereitung: Füllt größere Töpfe (ca. 8-10 cm Durchmesser) mit Anzuchterde.
2. Sämlinge vorsichtig ausheben: Löst die Sämlinge vorsichtig mit einem Pikierstab oder Bleistift aus der Anzuchtschale. Achtet darauf, die Wurzeln nicht zu beschädigen.
3. Einpflanzen: Setzt jeden Sämling in einen eigenen Topf. Die Wurzeln sollten ausreichend Platz haben.
4. Bewässern: Gießt die Sämlinge vorsichtig an.
5. Heller Standort: Stellt die pikierten Sämlinge an einen hellen, aber nicht zu sonnigen Ort.
6. Weiter pflegen: Haltet die Erde feucht und düngt die Pflanzen nach etwa zwei Wochen mit einem milden Flüssigdünger.
Die Vorbereitung des Beetes: Ein gutes Fundament für eine reiche Ernte
Kohlrabi braucht einen sonnigen bis halbschattigen Standort und einen nährstoffreichen, lockeren Boden. Bereitet das Beet daher gut vor.
1. Boden lockern: Lockert den Boden mit einem Spaten oder einer Grabegabel auf. Entfernt Steine und Unkraut.
2. Boden verbessern: Mischt Kompost oder organischen Dünger unter die Erde. Das verbessert die Bodenstruktur und versorgt die Pflanzen mit Nährstoffen.
3. Beet ebnen: Harkt das Beet glatt.
4. Abstand beachten: Plant die Kohlrabipflanzen mit einem Abstand von etwa 25-30 cm zueinander.
Das Auspflanzen: Ab ins Beet!
Nach den Eisheiligen (Mitte Mai) können die vorgezogenen Kohlrabipflanzen ins Beet umziehen.
1. Pflanzen vorbereiten: Gießt die Pflanzen in den Töpfen vor dem Auspflanzen gut an.
2. Pflanzlöcher graben: Grabt Pflanzlöcher, die etwas größer sind als die Wurzelballen der Pflanzen.
3. Pflanzen einsetzen: Setzt die Pflanzen vorsichtig in die Pflanzlöcher. Die Oberkante des Wurzelballens sollte mit der Erdoberfläche abschließen.
4. Anhäufeln: Füllt die Pflanzlöcher mit Erde auf und drückt sie leicht an.
5. Bewässern: Gießt die Pflanzen nach dem Auspflanzen gründlich an.
6. Schutzmaßnahmen: Bringt bei Bedarf Schneckenkorn aus oder deckt die Pflanzen mit einem Vlies ab, um sie vor Schädlingen und Kälte zu schützen.
Die Pflege: Damit der Kohlrabi sich wohlfühlt
Kohlrabi ist relativ pflegeleicht, aber ein paar Dinge solltet ihr beachten, damit er gut wächst und gedeiht.
1. Regelmäßig gießen: Kohlrabi braucht ausreichend Wasser, besonders in trockenen Perioden. Gießt am besten morgens oder abends, um Verdunstung zu vermeiden.
2. Unkraut entfernen: Haltet das Beet unkrautfrei, damit der Kohlrabi nicht um Nährstoffe und Wasser konkurrieren muss.
3. Düngen: Düngt die Pflanzen regelmäßig mit einem organischen Dünger oder Kompost.
4. Boden lockern: Lockert den Boden regelmäßig auf, um die Belüftung zu verbessern.
5. Schädlinge bekämpfen: Achtet auf Schädlinge wie Kohlweißlinge oder Erdflöhe. Bei Bedarf könnt ihr biologische Schädlingsbekämpfungsmittel einsetzen.
6. Schneckenabwehr: Schnecken lieben Kohlrabi! Schützt eure Pflanzen mit Schneckenkorn oder anderen Schneckenabwehrmaßnahmen.
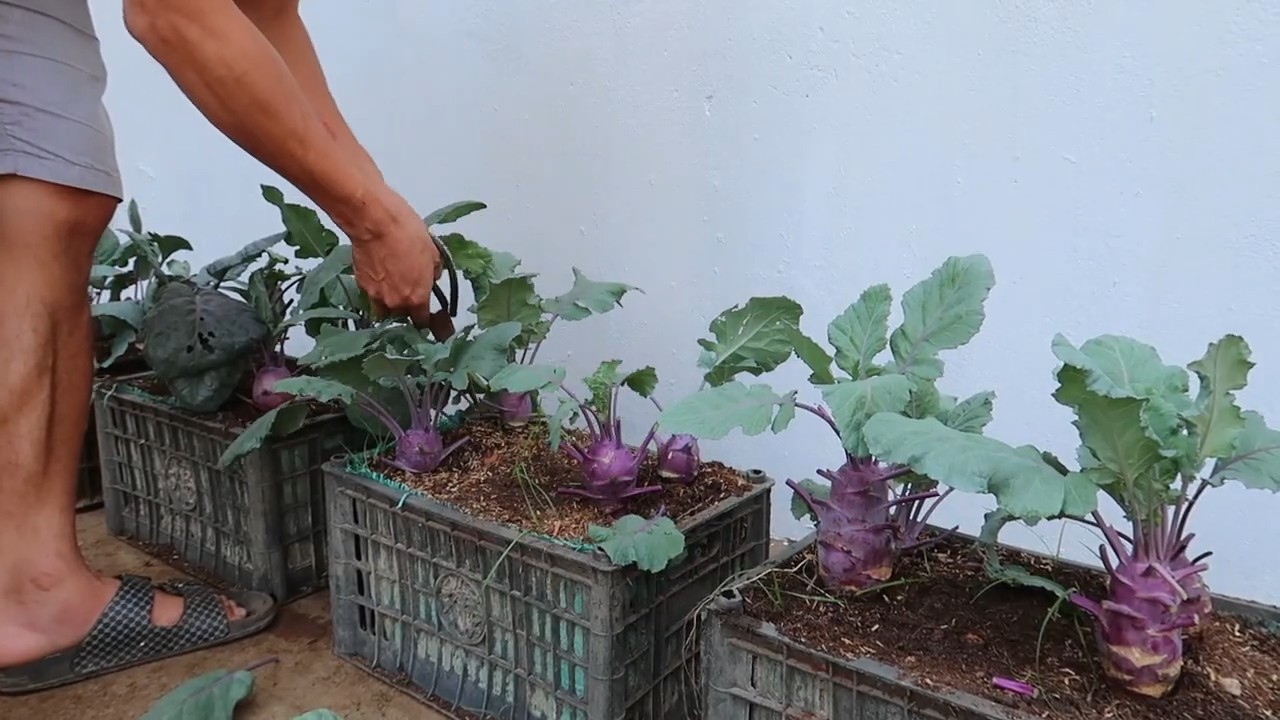
Die Ernte: Der Lohn der Mühe
Je nach Sorte und Witterung ist der Kohlrabi etwa 8-10 Wochen nach der Aussaat erntereif.
1. Erntezeitpunkt: Der Kohlrabi sollte etwa die Größe eines Tennisballs haben. Er ist dann noch zart und saftig.
2. Ernten: Schneidet den Kohlrabi mit einem scharfen Messer knapp über dem Boden ab.
3. Lagerung: Kohlrabi lässt sich im Kühlschrank einige Tage lagern. Am besten wickelt ihr ihn in ein feuchtes Tuch.
Zusätzliche Tipps für eine erfolgreiche Ernte
* Fruchtfolge beachten: Baut Kohlrabi nicht jedes Jahr am selben Standort an, um Krankheiten und Schädlinge zu vermeiden.
* Mischkultur: Kohlrabi verträgt sich gut mit Salat, Radieschen, Spinat und Dill.
* Sortenwahl: Wählt eine Sorte, die für eure Region und den gewünschten Erntezeitpunkt geeignet ist.
* Frühzeitige Aussaat: Beginnt frühzeitig mit der Aussaat, um eine frühe Ernte zu erzielen.
* Schutz vor Frost: Schützt die Pflanzen bei Spätfrösten mit einem Vlies.
Ich hoffe, diese Anleitung hilft euch dabei, erfolgreich lila Kohlrabi anzubauen. Es ist wirklich ein tolles Gefühl, eigenes Gemüse zu ernten und zu wissen, wo es herkommt. Viel Spaß beim
Conclusion
So, there you have it! Growing your own vibrant, delicious purple kohlrabi isn’t just a gardening project; it’s an adventure in flavor and a testament to the joys of homegrown goodness. We’ve walked you through the simple steps, from selecting the right seeds to harvesting those beautiful, bulbous stems. But why is this DIY trick a must-try? It’s about more than just saving money at the grocery store (though that’s certainly a perk!). It’s about connecting with your food, knowing exactly where it comes from, and experiencing the unparalleled taste of freshly harvested vegetables.
Imagine the satisfaction of serving a salad featuring kohlrabi you nurtured from a tiny seed. Picture the vibrant purple adding a pop of color and a burst of flavor to your favorite dishes. And think of the health benefits! Homegrown kohlrabi is packed with vitamins, minerals, and fiber, all without the pesticides and preservatives that can sometimes be found in store-bought produce.
But the beauty of this DIY project lies in its adaptability. Feel free to experiment with different varieties of purple kohlrabi. Some are sweeter, some are spicier, and some have slightly different textures. Try succession planting to ensure a continuous harvest throughout the growing season. And don’t be afraid to get creative with your culinary creations. Kohlrabi can be eaten raw in salads, roasted as a side dish, or even grated into slaws.
For a spicier kick, consider adding a pinch of cayenne pepper to the soil when planting. If you prefer a sweeter flavor, try growing your kohlrabi in a slightly shadier location. And if you’re feeling adventurous, why not try pickling your kohlrabi for a tangy and delicious treat?
Growing purple kohlrabi is a rewarding experience that will not only enhance your garden but also elevate your culinary creations. It’s a simple, sustainable way to enjoy fresh, healthy food and connect with the natural world.
We wholeheartedly encourage you to give this DIY trick a try. Don’t be intimidated if you’re a beginner gardener. Kohlrabi is a relatively easy vegetable to grow, and the rewards are well worth the effort. And most importantly, we want to hear about your experience! Share your photos, tips, and recipes in the comments below. Let’s create a community of kohlrabi enthusiasts and inspire others to embrace the joys of homegrown goodness. What are you waiting for? Get planting!
Frequently Asked Questions (FAQ)
What is the best time to plant purple kohlrabi?
The ideal time to plant purple kohlrabi depends on your climate. In cooler regions with short summers, start seeds indoors 4-6 weeks before the last expected frost. Transplant seedlings outdoors once the danger of frost has passed. In warmer regions with mild winters, you can plant kohlrabi in the fall for a winter or early spring harvest. Aim for planting when the soil temperature is consistently above 45°F (7°C).
How much sunlight does purple kohlrabi need?
Purple kohlrabi thrives in full sun, requiring at least 6 hours of direct sunlight per day. However, in hotter climates, some afternoon shade can be beneficial to prevent the bulbs from becoming tough and bitter. If you’re growing kohlrabi indoors, use grow lights to supplement natural sunlight.
What kind of soil is best for growing purple kohlrabi?
Kohlrabi prefers well-drained, fertile soil that is rich in organic matter. The ideal soil pH is between 6.0 and 7.5. Before planting, amend the soil with compost or well-rotted manure to improve drainage and fertility. Avoid heavy clay soils, as they can become waterlogged and hinder bulb development.
How often should I water purple kohlrabi?
Kohlrabi needs consistent moisture to grow properly. Water deeply and regularly, especially during dry periods. Aim to keep the soil consistently moist but not waterlogged. Mulching around the plants can help retain moisture and suppress weeds. A good rule of thumb is to water when the top inch of soil feels dry to the touch.
How do I fertilize purple kohlrabi?
Kohlrabi is a heavy feeder and benefits from regular fertilization. Before planting, incorporate a balanced fertilizer into the soil. During the growing season, side-dress the plants with a nitrogen-rich fertilizer every 2-3 weeks. Avoid over-fertilizing, as this can lead to excessive foliage growth at the expense of bulb development. Organic options like compost tea or fish emulsion are also excellent choices.
When is purple kohlrabi ready to harvest?
Purple kohlrabi is typically ready to harvest 50-60 days after planting. The bulbs should be about 2-3 inches in diameter. Harvest kohlrabi when it is young and tender, as larger bulbs can become tough and woody. To harvest, simply cut the bulb from the stem just above the soil line.
Can I eat the leaves of purple kohlrabi?
Yes, the leaves of purple kohlrabi are edible and nutritious. They can be eaten raw in salads or cooked like spinach or kale. Choose young, tender leaves for the best flavor and texture. Older leaves may be tougher and more bitter.
What are some common pests and diseases that affect purple kohlrabi?
Common pests that can affect purple kohlrabi include aphids, cabbage worms, and flea beetles. Diseases include clubroot and downy mildew. To prevent pests and diseases, practice crop rotation, keep the garden clean and free of debris, and use organic pest control methods such as insecticidal soap or neem oil. Ensure good air circulation to minimize fungal diseases.
How do I store purple kohlrabi?
Store unwashed purple kohlrabi bulbs in the refrigerator for up to 2-3 weeks. Remove the leaves before storing, as they can draw moisture from the bulb. Wrap the bulbs in a damp paper towel and place them in a plastic bag or container. Kohlrabi can also be frozen. Blanch the bulbs for 2-3 minutes, then cool them in ice water before freezing.
Can I grow purple kohlrabi in containers?
Yes, purple kohlrabi can be successfully grown in containers. Choose a container that is at least 12 inches deep and wide. Use a well-draining potting mix and provide regular watering and fertilization. Container-grown kohlrabi may need more frequent watering than kohlrabi grown in the ground. Make sure the container receives ample sunlight.

Leave a Comment