
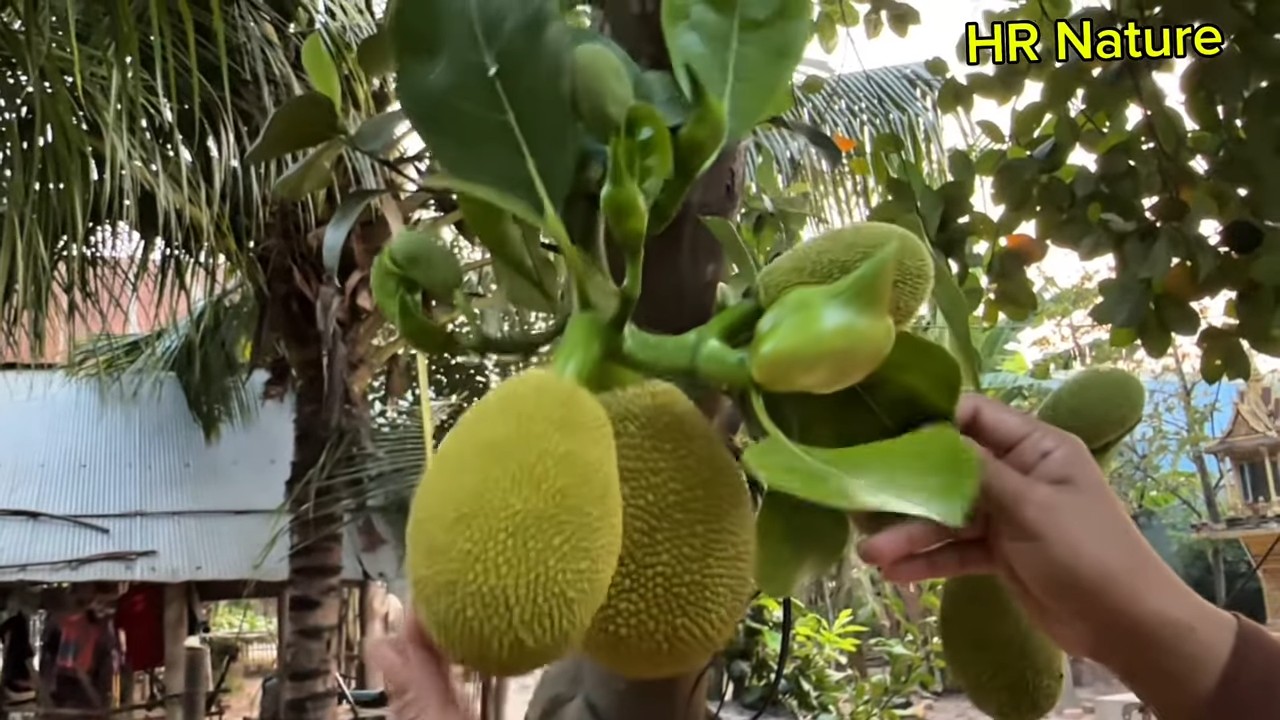
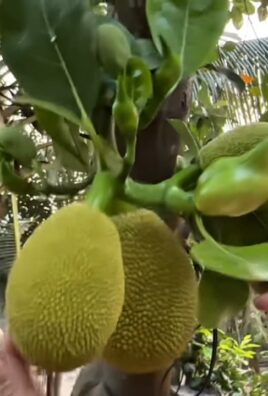
Jackfruit tree grafting at home might sound intimidating, but trust me, it’s a surprisingly rewarding DIY project that can bring the exotic flavors of the tropics right to your backyard! Forget waiting years for a jackfruit tree grown from seed to bear fruit – with grafting, you can significantly speed up the process and ensure you get a tree with desirable characteristics.
Grafting, the art of joining two plants together so they grow as one, has a rich history dating back thousands of years. Ancient civilizations, from the Chinese to the Romans, recognized its power to improve fruit quality and yield. Imagine, centuries ago, skilled gardeners meticulously combining the best traits of different plants, a practice we can still benefit from today!
But why should you consider jackfruit tree grafting at home? Well, for starters, it’s a fantastic way to propagate a specific jackfruit variety you adore. Perhaps your neighbor has a tree that produces incredibly sweet and flavorful fruit – grafting allows you to essentially clone that tree! More importantly, grafting often results in earlier fruiting compared to seed-grown trees, meaning you’ll be enjoying delicious jackfruit much sooner. Plus, it’s a fun and educational experience that connects you with nature and the age-old tradition of plant propagation. I’m excited to share some simple steps to get you started!
Jackfruchtbaumveredelung zu Hause: Eine Schritt-für-Schritt-Anleitung
Hallo liebe Gartenfreunde! Habt ihr euch jemals gefragt, wie man die Ernte eures Jackfruchtbaums verbessern oder eine bestimmte Sorte vermehren kann? Die Antwort ist Veredelung! Es mag anfangs einschüchternd wirken, aber mit der richtigen Anleitung und etwas Geduld könnt ihr das auch zu Hause schaffen. Ich zeige euch, wie ich es gemacht habe, und gebe euch alle Tipps und Tricks, die ich auf dem Weg gelernt habe.
Was ist Veredelung und warum Jackfruchtbäume veredeln?
Veredelung ist im Grunde genommen das Zusammenfügen von zwei Pflanzen, so dass sie als eine einzige Pflanze weiterwachsen. Der obere Teil, der die gewünschten Eigenschaften trägt (z.B. eine bestimmte Fruchtsorte), wird als Edelreis bezeichnet, und der untere Teil, der die Wurzeln liefert, als Unterlage.
Warum sollte man Jackfruchtbäume veredeln? Hier sind ein paar Gründe:
* Sortenechtheit: Veredelung ist der sicherste Weg, um sicherzustellen, dass ihr genau die Jackfruchtsorte erhaltet, die ihr wollt. Samen gezogene Bäume können variieren, aber ein veredelter Baum wird die Eigenschaften des Edelreises tragen.
* Frühere Ernte: Veredelte Bäume können oft früher Früchte tragen als samen gezogene Bäume.
* Krankheitsresistenz: Ihr könnt eine Unterlage wählen, die resistent gegen bestimmte Krankheiten ist, die eure Jackfruchtbäume befallen könnten.
* Verbesserte Fruchtqualität: Durch die Veredelung könnt ihr die Fruchtgröße, den Geschmack und die Textur verbessern.
Benötigte Materialien und Werkzeuge
Bevor wir loslegen, stellt sicher, dass ihr alles Notwendige zur Hand habt. Das spart Zeit und Frustration. Hier ist eine Liste:
* Edelreis: Wählt gesunde, kräftige Triebe von einem Jackfruchtbaum, der die gewünschten Eigenschaften besitzt. Die Triebe sollten etwa bleistiftdick sein und mehrere Knospen haben.
* Unterlage: Verwendet einen gesunden, jungen Jackfruchtbaum als Unterlage. Er sollte gut etabliert und frei von Krankheiten sein.
* Veredelungsmesser oder scharfes Messer: Ein sehr scharfes Messer ist unerlässlich für saubere Schnitte. Achtet darauf, dass es desinfiziert ist.
* Desinfektionsmittel: Alkohol oder eine andere Desinfektionslösung, um eure Werkzeuge zu reinigen und die Ausbreitung von Krankheiten zu verhindern.
* Veredelungsband oder -folie: Zum sicheren Verbinden von Edelreis und Unterlage.
* Gartenschere: Zum Beschneiden der Unterlage.
* Plastiktüten oder Frischhaltefolie: Um das Edelreis vor dem Austrocknen zu schützen.
* Wasserzerstäuber: Um die Luftfeuchtigkeit hoch zu halten.
* Etikett: Zum Beschriften des veredelten Baums mit der Sorte und dem Datum.
Die richtige Zeit für die Veredelung
Der beste Zeitpunkt für die Veredelung von Jackfruchtbäumen ist in der Regel während der Ruhephase des Baumes, also in den kühleren Monaten. In Deutschland wäre das typischerweise im späten Winter oder frühen Frühling, bevor das neue Wachstum beginnt. Vermeidet es, während der heißesten oder feuchtesten Zeit des Jahres zu veredeln, da dies die Erfolgschancen verringern kann.
Schritt-für-Schritt-Anleitung zur Jackfruchtbaumveredelung
Ich werde euch die Geißfußveredelung (auch bekannt als Keilveredelung) zeigen, da sie relativ einfach ist und gute Erfolgsraten erzielt.
1. Vorbereitung des Edelreises
1. Auswahl des Edelreises: Wählt einen gesunden Trieb von eurem gewünschten Jackfruchtbaum. Er sollte etwa 10-15 cm lang sein und mehrere gesunde Knospen haben.
2. Entfernen der Blätter: Entfernt alle Blätter vom Edelreis, um den Wasserverlust zu minimieren. Lasst nur einen kleinen Teil des Blattstiels übrig.
3. Anspitzen des Edelreises: Mit eurem scharfen, desinfizierten Messer schneidet ihr das untere Ende des Edelreises keilförmig zu. Macht zwei glatte, gleichmäßige Schnitte, so dass ein V-förmiger Keil entsteht. Die Schnitte sollten etwa 2-3 cm lang sein.
2. Vorbereitung der Unterlage
1. Auswahl der Unterlage: Wählt einen gesunden, jungen Jackfruchtbaum als Unterlage. Der Stamm sollte etwa den gleichen Durchmesser wie das Edelreis haben.
2. Beschneiden der Unterlage: Schneidet die Unterlage etwa 15-20 cm über dem Boden ab. Macht einen sauberen, geraden Schnitt.
3. Spalten der Unterlage: Mit eurem Messer spaltet ihr den Stamm der Unterlage in der Mitte etwa 2-3 cm tief. Achtet darauf, dass der Spalt sauber und gerade ist.
3. Zusammenfügen von Edelreis und Unterlage
1. Einsetzen des Edelreises: Schiebt den keilförmigen Edelreis vorsichtig in den Spalt der Unterlage. Achtet darauf, dass die Kambiumschichten (die grüne Schicht direkt unter der Rinde) von Edelreis und Unterlage so gut wie möglich aufeinander liegen. Das ist entscheidend für den Erfolg der Veredelung.
2. Sichern der Verbindung: Wickelt die Veredelungsstelle fest mit Veredelungsband oder -folie ein. Beginnt unterhalb des Spalts und arbeitet euch nach oben, um eine wasserdichte Abdichtung zu gewährleisten. Das Band sollte fest genug sein, um die beiden Teile zusammenzuhalten, aber nicht so fest, dass es die Durchblutung behindert.
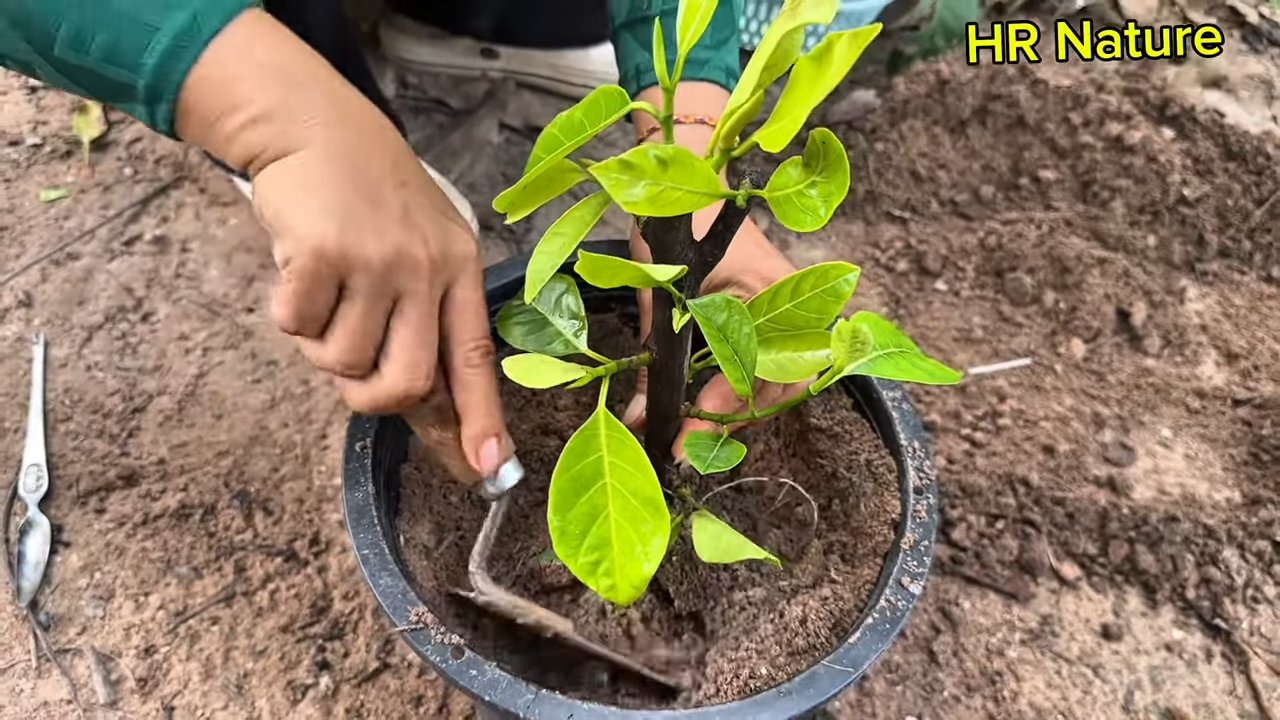
4. Schutz und Pflege
1. Abdecken des Edelreises: Stülpt eine Plastiktüte oder Frischhaltefolie über das Edelreis, um die Luftfeuchtigkeit hoch zu halten. Befestigt die Tüte unterhalb der Veredelungsstelle mit Klebeband oder einem Gummiband.
2. Platzierung des Baumes: Stellt den veredelten Baum an einen schattigen, geschützten Ort. Vermeidet direkte Sonneneinstrahlung und starke Winde.
3. Bewässerung: Gießt die Unterlage regelmäßig, aber vermeidet Staunässe.
4. Beobachtung: Überprüft die Veredelungsstelle regelmäßig auf Anzeichen von Wachstum. Nach einigen Wochen solltet ihr sehen, dass die Knospen am Edelreis anschwellen.
5. Entfernen der Tüte: Sobald die Knospen am Edelreis zu wachsen beginnen, könnt ihr die Plastiktüte allmählich entfernen. Beginnt damit, kleine Löcher in die Tüte zu machen, um die Luftfeuchtigkeit langsam zu reduzieren. Nach ein paar Tagen könnt ihr die Tüte ganz entfernen.
6. Entfernen des Veredelungsbandes: Wenn der Edelreis gut angewachsen ist und neues Wachstum zeigt, könnt ihr das Veredelungsband vorsichtig entfernen. Achtet darauf, den jungen Trieb nicht zu beschädigen.
Häufige Probleme und Lösungen
Auch wenn ihr alles richtig macht, kann es manchmal zu Problemen kommen. Hier sind ein paar häufige Probleme und wie ihr sie beheben könnt:
* Edelreis trocknet aus: Das kann passieren, wenn die Luftfeuchtigkeit zu niedrig ist oder die Veredelungsstelle nicht richtig abgedichtet ist. Stellt sicher, dass die Veredelungsstelle gut mit Veredelungsband oder -folie abgedichtet ist und dass das Edelreis mit einer Plastiktüte abgedeckt ist, um die Luftfeuchtigkeit hoch zu halten.
* Edelreis wächst nicht an: Das kann verschiedene Ursachen haben, z.B. inkompatible Edelreis- und Unterlagensorten, schlechte Kambiumverbindung oder Krankheiten. Achtet darauf, dass ihr gesunde Edelreiser und Unterlagen verwendet und dass die Kambiumschichten so gut wie möglich aufeinander liegen.
* Infektionen: Infektionen können auftreten, wenn die Werkzeuge nicht desinfiziert sind oder wenn die Veredelungsstelle nicht richtig abgedichtet ist. Desinfiziert eure Werkzeuge vor der Veredelung und achtet darauf, dass die Veredelungsstelle gut abgedichtet ist.
Zusätzliche Tipps für den Erfolg
* Übung macht den Meister:
Conclusion
So, there you have it! Mastering jackfruit tree grafting at home isn’t just a fun gardening project; it’s a gateway to enjoying superior fruit quality, faster yields, and the satisfaction of propagating your favorite varieties. We’ve walked you through the entire process, from selecting the right scion and rootstock to the crucial aftercare that ensures a successful graft.
Why is this DIY trick a must-try? Because it puts you in control. You’re no longer limited to the jackfruit varieties available at your local nursery. You can combine the disease resistance of one rootstock with the exceptional flavor of another scion, creating a truly unique and productive tree tailored to your specific needs and preferences. Imagine harvesting juicy, perfectly ripe jackfruits from your own backyard, knowing you played an integral role in their creation. That’s the power of grafting!
But the possibilities don’t stop there. Feel free to experiment with different grafting techniques, such as cleft grafting or side veneer grafting, to find what works best for you and your jackfruit trees. Consider using different rootstocks known for their adaptability to your local soil conditions. You can also explore grafting multiple scions onto a single rootstock to create a “fruit salad” tree, offering a diverse range of jackfruit flavors from a single plant. Just remember to research the compatibility of the varieties you choose.
The key to success lies in patience, precision, and consistent care. Don’t be discouraged if your first attempt isn’t perfect. Grafting is a skill that improves with practice. The more you experiment and learn, the better you’ll become at creating thriving jackfruit trees.
We wholeheartedly encourage you to embark on this rewarding journey of jackfruit tree grafting at home. It’s an investment in your garden, your taste buds, and your connection to the natural world. And most importantly, it’s a sustainable way to ensure a bountiful harvest of this delicious and nutritious fruit for years to come.
Now, we want to hear from you! Have you tried grafting jackfruit trees before? What challenges did you face, and what successes did you celebrate? Share your experiences, tips, and photos in the comments below. Let’s build a community of jackfruit grafting enthusiasts and learn from each other. Your insights could be invaluable to someone just starting out. Let’s get grafting!
Frequently Asked Questions (FAQ)
What is the best time of year to graft jackfruit trees?
The ideal time for jackfruit tree grafting is typically during the late winter or early spring, just before the tree begins its active growth phase. This is when the sap flow is increasing, which promotes successful union formation between the scion and rootstock. Avoid grafting during periods of extreme heat, cold, or heavy rainfall, as these conditions can hinder the grafting process and increase the risk of failure. In tropical climates with consistent temperatures, grafting can be attempted year-round, but monitoring weather conditions is still crucial.
How do I choose the right scion and rootstock for grafting?
Selecting the right scion and rootstock is paramount for successful jackfruit tree grafting. For the scion, choose a healthy, disease-free branch from a mature jackfruit tree that produces desirable fruit. The scion should be about the thickness of a pencil and have several healthy buds. For the rootstock, select a vigorous seedling jackfruit tree that is compatible with the scion variety. Consider factors such as disease resistance, soil adaptability, and growth rate when choosing the rootstock. Local nurseries or agricultural extension services can provide valuable information on compatible jackfruit varieties for your region.
What tools do I need for jackfruit tree grafting?
To perform jackfruit tree grafting, you’ll need a few essential tools:
* A sharp grafting knife: This is crucial for making clean, precise cuts on both the scion and rootstock.
* Pruning shears: For trimming branches and preparing the rootstock.
* Grafting tape or budding tape: To securely wrap the graft union and protect it from moisture and infection.
* Grafting wax or sealant: To further seal the graft union and prevent dehydration.
* Rubbing alcohol or disinfectant: To sterilize your tools and prevent the spread of disease.
* Optional: A small saw for cutting thicker branches.
Ensure all your tools are clean and sharp before starting the grafting process.
How do I care for the grafted jackfruit tree after grafting?
Proper aftercare is essential for the success of your jackfruit tree graft. Here are some key steps:
* Keep the graft union wrapped: Leave the grafting tape or budding tape in place for several weeks or months, until the graft union has fully healed and new growth emerges.
* Protect the graft from sunlight: Shield the newly grafted area from direct sunlight, especially during the hottest part of the day. You can use shade cloth or wrap the graft with paper.
* Water regularly: Keep the soil around the rootstock consistently moist, but avoid overwatering.
* Fertilize lightly: Once new growth appears, you can begin fertilizing the tree with a balanced fertilizer.
* Remove any suckers: Regularly remove any suckers that grow from the rootstock below the graft union. These suckers will compete with the scion for nutrients and water.
* Monitor for pests and diseases: Regularly inspect the grafted tree for signs of pests or diseases and take appropriate action if necessary.
How long does it take for a grafted jackfruit tree to produce fruit?
Grafted jackfruit trees typically produce fruit much sooner than trees grown from seed. While seedling trees may take 5-7 years to bear fruit, grafted trees can start producing fruit in as little as 2-3 years. The exact time frame will depend on the variety of jackfruit, the age of the scion, and the growing conditions.
What if my graft fails?
Grafting is not always successful, and it’s not uncommon for grafts to fail. If your graft fails, don’t be discouraged! Analyze what might have gone wrong, such as improper technique, incompatible varieties, or poor aftercare. You can try grafting again on the same rootstock, or you can start with a new rootstock. Remember, practice makes perfect!
Can I graft different varieties of jackfruit onto the same tree?
Yes, you can graft different varieties of jackfruit onto the same tree, creating a “fruit salad” tree. This can be a great way to enjoy a diverse range of jackfruit flavors from a single plant. However, it’s important to choose varieties that are compatible with each other and have similar growth rates. Research the compatibility of different jackfruit varieties before attempting to graft them together.
Where can I find more information about jackfruit tree grafting?
There are many resources available to help you learn more about jackfruit tree grafting. You can consult with local nurseries, agricultural extension services, or online gardening forums. There are also numerous books and articles on grafting techniques. Don’t hesitate to seek out information and advice from experienced gardeners or grafting experts.


Leave a Comment