
Grow Purple Basil from Seed and unlock a world of vibrant color and aromatic delight right in your own backyard! Have you ever dreamed of adding a touch of regal beauty to your garden and your culinary creations? Well, dream no more! This DIY guide will walk you through the surprisingly simple steps of cultivating your very own purple basil from seed, transforming your garden into a fragrant and visually stunning oasis.
Basil, in general, has a rich history, dating back thousands of years. It was revered in ancient cultures for its medicinal properties and symbolic significance, often associated with love, protection, and even royalty. Purple basil, a more recent cultivar, carries on this legacy with an added splash of drama. Its deep, rich hues make it a standout in any garden, adding visual interest and a touch of sophistication.
But why should you bother learning to grow purple basil from seed? Because it’s incredibly rewarding! Not only will you have a constant supply of fresh, flavorful basil for your favorite recipes, but you’ll also enjoy the satisfaction of nurturing a plant from its humble beginnings. Plus, let’s be honest, store-bought basil just doesn’t compare to the vibrant taste and aroma of homegrown. This DIY project is perfect for beginners and experienced gardeners alike, offering a fun and accessible way to elevate your gardening game. I’m excited to share my tips and tricks with you, so let’s get started!

Lila Basilikum aus Samen ziehen: Dein DIY-Leitfaden für eine farbenfrohe Ernte
Hallo liebe Gartenfreunde! Ich liebe es, meinen Garten mit ungewöhnlichen Pflanzen zu schmücken, und lila Basilikum ist da ganz vorne mit dabei. Es ist nicht nur wunderschön anzusehen, sondern schmeckt auch fantastisch und verleiht deinen Gerichten eine besondere Note. In diesem Artikel zeige ich dir, wie du lila Basilikum ganz einfach selbst aus Samen ziehen kannst. Keine Angst, es ist wirklich nicht schwer!
Was du brauchst:
* Samen: Besorge dir hochwertige Samen von lila Basilikum. Achte auf Sorten wie ‘Dark Opal’, ‘Purple Ruffles’ oder ‘Red Rubin’.
* Anzuchttöpfe oder -schalen: Kleine Töpfe oder Schalen mit Drainagelöchern sind ideal.
* Anzuchterde: Verwende spezielle Anzuchterde, da diese nährstoffarm und locker ist, was die Keimung fördert.
* Sprühflasche: Zum Befeuchten der Erde.
* Mini-Gewächshaus oder Frischhaltefolie: Um die Luftfeuchtigkeit zu erhöhen.
* Pflanzetiketten: Damit du den Überblick behältst.
* Gießkanne: Für die spätere Bewässerung.
* Ein sonniger Standort: Basilikum liebt die Sonne!
Vorbereitung ist alles: Der Start mit der Aussaat
Bevor wir loslegen, ist es wichtig, alles vorzubereiten. Eine gute Vorbereitung ist die halbe Miete, sagt man ja so schön!
1. Töpfe vorbereiten: Fülle die Anzuchttöpfe oder -schalen mit Anzuchterde. Drücke die Erde leicht an, aber nicht zu fest. Sie sollte locker und luftig bleiben.
2. Samen aussäen: Verteile die Samen gleichmäßig auf der Erde. Da Basilikumsamen Lichtkeimer sind, bedecke sie nur ganz leicht mit Erde – eine dünne Schicht reicht völlig aus.
3. Befeuchten: Befeuchte die Erde vorsichtig mit einer Sprühflasche. Achte darauf, dass die Erde gleichmäßig feucht ist, aber nicht durchnässt.
4. Mini-Gewächshaus schaffen: Decke die Töpfe oder Schalen mit einem Mini-Gewächshaus oder Frischhaltefolie ab. Das erhöht die Luftfeuchtigkeit und fördert die Keimung. Vergiss nicht, regelmäßig zu lüften, um Schimmelbildung zu vermeiden.
Die Keimung: Geduld ist eine Tugend
Jetzt heißt es abwarten und Tee trinken (oder Basilikumtee, wenn du schon welchen hast!). Die Keimung dauert in der Regel 7-14 Tage.
1. Standort: Stelle die Töpfe an einen warmen und hellen Ort. Eine Temperatur von 20-25°C ist ideal. Direkte Sonneneinstrahlung kann jedoch zu Verbrennungen der Keimlinge führen, also sei vorsichtig.
2. Feuchtigkeit: Kontrolliere regelmäßig die Feuchtigkeit der Erde. Sie sollte immer leicht feucht sein. Besprühe die Erde bei Bedarf mit der Sprühflasche.
3. Lüften: Lüfte das Mini-Gewächshaus oder die Frischhaltefolie täglich, um Schimmelbildung zu vermeiden.
4. Geduld: Hab Geduld! Es kann ein paar Tage dauern, bis die ersten Keimlinge sprießen.
Pikieren: Den kleinen Pflänzchen mehr Raum geben
Sobald die Keimlinge ihre ersten richtigen Blätter (nach den Keimblättern) entwickelt haben, ist es Zeit zum Pikieren. Das bedeutet, dass du die kleinen Pflänzchen in größere Töpfe umpflanzt, damit sie mehr Platz zum Wachsen haben.
1. Vorbereitung: Fülle größere Töpfe (ca. 8-10 cm Durchmesser) mit hochwertiger Pflanzerde.
2. Keimlinge vorsichtig ausheben: Löse die Keimlinge vorsichtig mit einem Pikierstab oder einem Löffel aus der Anzuchterde. Achte darauf, die Wurzeln nicht zu beschädigen.
3. Einpflanzen: Setze jeden Keimling in einen eigenen Topf. Die Wurzeln sollten ausreichend Platz haben. Fülle die Töpfe mit Erde auf und drücke sie leicht an.
4. Angießen: Gieße die Pikierlinge vorsichtig an.
5. Standort: Stelle die Töpfe an einen hellen, aber nicht zu sonnigen Ort.
Die Pflege: Damit dein Basilikum prächtig gedeiht
Nach dem Pikieren ist es wichtig, die Basilikumpflanzen gut zu pflegen, damit sie prächtig gedeihen.
1. Gießen: Gieße die Pflanzen regelmäßig, aber vermeide Staunässe. Die Erde sollte immer leicht feucht sein. Am besten gießt du morgens, damit die Blätter über den Tag abtrocknen können.
2. Düngen: Dünge die Pflanzen alle zwei Wochen mit einem organischen Flüssigdünger. Das fördert das Wachstum und die Blütenbildung.
3. Standort: Stelle die Pflanzen an einen sonnigen Standort. Basilikum liebt die Sonne!
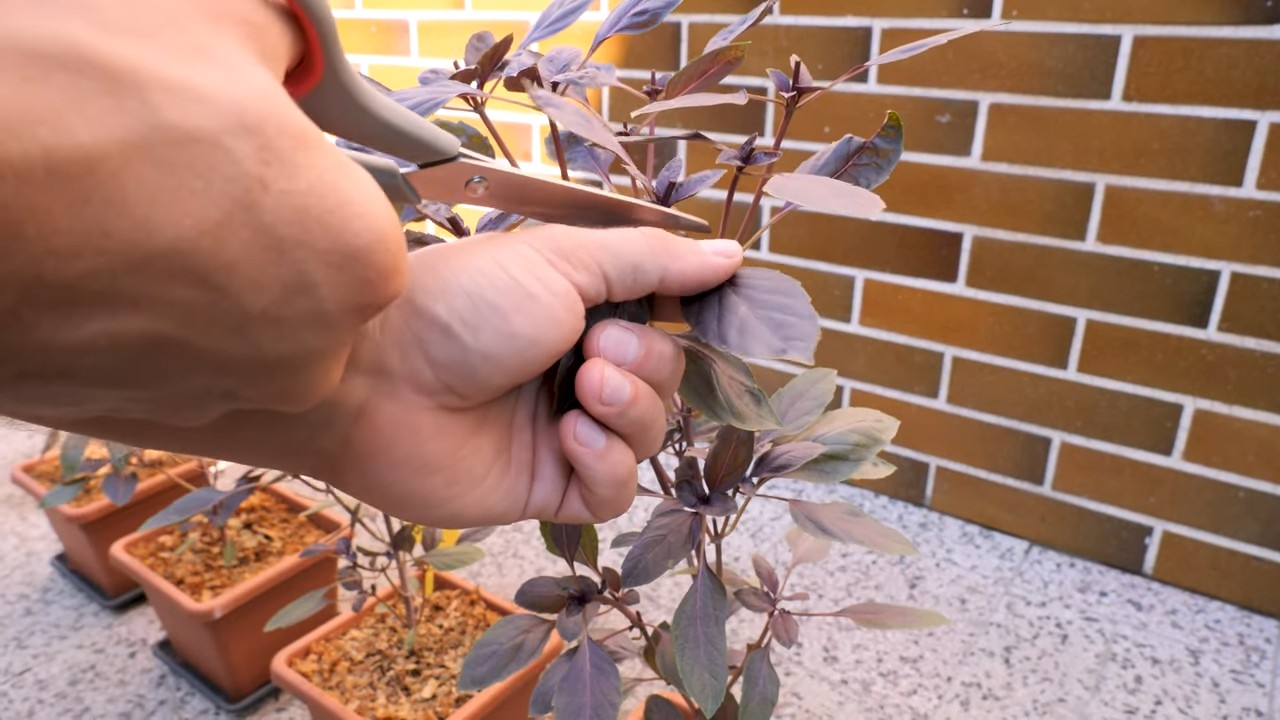
4. Ausgeizen: Entferne regelmäßig die Blütenstände, um das Wachstum der Blätter zu fördern. Wenn du die Blütenstände nicht entfernst, steckt die Pflanze ihre Energie in die Blütenbildung und nicht in die Blattproduktion.
5. Schädlinge: Kontrolliere die Pflanzen regelmäßig auf Schädlinge wie Blattläuse oder Spinnmilben. Bei Befall kannst du die Pflanzen mit einem biologischen Schädlingsbekämpfungsmittel behandeln.
Auspflanzen ins Freie: Wenn der Frost vorbei ist
Sobald keine Frostgefahr mehr besteht (in der Regel Mitte Mai), kannst du die Basilikumpflanzen ins Freie auspflanzen.
1. Abhärten: Bevor du die Pflanzen auspflanzt, solltest du sie langsam an die Bedingungen im Freien gewöhnen. Stelle sie dazu tagsüber für ein paar Stunden ins Freie und hole sie abends wieder herein.
2. Standort: Wähle einen sonnigen und windgeschützten Standort für deine Basilikumpflanzen.
3. Pflanzabstand: Achte auf einen ausreichenden Pflanzabstand (ca. 20-30 cm), damit die Pflanzen genügend Platz zum Wachsen haben.
4. Einpflanzen: Hebe ein Loch aus, das groß genug für den Wurzelballen ist. Setze die Pflanze hinein und fülle das Loch mit Erde auf. Drücke die Erde leicht an und gieße die Pflanze an.
5. Mulchen: Mulche den Boden um die Pflanzen herum mit Stroh oder Rasenschnitt. Das hält die Feuchtigkeit im Boden und unterdrückt das Unkrautwachstum.
Erntezeit: Die Früchte deiner Arbeit genießen
Nach ein paar Wochen kannst du mit der Ernte beginnen.
1. Ernten: Schneide die Blätter regelmäßig ab, um das Wachstum der Pflanze zu fördern. Am besten erntest du die Blätter am Morgen, wenn sie am aromatischsten sind.
2. Verwendung: Verwende die Blätter frisch in Salaten, Saucen, Suppen oder als Dekoration. Du kannst die Blätter auch trocknen oder einfrieren, um sie länger haltbar zu machen.
Extra-Tipps für den Erfolg:
* Die richtige Sorte wählen: Nicht alle lila Basilikumsorten sind gleich. Einige sind aromatischer als andere. Informiere dich vor dem Kauf über die verschiedenen Sorten und wähle diejenige, die deinen Bedürfnissen am besten entspricht.
* Gute Erde verwenden: Verwende hochwertige Pflanzerde, die reich an Nährstoffen ist. Das fördert das Wachstum der Pflanzen.
* Regelmäßig gießen und düngen: Basilikum braucht regelmäßig Wasser und Nährstoffe, um gut zu gedeihen. Achte darauf, die Pflanzen regelmäßig zu gießen und zu düngen.
* Schädlinge bekämpfen: Kontrolliere die Pflanzen regelmäßig auf Schädlinge und bekämpfe sie bei Bedarf mit einem biologischen Schädlingsbekämpfungsmittel.
* Freude haben: Das Wichtigste ist, dass du Spaß an der Aufzucht deines lila Basilikums hast! Mit etwas Geduld und Pflege wirst du bald eine reiche Ernte einfahren können.
Ich hoffe, dieser Leitfaden hilft dir dabei, dein eigenes lila Basilikum aus Samen zu ziehen. Viel Erfolg
Conclusion
So, there you have it! Growing purple basil from seed isn’t just a gardening project; it’s an investment in flavor, beauty, and a touch of culinary artistry. We’ve walked through the steps, from selecting the right seeds to nurturing your seedlings into vibrant, purple-leaved plants. The benefits extend far beyond simply having fresh herbs at your fingertips. Imagine the vibrant color and unique flavor you can add to your salads, pesto, and even cocktails. Think of the joy of gifting a homegrown purple basil plant to a friend or neighbor.
This DIY trick is a must-try for several compelling reasons. First, it’s incredibly rewarding to witness the entire life cycle of a plant, from tiny seed to mature herb. Second, growing your own purple basil allows you to control the growing environment, ensuring that your herbs are free from harmful pesticides and chemicals. Third, and perhaps most importantly, the flavor of homegrown purple basil is simply unmatched. It’s more intense, more aromatic, and more satisfying than anything you can buy at the store.
But don’t stop there! Once you’ve mastered the basics, feel free to experiment with different varieties of purple basil. ‘Dark Opal’ offers a deep, almost black hue, while ‘Red Rubin’ boasts a slightly sweeter flavor. You can also try growing your purple basil in different types of containers, from terracotta pots to raised garden beds. Consider companion planting with tomatoes or peppers, as basil is known to deter pests and improve the flavor of these vegetables. For a unique twist, try infusing olive oil with your homegrown purple basil for a flavorful and visually stunning condiment. You can also dry the leaves and use them in potpourri or herbal teas.
We understand that gardening can sometimes feel daunting, but growing purple basil from seed is surprisingly easy, even for beginners. The key is to be patient, provide the right conditions, and enjoy the process. Don’t be afraid to make mistakes – they’re all part of the learning experience.
We are confident that you’ll find this DIY project to be both enjoyable and rewarding. So, grab your seeds, prepare your soil, and get ready to experience the magic of growing your own purple basil. We encourage you to embark on this journey and discover the satisfaction of nurturing your own herbs from seed to table.
Now, we want to hear from you! Have you tried growing purple basil from seed before? What were your experiences? Do you have any tips or tricks to share? Please leave a comment below and let us know. We’re eager to learn from your successes and challenges. Share your photos of your beautiful purple basil plants on social media using #PurpleBasilDIY. Let’s create a community of purple basil enthusiasts and inspire others to try this amazing DIY trick! We can’t wait to see what you create!
Frequently Asked Questions (FAQ)
What is the best time of year to start growing purple basil from seed?
The best time to start growing purple basil from seed is typically in the late winter or early spring, about 6-8 weeks before the last expected frost. This allows you to get a head start on the growing season and ensures that your seedlings are strong and healthy when it’s time to transplant them outdoors. If you live in a warmer climate with a longer growing season, you can start your seeds directly outdoors after the last frost. However, starting them indoors provides more control over the growing environment and can lead to faster germination and stronger plants.
What kind of soil is best for growing purple basil?
Purple basil thrives in well-draining soil that is rich in organic matter. A good potting mix for starting seeds should be light and airy, allowing for good root development. You can also amend your garden soil with compost or other organic materials to improve its drainage and fertility. The ideal pH for purple basil is between 6.0 and 7.5. Avoid using heavy clay soils, as they can become waterlogged and inhibit root growth.
How much sunlight does purple basil need?
Purple basil requires at least 6-8 hours of direct sunlight per day to thrive. If you are growing your basil indoors, place it near a sunny window or use grow lights to provide adequate light. Insufficient sunlight can result in leggy plants with pale leaves. When transplanting your seedlings outdoors, choose a location that receives plenty of sunlight throughout the day.
How often should I water my purple basil plants?
Water your purple basil plants regularly, keeping the soil consistently moist but not waterlogged. Check the soil moisture by sticking your finger into the soil – if the top inch feels dry, it’s time to water. Avoid overwatering, as this can lead to root rot. During hot, dry weather, you may need to water your plants more frequently. When watering, water at the base of the plant to avoid wetting the leaves, which can increase the risk of fungal diseases.
How do I harvest purple basil?
You can start harvesting purple basil leaves as soon as the plant has several sets of true leaves. To harvest, simply pinch or cut off the leaves at the stem. Regular harvesting encourages the plant to produce more leaves, resulting in a bushier and more productive plant. Avoid removing more than one-third of the plant’s leaves at a time, as this can stress the plant. You can also harvest the flower buds to encourage more leaf growth.
What are some common pests and diseases that affect purple basil?
Purple basil can be susceptible to a few common pests and diseases, including aphids, spider mites, and fungal diseases like powdery mildew. To prevent pests and diseases, ensure that your plants have good air circulation and avoid overwatering. Inspect your plants regularly for signs of pests or diseases and take action promptly if you notice any problems. You can use insecticidal soap or neem oil to control pests, and fungicides to treat fungal diseases.
Can I grow purple basil in containers?
Yes, purple basil grows very well in containers. Choose a container that is at least 6 inches in diameter and has drainage holes. Use a good quality potting mix and water regularly. Place the container in a sunny location that receives at least 6-8 hours of direct sunlight per day. Container-grown purple basil may need to be fertilized more frequently than plants grown in the ground.
How do I store purple basil after harvesting?
There are several ways to store purple basil after harvesting. You can store fresh basil leaves in the refrigerator for a few days by wrapping them in a damp paper towel and placing them in a plastic bag. You can also freeze basil leaves by blanching them in boiling water for a few seconds, then plunging them into ice water. Drain the leaves and freeze them in a single layer on a baking sheet, then transfer them to a freezer bag. Another option is to dry the basil leaves by hanging them upside down in a cool, dry place or using a dehydrator. Dried basil can be stored in an airtight container for several months.
Can I propagate purple basil from cuttings?
Yes, purple basil can be easily propagated from cuttings. Simply take a cutting from a healthy stem, remove the lower leaves, and place the cutting in a glass of water. Roots should start to form within a week or two. Once the roots are about an inch long, you can transplant the cutting into a pot of soil.
My purple basil leaves are turning green. What’s wrong?
The purple color in purple basil is due to anthocyanins, pigments that are produced in response to sunlight. If your purple basil leaves are turning green, it could be a sign that they are not getting enough sunlight. Try moving your plants to a sunnier location or using grow lights to provide more light. Temperature can also play a role; cooler temperatures can enhance the purple coloration. Also, ensure you are growing a true purple basil variety, as some may revert to green under certain conditions.
Leave a Comment