
Growing Watermelons in Containers might sound like a summer dream reserved for those with sprawling gardens, but I’m here to tell you that juicy, homegrown watermelon is absolutely within your reach, even if your “garden” is a sunny balcony or a small patio! Forget the image of sprawling vines taking over acres; we’re about to unlock the secrets to cultivating these summertime favorites in compact spaces.
Watermelons have a rich history, dating back thousands of years to Africa, where they were prized for their hydrating properties in arid climates. Over time, different varieties were cultivated, eventually making their way around the globe. Now, you can participate in this agricultural journey, right from your own home!
Why should you try growing watermelons in containers? Well, for starters, imagine the satisfaction of biting into a sweet, refreshing watermelon that you nurtured from seed to fruit. Beyond the taste, it’s a fantastic way to connect with nature, learn about the growing process, and even save money on groceries. Plus, in a world where space is often a premium, mastering the art of container gardening opens up a whole new world of possibilities. This DIY guide will provide you with the essential tricks and hacks to successfully grow watermelons in containers, ensuring a bountiful harvest and a summer filled with delicious, homegrown goodness. Let’s get started!

Wassermelonen im Topf ziehen: So klappt’s auch auf kleinem Raum!
Hey Leute! Wer sagt, man braucht einen riesigen Garten, um saftige Wassermelonen zu ernten? Ich zeige euch, wie ihr diese süßen Früchte auch im Topf ziehen könnt – perfekt für Balkone, Terrassen oder kleine Gärten! Es ist einfacher, als ihr denkt, und das Erfolgserlebnis ist unbezahlbar. Lasst uns loslegen!
Die richtige Vorbereitung: Was du brauchst
Bevor wir mit dem Pflanzen beginnen, müssen wir sicherstellen, dass wir alles Nötige zur Hand haben. Hier ist eine Liste der Dinge, die du brauchst:
* Wassermelonensamen: Wähle am besten kompakte Sorten wie ‘Sugar Baby’, ‘Bush Sugar Baby’ oder ‘Golden Midget’. Diese sind speziell für den Anbau in Containern gezüchtet.
* Großer Topf: Der Topf sollte mindestens 50-60 Liter Fassungsvermögen haben. Je größer, desto besser, denn Wassermelonen brauchen Platz für ihre Wurzeln.
* Hochwertige Blumenerde: Verwende eine gut durchlässige Blumenerde, die reich an Nährstoffen ist. Du kannst auch Kompost oder organischen Dünger untermischen.
* Rankhilfe: Wassermelonenpflanzen ranken gerne. Eine Rankhilfe, wie ein Spalier oder ein Tomatenkäfig, hilft ihnen, sich auszubreiten und die Früchte zu tragen.
* Dünger: Ein Langzeitdünger oder ein Flüssigdünger speziell für Gemüse ist wichtig, um die Pflanzen während der Wachstumsphase mit ausreichend Nährstoffen zu versorgen.
* Gießkanne oder Schlauch: Wassermelonen brauchen viel Wasser, besonders während der Fruchtbildung.
* Mulch: Mulch hilft, die Feuchtigkeit im Boden zu halten und Unkraut zu unterdrücken. Stroh oder Holzhackschnitzel eignen sich gut.
* Sonniger Standort: Wassermelonen lieben die Sonne! Wähle einen Standort, der mindestens 6-8 Stunden Sonne pro Tag bekommt.
Schritt-für-Schritt-Anleitung: So pflanzt du deine Wassermelonen
Jetzt, wo wir alles vorbereitet haben, können wir mit dem Pflanzen beginnen. Folge diesen Schritten, um deine Wassermelonen erfolgreich im Topf zu ziehen:
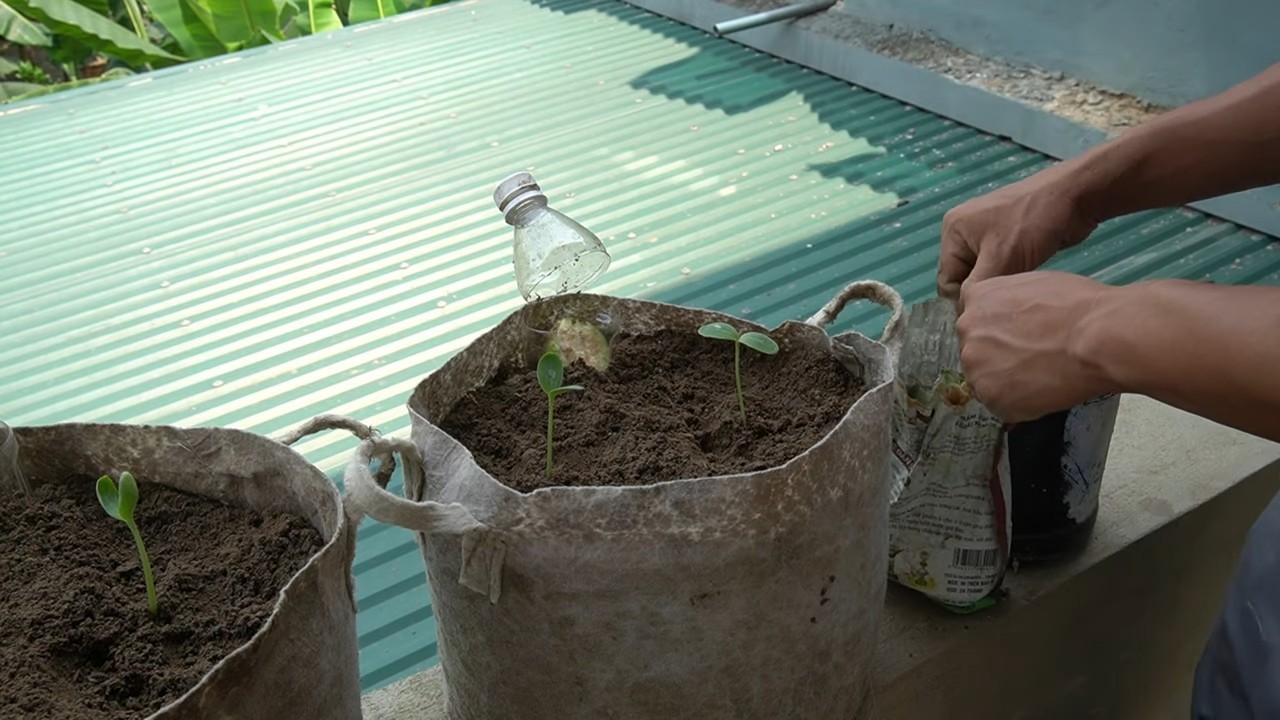
1. Samen vorziehen (optional): Ich empfehle, die Samen etwa 3-4 Wochen vor dem letzten Frost im Haus vorzuziehen. Das gibt den Pflanzen einen Vorsprung.
* Fülle kleine Anzuchttöpfe mit Anzuchterde.
* Lege 2-3 Samen pro Topf etwa 1-2 cm tief in die Erde.
* Gieße die Erde vorsichtig an und stelle die Töpfe an einen warmen, hellen Ort.
* Halte die Erde feucht, aber nicht nass.
* Sobald die Sämlinge gekeimt sind und 2-3 Blätter haben, kannst du den stärksten Sämling pro Topf auswählen und die anderen entfernen.
2. Topf vorbereiten:
* Stelle sicher, dass der Topf Abzugslöcher hat, damit überschüssiges Wasser ablaufen kann.
* Fülle den Topf mit hochwertiger Blumenerde. Lasse etwa 5-10 cm Platz bis zum Rand.
* Mische Langzeitdünger unter die Erde, um die Pflanzen von Anfang an mit Nährstoffen zu versorgen.
3. Pflanzen:
* Wenn du die Samen vorgezogen hast, pflanze die Sämlinge vorsichtig in den vorbereiteten Topf. Achte darauf, die Wurzeln nicht zu beschädigen.
* Wenn du die Samen direkt in den Topf säst, lege 2-3 Samen etwa 1-2 cm tief in die Erde.
* Gieße die Erde nach dem Pflanzen oder Säen gründlich an.
4. Rankhilfe installieren:
* Platziere die Rankhilfe im Topf, bevor die Pflanzen zu groß werden. Das erleichtert es ihnen, sich daran festzuhalten.
* Führe die Triebe der Pflanzen vorsichtig an der Rankhilfe entlang.
Pflege deiner Wassermelonenpflanzen: So bleiben sie gesund und produktiv
Die richtige Pflege ist entscheidend für eine erfolgreiche Ernte. Hier sind einige Tipps, die du beachten solltest:
1. Gießen:
* Wassermelonen brauchen viel Wasser, besonders während der Fruchtbildung. Gieße die Pflanzen regelmäßig, am besten morgens, damit die Blätter bis zum Abend abtrocknen können.
* Achte darauf, dass die Erde immer feucht, aber nicht nass ist. Vermeide Staunässe, da dies zu Wurzelfäule führen kann.
* Überprüfe die Feuchtigkeit der Erde regelmäßig, indem du deinen Finger etwa 2-3 cm tief in die Erde steckst.
2. Düngen:
* Wassermelonen sind Starkzehrer und brauchen regelmäßige Düngergaben.
* Verwende einen Flüssigdünger speziell für Gemüse oder einen Langzeitdünger.
* Dünge die Pflanzen alle 2-3 Wochen gemäß den Anweisungen auf der Verpackung.
* Achte darauf, dass der Dünger reich an Kalium ist, da dies die Fruchtbildung fördert.
3. Beschneiden:
* Das Beschneiden der Wassermelonenpflanzen kann helfen, die Fruchtbildung zu fördern.
* Entferne Seitentriebe, die keine Blüten tragen.
* Lasse pro Pflanze 2-3 Früchte reifen, um sicherzustellen, dass sie ausreichend Nährstoffe erhalten.
* Entferne gelbe oder beschädigte Blätter, um die Luftzirkulation zu verbessern und Krankheiten vorzubeugen.
4. Bestäubung:
* Wassermelonen haben männliche und weibliche Blüten. Die weiblichen Blüten erkennst du an dem kleinen Fruchtansatz direkt unter der Blüte.
* Wenn du keine Bienen oder andere Bestäuber in deinem Garten hast, musst du die Blüten möglicherweise von Hand bestäuben.
* Nimm dazu einen kleinen Pinsel und übertrage den Pollen von den männlichen auf die weiblichen Blüten.
* Die beste Zeit für die Bestäubung ist am frühen Morgen.
5. Schutz vor Schädlingen und Krankheiten:
* Achte auf Anzeichen von Schädlingen wie Blattläuse oder Spinnmilben.
* Entferne befallene Blätter oder verwende ein geeignetes Insektizid.
* Um Krankheiten vorzubeugen, sorge für eine gute Luftzirkulation und vermeide Staunässe.
* Mulche den Boden, um Unkraut zu unterdrücken und die Feuchtigkeit zu halten.
Erntezeit: Wann sind deine Wassermelonen reif?
Die Erntezeit ist der aufregendste Teil! Aber wie erkennst du, wann deine Wassermelonen reif sind? Hier sind einige Anzeichen:
* Der Klang: Klopfe leicht auf die Wassermelone. Wenn sie hohl klingt, ist sie wahrscheinlich reif.
* Der Stiel: Der Stiel, der die Wassermelone mit der Pflanze verbindet, sollte trocken und braun sein.
* Die Unterseite: Die Stelle, an der die Wassermelone auf dem Boden lag, sollte gelblich oder cremefarben sein.
* Die Farbe: Die Farbe der Wassermelone sollte sich intensiviert haben und glänzend sein.
Wenn du dir unsicher bist, kannst du eine Wassermelone vorsichtig anschneiden und probieren. Wenn sie süß und saftig ist, ist sie reif!
Zusätzliche Tipps für den erfolgreichen Anbau
* Wähle den richtigen Standort: Wassermelonen brauchen viel Sonne und Wärme. Wähle einen Standort, der mindestens 6-8 Stunden Sonne pro Tag bekommt.
* Verwende einen großen Topf: Je größer der Topf, desto besser. Wassermelonen brauchen Platz für ihre Wurzeln.
* Gieße regelmäßig: Wassermelonen brauchen viel Wasser, besonders während der Fruchtbildung.
* Dünge regelmäßig: Wassermelonen sind Starkzehrer und brauchen regelmäßige Düngergaben.
* Schütze die Früchte vor direkter Sonneneinstrahlung: Wenn die Früchte zu starker Sonneneinstra
Conclusion
So, there you have it! Growing watermelons in containers might seem like a daunting task, but with the right approach and a little bit of dedication, you can absolutely enjoy the sweet taste of homegrown watermelon, even without a sprawling garden. This DIY trick isn’t just about saving space; it’s about taking control of your food source, experiencing the satisfaction of nurturing a plant from seed to fruit, and enjoying a truly fresh and delicious treat.
Why is this a must-try? Because it democratizes watermelon cultivation! No longer is this summer staple limited to those with acres of land. Apartment dwellers, balcony gardeners, and anyone with a sunny patio can participate in the joy of growing their own. Imagine the bragging rights when you serve slices of your own container-grown watermelon at your next barbecue!
But the benefits extend beyond mere convenience. Container gardening allows you to control the soil quality, ensuring your watermelon receives the precise nutrients it needs. You can also protect your plants from pests and diseases more easily than in a traditional garden setting. Plus, moving your container to chase the sun or shelter it from harsh weather is a breeze.
Don’t be afraid to experiment! Try different watermelon varieties suited for smaller spaces, like ‘Sugar Baby’ or ‘Bush Sugar Baby’. Consider using self-watering containers to simplify watering, especially during hot summer months. You can also add companion plants like basil or marigolds to your container to deter pests and attract pollinators. Another variation to consider is vertical gardening. Train your watermelon vine up a trellis or support structure to maximize space and improve air circulation. This can also help prevent fruit rot by keeping the watermelon off the ground.
We’ve covered the essentials, from choosing the right container and soil to providing adequate sunlight and water. We’ve also touched on pollination and pest control. Now, it’s your turn to put this knowledge into action. Don’t be intimidated by the process. Start small, learn as you go, and most importantly, have fun!
We are confident that with a little effort, you’ll be harvesting your own juicy watermelons in no time. This DIY trick for **growing watermelons in containers** is a rewarding experience that connects you to nature and provides you with a delicious, healthy treat.
We encourage you to embark on this gardening adventure. Once you’ve harvested your first watermelon, we’d love to hear about your experience! Share your photos, tips, and challenges in the comments below. Let’s create a community of container watermelon growers and learn from each other’s successes and failures. Happy gardening!
Frequently Asked Questions (FAQ)
1. What is the best size container for growing watermelons?
The ideal container size for growing watermelons is at least 20 gallons, but larger is always better. A 25-30 gallon container will provide ample space for the roots to develop and support the growth of the vine and fruit. The bigger the container, the more moisture it will retain, reducing the frequency of watering. Make sure the container has drainage holes to prevent waterlogging, which can lead to root rot. Consider using a fabric pot, as they allow for better air circulation and drainage.
2. What type of soil should I use for container watermelons?
Watermelons need well-draining, nutrient-rich soil. A good mix consists of equal parts potting soil, compost, and perlite or vermiculite. The potting soil provides a base for the roots to grow, the compost adds essential nutrients, and the perlite or vermiculite improves drainage and aeration. Avoid using garden soil, as it can be too heavy and compact in containers, hindering root growth. You can also add a slow-release fertilizer to the soil mix to provide a steady supply of nutrients throughout the growing season.
3. How much sunlight do watermelons need?
Watermelons are sun-loving plants and require at least 6-8 hours of direct sunlight per day. Choose a location for your container that receives ample sunlight throughout the day. If you live in a particularly hot climate, you may need to provide some afternoon shade to prevent the leaves from scorching. Rotate the container regularly to ensure all sides of the plant receive equal sunlight. Insufficient sunlight can lead to poor fruit development and reduced sweetness.
4. How often should I water my container watermelons?
Watermelons need consistent moisture, especially during hot weather and fruit development. Water deeply whenever the top inch of soil feels dry to the touch. Avoid overwatering, as this can lead to root rot. Check the soil moisture regularly, especially during hot, dry spells. Consider using a moisture meter to accurately assess the soil moisture level. Mulching around the base of the plant can help retain moisture and reduce the frequency of watering.
5. How do I pollinate my watermelon flowers?
Watermelons have separate male and female flowers. Bees and other pollinators typically handle pollination, but if you’re growing watermelons indoors or in an area with limited pollinators, you may need to hand-pollinate. To hand-pollinate, use a small paintbrush to collect pollen from the male flower (the one with the long, thin stem) and transfer it to the female flower (the one with a small fruit behind it). Do this in the morning, when the flowers are open. You’ll know if pollination was successful if the small fruit behind the female flower starts to grow.
6. What are some common pests and diseases that affect watermelons?
Common pests that affect watermelons include aphids, squash bugs, and vine borers. Aphids can be controlled with insecticidal soap or a strong spray of water. Squash bugs can be hand-picked or controlled with neem oil. Vine borers can be prevented by wrapping the base of the stem with aluminum foil or using row covers. Common diseases include powdery mildew and fusarium wilt. Powdery mildew can be treated with fungicide. Fusarium wilt is a soilborne disease that can be prevented by using disease-resistant varieties and practicing crop rotation.
7. How do I know when my watermelon is ripe?
There are several indicators that a watermelon is ripe. The tendril closest to the fruit should be brown and dry. The bottom of the watermelon, where it rests on the ground (the “ground spot”), should be yellow or cream-colored. The watermelon should also sound hollow when you thump it. These are general guidelines, and the best way to determine ripeness is to taste a small piece.
8. Can I grow more than one watermelon plant in a single container?
While it’s possible to grow more than one watermelon plant in a large container, it’s generally not recommended. Watermelon plants need a lot of space to grow and develop, and overcrowding can lead to stunted growth and reduced fruit production. If you do decide to grow multiple plants in a single container, make sure the container is very large (at least 50 gallons) and provide ample support for the vines.
9. What are some good companion plants for watermelons in containers?
Good companion plants for watermelons include basil, marigolds, and nasturtiums. Basil repels pests like aphids and whiteflies. Marigolds deter nematodes and other soil pests. Nasturtiums attract beneficial insects and act as a trap crop for aphids. Avoid planting watermelons near members of the cabbage family, as they can compete for nutrients.
10. How do I support the weight of the watermelon fruit in a container?
As the watermelon fruit grows, it can become quite heavy and may need support to prevent the vine from breaking. You can use slings made from old t-shirts or pantyhose to support the fruit. Tie the slings to a trellis or other support structure. You can also place the watermelon on a bed of straw or wood chips to protect it from the ground and improve air circulation.

Leave a Comment