
Growing Mushrooms at Home might sound like something reserved for seasoned horticulturalists, but trust me, it’s more accessible than you think! Forget trekking to the grocery store for those gourmet fungi; imagine harvesting your own delicious, earthy mushrooms right from your kitchen.
For centuries, cultivating mushrooms has been a revered practice in many cultures, from ancient Chinese medicinal traditions to European culinary arts. The Romans, for example, considered mushrooms a delicacy fit for emperors! While we might not be royalty, we can certainly enjoy the regal flavors of homegrown mushrooms.
Why should you embark on this fascinating DIY adventure? Well, besides the sheer satisfaction of nurturing your own food, growing mushrooms at home is incredibly rewarding. It’s a sustainable way to add nutritious and flavorful ingredients to your meals, reduce your carbon footprint, and even impress your friends with your newfound green thumb (or should I say, mushroom thumb?). Plus, with the rising cost of groceries, cultivating your own mushrooms can be a budget-friendly way to enjoy these culinary delights. This article will guide you through simple, effective DIY tricks and hacks to successfully grow mushrooms at home, even if you’re a complete beginner. Let’s get started and unlock the secrets to a bountiful mushroom harvest!
Growing Mushrooms at Home: Your Comprehensive DIY Guide
Hello mushroom friends! Have you ever wondered what it would be like to grow your own delicious mushrooms at home? It’s easier than you might think! In this article, I’ll show you how you can start your own little mushroom farm with simple materials and a bit of patience. Let’s dive in!
What you need to get started
Before we begin, here is a list of the things you’ll need:
- Mushroom spawn: This is the “seed” for your mushrooms. You can buy it online or at garden centers. Popular varieties for beginners are Oyster mushrooms (Pleurotus ostreatus) and Shiitake (Lentinula edodes).
- Substrate: This is the material on which your mushrooms will grow. Suitable substrates include straw, sawdust, coffee grounds, or even old newspapers. The choice of substrate depends on the mushroom variety.
- Container: You’ll need a container to house your substrate and mushroom spawn. This can be a bucket, a plastic bag, or even an old flower pot.
- Spray bottle: To keep the substrate moist.
- Disinfectant: To keep your work surface and tools clean and avoid contamination.
- Gloves: To keep your hands clean and avoid contamination.
- Optional: A thermometer and a hygrometer to monitor temperature and humidity.
Step-by-Step Guide: Growing Mushrooms with Straw
I’ll show you the method with straw here, as it is relatively simple and inexpensive.
1. Preparing the Straw
- Cut the straw: Cut the straw into short pieces, about 5-10 cm (2-4 inches) long. This makes it easier to handle and for the mushroom spawn to colonize.
- Pasteurize the straw: This is an important step to kill unwanted microorganisms that could compete with the mushrooms.
- Method 1 (Hot Water): Fill a large pot or tub with water and heat it to about 65-75°C (150-167°F). Add the straw and let it soak for 1-2 hours. Make sure the straw is completely submerged.
- Method 2 (Steam): Fill a steamer or a large pot with a steamer insert with water. Put the straw in the steamer insert and steam it for 1-2 hours.
- Let the straw cool: Let the pasteurized straw cool down until it is lukewarm. It should be moist, but not dripping wet. Squeeze out any excess water.
2. Inoculating the Substrate
- Disinfect your work surface: Clean your work surface thoroughly with disinfectant.
- Prepare the container: Clean your container (bucket, bag, etc.) thoroughly. If you are using a bag, make small holes in it to ensure ventilation.
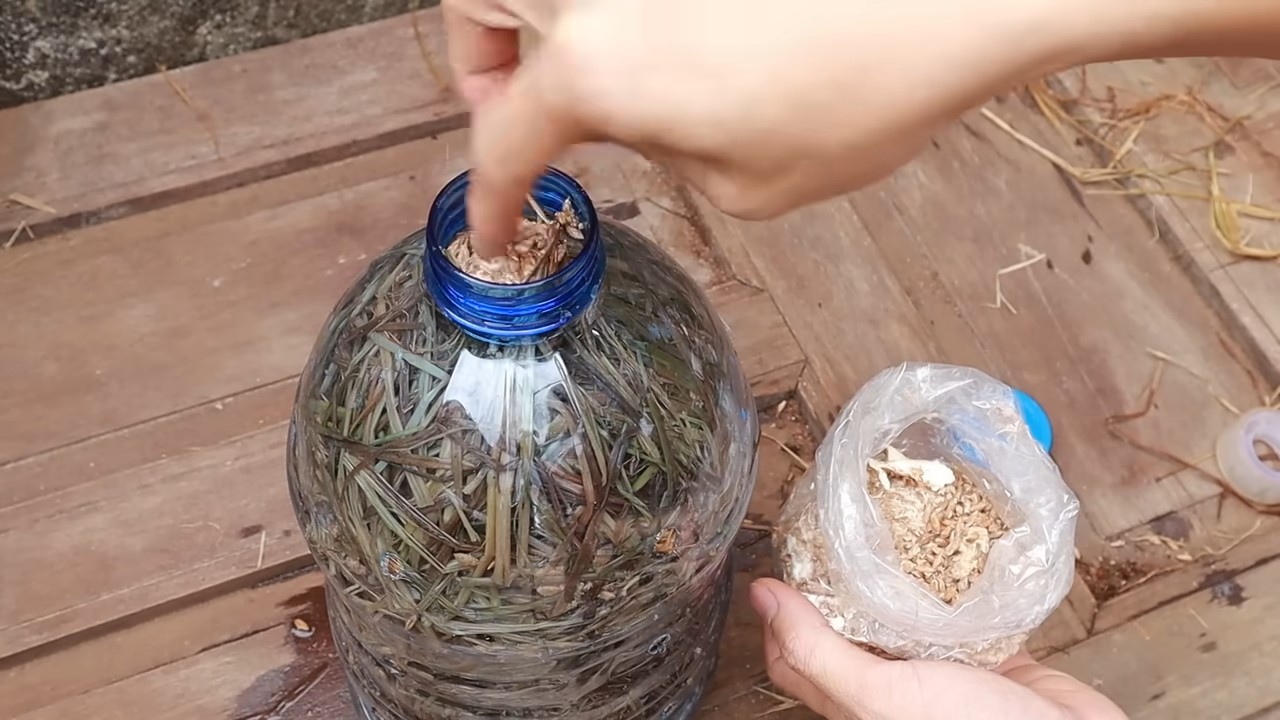
- Create layers: Put a layer of straw in the container. Then, spread a layer of mushroom spawn over it. Repeat this process until the container is full. The last layer should be straw.
- Press down: Press the substrate down lightly to ensure good contact between the straw and the mushroom spawn.
3. Incubation
- Choose a location: Place the container in a dark, cool, and humid place. A garage, a cellar, or a closet is ideal. The temperature should be between 18-24°C (64-75°F).
- Maintain humidity: Spray the substrate regularly with water to keep it moist. Be careful not to make it too wet.
- Ventilation: Ensure good ventilation to prevent mold growth.
4. Fruiting
- Light: Once the substrate is fully colonized with mycelium (the white, thread-like network of the mushrooms), it needs light to form fruiting bodies (the actual mushrooms). Move the container to a brighter spot, but avoid direct sunlight.
- Increase humidity: Increase the humidity by spraying the container regularly or placing it inside a plastic bag with holes.
- Ventilation: Continue to ensure good ventilation.
- Wait: After a few days or weeks, small mushroom pins (primordia) should start to form.
5. Harvest
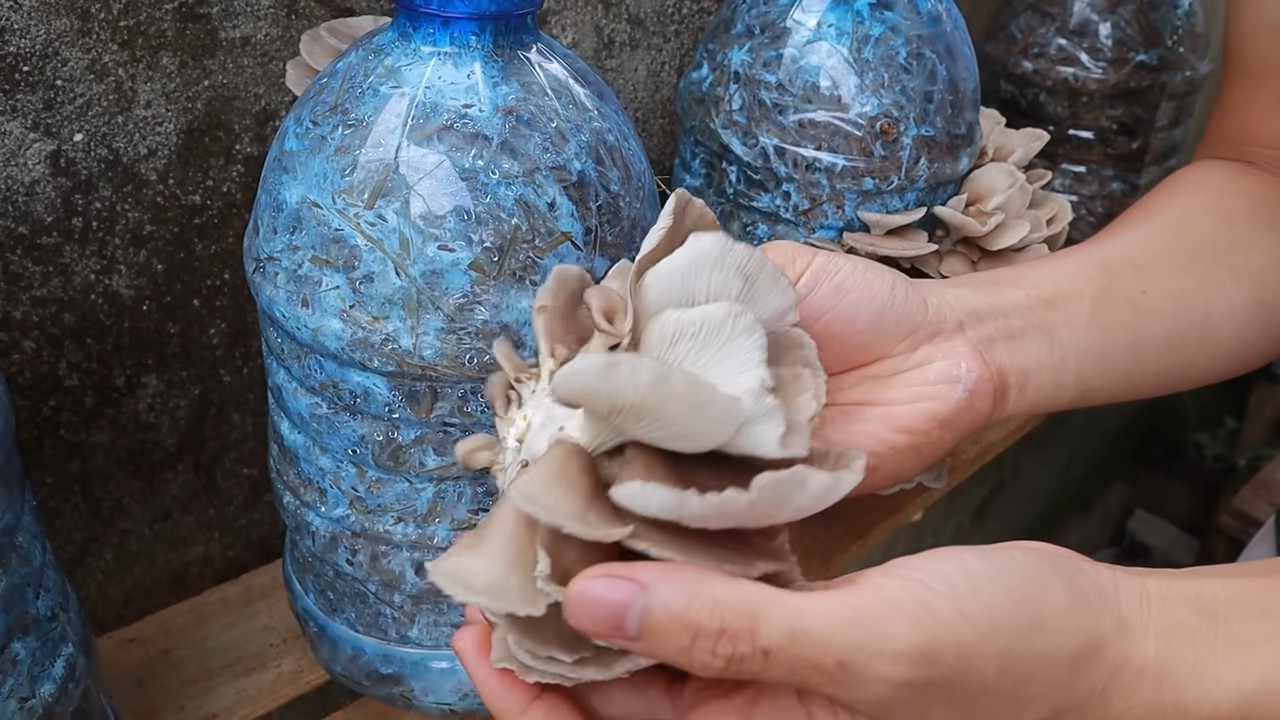
- Harvest time: Harvest the mushrooms when they have reached their full size but before they release their spores. For oyster mushrooms, this is when the caps start to curl upwards slightly.
- Harvesting method: Gently twist the mushrooms off or cut them with a sharp knife.
- Second harvest: After the first harvest, you can re-moisten the substrate and it will likely produce a second or even a third harvest.
Step-by-Step Guide: Growing Mushrooms with Coffee Grounds
Coffee grounds are an excellent substrate as they are already pasteurized and contain many nutrients.
1. Collecting and Preparing Coffee Grounds
- Collect coffee grounds: Collect used coffee grounds. Make sure they are not mixed with milk or sugar.
- Let the coffee grounds cool: Let the coffee grounds cool down before you use them.
- Mix the coffee grounds (optional): You can mix the coffee grounds with other substrates like sawdust or straw to improve the nutrient composition.
2. Inoculating the Substrate
- Disinfect your work surface: Clean your work surface thoroughly with disinfectant.
- Prepare the container: Clean your container (bucket, bag, etc.) thoroughly. If you are using a bag, make small holes in it to ensure ventilation.
- Create layers: Put a layer of coffee grounds in the container. Then, spread a layer of mushroom spawn over it. Repeat this process until the container is full. The last layer should be coffee grounds.
- Press down: Press the substrate down lightly to ensure good contact between the coffee grounds and the mushroom spawn.
3. Incubation
- Choose a location: Place the container in a dark, cool, and humid place. A garage, a cellar, or a closet is ideal. The temperature should be between 18-24°C (64-75°F).
- Maintain humidity: Spray the substrate regularly with water to keep it moist. Be careful not to make it too wet. Coffee grounds hold moisture well, so be cautious with spraying.
- Ventilation: Ensure good ventilation to prevent mold growth.
4. Fruiting
Wait: After a few days or weeks, small mushroom pins should form.
Light: Once the substrate is fully colonized with mycelium (the white, thread-like network of the mushrooms), it needs light to form fruiting bodies (the actual mushrooms). Move the container to a brighter spot, but avoid direct sunlight.
Increase humidity: Increase the humidity by spraying the container regularly or placing it inside a plastic bag with holes.
Ventilation: Continue to ensure good ventilation.
Conclusion
So, there you have it! Growing mushrooms at home, once shrouded in mystery, is now an accessible and rewarding endeavor thanks to this simple yet effective DIY trick. We’ve demystified the process, breaking it down into manageable steps that anyone, regardless of their gardening experience, can follow. The beauty of this method lies not only in its simplicity but also in its sustainability. By utilizing readily available materials and repurposing organic waste, you’re contributing to a more eco-friendly lifestyle while simultaneously enjoying the freshest, most flavorful mushrooms imaginable.
Why is this DIY trick a must-try? Because it empowers you to take control of your food source, offering a level of freshness and quality that store-bought mushrooms simply can’t match. Imagine the satisfaction of harvesting your own gourmet mushrooms, knowing exactly where they came from and how they were grown. Think of the culinary possibilities – adding them to your favorite pasta dishes, omelets, stir-fries, or even grilling them as a delicious and healthy side dish. The possibilities are truly endless.
But the benefits extend beyond just the culinary realm. Growing mushrooms at home is also a fantastic way to learn about the fascinating world of fungi and their vital role in our ecosystem. It’s a hands-on educational experience that can spark curiosity and inspire a deeper appreciation for the natural world. Plus, it’s a fun and engaging activity that the whole family can enjoy.
Looking for variations? Consider experimenting with different types of substrate. While coffee grounds are a great starting point, you can also try using straw, cardboard, or even wood chips. Each substrate will impart a slightly different flavor and texture to your mushrooms, so it’s worth exploring to find your favorite combination. You can also try different mushroom varieties. Oyster mushrooms are a popular choice for beginners, but once you’ve mastered the basics, you can branch out to other varieties like shiitake, lion’s mane, or even more exotic species. Remember to research the specific growing conditions required for each variety to ensure success.
Don’t be afraid to get creative and personalize your mushroom-growing setup. You can use different containers, experiment with different lighting conditions, and even build your own miniature mushroom farm. The key is to have fun and learn from your experiences.
We wholeheartedly encourage you to try this DIY trick for growing mushrooms at home. It’s a rewarding, sustainable, and delicious way to connect with nature and enhance your culinary creations. Once you’ve given it a try, we’d love to hear about your experience. Share your photos, tips, and stories with us in the comments section below. Let’s build a community of mushroom enthusiasts and inspire others to embark on this exciting journey! Let us know what kind of **growing mushrooms at home** experience you had.
Frequently Asked Questions (FAQ)
What are the best types of mushrooms to grow at home for beginners?
Oyster mushrooms are generally considered the easiest and most forgiving type of mushroom to grow at home, making them an excellent choice for beginners. They are relatively fast-growing, tolerant of a wider range of environmental conditions, and produce a generous yield. Shiitake mushrooms are another popular option, although they require a bit more patience and attention to detail. Avoid more demanding varieties like morels or truffles until you have gained some experience with mushroom cultivation.
What kind of substrate should I use for growing mushrooms at home?
Coffee grounds are a readily available and effective substrate for growing oyster mushrooms. They are rich in nutrients and provide a suitable environment for mycelial growth. Other options include straw, cardboard, wood chips, and sawdust. The best substrate will depend on the type of mushroom you are growing and the resources available to you. Be sure to properly pasteurize or sterilize your substrate before inoculation to prevent contamination.
How do I pasteurize or sterilize my substrate?
Pasteurization involves heating the substrate to a temperature that kills most harmful microorganisms without destroying beneficial ones. This can be achieved by soaking the substrate in hot water (around 160-180°F) for an hour or two. Sterilization, on the other hand, involves heating the substrate to a higher temperature (typically in an autoclave or pressure cooker) to kill all microorganisms. Sterilization is generally recommended for more demanding mushroom varieties or when using substrates that are prone to contamination.
How long does it take to grow mushrooms at home?
The time it takes to grow mushrooms at home varies depending on the type of mushroom, the substrate used, and the environmental conditions. Oyster mushrooms typically take 2-3 weeks to colonize the substrate and another week or two to fruit. Shiitake mushrooms can take several months to colonize the substrate and may require a cold shock to induce fruiting. Be patient and monitor your mushrooms closely for signs of growth or contamination.
What are the ideal environmental conditions for growing mushrooms at home?
Mushrooms generally prefer cool, humid, and dark environments. The ideal temperature range for most mushroom varieties is between 60-75°F. Humidity levels should be maintained at around 80-90%. Adequate ventilation is also important to prevent the buildup of carbon dioxide. You can create a suitable environment by placing your mushroom-growing container in a basement, closet, or other cool, dark space. You may also need to mist the mushrooms regularly to maintain humidity.
How do I know when my mushrooms are ready to harvest?
Mushrooms are typically ready to harvest when the caps have fully expanded and the edges are starting to curl upwards. The gills should be visible and the mushrooms should feel firm to the touch. Avoid harvesting mushrooms that are overly mature or have started to decompose. To harvest,
So, there you have it! Growing mushrooms at home, once shrouded in mystery, is now an accessible and rewarding endeavor thanks to this simple yet effective DIY trick. We’ve demystified the process, breaking it down into manageable steps that anyone, regardless of their gardening experience, can follow. The beauty of this method lies not only in its simplicity but also in its sustainability. By utilizing readily available materials and repurposing organic waste, you’re contributing to a more eco-friendly lifestyle while simultaneously enjoying the freshest, most flavorful mushrooms imaginable.
Why is this DIY trick a must-try? Because it empowers you to take control of your food source, offering a level of freshness and quality that store-bought mushrooms simply can’t match. Imagine the satisfaction of harvesting your own gourmet mushrooms, knowing exactly where they came from and how they were grown. Think of the culinary possibilities – adding them to your favorite pasta dishes, omelets, stir-fries, or even grilling them as a delicious and healthy side dish. The possibilities are truly endless.
But the benefits extend beyond just the culinary realm. Growing mushrooms at home is also a fantastic way to learn about the fascinating world of fungi and their vital role in our ecosystem. It’s a hands-on educational experience that can spark curiosity and inspire a deeper appreciation for the natural world. Plus, it’s a fun and engaging activity that the whole family can enjoy.
Looking for variations? Consider experimenting with different types of substrate. While coffee grounds are a great starting point, you can also try using straw, cardboard, or even wood chips. Each substrate will impart a slightly different flavor and texture to your mushrooms, so it’s worth exploring to find your favorite combination. You can also try different mushroom varieties. Oyster mushrooms are a popular choice for beginners, but once you’ve mastered the basics, you can branch out to other varieties like shiitake, lion’s mane, or even more exotic species. Remember to research the specific growing conditions required for each variety to ensure success.
Don’t be afraid to get creative and personalize your mushroom-growing setup. You can use different containers, experiment with different lighting conditions, and even build your own miniature mushroom farm. The key is to have fun and learn from your experiences.
We wholeheartedly encourage you to try this DIY trick for growing mushrooms at home. It’s a rewarding, sustainable, and delicious way to connect with nature and enhance your culinary creations. Once you’ve given it a try, we’d love to hear about your experience. Share your photos, tips, and stories with us in the comments section below. Let’s build a community of mushroom enthusiasts and inspire others to embark on this exciting journey! Let us know what kind of **growing mushrooms at home** experience you had.
Frequently Asked Questions (FAQ)
What are the best types of mushrooms to grow at home for beginners?
Oyster mushrooms are generally considered the easiest and most forgiving type of mushroom to grow at home, making them an excellent choice for beginners. They are relatively fast-growing, tolerant of a wider range of environmental conditions, and produce a generous yield. Shiitake mushrooms are another popular option, although they require a bit more patience and attention to detail. Avoid more demanding varieties like morels or truffles until you have gained some experience with mushroom cultivation.
What kind of substrate should I use for growing mushrooms at home?
Coffee grounds are a readily available and effective substrate for growing oyster mushrooms. They are rich in nutrients and provide a suitable environment for mycelial growth. Other options include straw, cardboard, wood chips, and sawdust. The best substrate will depend on the type of mushroom you are growing and the resources available to you. Be sure to properly pasteurize or sterilize your substrate before inoculation to prevent contamination.
How do I pasteurize or sterilize my substrate?
Pasteurization involves heating the substrate to a temperature that kills most harmful microorganisms without destroying beneficial ones. This can be achieved by soaking the substrate in hot water (around 160-180°F) for an hour or two. Sterilization, on the other hand, involves heating the substrate to a higher temperature (typically in an autoclave or pressure cooker) to kill all microorganisms. Sterilization is generally recommended for more demanding mushroom varieties or when using substrates that are prone to contamination.
How long does it take to grow mushrooms at home?
The time it takes to grow mushrooms at home varies depending on the type of mushroom, the substrate used, and the environmental conditions. Oyster mushrooms typically take 2-3 weeks to colonize the substrate and another week or two to fruit. Shiitake mushrooms can take several months to colonize the substrate and may require a cold shock to induce fruiting. Be patient and monitor your mushrooms closely for signs of growth or contamination.
What are the ideal environmental conditions for growing mushrooms at home?
Mushrooms generally prefer cool, humid, and dark environments. The ideal temperature range for most mushroom varieties is between 60-75°F. Humidity levels should be maintained at around 80-90%. Adequate ventilation is also important to prevent the buildup of carbon dioxide. You can create a suitable environment by placing your mushroom-growing container in a basement, closet, or other cool, dark space. You may also need to mist the mushrooms regularly to maintain humidity.
How do I know when my mushrooms are ready to harvest?
Mushrooms are typically ready to harvest when the caps have fully expanded and the edges are starting to curl upwards. The gills should be visible and the mushrooms should feel firm to the touch. Avoid harvesting mushrooms that are overly mature or have started to decompose. To harvest, gently twist or cut the mushrooms from the substrate.
What are some common problems I might encounter when growing mushrooms at home?
Contamination is one of the most common problems encountered when growing mushrooms at home. This can be caused by bacteria, mold, or other fungi. To prevent contamination, be sure to properly pasteurize or sterilize your substrate and maintain a clean growing environment. Other common problems include insufficient humidity, inadequate ventilation, and pest infestations.
Can I reuse coffee grounds for growing mushrooms?
Yes, you can reuse coffee grounds for growing mushrooms, but it’s important to use them within a week or two of brewing to prevent contamination. Store used coffee grounds in a clean, airtight container in the refrigerator until you’re ready to use them. You may also want to mix the coffee grounds with other substrates, such as straw or wood chips, to improve drainage and aeration.
Are there any health benefits to eating home-grown mushrooms?
Home-grown mushrooms are a nutritious and delicious addition to any diet. They are low in calories and fat and high in protein, fiber, and essential vitamins and minerals. Mushrooms also contain antioxidants and other compounds that may have health-promoting properties. Growing your own mushrooms allows you to control the quality and freshness of your food, ensuring that you are getting the most nutritional value possible.
What if my mushrooms don’t grow?
Several factors can contribute to a failed mushroom-growing attempt. First, ensure your substrate was properly pasteurized or sterilized. Contamination is a common culprit. Second, check the temperature and humidity levels. Mushrooms need a cool, humid environment to thrive. Third, make sure you’re using a viable mushroom spawn or culture. If your spawn is old or contaminated, it may not colonize the substrate. Finally, be patient. Mushroom growing takes time, and it may take several weeks or even months to see results. If you’ve tried everything and your mushrooms still aren’t growing, consider starting over with fresh materials and a new spawn source.

Leave a Comment