
Growing garlic at home can seem intimidating, but trust me, it’s one of the most rewarding and surprisingly simple gardening projects you can undertake! Imagine the satisfaction of harvesting your own pungent, flavorful garlic, knowing exactly where it came from and how it was grown. For centuries, garlic has been revered not just for its culinary uses, but also for its medicinal properties. From ancient Egypt, where it fueled the pyramid builders, to traditional medicine practices around the globe, garlic boasts a rich and fascinating history.
But beyond the historical significance, why should you consider growing garlic at home? Well, store-bought garlic often lacks the robust flavor of homegrown varieties, and let’s be honest, sometimes it’s just plain old! Plus, with rising grocery costs, cultivating your own garlic is a fantastic way to save money and reduce your reliance on commercially produced food. In this article, I’m going to share some easy-to-follow DIY tricks and hacks that will empower you to successfully grow your own thriving garlic crop, even if you’re a complete beginner. Get ready to unleash your inner gardener and enjoy the delicious rewards of growing garlic at home!
Growing Garlic at Home: A Beginner’s Guide
Okay, garlic lovers, let’s get down to business! Growing your own garlic is surprisingly easy and incredibly rewarding. Imagine the satisfaction of cooking with garlic you nurtured from clove to bulb. Plus, homegrown garlic often has a more intense and complex flavor than what you find in the store. I’m going to walk you through everything you need to know, from choosing the right garlic to harvesting your bounty.
Choosing Your Garlic
First things first, you can’t just grab any garlic from the grocery store and expect it to thrive. You need to choose garlic specifically meant for planting. This is usually called “seed garlic” and you can find it at local nurseries, garden centers, or online retailers.
* Hardneck vs. Softneck: This is the big decision.
* Hardneck: These are generally more cold-hardy and produce a flower stalk called a scape (which is delicious, by the way!). They typically have a more complex flavor and fewer, larger cloves. They are better suited for colder climates.
* Softneck: These are more common in grocery stores. They are less cold-hardy but store longer. They have more cloves per bulb and are better suited for warmer climates. They are also the type you usually see braided.
* Variety Matters: Within hardneck and softneck, there are tons of varieties! Do some research to see what grows well in your area and what flavor profiles you prefer. Some popular hardneck varieties include ‘German Extra Hardy,’ ‘Music,’ and ‘Chesnok Red.’ Popular softneck varieties include ‘California Early’ and ‘Silverskin.’
* Buy from a Reputable Source: Make sure you’re buying from a source that guarantees disease-free garlic. You don’t want to introduce any problems into your garden.
Preparing Your Planting Site
Garlic needs a sunny spot with well-drained soil. Seriously, well-drained soil is crucial. Garlic hates wet feet!
* Sunlight: Aim for at least 6 hours of direct sunlight per day.
* Soil: Loamy soil is ideal. If your soil is heavy clay, amend it with plenty of compost or other organic matter to improve drainage. Sandy soil will also benefit from organic matter to help retain moisture.
* Soil pH: Garlic prefers a soil pH between 6.0 and 7.0. You can test your soil pH with a simple kit from a garden center.
* Fertilizing: Before planting, work in some compost or a balanced organic fertilizer into the soil. Garlic is a heavy feeder, so giving it a good start is important.
Planting Your Garlic
The best time to plant garlic is in the fall, about 4-6 weeks before the ground freezes. This gives the cloves time to establish roots before winter.
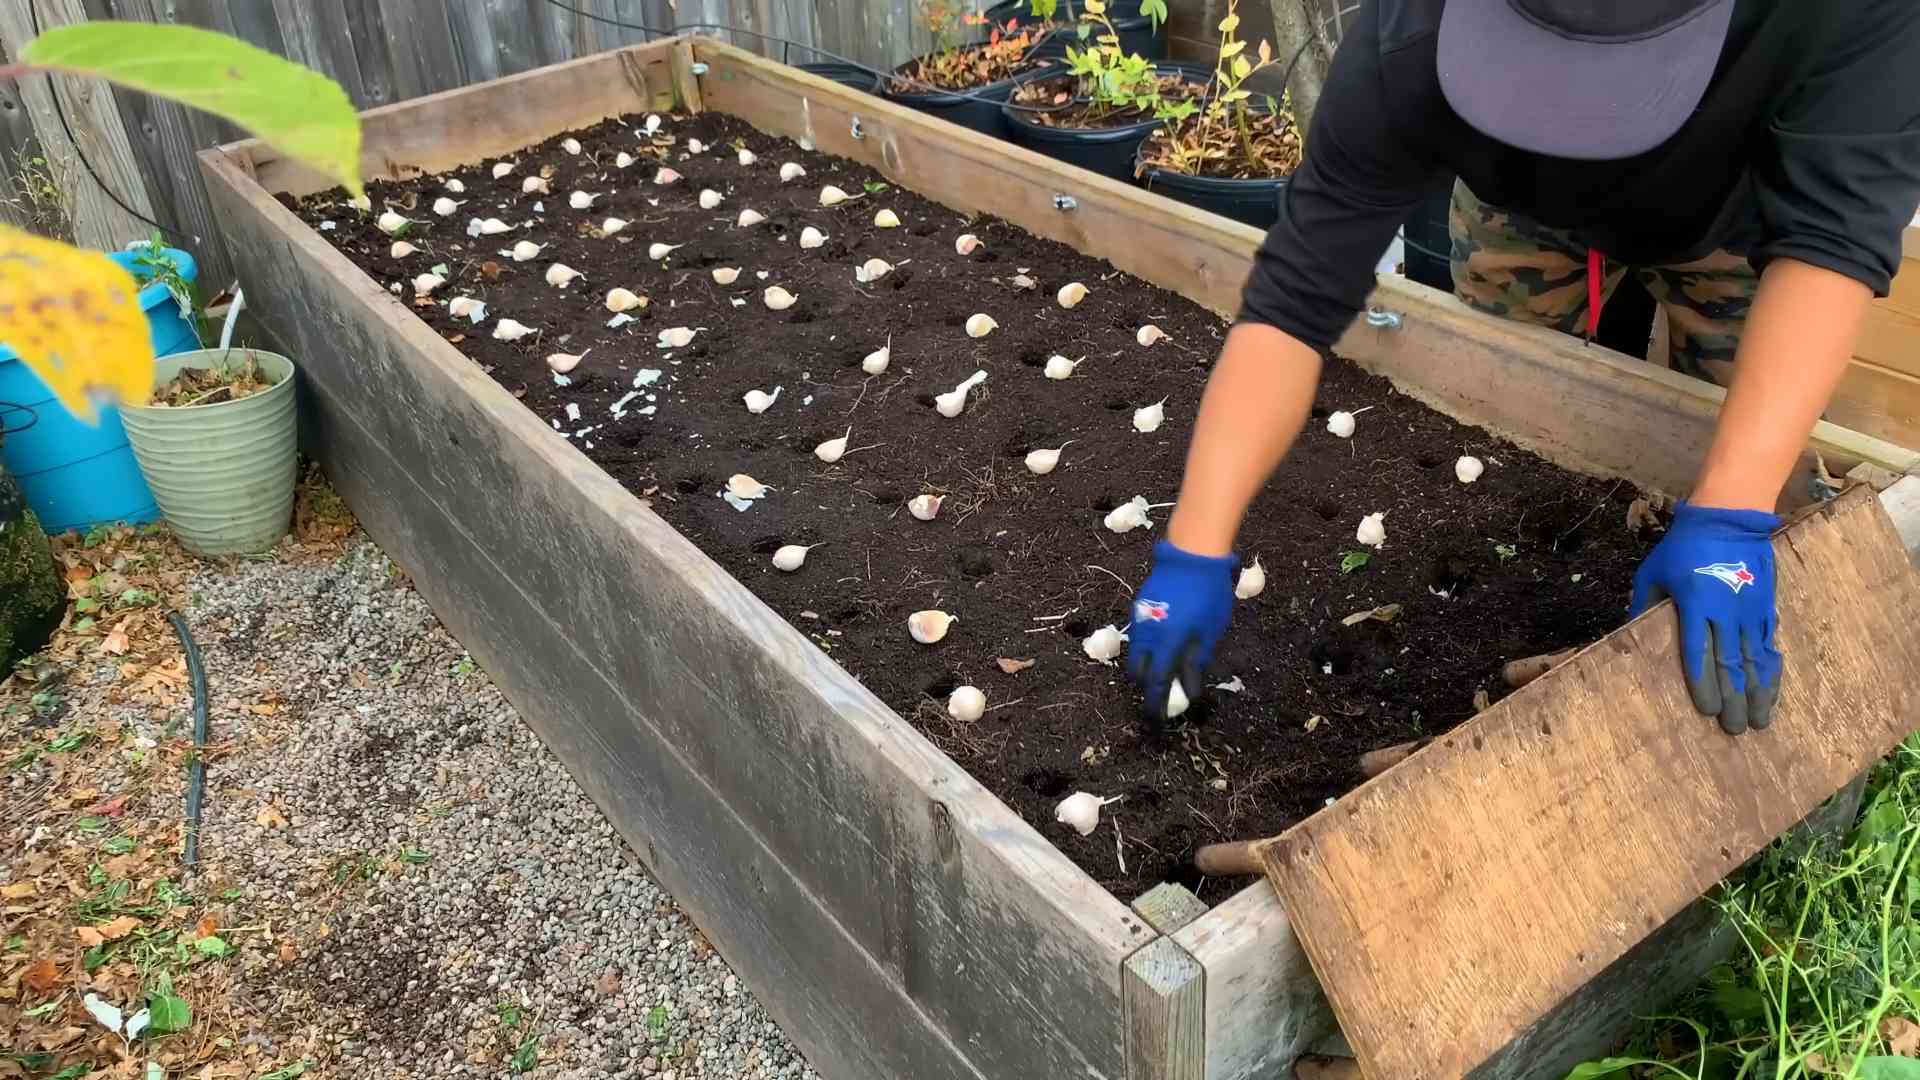
1. Separate the Cloves: Gently separate the cloves from the bulb, being careful not to damage them. Plant only the largest, healthiest cloves. The bigger the clove, the bigger the bulb it will produce. Don’t peel the cloves! The papery skin protects them.
2. Planting Depth: Plant the cloves about 2 inches deep (to the top of the clove) and 6 inches apart. If you’re planting in rows, space the rows about 12 inches apart.
3. Orientation: Plant the cloves with the pointed end facing up and the flat end (where it was attached to the bulb) facing down.
4. Cover and Water: Cover the cloves with soil and water them well.
5. Mulch: Apply a thick layer of mulch (straw, shredded leaves, or wood chips) to help insulate the soil, retain moisture, and suppress weeds. This is especially important in colder climates.
Caring for Your Garlic
Garlic is relatively low-maintenance, but there are a few things you’ll need to do to ensure a good harvest.
* Watering: Water regularly, especially during dry periods. Garlic needs consistent moisture, but avoid overwatering, which can lead to rot.
* Weeding: Keep the area around your garlic free of weeds. Weeds compete for nutrients and can harbor pests and diseases.
* Fertilizing: Side-dress your garlic with a nitrogen-rich fertilizer in the spring, when the plants start to actively grow. Fish emulsion or compost tea are good options.
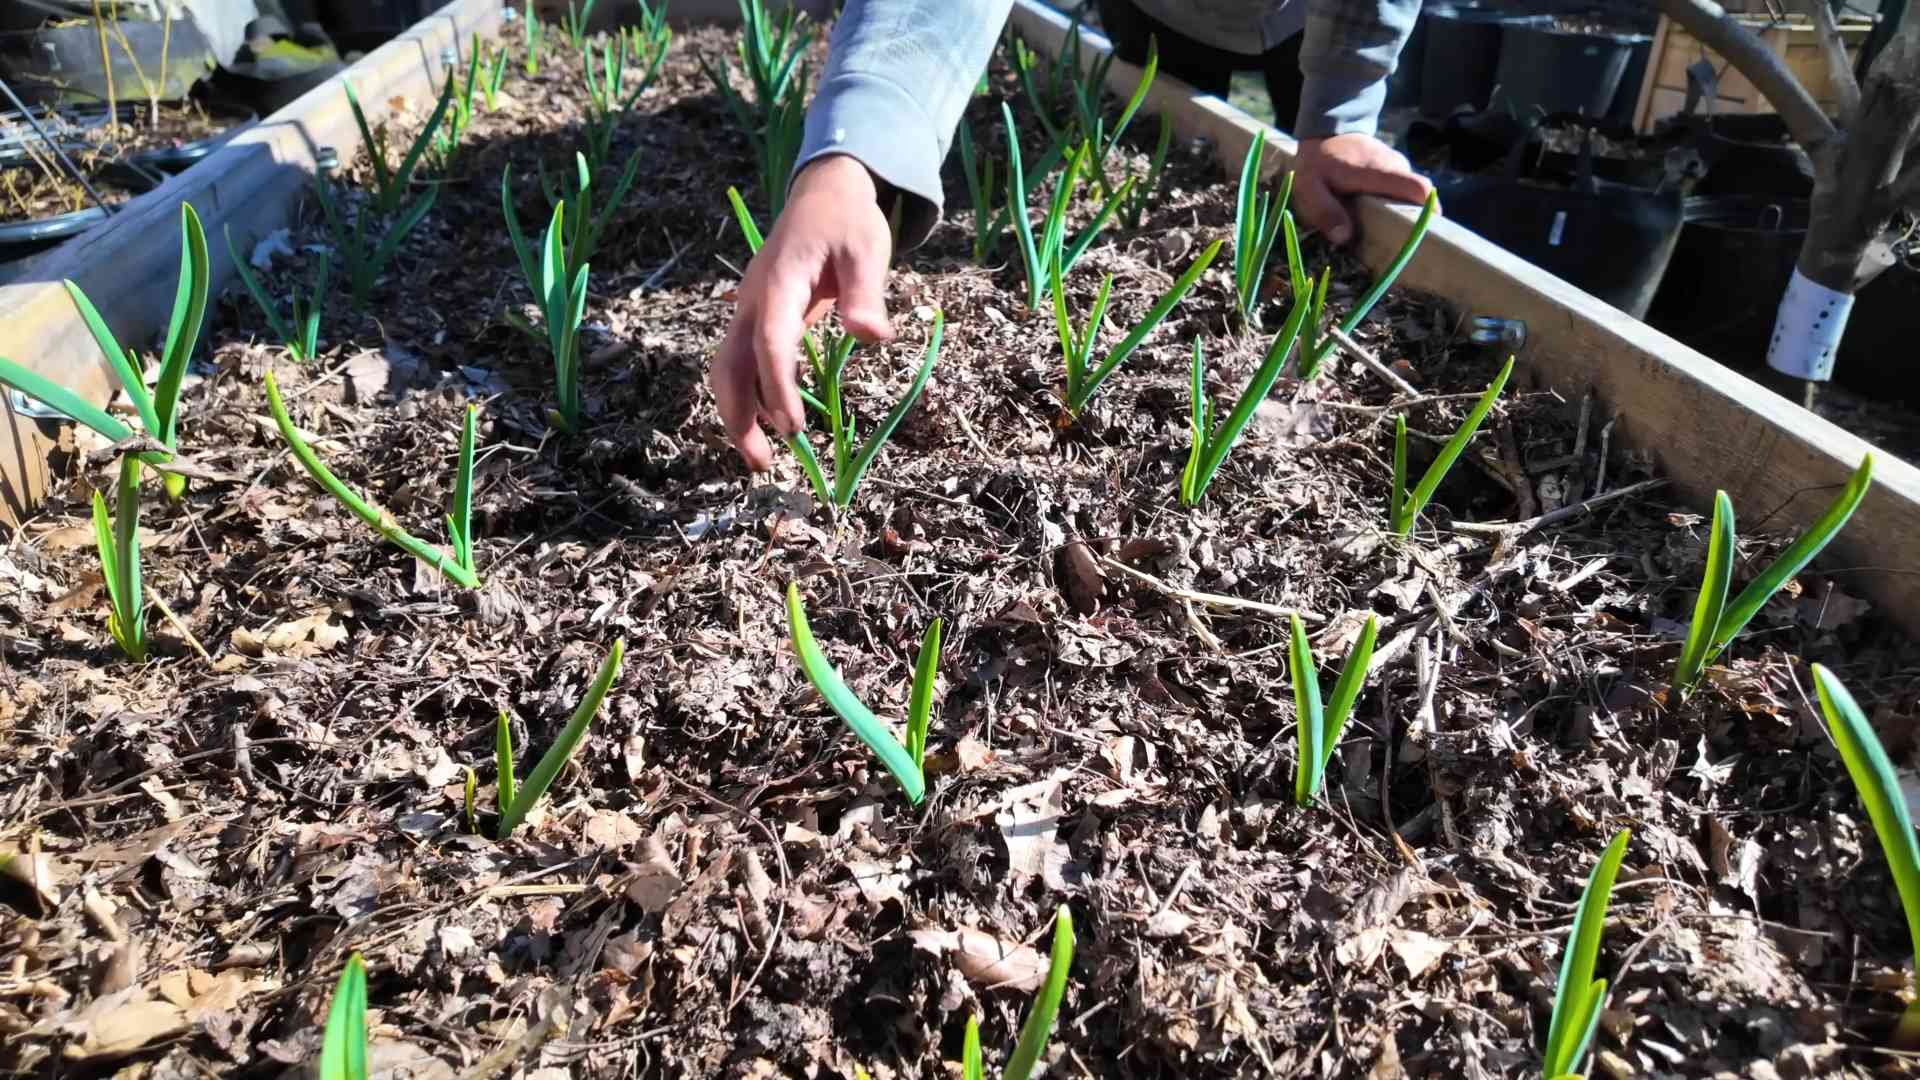
* Scapes (Hardneck Varieties): If you’re growing hardneck garlic, you’ll notice a flower stalk (scape) emerging in the spring or early summer. Cut off the scapes as soon as they start to curl. This will redirect the plant’s energy into bulb development. Don’t throw the scapes away! They’re delicious sautéed, grilled, or made into pesto.
* Pest and Disease Control: Garlic is generally pest-resistant, but keep an eye out for onion thrips or garlic mites. If you notice any problems, treat them with an appropriate organic insecticide or fungicide. Good air circulation and well-drained soil can help prevent many diseases.
Harvesting Your Garlic
Harvest time is usually in mid-summer, when the lower leaves start to turn yellow and brown.
1. Timing is Key: Don’t wait too long to harvest, or the bulbs will start to split apart. A good rule of thumb is to harvest when about half of the leaves have turned brown.
2. Dig Carefully: Use a garden fork or shovel to carefully dig up the bulbs, being careful not to damage them.
3. Gently Remove Soil: Gently brush off any excess soil. Don’t wash the bulbs!
4. Curing: This is a crucial step for long-term storage. Tie the garlic plants together in bundles of 4-6 bulbs and hang them in a cool, dry, well-ventilated place for 2-4 weeks. You can also spread them out on screens or racks. The bulbs are cured when the necks are dry and the outer skins are papery.
5. Trimming: Once the garlic is cured, trim the roots and cut off the stalks, leaving about an inch or two above the bulb.
6. Storage: Store your cured garlic in a cool, dry, dark place. A pantry or basement is ideal. Properly cured garlic can last for several months.
Troubleshooting
Even with the best planning, things can sometimes go wrong. Here are a few common problems and how to deal with them:
* Yellowing Leaves: This can be caused by a number of factors, including nutrient deficiencies, overwatering, or disease. Check your soil pH and nutrient levels, and make sure your garlic is getting adequate drainage.
* Small Bulbs: This can be caused by poor soil, insufficient sunlight, or not removing the scapes (on hardneck varieties). Make sure your garlic is getting enough sunlight and nutrients, and that you’re removing the scapes promptly.
* Rotting Bulbs: This is usually caused by overwatering or poor drainage. Make sure your soil is well-drained, and avoid overwatering.
* Pests: Keep an eye out for onion thrips or garlic mites. Treat them with an appropriate organic insecticide if necessary.
Saving Garlic for Next Year
To ensure you have garlic to plant next year, save some of your best bulbs from this year’s harvest. Choose the largest, healthiest bulbs and store them in a cool, dry, dark place. These will be your seed garlic for next year!
Enjoying Your Harvest
Now for the best part – enjoying your homegrown garlic! Use it in all your favorite recipes. The flavor will be amazing! You can also roast whole bulbs of garlic for a delicious and healthy treat.
Section: Detailed Step-by-Step Instructions
Let’s break down the planting process into even more detail.
Step 1: Soil Preparation
1. Clear the Area: Remove any weeds, rocks, or debris from the planting area.
2. Amend the Soil: Spread a 2-3 inch layer of compost or other organic matter over the soil.
3. Till or Dig: Use a garden fork or tiller to incorporate the compost into the soil to a depth of at least 6-8 inches.
4. Level the Surface: Rake the soil to create a smooth, even surface.
5. Optional: Soil Test: If you haven’t tested your soil recently, now is a good time to do so. This will help you determine if you need to add any additional amendments.
Step 2: Preparing the Cloves
1. Choose Your Bulbs: Select the largest, healthiest bulbs from your seed garlic.
2. Separate the Cloves: Gently separate the cloves from the bulb, starting from the outside and working your way in. Be careful not to damage the cloves.
3. Inspect the Cloves: Discard any cloves that are damaged, diseased, or moldy.
4. Keep the Skin On:
Conclusion
So, there you have it! Growing garlic at home is not only surprisingly simple, but it’s also incredibly rewarding. Imagine the satisfaction of harvesting plump, flavorful bulbs that you nurtured from a single clove. Forget those bland, pre-packaged garlic cloves from the supermarket; with this DIY trick, you’ll have access to the freshest, most potent garlic imaginable, right at your fingertips.
This isn’t just about saving a few dollars; it’s about connecting with your food, understanding its origins, and enjoying the unparalleled taste of homegrown produce. The difference in flavor between store-bought and homegrown garlic is truly remarkable. You’ll notice a richer, more complex taste that will elevate your culinary creations to a whole new level.
But the benefits don’t stop there. Growing your own garlic allows you to control the entire process, ensuring that your garlic is free from harmful pesticides and herbicides. You’ll know exactly what went into growing your garlic, giving you peace of mind and a healthier, more sustainable food source.
Why is this DIY trick a must-try? Because it’s easy, cost-effective, and yields incredibly flavorful garlic. It’s a fantastic way to add fresh, organic produce to your diet and connect with the natural world. Plus, it’s a fun and educational activity for the whole family.
Looking for variations? Consider experimenting with different varieties of garlic. There are hardneck and softneck varieties, each with its own unique flavor profile and growing requirements. Hardneck varieties are generally more cold-hardy and produce scapes (edible flower stalks) that can be used in pesto or stir-fries. Softneck varieties are better suited for warmer climates and are known for their long storage life. You can also try growing garlic in containers if you have limited space. Just make sure to choose a large container with good drainage.
Don’t be intimidated by the thought of growing your own garlic. It’s a forgiving plant that thrives on neglect. With a little bit of preparation and care, you’ll be harvesting your own garlic in no time.
We wholeheartedly encourage you to give this DIY trick a try. It’s a simple yet profound way to enhance your cooking, connect with nature, and enjoy the unparalleled taste of homegrown garlic. Once you experience the difference, you’ll never go back to store-bought again.
And most importantly, we want to hear about your experience! Share your tips, tricks, and photos with us in the comments below. Let’s build a community of garlic growers and inspire others to embrace the joys of homegrown produce. Happy growing!
Frequently Asked Questions (FAQ)
What is the best time to plant garlic?
The ideal time to plant garlic is in the fall, typically 4-6 weeks before the ground freezes. This allows the garlic cloves to establish roots before winter sets in. In colder climates, planting in late September or early October is recommended. In warmer climates, you can plant in late October or November. The key is to give the cloves enough time to develop roots but not enough time to sprout above ground before the first frost. Spring planting is possible, but the bulbs may be smaller. If planting in the spring, do so as soon as the ground can be worked.
What type of soil is best for growing garlic?
Garlic thrives in well-drained, fertile soil that is rich in organic matter. Amend your soil with compost or well-rotted manure before planting to improve drainage and fertility. The ideal soil pH for garlic is between 6.0 and 7.0. Avoid heavy clay soils, as they can retain too much moisture and cause the garlic cloves to rot. If you have clay soil, consider growing garlic in raised beds or containers.
How deep should I plant the garlic cloves?
Plant garlic cloves about 2 inches deep, with the pointed end facing up. Space the cloves about 6 inches apart in rows that are 12 inches apart. This spacing allows the garlic plants enough room to grow and develop large bulbs.
How much water does garlic need?
Garlic needs consistent moisture, especially during the spring when the bulbs are forming. Water deeply once a week, or more often if the soil is dry to the touch. Avoid overwatering, as this can lead to rot. Reduce watering as the garlic matures and the leaves begin to yellow.
How do I know when my garlic is ready to harvest?
Garlic is typically ready to harvest in late spring or early summer, about 8-9 months after planting. The leaves will begin to turn yellow and brown, and the stalks may start to fall over. To check if the bulbs are ready, carefully dig up a few plants and examine the bulbs. The bulbs should be plump and well-formed, with papery skins.
Can I grow garlic in containers?
Yes, you can grow garlic in containers if you have limited space. Choose a large container that is at least 12 inches deep and wide. Use a well-draining potting mix and plant the garlic cloves as you would in the ground. Water regularly and fertilize every few weeks.
What are garlic scapes and how do I use them?
Garlic scapes are the edible flower stalks that grow from hardneck garlic varieties. They are typically harvested in the spring, before the flowers bloom. Scapes have a mild garlic flavor and can be used in a variety of dishes, such as pesto, stir-fries, and soups. To harvest scapes, simply snap them off at the point where they emerge from the plant. Removing the scapes encourages the plant to put more energy into bulb development.
How do I store garlic after harvesting?
After harvesting, cure the garlic bulbs by laying them out in a single layer in a well-ventilated, dry place for 2-3 weeks. This allows the skins to dry and harden, which helps to prevent rot. Once the garlic is cured, you can store it in a cool, dry place for several months. Braiding the garlic bulbs together is a traditional way to store them.
What are some common pests and diseases that affect garlic?
Some common pests that affect garlic include onion maggots, thrips, and nematodes. Diseases that can affect garlic include white rot, botrytis rot, and downy mildew. To prevent pests and diseases, practice good sanitation, such as removing plant debris and rotating crops. You can also use organic pest control methods, such as neem oil or insecticidal soap.
Can I use store-bought garlic to grow more garlic?
While it’s possible to grow garlic from store-bought cloves, it’s not always recommended. Store-bought garlic may have been treated with chemicals to prevent sprouting, which can inhibit growth. Additionally, store-bought garlic may not be adapted to your local climate. For best results, use garlic cloves that are specifically intended for planting, which can be purchased from a local nursery or seed supplier. These cloves are more likely to be disease-free and adapted to your growing conditions.


Leave a Comment