
Grow radishes indoors? Absolutely! Forget waiting for the perfect spring weather or battling garden pests. I’m going to show you how to enjoy crisp, peppery radishes fresh from your own home, any time of year. For centuries, humans have cultivated gardens, finding ways to coax life from the soil. While radishes themselves have a relatively short history compared to other vegetables, their ease of cultivation has made them a staple in gardens worldwide.
But let’s face it, not everyone has the space or the time for a traditional outdoor garden. That’s where this DIY guide comes in! Imagine adding a vibrant, crunchy element to your salads or snacking on a freshly harvested radish, all thanks to your indoor gardening efforts. This isn’t just about convenience; it’s about connecting with nature, even in the smallest of spaces. Plus, growing your own food is incredibly rewarding!
This article will provide you with simple, step-by-step instructions and insider tips to successfully grow radishes indoors. We’ll cover everything from choosing the right container and soil to providing adequate light and water. Get ready to unleash your inner gardener and enjoy the satisfaction of harvesting your own delicious, homegrown radishes!
Grow Your Own Radishes Indoors: A Beginner’s Guide
Okay, so you’re itching to grow something, but maybe you don’t have a garden, or it’s the dead of winter? No problem! Radishes are your answer. They’re super fast-growing, relatively low-maintenance, and perfect for indoor gardening. I’m going to walk you through everything you need to know to get those peppery little roots sprouting right in your kitchen.
What You’ll Need
Before we dive in, let’s gather our supplies. This is a pretty simple project, so the list isn’t too daunting:
* Radish Seeds: Obviously! Choose a variety that’s known for doing well indoors. ‘Cherry Belle’ and ‘French Breakfast’ are popular choices. You can find these at most garden centers or online.
* Containers: You’ll need pots or containers that are at least 6 inches deep. Radishes need room to grow downwards. Make sure they have drainage holes! Trust me, soggy radishes are sad radishes.
* Potting Mix: Don’t use garden soil! It’s too heavy and compacts easily. Opt for a good quality potting mix that’s light and well-draining.
* Watering Can or Spray Bottle: For gentle watering. You don’t want to blast your delicate seedlings with a firehose.
* Grow Lights (Optional, but Recommended): Radishes need a lot of light. If you don’t have a super sunny windowsill, grow lights will be your best friend.
* Small Shovel or Trowel: For filling your containers with soil.
* Plant Labels (Optional): If you’re growing multiple varieties, labels will help you keep track.
Getting Started: Planting Your Radish Seeds
Alright, let’s get our hands dirty! This is the fun part.
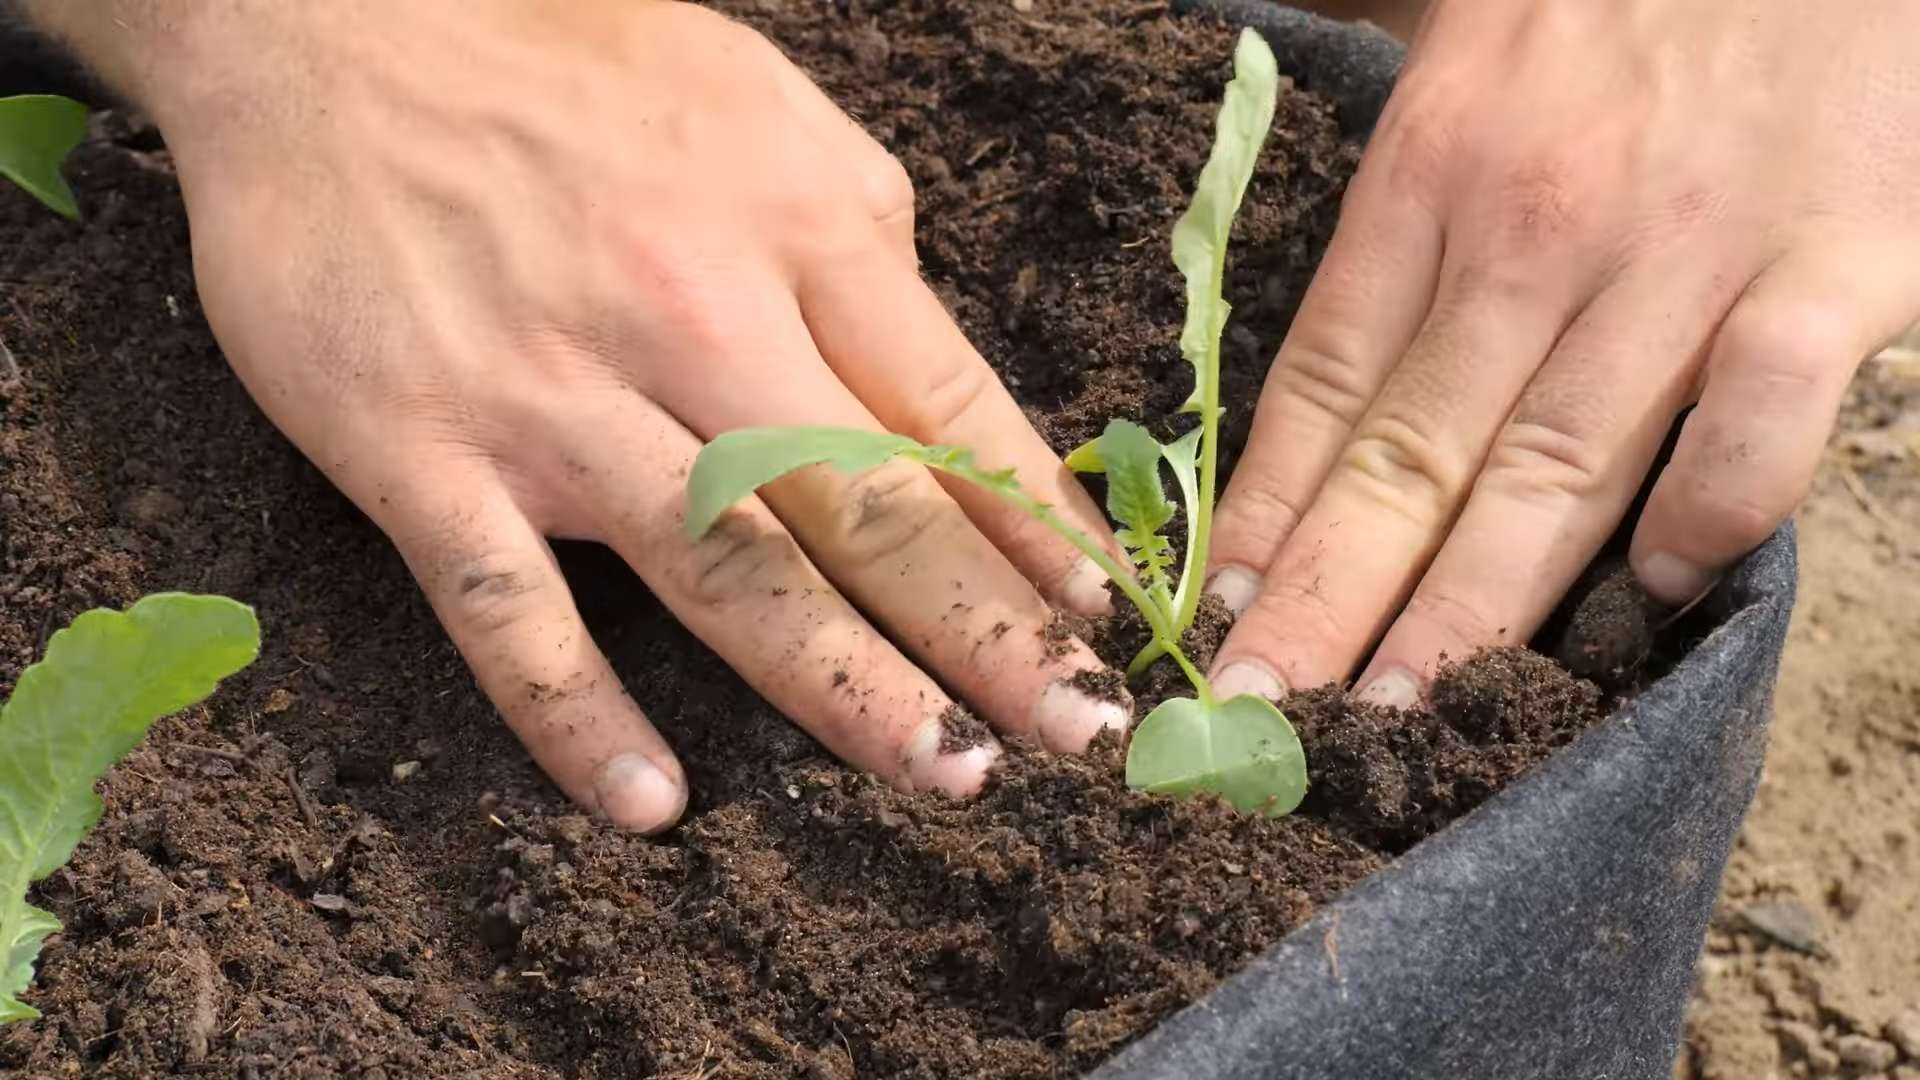
1. Prepare Your Containers: Fill your containers with potting mix, leaving about an inch of space at the top. Gently pat down the soil to remove any large air pockets. Don’t pack it too tightly, though!
2. Sow the Seeds: Radish seeds are small, so you don’t need to bury them too deep. Make small indentations in the soil, about ½ inch deep and 1 inch apart. Place one or two seeds in each indentation. I usually plant two, just in case one doesn’t sprout.
3. Cover the Seeds: Gently cover the seeds with potting mix.
4. Water Thoroughly: Water the soil gently until it’s evenly moist. You don’t want to flood the containers, just make sure the soil is damp. A spray bottle is great for this.
5. Label (Optional): If you’re using labels, now’s the time to stick them in the pots.
Light, Water, and Love: Caring for Your Radishes
Now that your seeds are planted, it’s time to nurture them. Radishes are pretty easygoing, but they do have a few basic needs.
1. Light: Radishes need at least 6 hours of sunlight per day. If you’re using a windowsill, choose one that gets plenty of direct sunlight. If you’re using grow lights, position them a few inches above the seedlings and keep them on for 12-14 hours a day. I’ve found that using a timer for my grow lights makes my life so much easier.
2. Watering: Keep the soil consistently moist, but not soggy. Water when the top inch of soil feels dry to the touch. Overwatering can lead to root rot, so be careful! I usually check the soil moisture every day or two.
3. Thinning: Once your seedlings have sprouted and have a few true leaves (the leaves that look like tiny radish leaves, not the initial seed leaves), you’ll need to thin them out. This means removing some of the seedlings so that the remaining ones have enough space to grow. Snip off the weaker seedlings at the soil line, leaving about 1-2 inches between each plant. It might feel a little brutal, but it’s necessary for healthy radish growth.
4. Temperature: Radishes prefer cooler temperatures, ideally between 60-70°F (15-21°C). Avoid placing them near heat sources like radiators.
5. Fertilizing (Optional): Radishes don’t need a lot of fertilizer, but you can give them a light feeding with a balanced liquid fertilizer a couple of weeks after they sprout. Follow the instructions on the fertilizer package. I usually dilute the fertilizer to half strength to avoid burning the roots.
Troubleshooting: Common Radish Problems
Even with the best care, you might encounter a few problems along the way. Here are some common issues and how to deal with them:
* Leggy Seedlings: This means your seedlings are stretching towards the light and are weak and spindly. This is usually caused by insufficient light. Move your radishes to a sunnier location or use grow lights.
* Root Rot: This is caused by overwatering. The roots will turn brown and mushy. Make sure your containers have good drainage and allow the soil to dry out slightly between waterings.
* Pests: Indoor radishes are less likely to be attacked by pests than outdoor radishes, but you might still encounter aphids or other small insects. You can usually get rid of them by spraying the plants with a mixture of water and a few drops of dish soap.
* Splitting Radishes: This can happen if the soil dries out too much and then gets flooded. Try to keep the soil consistently moist.
Harvest Time!
This is the moment you’ve been waiting for! Radishes are usually ready to harvest in about 3-4 weeks after planting.
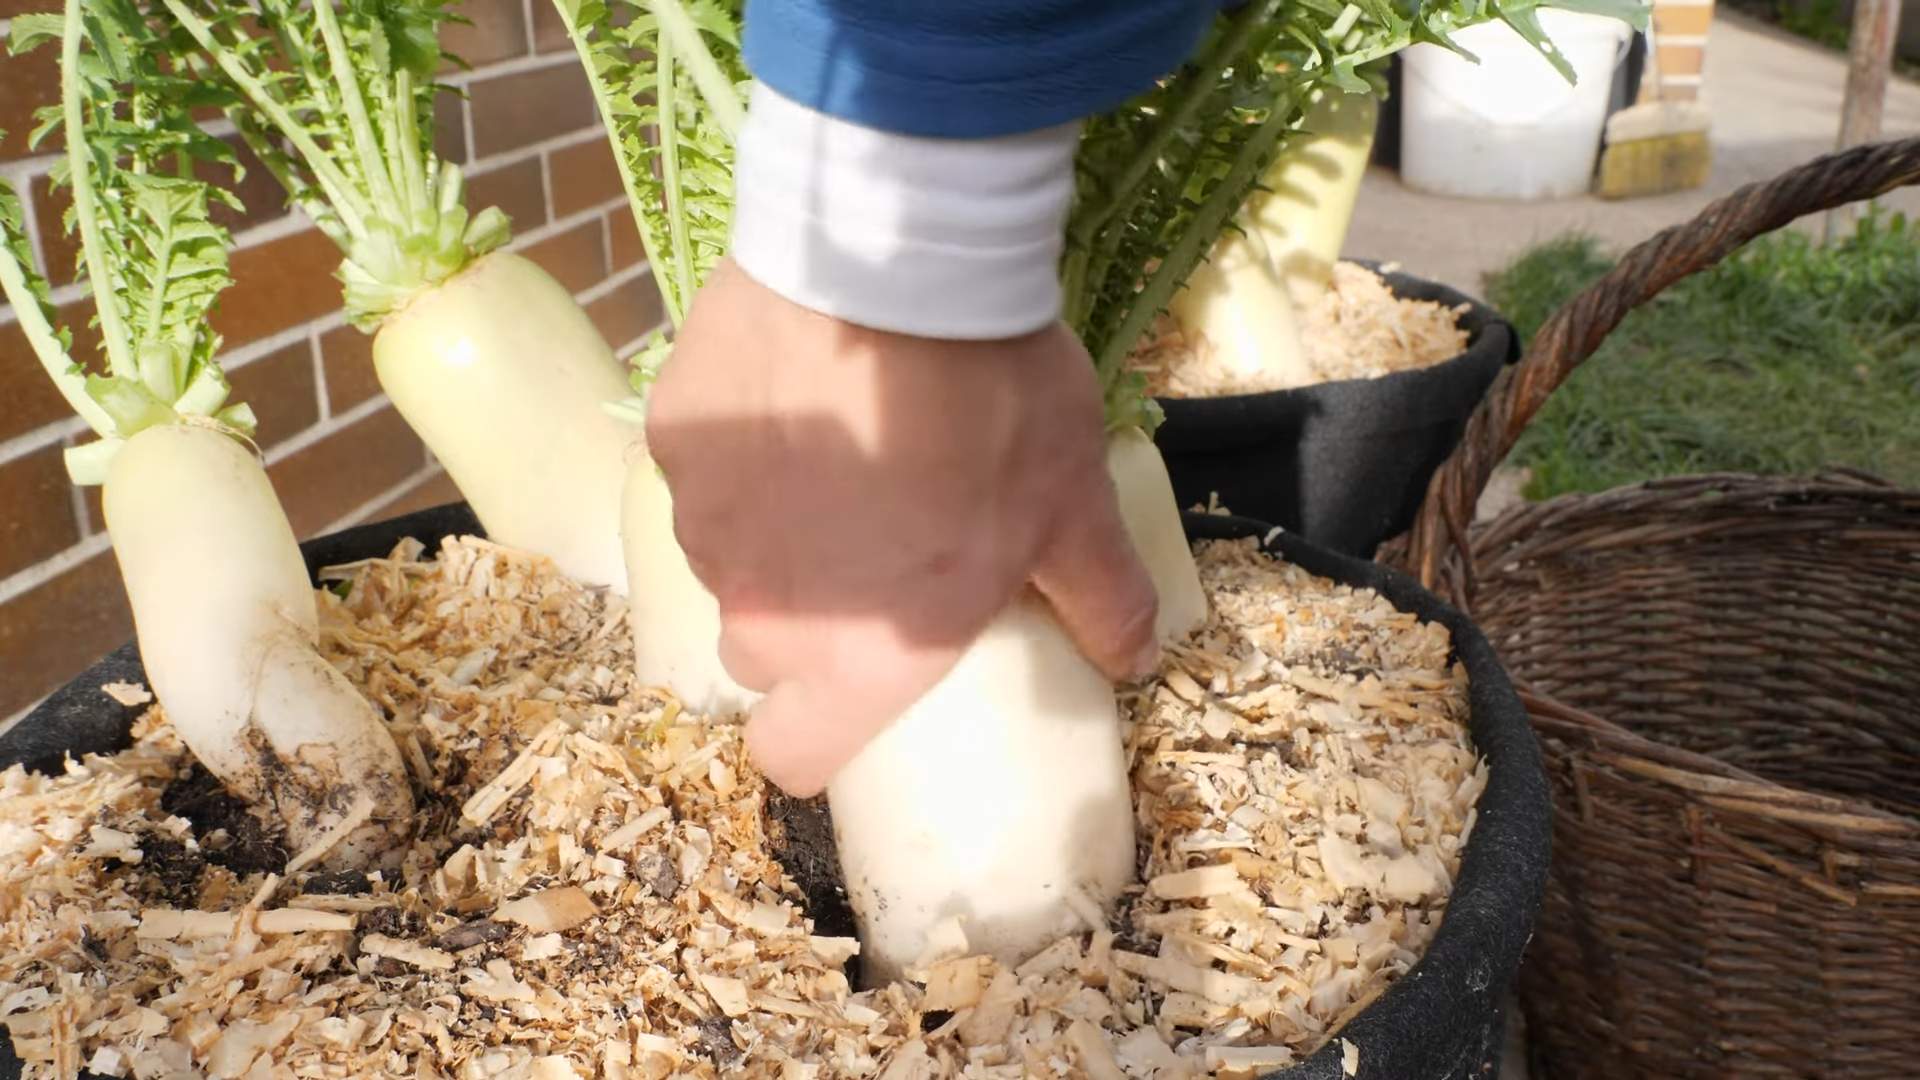
1. Check for Maturity: Gently brush away some of the soil around the base of the radish to check its size. Most radish varieties are ready to harvest when they’re about 1 inch in diameter.
2. Harvest Carefully: Gently pull the radishes out of the soil. If they’re difficult to pull, you can loosen the soil around them with a small trowel.
3. Enjoy! Wash your radishes and enjoy them fresh. They’re delicious in salads, sandwiches, or as a crunchy snack. You can also eat the radish greens! They have a peppery flavor and can be used in salads or cooked like spinach.
Choosing the Right Radish Variety
Not all radishes are created equal, especially when it comes to indoor growing. Here are a few varieties that I’ve had success with:
* Cherry Belle: This is a classic, round, red radish that’s known for its mild flavor and quick growth. It’s a great choice for beginners.
* French Breakfast: This radish is oblong in shape and has a mild, slightly sweet flavor. It’s also very fast-growing.
* Easter Egg: This variety produces a mix of radishes in different colors, including red, pink, purple, and white. It’s a fun and colorful addition to any indoor garden.
* Sparkler: This radish is round and red with a white tip. It has a slightly spicier flavor than Cherry Belle.
Extending Your Harvest
Want to keep those radishes coming? Here are a few tips for extending your harvest:
* Succession Planting: Plant a new batch of radish seeds every week or two to ensure a continuous supply.
* Cool Temperatures: Radishes grow best in cool temperatures, so try to keep your indoor garden in a cool location.
* Proper Watering: Consistent watering is essential for healthy radish growth.
* Harvest Promptly: Harvest your radishes as soon as they’re ready to prevent them from becoming overgrown and bitter.
Why Grow Radishes Indoors?
Okay, so why bother growing radishes indoors when you could just buy them at the store? Here are a few reasons:
* Freshness: Nothing beats the taste of freshly harvested radishes. They’re so much more flavorful than the ones you buy at the store.
* Convenience: You can have fresh radishes on hand whenever you need them.
* Fun: Growing your own food is a rewarding and enjoyable experience.
* Space-Saving: Radishes don’t take up a lot of space, so they’re perfect for small apartments or homes.
* Year-Round Growing: You can grow radishes indoors year-round, regardless of the weather outside.
Final Thoughts
Growing radishes indoors is a fun and easy way to add some fresh flavor to your meals. With a little bit of care and attention, you can have a continuous supply of these peppery little roots right in your kitchen. So, grab some seeds, get your hands dirty, and start growing! You won’t regret it. Happy gardening!
Conclusion
So, there you have it! Growing radishes indoors is not only possible, but it’s also incredibly rewarding. Forget those bland, store-bought radishes that lack that peppery punch. With this simple DIY trick, you can cultivate a continuous supply of crisp, flavorful radishes right in your own home, regardless of the season. Imagine adding freshly harvested radishes to your salads, sandwiches, or enjoying them as a crunchy, healthy snack. The vibrant color and zesty taste will elevate your meals and impress your friends and family.
This method is a must-try for several reasons. First, it’s incredibly space-efficient, making it perfect for apartment dwellers or anyone with limited outdoor gardening space. Second, it gives you complete control over the growing environment, minimizing the risk of pests and diseases that can plague outdoor gardens. Third, and perhaps most importantly, it allows you to enjoy fresh, homegrown radishes year-round. No more waiting for the right season or relying on the quality of produce at the grocery store.
Looking for some variations? Consider experimenting with different radish varieties. French Breakfast radishes are known for their mild flavor and elongated shape, while Cherry Belle radishes are a classic choice with their bright red color and crisp texture. You can also try growing daikon radishes indoors, although they will require a larger container due to their size. Another fun variation is to add companion plants to your radish container. Herbs like chives or parsley can help deter pests and enhance the flavor of your radishes. You can also try interplanting with carrots, as they are known to be good companions.
Don’t be intimidated if you’ve never grown anything before. This DIY trick is beginner-friendly and requires minimal effort. Just follow the simple steps outlined above, and you’ll be enjoying your own homegrown radishes in no time. The satisfaction of harvesting your own food is truly unparalleled.
We wholeheartedly encourage you to give this DIY trick a try. It’s a fun, easy, and rewarding way to bring a little bit of the garden indoors. And once you’ve experienced the joy of growing your own radishes, you’ll never want to go back to store-bought ones again.
But don’t just take our word for it! We want to hear about your experiences. Share your photos, tips, and tricks in the comments below. Let us know what varieties you’ve tried, what challenges you’ve faced, and what successes you’ve achieved. Together, we can create a community of indoor radish growers and inspire others to embrace the joys of homegrown produce. So, grab your seeds, your soil, and your containers, and get ready to embark on a delicious and rewarding gardening adventure. Happy growing!
Frequently Asked Questions (FAQ)
What kind of container should I use for growing radishes indoors?
The best container for growing radishes indoors is one that is at least 6 inches deep and has drainage holes. Radishes have relatively short roots, but they still need enough space to develop properly. A container that is too shallow will restrict their growth and result in smaller, less flavorful radishes. As for the material, plastic, terracotta, or even repurposed containers like yogurt tubs or milk cartons can work well, as long as they are clean and have drainage. Consider the number of radishes you want to grow when choosing the size of the container. A good rule of thumb is to allow at least 1-2 inches of space between each radish seed.
What type of soil is best for growing radishes indoors?
Radishes thrive in well-draining, loose soil that is rich in organic matter. A good potting mix specifically formulated for vegetables is ideal. Avoid using garden soil, as it can be too heavy and compacted, which can hinder root development. You can also amend your potting mix with compost or other organic materials to improve its fertility and drainage. A slightly acidic to neutral pH (around 6.0 to 7.0) is optimal for radish growth.
How much sunlight do radishes need when grown indoors?
Radishes need at least 6 hours of sunlight per day to grow properly. If you don’t have a sunny windowsill, you can supplement with artificial light, such as a grow light. Place the grow light about 6-12 inches above the plants and keep it on for 12-14 hours per day. Insufficient light can result in leggy, weak plants with small, underdeveloped radishes. Rotate the container regularly to ensure that all sides of the plants receive equal exposure to light.
How often should I water my indoor radishes?
Radishes need consistent moisture to grow quickly and develop crisp, flavorful roots. Water the soil thoroughly when the top inch feels dry to the touch. Avoid overwatering, as this can lead to root rot. Ensure that the container has good drainage to prevent water from pooling at the bottom. The frequency of watering will depend on factors such as the temperature, humidity, and type of container you are using. Check the soil moisture regularly and adjust your watering schedule accordingly.
How long does it take for radishes to mature when grown indoors?
One of the great things about radishes is that they are quick to mature. Most varieties are ready to harvest in just 3-4 weeks from planting. The exact time will depend on the variety, growing conditions, and your personal preferences. You can start harvesting radishes when they reach about 1 inch in diameter. To harvest, gently pull the radishes from the soil.
What are some common problems when growing radishes indoors and how can I prevent them?
Some common problems when growing radishes indoors include pests, diseases, and nutrient deficiencies. Pests such as aphids and flea beetles can damage the leaves of radishes. You can prevent these pests by inspecting your plants regularly and using insecticidal soap or neem oil if necessary. Diseases such as root rot can occur if the soil is too wet. Prevent root rot by ensuring that the container has good drainage and avoiding overwatering. Nutrient deficiencies can result in stunted growth or yellowing leaves. You can prevent nutrient deficiencies by using a good quality potting mix and fertilizing your plants regularly with a balanced fertilizer.
Can I grow radishes indoors year-round?
Yes, one of the biggest advantages of growing radishes indoors is that you can do it year-round, regardless of the weather outside. By controlling the growing environment, you can ensure that your radishes receive the optimal amount of light, water, and nutrients, allowing you to enjoy fresh, homegrown radishes any time of year.
How do I know when my radishes are ready to harvest?
Radishes are typically ready to harvest when the root is about 1 inch in diameter, but this can vary depending on the variety. Gently brush away some of the soil around the base of the plant to check the size of the radish. You can also harvest a few radishes early to get an idea of their flavor and texture. The leaves of the radish plant can also be eaten, so don’t throw them away! They can be added to salads or stir-fries.
Can I grow different varieties of radishes in the same container?
While it’s technically possible to grow different varieties of radishes in the same container, it’s generally not recommended. Different varieties may have different growth rates and maturity times, which can make it difficult to manage their watering and fertilization needs. It’s best to stick to one variety per container for optimal results.
What can I do with my homegrown radishes?
The possibilities are endless! Radishes can be eaten raw in salads, sandwiches, or as a crunchy snack. They can also be cooked in stir-fries, soups, or roasted in the oven. The leaves of the radish plant can also be eaten and are a great addition to salads or stir-fries. Radishes are a versatile and nutritious vegetable that can be enjoyed in many different ways.

Leave a Comment