
Growing Peppers at Home can seem daunting, especially if you’re new to gardening. But trust me, there’s nothing quite as satisfying as harvesting your own vibrant, flavorful peppers right from your backyard! For centuries, peppers have been cultivated across the globe, from their origins in South America where indigenous cultures revered them not only for their culinary uses but also for their medicinal properties. Now, you can bring that rich history and spicy goodness to your own table.
Have you ever dreamed of adding a fiery kick to your homemade salsa or a sweet crunch to your summer salads, all with ingredients you nurtured yourself? That’s the magic of growing your own peppers! But let’s face it, not everyone has a sprawling garden or a green thumb. That’s where these easy DIY tricks and hacks come in. I’m going to share some simple, yet effective methods to help you succeed, even if you’re working with limited space or battling common gardening challenges.
Imagine avoiding those inflated grocery store prices and enjoying fresh, organic peppers whenever you want. Plus, you’ll know exactly what went into growing them – no mystery pesticides or questionable practices! So, whether you’re a seasoned gardener or a complete beginner, get ready to unlock the secrets to successfully growing peppers at home and enjoy a bountiful harvest. Let’s get started!
Growing Peppers at Home: From Seed to Salsa!
Hey there, fellow gardening enthusiasts! I’m so excited to share my tried-and-true method for growing peppers at home. Whether you’re dreaming of spicy jalapeños, sweet bell peppers, or fiery habaneros, this guide will walk you through every step of the process, from starting seeds indoors to harvesting your delicious bounty. Let’s get our hands dirty!
Getting Started: Seeds and Supplies
Before we dive into the nitty-gritty, let’s gather our supplies. Having everything ready beforehand will make the whole process smoother and more enjoyable.
* Pepper Seeds: Choose varieties that suit your taste and climate. Consider factors like heat level, size, and growing season length. I personally love starting with a mix of bell peppers, jalapeños, and maybe a few hotter varieties like cayenne or serrano for a little kick.
* Seed Starting Trays or Pots: These provide a controlled environment for germination. I prefer using seed starting trays with a clear plastic dome to help retain moisture.
* Seed Starting Mix: This is a lightweight, sterile soil mix specifically formulated for seedlings. Don’t use garden soil, as it can be too heavy and may contain diseases.
* Grow Lights: Peppers need plenty of light, especially when started indoors. A simple fluorescent shop light or a dedicated LED grow light will do the trick.
* Heat Mat (Optional): Pepper seeds germinate best in warm soil (around 80-85°F). A heat mat can significantly improve germination rates, especially for hotter varieties.
* Small Pots (3-4 inch): You’ll need these for transplanting the seedlings once they’ve outgrown their starting trays.
* Potting Mix: A good quality potting mix is essential for healthy pepper plants.
* Fertilizer: A balanced fertilizer (e.g., 10-10-10) or a fertilizer specifically formulated for tomatoes and peppers will provide the necessary nutrients.
* Watering Can or Spray Bottle: For gentle watering.
* Plant Labels: To keep track of your different pepper varieties. Trust me, you’ll thank yourself later!
* Gardening Gloves: To keep your hands clean and protected.
* Trowel or Small Shovel: For transplanting.
* Optional: Epsom Salts: Epsom salts can help with magnesium deficiency, which can affect pepper production.
Starting Seeds Indoors: A Step-by-Step Guide
Starting pepper seeds indoors gives them a head start, especially in regions with shorter growing seasons. I usually start my seeds about 6-8 weeks before the last expected frost.
1. Prepare the Seed Starting Trays: Fill the seed starting trays or pots with seed starting mix. Gently tap the trays to settle the mix and remove any air pockets.
2. Sow the Seeds: Make a small indentation (about ¼ inch deep) in the center of each cell or pot. Place 2-3 pepper seeds in each indentation. This increases the chances of at least one seed germinating.
3. Cover the Seeds: Gently cover the seeds with seed starting mix.
4. Water Thoroughly: Water the trays or pots gently using a watering can or spray bottle. The soil should be moist but not soggy.
5. Cover with a Dome (if using): Place the clear plastic dome over the seed starting trays to create a humid environment.
6. Place on a Heat Mat (Optional): If you’re using a heat mat, place the trays on the mat.
7. Provide Light: Place the trays under grow lights. The lights should be about 2-4 inches above the trays.
8. Monitor Moisture Levels: Check the soil moisture daily. Keep the soil consistently moist but not waterlogged. Mist with water as needed.
9. Germination: Pepper seeds typically germinate in 7-21 days, depending on the variety and temperature. Once the seeds germinate, remove the plastic dome to improve air circulation.
10. Thin Seedlings: Once the seedlings have their first true leaves (the second set of leaves that appear after the initial seed leaves), thin them to one seedling per cell or pot. Choose the strongest, healthiest-looking seedling and snip off the others at the soil line with scissors. This prevents overcrowding and allows the remaining seedling to thrive.
11. Harden Off Seedlings: Before transplanting the seedlings outdoors, you need to “harden them off.” This process gradually acclimates them to outdoor conditions. Start by placing the seedlings outdoors in a sheltered location for a few hours each day, gradually increasing the amount of time they spend outdoors over a week or two. Protect them from direct sunlight and strong winds initially.
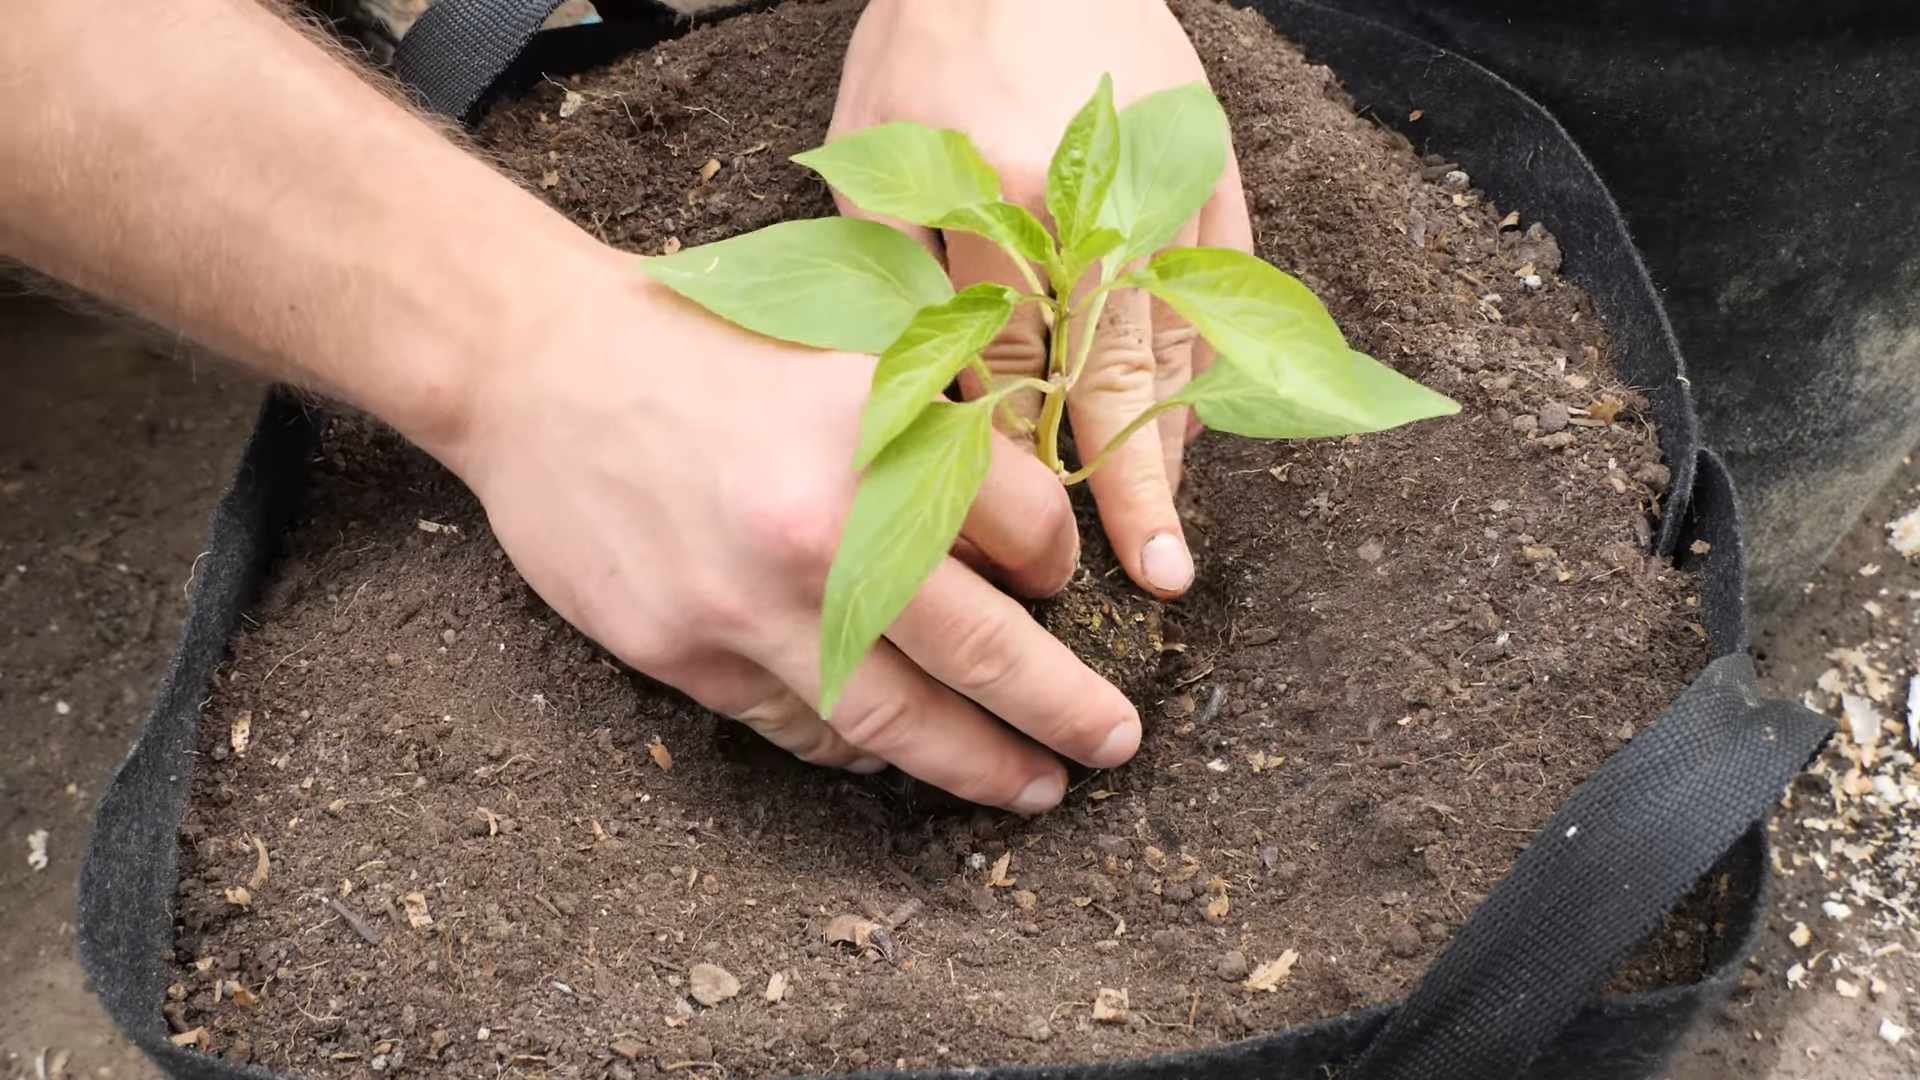
Transplanting Seedlings Outdoors: Giving Them a Home
Once the danger of frost has passed and the soil has warmed up, it’s time to transplant your pepper seedlings outdoors.
1. Choose a Sunny Location: Peppers need at least 6-8 hours of sunlight per day. Choose a location in your garden that receives plenty of sunshine.
2. Prepare the Soil: Peppers prefer well-drained soil that is rich in organic matter. Amend the soil with compost or well-rotted manure before planting.
3. Dig Holes: Dig holes that are slightly larger than the root balls of the seedlings. Space the holes about 18-24 inches apart, depending on the variety. Larger pepper varieties will need more space.
4. Transplant the Seedlings: Gently remove the seedlings from their pots. If the roots are tightly bound, gently loosen them before planting. Place the seedlings in the holes and backfill with soil.
5. Water Thoroughly: Water the seedlings thoroughly after transplanting.
6. Mulch (Optional): Apply a layer of mulch around the plants to help retain moisture, suppress weeds, and regulate soil temperature. I like to use straw or wood chips.
7. Stake or Cage (Optional): Taller pepper varieties may need staking or caging to prevent them from falling over, especially when they are laden with fruit. Install stakes or cages soon after transplanting.
Caring for Your Pepper Plants: Nurturing Growth
Once your pepper plants are in the ground, it’s important to provide them with the care they need to thrive.
1. Watering: Water your pepper plants regularly, especially during hot, dry weather. Aim to keep the soil consistently moist but not waterlogged. Water deeply and less frequently, rather than shallowly and often.
2. Fertilizing: Fertilize your pepper plants every 2-3 weeks with a balanced fertilizer or a fertilizer specifically formulated for tomatoes and peppers. Follow the instructions on the fertilizer label. I also like to give them a boost with Epsom salts (1 tablespoon per gallon of water) every few weeks to prevent magnesium deficiency.
3. Weeding: Keep the area around your pepper plants free of weeds. Weeds compete with the pepper plants for water and nutrients.
4. Pruning (Optional): Pruning pepper plants can improve air circulation and encourage fruit production. Remove any suckers (small shoots that grow from the base of the plant) and any yellowing or diseased leaves.
5. Pest and Disease Control: Monitor your pepper plants regularly for pests and diseases. Common pests include aphids, flea beetles, and spider mites. Common diseases include blossom end rot and fungal diseases. Treat any problems promptly with appropriate organic or chemical controls. I prefer to use organic methods whenever possible, such as insecticidal soap or neem oil.
6. Blossom End Rot Prevention: Blossom end rot is a common problem in peppers, caused by calcium deficiency. To prevent blossom end rot, ensure that your soil is well-drained and that your plants receive consistent watering. You can also add calcium to the soil by incorporating bone meal or crushed eggshells.
Harvesting Your Peppers: The Fruits of Your Labor
The moment you’ve been waiting for! Harvesting your peppers is the most rewarding part of the process.
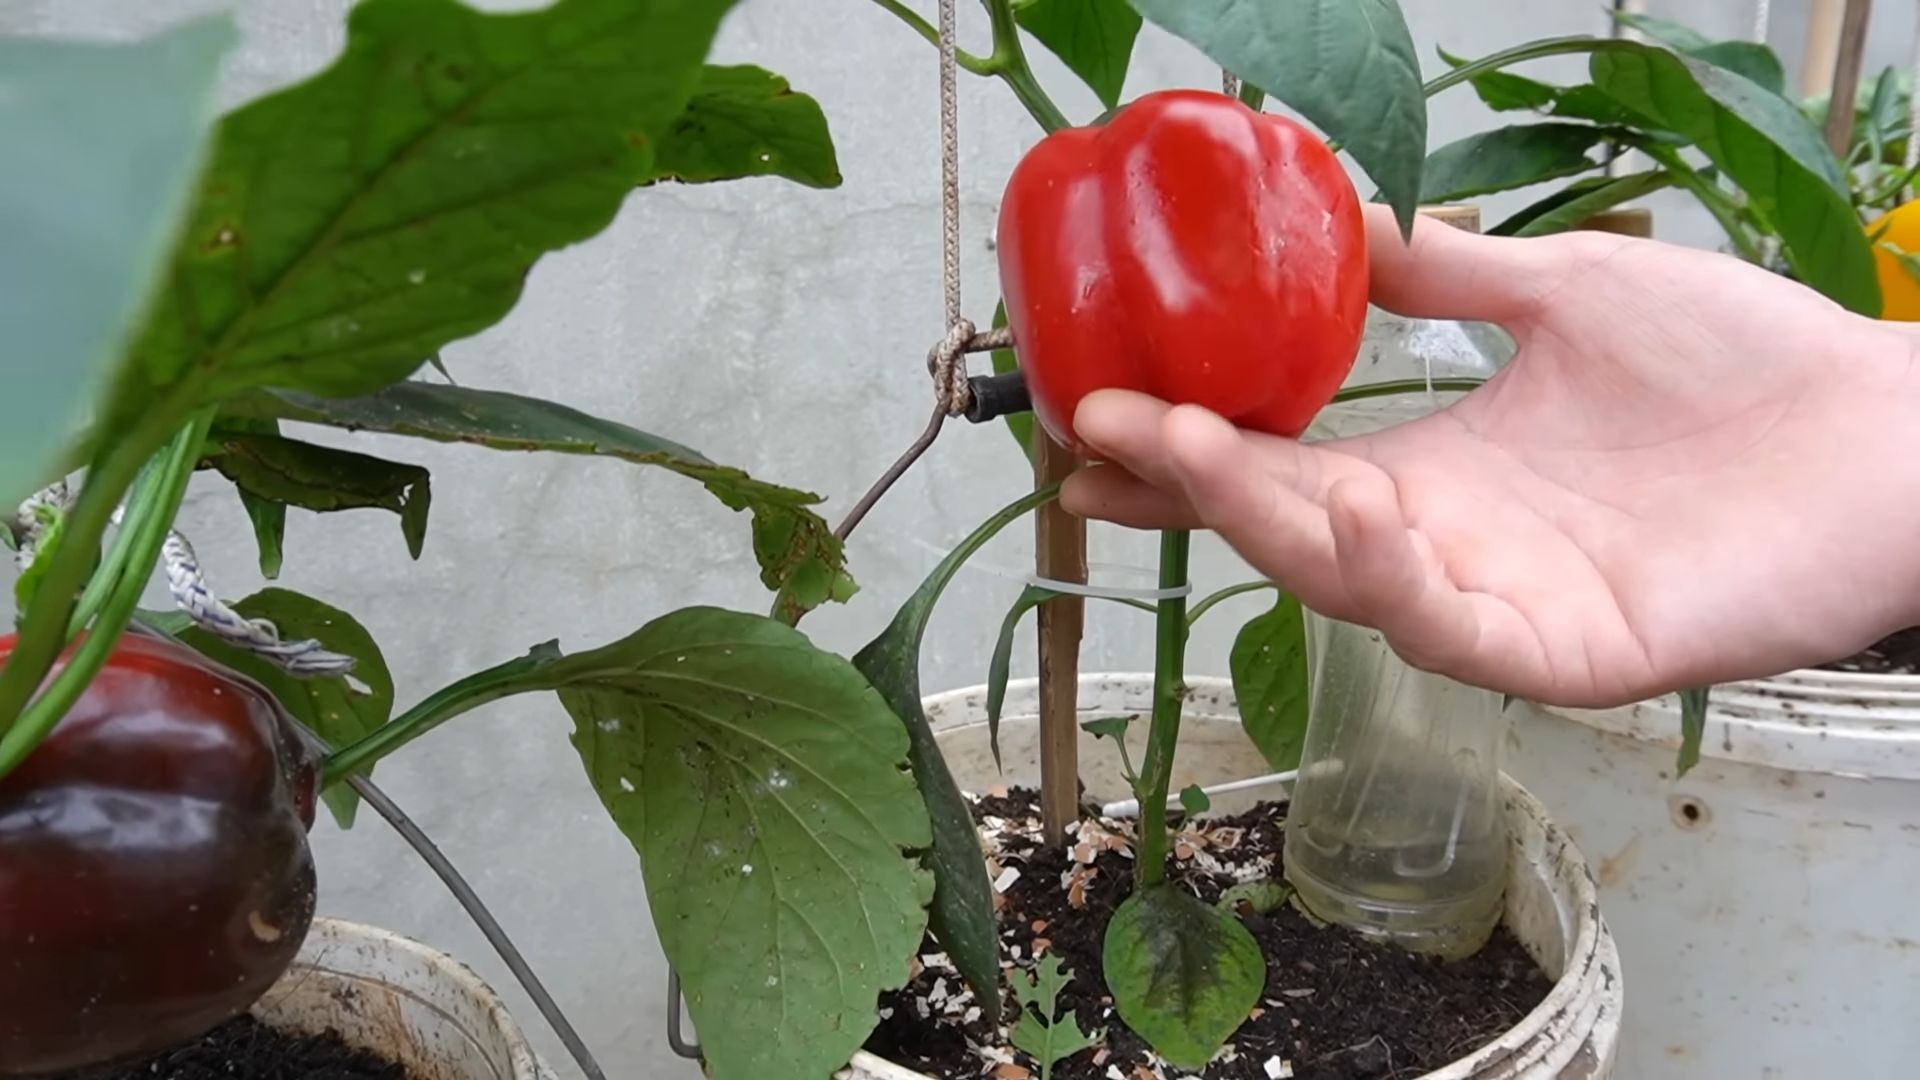
1. Harvest Time: Peppers are typically ready to harvest when they have reached their mature size and color. The exact time will vary depending on the variety. Bell peppers are usually harvested when they are green, red, yellow, or orange. Jalapeños are typically harvested when they are green, but they can also be left to ripen to red for a hotter flavor.
2. Harvesting Technique: Use a sharp knife or scissors to cut the peppers from the plant. Be careful not to damage the plant.
3. Storage: Freshly harvested peppers can be stored in the refrigerator for up to a week. For longer storage, you can freeze, dry, or pickle them.
Troubleshooting: Common Pepper Growing Problems
Even with the best care, you may encounter some problems while growing peppers. Here are a few common issues and how to address them:
* Yellowing Leaves: This can be caused by nutrient deficiencies, overwatering, or underwatering. Check the soil moisture and
Conclusion
So, there you have it! Growing peppers at home, especially using our simple DIY trick, is not just a gardening endeavor; it’s an investment in flavor, freshness, and a rewarding connection with nature. Forget those bland, overpriced peppers from the grocery store. Imagine plucking vibrant, sun-ripened peppers straight from your own garden, bursting with intense flavor and ready to elevate your culinary creations.
This DIY approach, focusing on [mention the specific DIY trick from the main article – assuming it’s something like “using coffee grounds as fertilizer”], offers a sustainable and cost-effective way to nurture your pepper plants. The coffee grounds enrich the soil, providing essential nutrients that promote healthy growth and abundant yields. It’s a win-win: you’re recycling a common household waste product and giving your peppers the boost they need to thrive.
But the beauty of growing peppers at home lies in its versatility. Feel free to experiment with different varieties. From the mildest bell peppers to the fiery habaneros, the possibilities are endless. Consider growing a rainbow of peppers to add visual appeal to your garden and a diverse range of flavors to your dishes. You can also adapt the DIY trick to suit your specific needs and resources. If you don’t have coffee grounds, try using other organic materials like compost or eggshells. The key is to provide your pepper plants with a nutrient-rich environment that supports their growth.
Furthermore, think about the different ways you can use your homegrown peppers. Roast them for a smoky flavor, pickle them for a tangy treat, or dry them for a spicy seasoning. The options are limited only by your imagination. You can even share your bounty with friends and neighbors, spreading the joy of homegrown goodness.
Growing peppers at home is more than just a hobby; it’s a lifestyle. It’s about connecting with nature, nurturing your plants, and enjoying the fruits (or vegetables!) of your labor. It’s about savoring the fresh, vibrant flavors of homegrown peppers and sharing them with those you love.
We wholeheartedly encourage you to try this DIY trick and embark on your own pepper-growing adventure. Don’t be afraid to experiment, learn from your mistakes, and most importantly, have fun! We’re confident that you’ll be amazed by the results.
And once you’ve harvested your first batch of homegrown peppers, we’d love to hear about your experience. Share your tips, tricks, and photos with us in the comments below. Let’s create a community of pepper-growing enthusiasts and inspire others to discover the joys of growing their own food. So, grab your seeds, get your hands dirty, and get ready to experience the unparalleled satisfaction of growing peppers at home!
Frequently Asked Questions (FAQ)
What are the best pepper varieties to grow for beginners?
For beginners, bell peppers are an excellent choice due to their mild flavor and relatively easy cultivation. Jalapenos are also a good option, offering a bit of heat without being overwhelming. Other beginner-friendly varieties include banana peppers, poblano peppers, and sweet Italian peppers. These peppers are generally more resilient and forgiving, making them ideal for those new to pepper gardening. Remember to choose varieties that are well-suited to your local climate and growing conditions.
How often should I water my pepper plants?
Pepper plants need consistent moisture, but overwatering can be detrimental. Water deeply when the top inch of soil feels dry to the touch. The frequency of watering will depend on factors such as weather conditions, soil type, and the size of your plants. During hot, dry periods, you may need to water daily, while during cooler, wetter periods, you may only need to water every few days. Always check the soil moisture before watering to avoid overwatering, which can lead to root rot.
What kind of soil is best for growing peppers?
Peppers thrive in well-draining, fertile soil that is rich in organic matter. A slightly acidic to neutral pH (around 6.0 to 7.0) is ideal. Amend your soil with compost, aged manure, or other organic materials to improve drainage, fertility, and water retention. Avoid heavy clay soils, as they can become waterlogged and suffocate the roots. If you have clay soil, consider growing your peppers in raised beds or containers with a well-draining potting mix.
How much sunlight do pepper plants need?
Pepper plants require at least 6-8 hours of direct sunlight per day to produce abundant yields. Choose a sunny location in your garden where your plants will receive ample sunlight throughout the day. If you live in a particularly hot climate, some afternoon shade may be beneficial to prevent the plants from overheating. Insufficient sunlight can result in stunted growth, reduced flowering, and lower pepper production.
What are some common pests and diseases that affect pepper plants?
Common pests that can affect pepper plants include aphids, spider mites, whiteflies, and pepper weevils. Diseases include blossom-end rot, fungal leaf spot, and verticillium wilt. Regularly inspect your plants for signs of pests or diseases and take action promptly to prevent them from spreading. Use organic pest control methods such as insecticidal soap, neem oil, or beneficial insects. Ensure good air circulation around your plants to prevent fungal diseases. Blossom-end rot is often caused by calcium deficiency, so amend your soil with calcium-rich amendments like bone meal or crushed eggshells.
How do I prevent blossom-end rot in my peppers?
Blossom-end rot is a common problem in peppers, characterized by a dark, sunken spot on the bottom of the fruit. It is typically caused by a calcium deficiency, which can be exacerbated by inconsistent watering. To prevent blossom-end rot, ensure that your soil is well-drained and rich in calcium. Amend your soil with bone meal or crushed eggshells before planting. Water your plants consistently and deeply, avoiding both overwatering and underwatering. Mulching around the plants can help retain moisture and prevent fluctuations in soil moisture levels. You can also use a calcium foliar spray to provide a quick boost of calcium to the plants.
When is the best time to harvest my peppers?
The best time to harvest your peppers depends on the variety and your desired level of ripeness. Bell peppers are typically harvested when they are fully colored and firm to the touch. Jalapenos can be harvested when they are green or allowed to ripen to red for a hotter flavor. Hot peppers generally become hotter as they ripen. Use pruning shears or a sharp knife to cut the peppers from the plant, leaving a small stem attached. Avoid pulling the peppers off the plant, as this can damage the branches.
Can I grow peppers in containers?
Yes, peppers can be successfully grown in containers. Choose a container that is at least 12 inches in diameter and has good drainage holes. Use a high-quality potting mix that is well-draining and rich in nutrients. Place the container in a sunny location that receives at least 6-8 hours of direct sunlight per day. Water regularly and fertilize every few weeks with a balanced fertilizer. Container-grown peppers may need to be watered more frequently than those grown in the ground, especially during hot weather.
How can I overwinter my pepper plants?
In colder climates, you can overwinter your pepper plants indoors to extend their lifespan. Before the first frost, prune the plants back to about 6-8 inches tall and dig them up carefully, preserving as much of the root system as possible. Pot the plants in containers with fresh potting mix and place them in a sunny location indoors. Water sparingly and avoid fertilizing during the winter months. The plants may lose some leaves, but they should start to regrow in the spring. Once the weather warms up, gradually acclimate the plants to outdoor conditions before transplanting them back into the garden.
What are some companion plants for peppers?
Companion planting can benefit pepper plants by attracting beneficial insects, repelling pests, and improving soil health. Good companion plants for peppers include basil, marigolds, onions, garlic, carrots, and tomatoes. Basil repels aphids and whiteflies, while marigolds deter nematodes. Onions and garlic can help to deter pests and improve soil health. Carrots attract beneficial insects that prey on pepper pests. Tomatoes are also good companions, as they share similar growing requirements and can provide shade for pepper plants in hot climates. Avoid planting peppers near fennel, as it can inhibit their growth.
Leave a Comment