
Grow Bok Choy Indoors? Absolutely! Imagine fresh, crisp Bok Choy, bursting with flavor, ready to harvest right from your windowsill, even in the dead of winter. Forget those limp, overpriced greens at the grocery store. I’m going to show you how to cultivate your own thriving Bok Choy patch inside your home, no matter your experience level.
Bok Choy, also known as Chinese cabbage, has been a staple in Asian cuisine for centuries. Its cultivation dates back to the 5th century in China, and it holds a significant place in traditional dishes. Beyond its culinary appeal, it’s packed with vitamins and nutrients, making it a healthy addition to any diet.
But why bother learning to grow Bok Choy indoors? Well, for starters, it gives you complete control over the growing environment. No more worrying about pests, unpredictable weather, or soil quality. Plus, it’s incredibly rewarding to nurture a plant from seed to harvest, knowing you’re providing yourself and your family with fresh, healthy food. In this article, I’ll share my favorite DIY tricks and hacks to ensure your indoor Bok Choy garden flourishes, even if you don’t have a green thumb. Get ready to enjoy the freshest Bok Choy imaginable, all year round!
Grow Your Own Bok Choy Indoors: A Beginner’s Guide
Hey there, fellow plant enthusiasts! Ever thought about growing your own fresh, crisp bok choy right in your kitchen? It’s easier than you might think, and I’m here to guide you through the whole process. Get ready to enjoy delicious, homegrown bok choy, even if you don’t have a garden!
Choosing the Right Bok Choy Variety
First things first, let’s talk about bok choy varieties. While most bok choy will grow indoors, some are better suited than others. Here are a few of my favorites:
* Dwarf Bok Choy (e.g., Toy Choy): These smaller varieties are perfect for indoor containers. They mature quickly and don’t take up a ton of space.
* Baby Bok Choy: Similar to dwarf varieties, baby bok choy is compact and ideal for indoor growing.
* Mei Qing Choi: This variety is known for its mild flavor and smooth, light green leaves. It’s also relatively quick to mature.
Gathering Your Supplies
Before we dive into planting, let’s make sure you have everything you need. Here’s a checklist:
* Bok Choy Seeds: Choose a variety that suits your taste and growing space.
* Containers: Select pots that are at least 6-8 inches deep and wide. Good drainage is crucial!
* Potting Mix: Use a high-quality, well-draining potting mix. Avoid garden soil, as it can compact and hinder drainage.
* Grow Lights (Optional but Recommended): Bok choy needs plenty of light, so grow lights can be a lifesaver, especially during winter months.
* Watering Can or Spray Bottle: For gentle watering.
* Fertilizer (Optional): A balanced liquid fertilizer can help boost growth.
* Seed Starting Tray (Optional): If you prefer to start your seeds indoors before transplanting.
Planting Your Bok Choy Seeds
Now for the fun part! Let’s get those seeds in the soil.
1. Prepare Your Containers: Fill your containers with potting mix, leaving about an inch of space at the top. Gently pat down the soil.
2. Sow the Seeds: Sprinkle the bok choy seeds evenly over the surface of the soil. You can sow them quite densely, as you’ll thin them out later.
3. Cover the Seeds: Lightly cover the seeds with a thin layer of potting mix (about ¼ inch).
4. Water Gently: Use a watering can or spray bottle to gently moisten the soil. Be careful not to wash away the seeds.
5. Provide Light and Warmth: Place your containers in a warm location (around 60-70°F) with plenty of light. If you’re using grow lights, position them a few inches above the soil surface.
6. Keep the Soil Moist: The soil should be consistently moist but not soggy. Check the moisture level daily and water as needed.
Germination and Thinning
Within a week or two, you should start to see tiny bok choy seedlings emerge. This is where the magic happens!
1. Monitor Germination: Keep an eye on your seedlings and ensure they’re getting enough light.
2. Thin the Seedlings: Once the seedlings have a few true leaves (the second set of leaves that appear after the initial seed leaves), it’s time to thin them out. This means removing some of the seedlings to give the remaining ones enough space to grow.
* Choose the strongest, healthiest-looking seedlings and gently snip off the weaker ones at the soil line using small scissors.
* Aim for a spacing of about 2-3 inches between plants for dwarf varieties and 4-6 inches for larger varieties.
3. Transplanting (Optional): If you started your seeds in a seed starting tray, you can transplant the seedlings into individual containers once they have a few true leaves. Be very gentle when transplanting to avoid damaging the roots.
Caring for Your Bok Choy Plants
Now that your bok choy plants are growing, it’s important to provide them with the right care to ensure a bountiful harvest.
1. Light: Bok choy needs at least 6 hours of direct sunlight per day. If you’re growing indoors, grow lights are highly recommended. Position the lights a few inches above the plants and adjust as they grow.
2. Watering: Water your bok choy plants regularly, keeping the soil consistently moist but not waterlogged. Check the soil moisture daily and water when the top inch feels dry.
3. Fertilizing (Optional): If you want to give your bok choy plants a boost, you can fertilize them every 2-3 weeks with a balanced liquid fertilizer diluted to half strength.
4. Temperature: Bok choy prefers cooler temperatures (60-70°F). Avoid exposing your plants to extreme heat or cold.
5. Air Circulation: Good air circulation is important to prevent fungal diseases. Make sure your plants have enough space between them and consider using a small fan to circulate the air.
6. Pest Control: Keep an eye out for pests like aphids, slugs, and cabbage worms. If you spot any pests, you can try hand-picking them off or using an organic insecticide like neem oil.
Harvesting Your Bok Choy
The moment you’ve been waiting for! Harvesting your own homegrown bok choy is incredibly rewarding.
1. Harvest Time: Bok choy is typically ready to harvest in 30-50 days, depending on the variety. You can harvest the entire plant at once or harvest individual leaves as needed.
2. Harvesting Individual Leaves: To harvest individual leaves, simply cut them off at the base of the plant using a sharp knife or scissors. Start with the outer leaves and work your way inwards. This allows the plant to continue producing new leaves.
3. Harvesting the Entire Plant: To harvest the entire plant, cut it off at the base of the stem.
4. Storage: Freshly harvested bok choy can be stored in the refrigerator for up to a week. Wrap it loosely in a damp paper towel and place it in a plastic bag.
Troubleshooting Common Problems
Even with the best care, you might encounter a few challenges along the way. Here are some common problems and how to address them:
* Yellowing Leaves: This could be a sign of overwatering, underwatering, or nutrient deficiency. Check the soil moisture and adjust your watering accordingly. If the problem persists, try fertilizing with a balanced liquid fertilizer.
* Leggy Growth: This usually indicates insufficient light. Make sure your plants are getting enough sunlight or grow light.
* Pest Infestations: Keep an eye out for pests and take action promptly. Hand-picking, insecticidal soap, or neem oil can be effective solutions.
* Bolting (Premature Flowering): Bolting can occur when bok choy is exposed to high temperatures or stress. Try to keep the temperature cool and provide consistent watering.
Enjoying Your Homegrown Bok Choy
Now that you’ve successfully grown your own bok choy, it’s time to enjoy the fruits (or rather, vegetables) of your labor! Bok choy is incredibly versatile and can be used in a variety of dishes. Here are a few ideas:
* Stir-fries: Bok choy is a classic ingredient in stir-fries. Add it to your favorite stir-fry recipe for a healthy and delicious meal.
* Soups: Bok choy adds a mild, slightly sweet flavor to soups. Try adding it to miso soup, chicken noodle soup, or vegetable soup.
* Salads: Baby bok choy can be used in salads. Its tender leaves and mild flavor make it a great addition to any salad.
* Steamed or Sautéed: Simply steam or sauté bok choy with a little garlic and soy sauce for a quick and easy side dish.
* Grilled: Grilling bok choy gives it a slightly smoky flavor. Brush it with olive oil and grill it until tender.
Tips for Success
Here are a few extra tips to help you succeed in growing bok choy indoors:
* Choose the Right Container: Make sure your container has good drainage to prevent root rot.
* Use High-Quality Potting Mix: Avoid using garden soil, as it can compact and hinder drainage.
* Provide Adequate Light: Bok choy needs plenty of light, so use grow lights if necessary.
* Water Regularly: Keep the soil consistently moist but not waterlogged.
* Monitor for Pests: Check your plants regularly for pests and take action promptly.
* Don’t Be Afraid to Experiment: Try different varieties of bok choy and see which ones grow best in your

Conclusion
So, there you have it! Growing Bok Choy indoors is not only achievable, but it’s also a deeply rewarding experience. Forget those limp, overpriced heads of Bok Choy at the grocery store. Imagine stepping into your kitchen and harvesting crisp, vibrant leaves whenever you need them. This DIY trick transforms your windowsill or spare room into a miniature, edible garden, providing you with a constant supply of fresh, nutritious greens.
Why is this a must-try? Because it puts you in control. You control the growing environment, ensuring your Bok Choy is free from pesticides and grown with the utmost care. You control the harvest, picking only what you need and leaving the rest to continue growing. And you control the flavor, enjoying the superior taste of freshly grown produce that hasn’t traveled miles to reach your plate.
Beyond the basic method outlined, there’s plenty of room for experimentation. Try different varieties of Bok Choy, such as Baby Bok Choy for a more delicate flavor or Shanghai Bok Choy for its thicker stems. Play around with different lighting setups. While a sunny windowsill works wonders, supplementing with a grow light can significantly boost your yield, especially during the darker winter months. Consider using different types of growing mediums. While soil is the most common choice, hydroponic systems offer a soilless alternative that can lead to faster growth and higher yields.
Don’t be afraid to get creative with your container choices, either. While standard pots work perfectly well, you can also repurpose old containers like plastic tubs or even buckets. Just make sure they have adequate drainage holes to prevent waterlogging.
But the real magic of growing Bok Choy indoors lies in the connection it fosters with nature. It’s a reminder that even in the heart of a city, we can cultivate our own food and enjoy the simple pleasures of gardening. It’s a chance to slow down, observe the miracle of growth, and appreciate the bounty that the earth provides.
We wholeheartedly encourage you to give this DIY trick a try. It’s easier than you might think, and the rewards are well worth the effort. Once you’ve harvested your first batch of homegrown Bok Choy, you’ll be hooked!
And most importantly, we want to hear about your experience! Share your photos, tips, and challenges in the comments below. Let’s build a community of indoor Bok Choy growers and learn from each other. What growing medium did you find most effective? What lighting setup worked best for you? What delicious recipes did you create with your homegrown Bok Choy? Your insights could help other aspiring gardeners embark on their own indoor growing journey. So, get your hands dirty, embrace the challenge, and discover the joy of growing your own Bok Choy indoors. You won’t regret it!
Frequently Asked Questions (FAQ)
What is the best time of year to start growing Bok Choy indoors?
You can start growing Bok Choy indoors at any time of year! Because you’re controlling the environment, you’re not limited by seasonal changes. However, if you’re relying solely on natural light, you might find that growth is slower during the winter months. Supplementing with a grow light can help overcome this challenge and ensure a consistent harvest year-round. Starting seeds indoors in late summer or early fall is a great way to have a continuous supply of Bok Choy throughout the winter.
How much light does Bok Choy need when grown indoors?
Bok Choy thrives in bright light. Ideally, it needs at least 6 hours of direct sunlight per day. If you don’t have a sunny windowsill, you can supplement with a grow light. Fluorescent or LED grow lights are both excellent options. Position the light a few inches above the plants and keep it on for 12-14 hours per day. Watch your plants closely for signs of insufficient light, such as leggy growth or pale leaves.
What kind of soil should I use for growing Bok Choy indoors?
Bok Choy prefers well-draining, fertile soil. A good potting mix specifically formulated for vegetables is an excellent choice. You can also create your own mix by combining equal parts of potting soil, compost, and perlite or vermiculite. The compost will provide essential nutrients, while the perlite or vermiculite will improve drainage. Avoid using garden soil, as it can be too heavy and may contain pests or diseases.
How often should I water my indoor Bok Choy plants?
Water your Bok Choy plants regularly, keeping the soil consistently moist but not waterlogged. Check the soil moisture by sticking your finger about an inch into the soil. If it feels dry, it’s time to water. Water deeply, allowing the excess water to drain out of the bottom of the pot. Avoid getting the leaves wet, as this can increase the risk of fungal diseases. During the warmer months, you may need to water more frequently.
How long does it take for Bok Choy to grow indoors?
Bok Choy is a relatively fast-growing vegetable. From seed to harvest, it typically takes about 30-45 days. You can start harvesting the outer leaves when they are about 4-6 inches long. This allows the plant to continue producing new leaves. For a full head of Bok Choy, wait until it reaches the desired size, usually around 6-8 inches tall.
What are some common pests and diseases that affect indoor Bok Choy?
While growing Bok Choy indoors reduces the risk of pest and disease problems, it’s still important to be vigilant. Common pests that can affect indoor Bok Choy include aphids, spider mites, and whiteflies. These pests can be controlled with insecticidal soap or neem oil. Fungal diseases, such as powdery mildew, can also occur, especially in humid conditions. Improve air circulation and avoid getting the leaves wet to prevent these diseases.
Can I grow Bok Choy in containers other than pots?
Yes, you can grow Bok Choy in a variety of containers, as long as they have adequate drainage holes. Plastic tubs, buckets, and even repurposed containers like yogurt containers can be used. Just make sure the container is large enough to accommodate the plant’s root system. A container that is at least 6 inches deep and 6 inches wide is generally sufficient.
How do I harvest Bok Choy when growing indoors?
You can harvest Bok Choy in two ways: by harvesting individual leaves or by harvesting the entire head. To harvest individual leaves, simply cut the outer leaves near the base of the plant. This allows the plant to continue producing new leaves. To harvest the entire head, cut the plant at the base, just above the soil line.
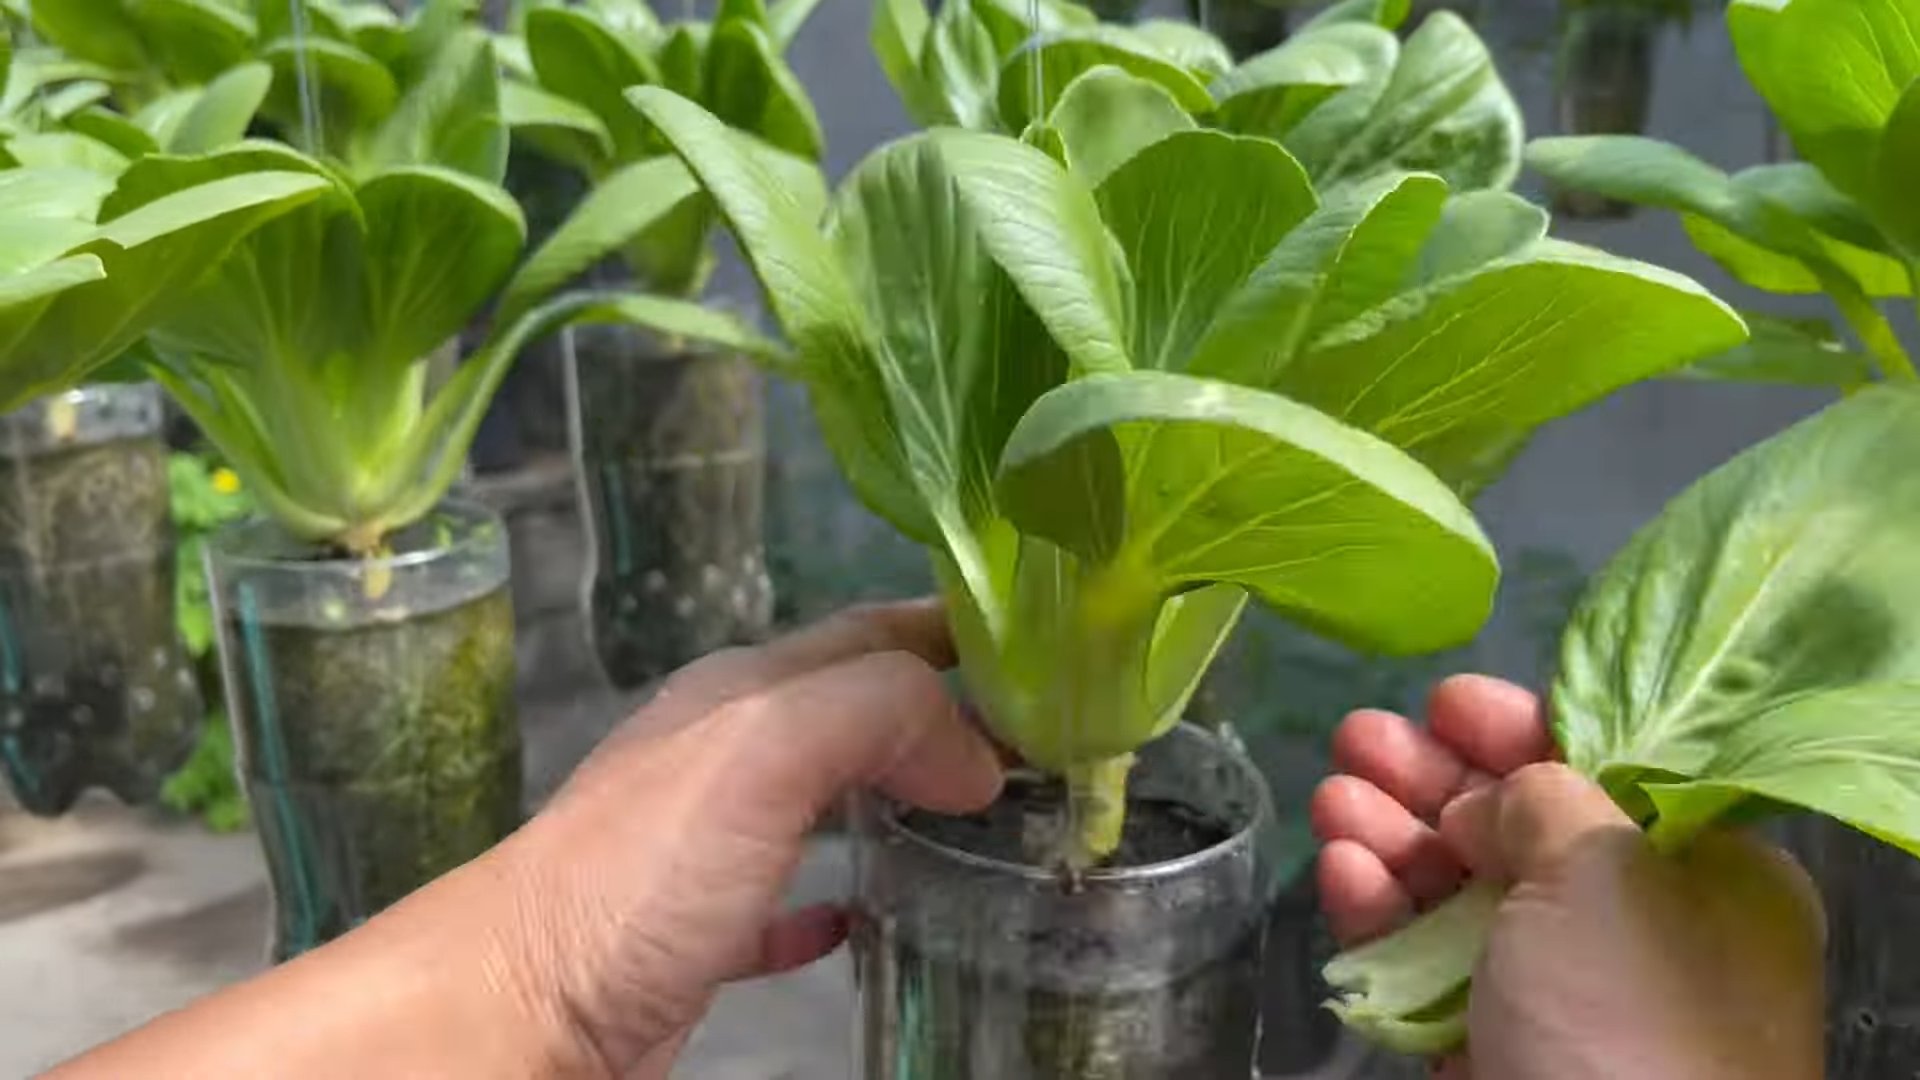
Can I regrow Bok Choy from the base after harvesting?
Yes, you can often regrow Bok Choy from the base after harvesting. Place the base of the Bok Choy in a shallow dish of water, ensuring that the cut end is submerged. Place the dish in a sunny location and change the water every day. After a few days, you should start to see new leaves sprouting from the center of the base. Once the leaves have grown a few inches, you can transplant the base into a pot of soil and continue growing it.
What are some delicious ways to use homegrown Bok Choy?
Homegrown Bok Choy is incredibly versatile and can be used in a variety of dishes. It’s delicious stir-fried with garlic and ginger, added to soups and stews, or used in salads. You can also steam or sauté it as a side dish. The leaves and stems are both edible and have a slightly sweet, peppery flavor. Experiment with different recipes and find your favorite ways to enjoy your homegrown Bok Choy!

Leave a Comment