
Growing Avocados at Home might seem like a tropical dream reserved for sunny California or Florida, but I’m here to tell you that with a few clever tricks and a little patience, you can cultivate your own creamy, delicious avocados, no matter where you live! Forget those rock-hard, overpriced avocados from the grocery store – imagine plucking a perfectly ripe one straight from your own tree!
Avocados have a rich history, dating back thousands of years to ancient Mesoamerica, where they were revered for their nutritional value and even used as symbols of love and fertility. Today, their popularity has exploded worldwide, making them a staple in everything from guacamole to smoothies. But with increasing demand and environmental concerns surrounding commercial avocado farming, growing avocados at home offers a sustainable and rewarding alternative.
Why should you try this DIY project? Well, besides the obvious benefit of fresh, homegrown avocados, it’s incredibly satisfying to nurture a plant from seed to fruit. Plus, it’s a fantastic way to connect with nature, learn about plant life cycles, and even impress your friends with your green thumb. This article will guide you through simple, effective DIY tricks and hacks to successfully grow your own avocado tree, even if you’re a complete beginner. Let’s get started!
Growing Avocados at Home: My DIY Guide for Beginners
Hello plant friends! Have you ever wondered what it would be like to grow your own avocados? I was also curious and embarked on this adventure. And you know what? It’s not as hard as you might think! In this article, I’ll share my experiences and give you a detailed guide on how to grow your own avocado plants at home. Let’s get started!
What you’ll need: The Ingredients for Your Avocado Success
Before we begin, here is a list of the things you’ll need:
- An avocado: A ripe avocado from the supermarket is best. The riper, the better!
- Toothpicks: To hold the pit above water.
- A glass or a cup: Large enough to hold the pit, but not so large that it falls in.
- Water: Fresh, clean water.
- A flowerpot: Once the roots have grown.
- Potting soil: Well-draining potting soil.
- Patience: The most important thing of all!
The Preparation: Getting the Avocado Pit to Sprout
This step is crucial for success. Here’s how I do it:
- Enjoy the avocado: First, you have to eat the avocado! Enjoy the delicious flesh and carefully save the pit.
- Clean the pit: Rinse the pit thoroughly under running water. Remove all fruit residue, as it can cause mold.
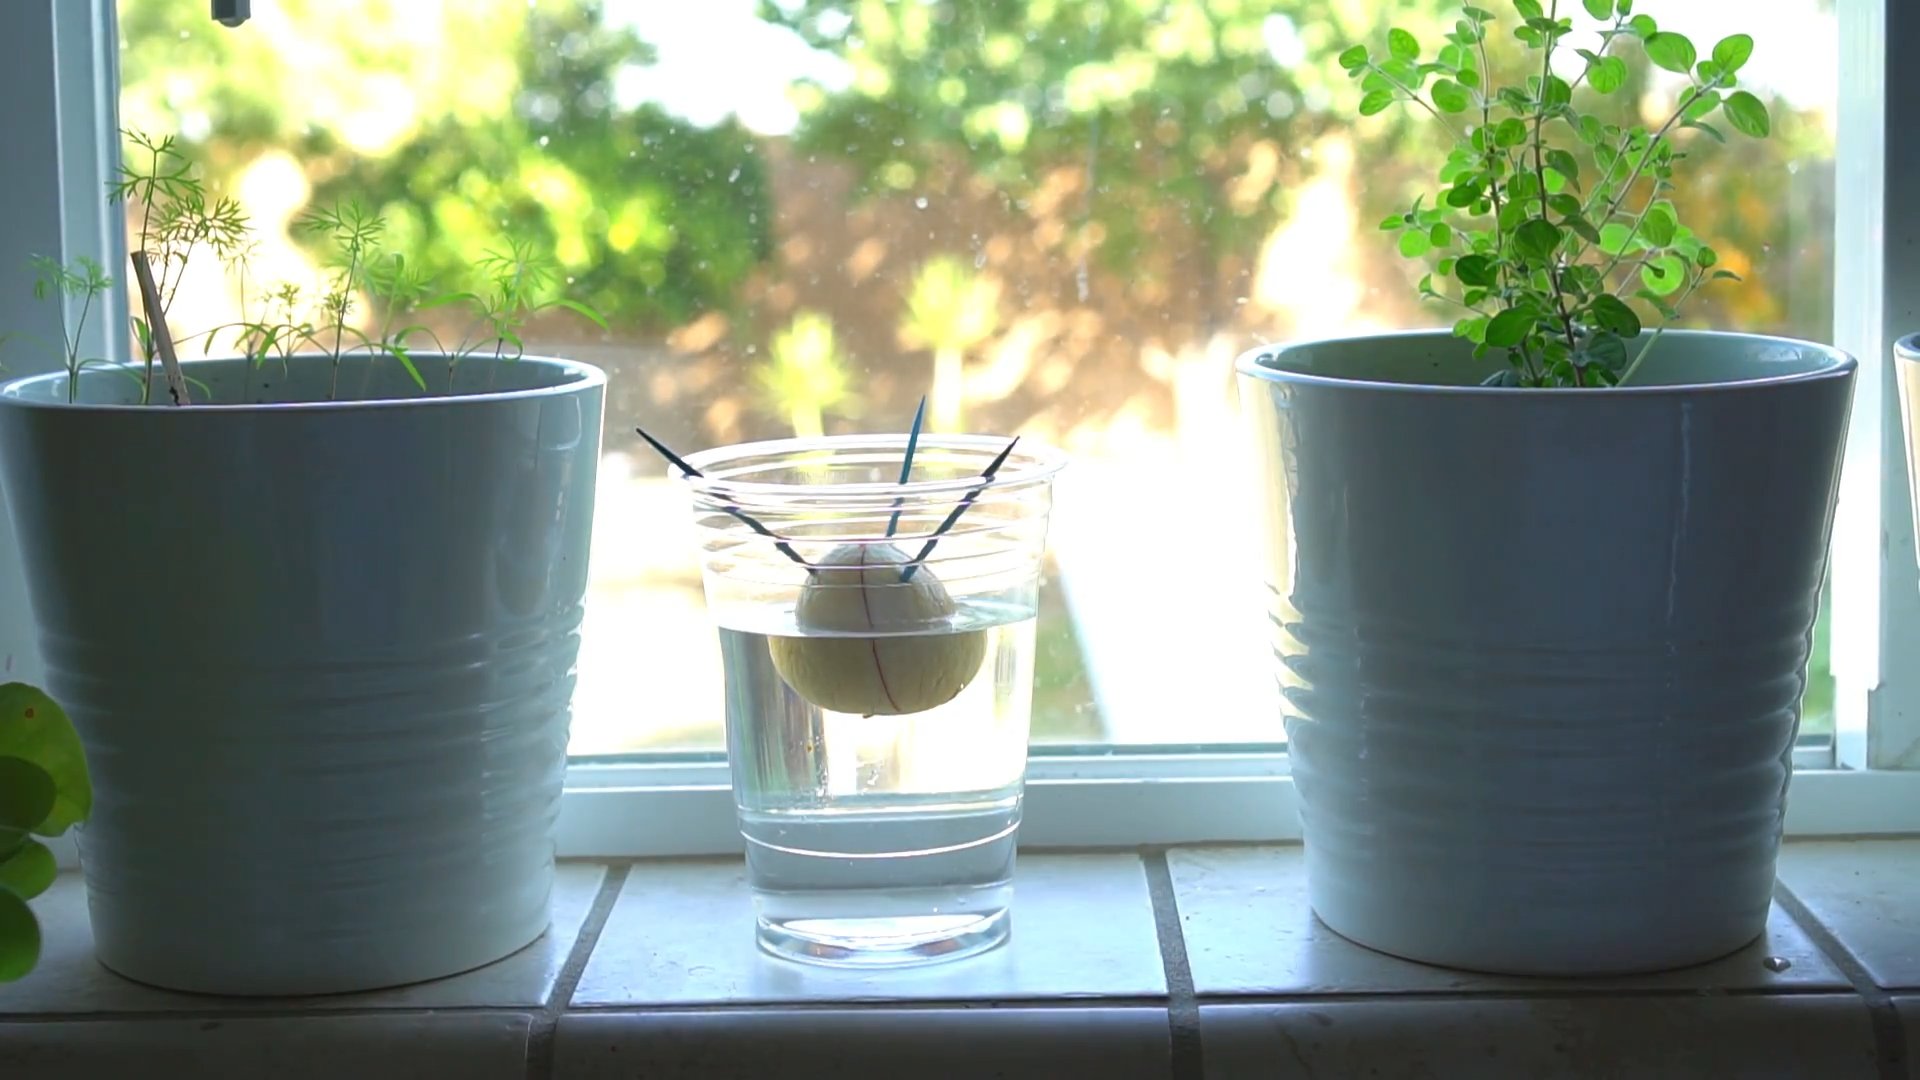
- Insert toothpicks: Insert four toothpicks evenly into the pit. They should be placed about midway up the pit. Be careful not to pierce the pit too deeply.
- Place the pit in water: Fill the glass or cup with water. Place the pit with the toothpicks on the rim of the glass so that the bottom half of the pit is in the water. The tip of the pit should remain dry.
- Be patient: Place the glass in a warm, bright spot, but not in direct sunlight. Change the water every one to two days to keep it clean.
Germination: Waiting for the Magic
Now the waiting begins. It can take several weeks or even months for the pit to sprout. Here are some things you should look out for:
- Observe: Watch for cracks in the outer layer of the pit. That’s a good sign!
- Roots: After some time, small roots should grow from the bottom part of the pit.
- Stem: Finally, a small stem will sprout from the tip of the pit.
- Stay patient: Sometimes it takes longer than expected. Don’t give up!
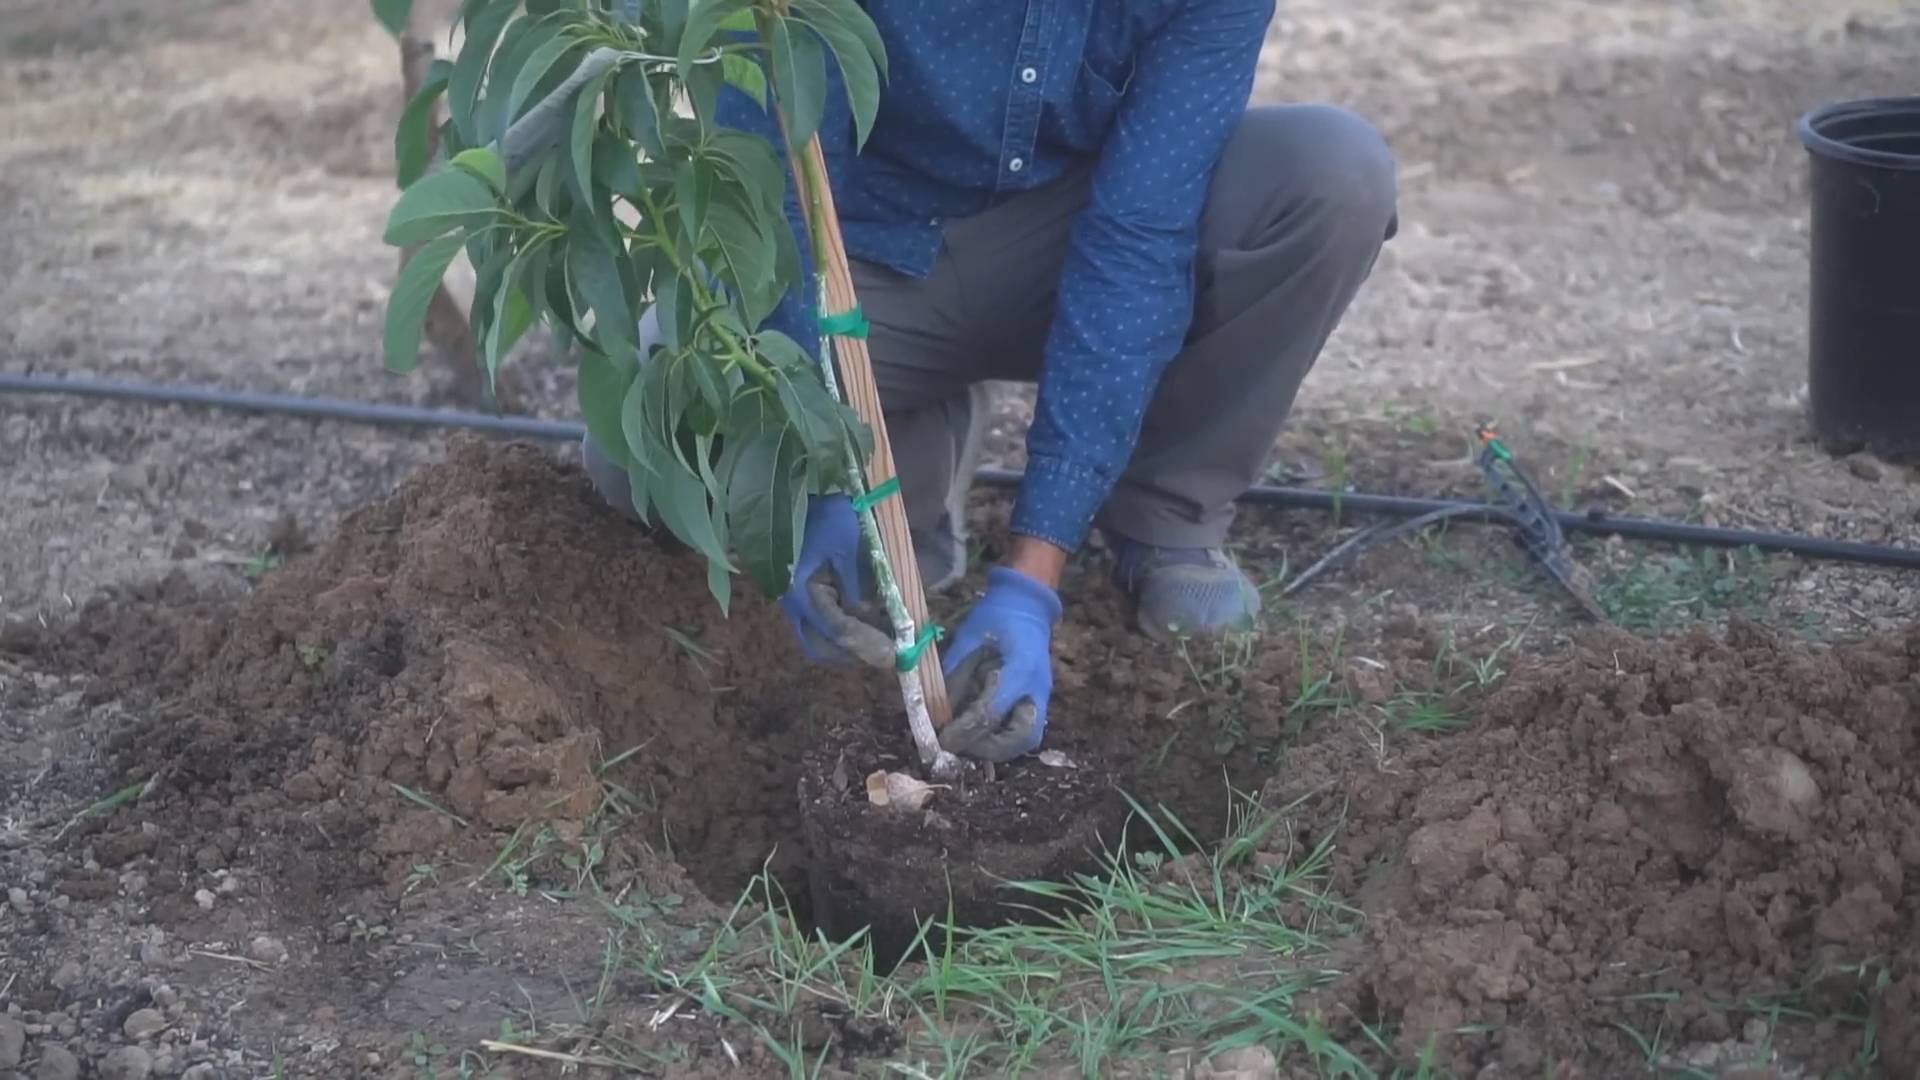
Transplanting: A New Home for Your Avocado
Once the roots are about 5-8 cm (2-3 inches) long and the stem has a few leaves, it’s time to transplant the avocado into a pot.
- Prepare the pot: Choose a pot with a diameter of about 15-20 cm (6-8 inches). Fill it with well-draining potting soil.
- Plant the avocado: Make a hole in the soil large enough to accommodate the roots. Carefully remove the pit from the water and take out the toothpicks. Place the pit in the hole and cover the roots with soil. Leave the top half of the pit exposed.
- Water: Water the avocado thoroughly until water runs out of the pot’s drainage hole.
- Location: Place the pot in a bright, warm spot, but not in direct sunlight.
The Care: Making Your Avocado Happy
Now that your avocado is in a pot, it’s important to care for it properly.
- Watering: Water the avocado regularly, but avoid waterlogging. The soil should be moist, but not wet. Let the top layer of soil dry out slightly between waterings.
- Fertilizing: Fertilize the avocado every few weeks with a liquid houseplant fertilizer. Follow the instructions on the packaging.
- Pruning: If the stem gets too long and thin, you can prune it to encourage growth. Simply cut the stem just above a leaf node.
- Repotting: As the avocado grows larger, you will need to repot it into a bigger pot.
- Pests: Watch out for pests like spider mites or aphids. If you spot pests, treat the avocado with a suitable insecticide.
- Light: Avocados love light! A south-facing window is ideal. If you don’t have enough natural light, you can use a grow light.
- Temperature: Avocados prefer warm temperatures between 18 and 24 degrees Celsius (65-75°F). Avoid drafts and sudden temperature changes.
Common Problems and Solutions
Problems can also arise with avocado cultivation. Here are some common problems and how you can solve them:
- Leaves turning brown: This can be caused by too much or too little water, too much sun, or too little humidity. Adjust your watering habits, move the avocado to a different location, or increase the humidity.
- No growth: This can be caused by too little light, not enough fertilizer, or a pot that is too small. Move the avocado to a brighter location, fertilize it, or transplant it into a larger pot.
- Pests: Treat the avocado with a suitable insecticide.
Will my avocado ever bear fruit?
That’s the million-dollar question! Avocados grown from pits usually take a very long time to bear fruit—often 5 to 10 years, or even longer. Furthermore, it is not guaranteed that the fruit your avocado bears will taste the same as the avocado from which you took the pit. This is because avocados are not “true to seed” when grown from pits.
If you want to ensure that your avocado bears fruit and that the fruit tastes good, you should buy a grafted avocado plant. These plants have been grafted onto a specific variety and usually bear fruit earlier.
Conclusion
So, there you have it! Growing avocados at home, while requiring patience and a little dedication, is an incredibly rewarding experience. It’s more than just a fun project; it’s about connecting with nature, understanding the life cycle of a plant, and ultimately, enjoying the fruits (literally!) of your labor. We’ve walked you through the entire process, from sprouting the pit to nurturing a young tree, and hopefully, we’ve demystified the process enough to make you feel confident in giving it a try.
But why is this DIY trick a must-try? Beyond the satisfaction of growing your own food, consider the environmental benefits. Homegrown avocados reduce your carbon footprint by eliminating the transportation and packaging associated with store-bought produce. Plus, you have complete control over the growing process, ensuring your avocado tree is free from harmful pesticides and chemicals.
And the possibilities don’t stop there! Once you’ve mastered the basics, you can experiment with different avocado varieties. Perhaps you’d like to try growing a Hass avocado, known for its creamy texture and rich flavor, or maybe a Fuerte avocado, prized for its thin skin and nutty taste. You can also explore different grafting techniques to potentially speed up the fruiting process or even create a tree with multiple avocado varieties.
Don’t be afraid to get creative with your growing environment, too. While we’ve focused on growing avocados in pots, you can eventually transplant your tree into the ground if you live in a suitable climate. Or, if you’re short on space, consider training your avocado tree as an espalier, a technique that involves pruning and training the branches to grow flat against a wall or fence. This not only saves space but also adds a unique aesthetic element to your garden.
Growing avocados at home is not just about the end result; it’s about the journey. It’s about learning, experimenting, and connecting with the natural world. It’s about the pride you’ll feel when you finally harvest your first homegrown avocado.
We strongly encourage you to give this DIY project a try. It may seem daunting at first, but with a little patience and the right guidance, you’ll be well on your way to enjoying homegrown avocados. And most importantly, we want to hear about your experience! Share your successes, your challenges, and your tips with us and the rest of the community. Let’s learn and grow together! Post pictures of your avocado seedlings, share your favorite avocado recipes, and let us know what you’ve learned along the way. Your experiences can inspire and help others embark on their own avocado-growing adventures.
Frequently Asked Questions (FAQ)
Q: How long does it take for an avocado tree grown from a pit to produce fruit?
A: This is probably the most common question, and unfortunately, the answer isn’t a simple one. Avocado trees grown from seed can take anywhere from 5 to 13 years to produce fruit. This is because they are not genetically identical to the parent tree and may not inherit the same fruiting characteristics. Grafting a branch from a known fruiting tree onto your seedling can significantly reduce this time, potentially yielding fruit in 2-3 years. Grafting ensures you’re propagating a tree with proven fruiting capabilities.
Q: What kind of soil is best for growing avocados?
A: Avocados thrive in well-draining soil that is slightly acidic to neutral (pH 6.0-7.0). They are susceptible to root rot if the soil is constantly waterlogged. A good potting mix for avocados should consist of a blend of potting soil, perlite, and sand to improve drainage. Avoid heavy clay soils that retain too much moisture. When planting in the ground, amend the soil with organic matter like compost to improve drainage and fertility.
Q: How much sunlight do avocado trees need?
A: Avocado trees need at least 6 hours of direct sunlight per day to thrive. Young seedlings can be more sensitive to intense sunlight, so it’s best to provide them with some afternoon shade, especially during the hottest months. As the tree matures, it can tolerate more direct sunlight. If you’re growing your avocado tree indoors, place it near a sunny window or supplement with grow lights.
Q: How often should I water my avocado tree?
A: Watering frequency depends on several factors, including the size of the pot, the type of soil, and the climate. Generally, you should water your avocado tree when the top inch of soil feels dry to the touch. Avoid overwatering, as this can lead to root rot. During the growing season (spring and summer), you may need to water more frequently than during the dormant season (fall and winter). Ensure the pot has drainage holes to prevent water from accumulating at the bottom.
Q: What are some common pests and diseases that affect avocado trees?
A: Avocado trees can be susceptible to various pests and diseases, including aphids, spider mites, scale, and root rot. Regularly inspect your tree for signs of infestation or disease. Aphids and spider mites can be controlled with insecticidal soap or neem oil. Scale can be removed manually or treated with horticultural oil. Root rot is caused by overwatering and poor drainage. To prevent root rot, ensure your soil is well-draining and avoid overwatering.
Q: Can I grow an avocado tree indoors year-round?
A: Yes, you can grow an avocado tree indoors year-round, but it requires some extra care. Ensure your tree receives adequate sunlight, either from a sunny window or grow lights. Maintain a consistent temperature and humidity level. You may also need to hand-pollinate the flowers to encourage fruit production, as indoor environments lack the natural pollinators found outdoors. Even with the best care, indoor avocado trees may not produce as much fruit as those grown outdoors.
Q: How do I prune my avocado tree?
A: Pruning is essential for maintaining the shape and health of your avocado tree. Prune your tree in late winter or early spring, before new growth begins. Remove any dead, damaged, or crossing branches. You can also prune to control the size and shape of the tree. When pruning, make clean cuts at a 45-degree angle, just above a node or bud. Avoid pruning too heavily, as this can stress the tree.
Q: What kind of fertilizer should I use for my avocado tree?
A: Avocado trees benefit from regular fertilization, especially during the growing season. Use a balanced fertilizer specifically formulated for avocado trees or citrus trees. Follow the instructions on the fertilizer label for application rates. Avoid over-fertilizing, as this can damage the roots. You can also amend the soil with organic matter like compost to provide essential nutrients.
Q: My avocado tree is not producing fruit. What could be the problem?
A: There are several reasons why your avocado tree may not be producing fruit. As mentioned earlier, trees grown from seed can take many years to mature and bear fruit. Lack of pollination is another common issue. Avocado trees have a unique flowering pattern that can make pollination challenging. You may need to hand-pollinate the flowers or plant multiple avocado trees to improve pollination rates. Other factors that can affect fruit production include inadequate sunlight, poor soil, and nutrient deficiencies.
Q: How do I know when an avocado is ripe?
A: Determining when an avocado is ripe can be tricky. The best way to tell is to gently squeeze the fruit. A ripe avocado will yield slightly to gentle pressure. You can also check the color of the skin. Some avocado varieties, like Hass, turn dark green or black when ripe. Another method is to remove the small stem at the top of the avocado. If the flesh underneath is green, the avocado is ripe. If it’s brown, the avocado is overripe.
Leave a Comment