
Growing Carrots from Seeds can seem daunting, but trust me, it’s one of the most rewarding experiences a home gardener can have! Imagine pulling vibrant, sweet carrots straight from your own backyard – fresher and tastier than anything you’ll find in the store. I’m here to tell you that with a few simple tricks and a little DIY know-how, you can absolutely achieve a bountiful carrot harvest.
For centuries, carrots have been a staple in diets around the world. From their humble beginnings as wild, pale roots to the vibrant orange varieties we know and love today, carrots have a rich history. Did you know that the orange carrot, the one we most commonly see, was actually cultivated in the Netherlands in the 17th century as a patriotic symbol? Fascinating, right?
But beyond their historical significance, growing carrots from seeds offers a practical solution for anyone looking to eat healthier, save money, and connect with nature. Let’s face it, store-bought carrots can sometimes lack flavor and freshness. Plus, gardening is a fantastic way to relieve stress and get some much-needed vitamin D. This DIY guide will equip you with the essential tips and tricks to successfully cultivate your own carrot patch, even if you’re a complete beginner. So, grab your gardening gloves, and let’s get started!
Growing Carrots from Seeds: A Beginner’s Guide to Sweet Success
Okay, so you want to grow carrots from seeds? Awesome! It’s surprisingly rewarding to pull those vibrant orange roots from the ground, especially when you know you grew them yourself. Don’t be intimidated; it’s easier than you think. I’m going to walk you through everything you need to know, from choosing the right seeds to harvesting your crunchy bounty.
Choosing Your Carrot Variety
First things first, let’s talk carrots! There are so many different varieties, and the best one for you will depend on your climate, soil, and personal preference.
* Nantes: These are classic, cylindrical carrots, known for their sweet flavor and smooth texture. They’re a great choice for beginners and do well in a variety of soils.
* Danvers: These are longer and more tapered than Nantes carrots. They’re also very sweet and store well. They’re a good option if you have slightly heavier soil.
* Chantenay: These are shorter, thicker carrots, perfect for heavier or rocky soils. They’re also very flavorful.
* Imperator: These are the long, slender carrots you often see in the grocery store. They require loose, well-drained soil to grow properly.
* Novelty Carrots: Don’t forget the fun ones! You can find carrots in purple, yellow, white, and even red. They add a splash of color to your garden and your plate.
Consider your growing season length too. Some varieties mature faster than others. Check the seed packet for the “days to maturity” information.
Preparing the Soil: The Key to Carrot Success
Carrots need loose, well-drained soil to grow long and straight. Rocky or compacted soil will result in short, forked, or misshapen carrots. This is probably the most crucial step, so don’t skip it!
* Soil Testing: Ideally, you should test your soil to determine its pH and nutrient levels. Carrots prefer a slightly acidic soil with a pH between 6.0 and 6.8. You can buy a soil testing kit at most garden centers.
* Loosening the Soil: Use a garden fork or tiller to loosen the soil to a depth of at least 12 inches. Remove any rocks, stones, or debris.
* Adding Organic Matter: Incorporate plenty of compost or well-rotted manure into the soil. This will improve drainage, aeration, and fertility. I usually add a generous layer, about 2-3 inches thick.
* Creating Raised Beds (Optional): If you have heavy clay soil, consider growing your carrots in raised beds. This will improve drainage and prevent the roots from becoming waterlogged.
* Avoiding Fresh Manure: Don’t use fresh manure, as it can cause forked roots. Make sure it’s well-rotted.
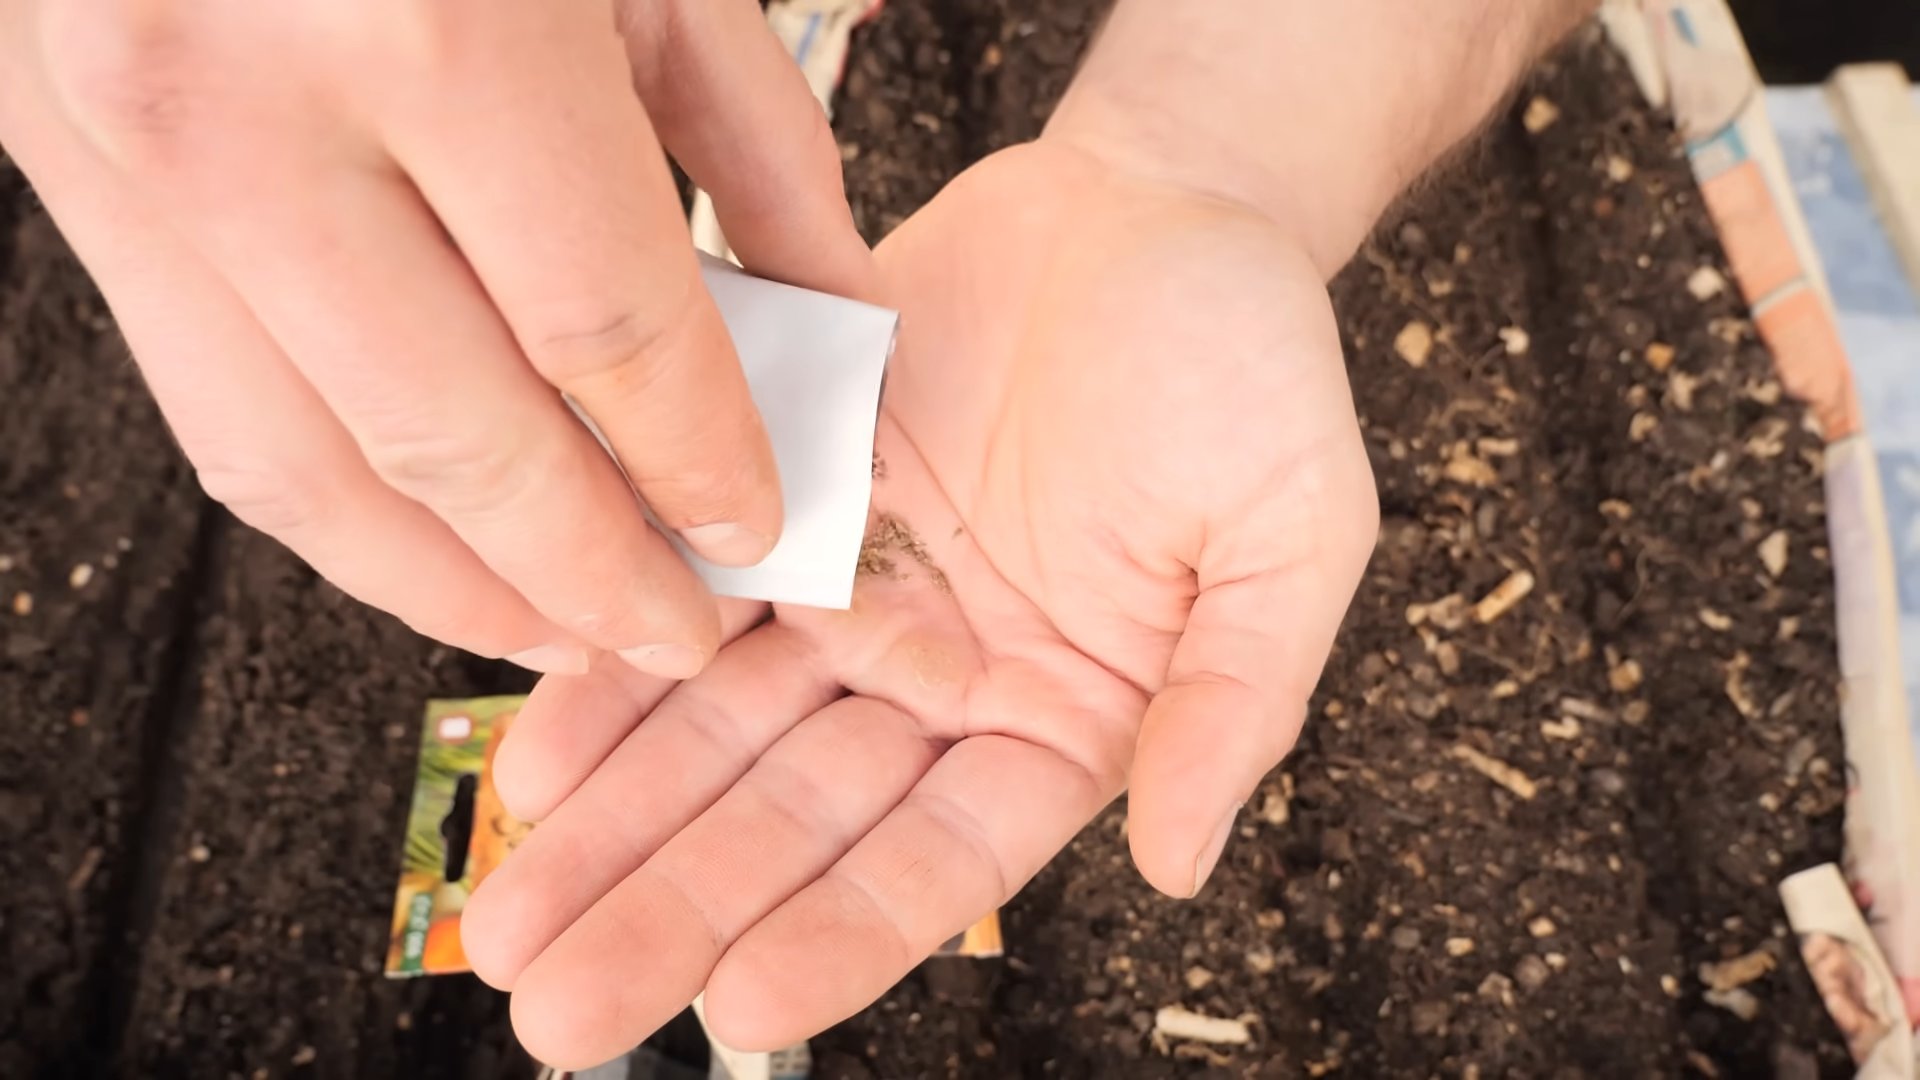
Sowing the Seeds: Getting Started
Carrot seeds are tiny, which can make them a bit tricky to sow evenly. But don’t worry, I’ve got some tips for you!
1. Timing is Everything: Carrots are a cool-season crop, so you can plant them in early spring or late summer. For a spring crop, sow the seeds 2-3 weeks before the last expected frost. For a fall crop, sow the seeds 10-12 weeks before the first expected frost. Check your local frost dates to be sure.
2. Making the Rows: Use a hoe or trowel to create shallow furrows in the soil, about 1/4 to 1/2 inch deep. Space the rows about 12-18 inches apart.
3. Sowing the Seeds: Sprinkle the seeds evenly into the furrows. Carrot seeds are notoriously small, so it’s easy to sow them too thickly. Try mixing the seeds with sand or coffee grounds to help you spread them more evenly. I find this really helps!
4. Covering the Seeds: Gently cover the seeds with a thin layer of soil.
5. Watering: Water the soil gently but thoroughly. You want to keep the soil consistently moist until the seeds germinate. A gentle spray from a watering can or hose is best to avoid washing away the seeds.
6. Marking the Rows: Label your rows with the carrot variety and planting date. This will help you keep track of what you’ve planted and when to expect a harvest.
Thinning the Seedlings: Giving Them Room to Grow
This is a crucial step that many beginners overlook. If you don’t thin your carrot seedlings, they’ll be overcrowded and won’t develop properly.
1. When to Thin: Once the seedlings are about 2 inches tall, it’s time to thin them.
2. How to Thin: Carefully pull out the weaker seedlings, leaving the strongest ones spaced about 1-2 inches apart. You can use small scissors to snip the seedlings at the soil line if you’re worried about disturbing the roots of the remaining plants.
3. Second Thinning (Optional): When the carrots are about 4-5 inches tall, you can thin them again, leaving them spaced about 3-4 inches apart. This will give them even more room to grow.
4. Water After Thinning: Water the remaining seedlings after thinning to help them settle in.
Watering and Weeding: Keeping Your Carrots Happy
Carrots need consistent moisture to thrive. They also don’t like competition from weeds.
* Watering: Water your carrots regularly, especially during dry spells. Aim for about 1 inch of water per week. Water deeply and less frequently, rather than shallowly and often. This encourages the roots to grow deeper.
* Weeding: Keep the area around your carrots free of weeds. Weeds compete with carrots for water, nutrients, and sunlight. Hand-pull weeds carefully to avoid disturbing the carrot roots.
* Mulching: Apply a layer of mulch around your carrots to help retain moisture, suppress weeds, and regulate soil temperature. Straw, hay, or shredded leaves are all good options.
Fertilizing: Giving Them a Boost
Carrots are not heavy feeders, but they will benefit from a light feeding of fertilizer.
* When to Fertilize: Fertilize your carrots about 3-4 weeks after they emerge.
* What to Use: Use a balanced fertilizer with equal amounts of nitrogen, phosphorus, and potassium (e.g., 10-10-10). You can also use a fertilizer specifically formulated for root vegetables.
* How to Apply: Follow the instructions on the fertilizer package. Generally, you’ll want to sprinkle the fertilizer around the base of the plants and then water it in.
* Avoid Over-Fertilizing: Too much nitrogen can cause the carrots to develop excessive foliage at the expense of root growth.
Pest and Disease Control: Protecting Your Crop
Carrots are generally pest-resistant, but there are a few things to watch out for.
* Carrot Rust Fly: This is a common pest that can damage carrot roots. The larvae tunnel into the roots, causing them to become discolored and unmarketable. Cover your carrots with row covers to prevent the flies from laying their eggs.
* Nematodes: These microscopic worms can also damage carrot roots. Rotate your crops to prevent nematode infestations.
* Leaf Spot Diseases: These fungal diseases can cause spots on the carrot leaves. Improve air circulation around the plants and avoid overhead watering to prevent these diseases.
* Companion Planting: Plant carrots with onions, garlic, or rosemary to help deter pests.
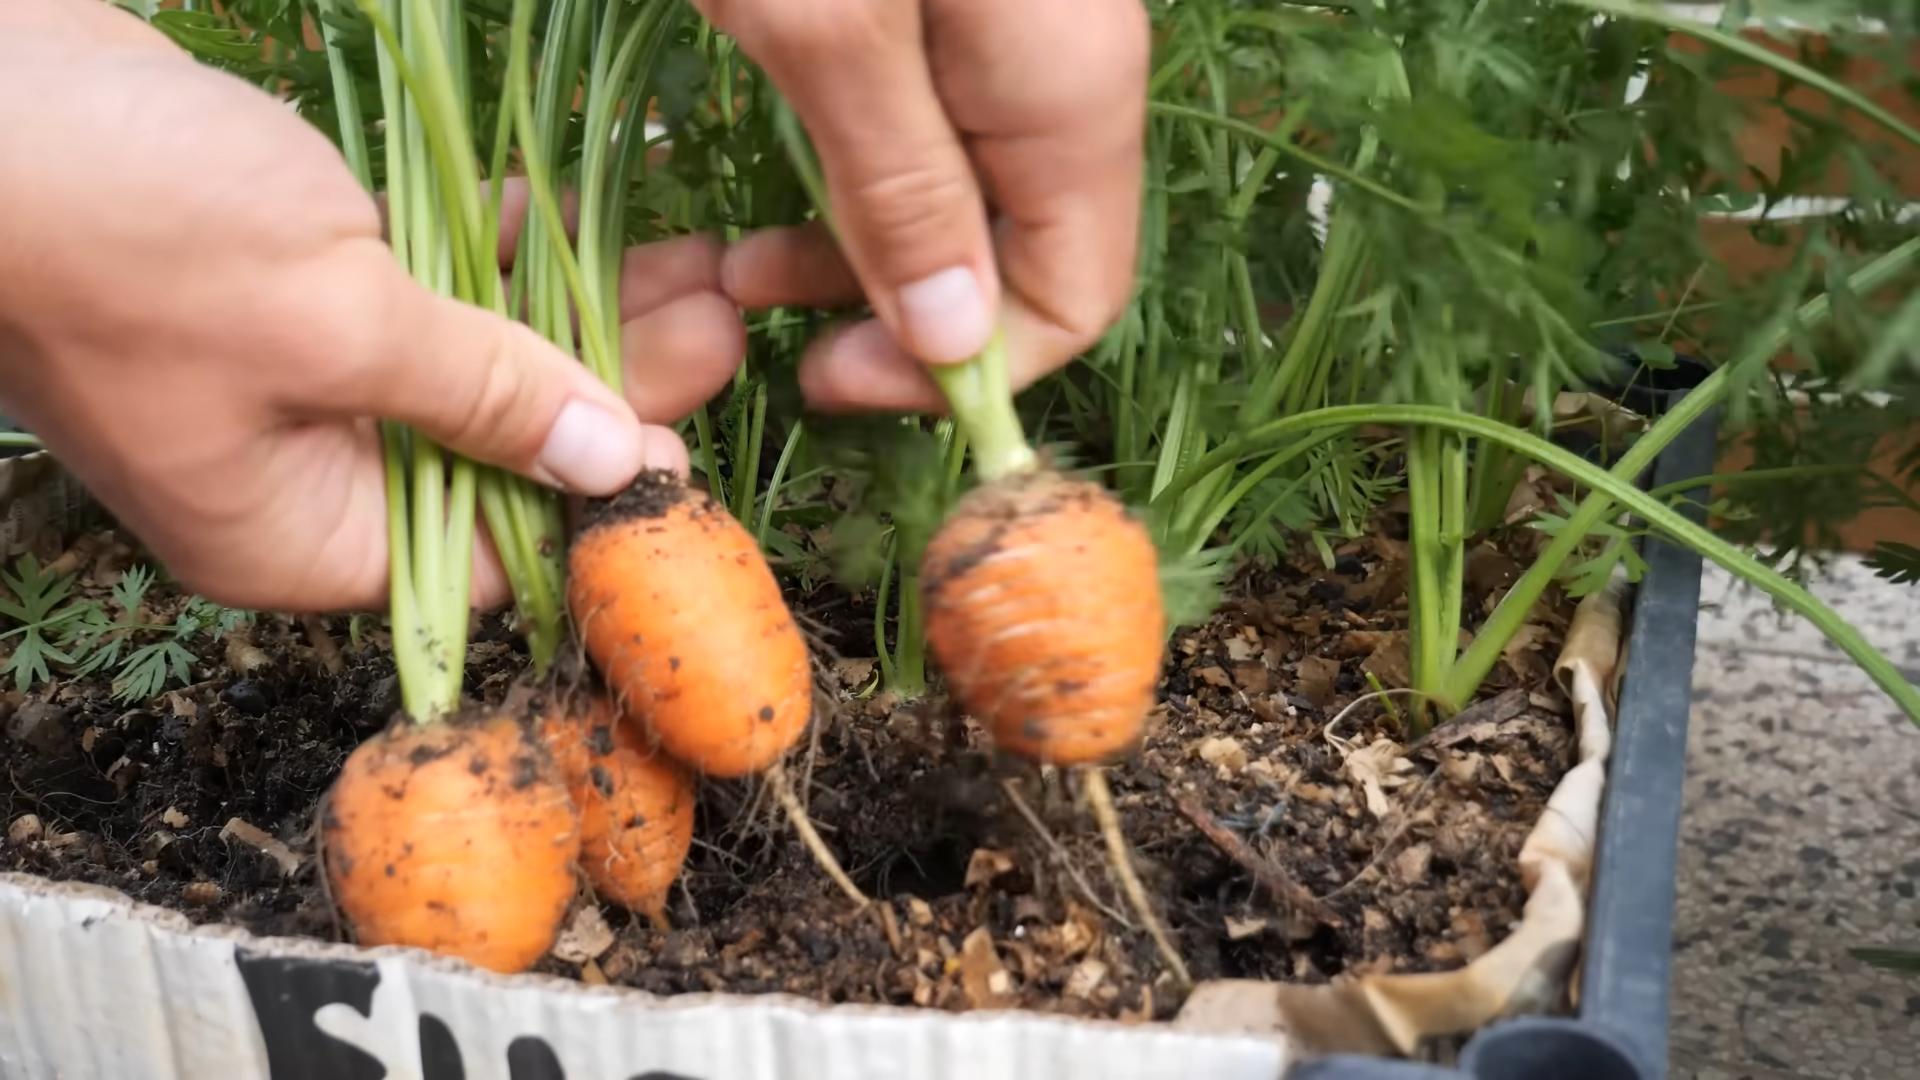
Harvesting: The Sweet Reward
The moment you’ve been waiting for! Harvesting your own carrots is so satisfying.
1. When to Harvest: Carrots are typically ready to harvest 60-80 days after planting, depending on the variety. Check the seed packet for the specific days to maturity.
2. How to Harvest: Gently loosen the soil around the carrots with a garden fork or trowel. Then, grasp the carrot tops firmly and pull straight up. If the carrots are difficult to pull, you may need to loosen the soil further.
3. Washing and Storing: Wash the carrots thoroughly to remove any dirt. Cut off the tops, leaving about 1/2 inch of stem. Store the carrots in the refrigerator in a plastic bag or container. They should keep for several weeks.
4. Enjoy! Now you can enjoy your homegrown carrots in salads, soups, stews, or as a healthy snack.
Troubleshooting: Common Carrot Growing Problems
Even with the best planning, things can sometimes go wrong. Here are some common problems and how to fix them:
* Forked Roots: This is usually caused by rocky or compacted soil. Make sure to prepare the soil properly before planting.
* Short, Stunted Roots: This can be caused by poor soil fertility, overcrowding, or pests. Thin your seedlings
Conclusion
So, there you have it! Growing carrots from seeds might seem a little daunting at first, but with a little patience and these simple tricks, you’ll be harvesting sweet, crunchy carrots from your own garden in no time. We’ve covered everything from seed selection and soil preparation to thinning and pest control, giving you a comprehensive guide to success.
Why is this DIY approach a must-try? Because it’s incredibly rewarding! There’s nothing quite like the satisfaction of pulling a vibrant orange carrot from the earth, knowing you nurtured it from a tiny seed. Plus, homegrown carrots often taste sweeter and more flavorful than store-bought varieties. You also have complete control over what goes into your garden, ensuring your carrots are free from harmful pesticides and chemicals.
But the benefits don’t stop there. Growing your own carrots is also a fantastic way to save money, reduce your carbon footprint, and connect with nature. It’s a fun and educational activity for the whole family, teaching children about the importance of healthy eating and sustainable living.
Looking for variations? Consider experimenting with different carrot varieties! ‘Nantes’ carrots are known for their cylindrical shape and sweet flavor, while ‘Chantenay’ carrots are shorter and sturdier, making them ideal for heavier soils. You can even try growing colorful carrots like purple, yellow, or white varieties for a visually stunning harvest.
Another variation is to try succession planting. Sow a small batch of carrot seeds every few weeks to ensure a continuous supply of fresh carrots throughout the growing season. This is especially useful if you have a small garden or a large family to feed.
Don’t be afraid to get creative with your carrot growing! Try companion planting with herbs like rosemary or sage to deter pests, or interplant with fast-growing crops like radishes to maximize space. The possibilities are endless!
We strongly encourage you to give this DIY trick a try. Even if you’ve never grown anything before, you’ll be surprised at how easy and enjoyable it can be. Remember to follow the steps outlined in this guide, and don’t be afraid to experiment and learn from your mistakes.
And most importantly, we want to hear about your experience! Share your photos, tips, and stories in the comments below. Let us know what worked for you, what challenges you faced, and what delicious recipes you created with your homegrown carrots. Your feedback will help other gardeners succeed and inspire them to embark on their own carrot-growing adventures.
Growing carrots from seeds is more than just a gardening project; it’s a journey of discovery, a celebration of nature, and a delicious way to nourish your body and soul. So grab your seeds, get your hands dirty, and get ready to enjoy the sweet taste of success!
Frequently Asked Questions (FAQ)
What is the best time of year to plant carrot seeds?
The best time to plant carrot seeds depends on your climate. In general, carrots are a cool-season crop, so they thrive in temperatures between 60°F and 70°F (15°C and 21°C). For most regions, this means planting in early spring or late summer/early fall.
* **Spring Planting:** Plant carrot seeds 2-3 weeks before the last expected frost. This will give them enough time to germinate and establish before the weather gets too hot.
* **Fall Planting:** Plant carrot seeds 10-12 weeks before the first expected frost. This will allow them to mature before the ground freezes.
If you live in a warmer climate, you can plant carrots throughout the winter, as long as the soil doesn’t freeze.
How deep should I plant carrot seeds?
Carrot seeds are very small, so they should be planted shallowly. Sow them about ¼ to ½ inch (0.6 to 1.3 cm) deep. Gently cover the seeds with soil and water thoroughly.
How long does it take for carrot seeds to germinate?
Carrot seeds can be slow to germinate, typically taking 1-3 weeks. Keep the soil consistently moist during this time. Covering the seedbed with a piece of burlap or shade cloth can help retain moisture and speed up germination. Remove the covering once the seedlings emerge.
Why are my carrots small and stunted?
There are several reasons why your carrots might be small and stunted:
* **Crowding:** Carrots need plenty of space to grow. Thin your seedlings to 2-3 inches (5-7.5 cm) apart.
* **Poor Soil:** Carrots prefer loose, well-drained soil. Amend heavy clay soil with compost or other organic matter.
* **Lack of Nutrients:** Carrots need adequate nutrients to thrive. Fertilize with a balanced fertilizer or side-dress with compost.
* **Pests:** Carrot rust flies and nematodes can damage carrot roots, leading to stunted growth. Use row covers to protect your plants from pests.
* **Watering Issues:** Inconsistent watering can stress carrots and affect their growth. Water deeply and regularly, especially during dry periods.
How do I prevent carrot rust flies?
Carrot rust flies are a common pest that can damage carrot roots. Here are some tips for preventing them:
* **Row Covers:** Use row covers to create a physical barrier between your carrots and the flies.
* **Companion Planting:** Plant strong-smelling herbs like rosemary or sage near your carrots to deter the flies.
* **Crop Rotation:** Avoid planting carrots in the same location year after year.
* **Remove Infested Plants:** If you find any carrots that are infested with rust fly larvae, remove them immediately to prevent the infestation from spreading.
* **Beneficial Nematodes:** Apply beneficial nematodes to the soil to control rust fly larvae.
Can I grow carrots in containers?
Yes, you can grow carrots in containers, but you’ll need to choose a container that is deep enough to accommodate the carrot roots. A container that is at least 12 inches (30 cm) deep is ideal. Use a well-draining potting mix and water regularly. Choose shorter carrot varieties like ‘Thumbelina’ or ‘Paris Market’ for container growing.
How do I know when my carrots are ready to harvest?
Carrots are typically ready to harvest 60-80 days after planting. The exact time will depend on the variety and growing conditions. You can check the size of the carrots by gently pulling back the soil around the crown. If they are the size you want, you can harvest them.
How do I store carrots after harvesting?
To store carrots, remove the tops and gently brush off any excess soil. Store them in a cool, dark, and humid place, such as a refrigerator or root cellar. You can wrap them in a damp cloth or store them in a container filled with moist sand or sawdust to help them stay fresh longer. Properly stored carrots can last for several months.
What are some good companion plants for carrots?
Good companion plants for carrots include:
* **Onions and Garlic:** These plants deter carrot rust flies.
* **Rosemary and Sage:** These herbs also deter carrot rust flies.
* **Radishes:** Radishes help break up the soil and mark the rows for carrots.
* **Lettuce:** Lettuce provides shade for young carrot seedlings.
* **Marigolds:** Marigolds deter nematodes.
My carrots are forking. What causes this?
Forking in carrots is usually caused by compacted soil or rocks in the soil. The carrot root hits an obstruction and splits into multiple roots. To prevent forking, make sure your soil is loose and well-drained. Remove any rocks or debris before planting. You can also try growing shorter carrot varieties that are less susceptible to forking.

Leave a Comment