
Planting Parsley Indoors: Unlock the secrets to a vibrant, fragrant herb garden right in your kitchen! Imagine fresh, flavorful parsley always at your fingertips, ready to elevate your culinary creations. No more sad, wilted bunches from the grocery store – just the bright, peppery taste of homegrown goodness.
For centuries, parsley has been more than just a garnish. From ancient Greeks crowning victors with its leaves to Romans using it for medicinal purposes, this humble herb boasts a rich history. Today, we’re bringing that tradition into our homes, making it easier than ever to enjoy the benefits of fresh parsley year-round.
But why should you bother planting parsley indoors? Well, let’s face it, not everyone has a sprawling garden or the perfect outdoor climate. Plus, store-bought herbs can be expensive and often lack the robust flavor of freshly grown ones. This DIY guide will empower you to cultivate your own thriving parsley patch, regardless of your space or gardening experience. I’m going to show you simple, effective tricks and hacks that will have you harvesting delicious parsley in no time. Get ready to transform your kitchen into a mini herb haven!

Planting Parsley Indoors: A Beginner’s Guide to Fresh Herbs Year-Round
Okay, so you want fresh parsley at your fingertips, no matter the season? I get it! There’s nothing quite like snipping off a few sprigs of homegrown parsley to brighten up a dish. Planting parsley indoors is totally doable, and I’m going to walk you through everything you need to know. Trust me, even if you think you have a black thumb, you can do this!
What You’ll Need: The Parsley Planting Arsenal
Before we dive in, let’s gather our supplies. Having everything ready beforehand will make the whole process smoother and more enjoyable.
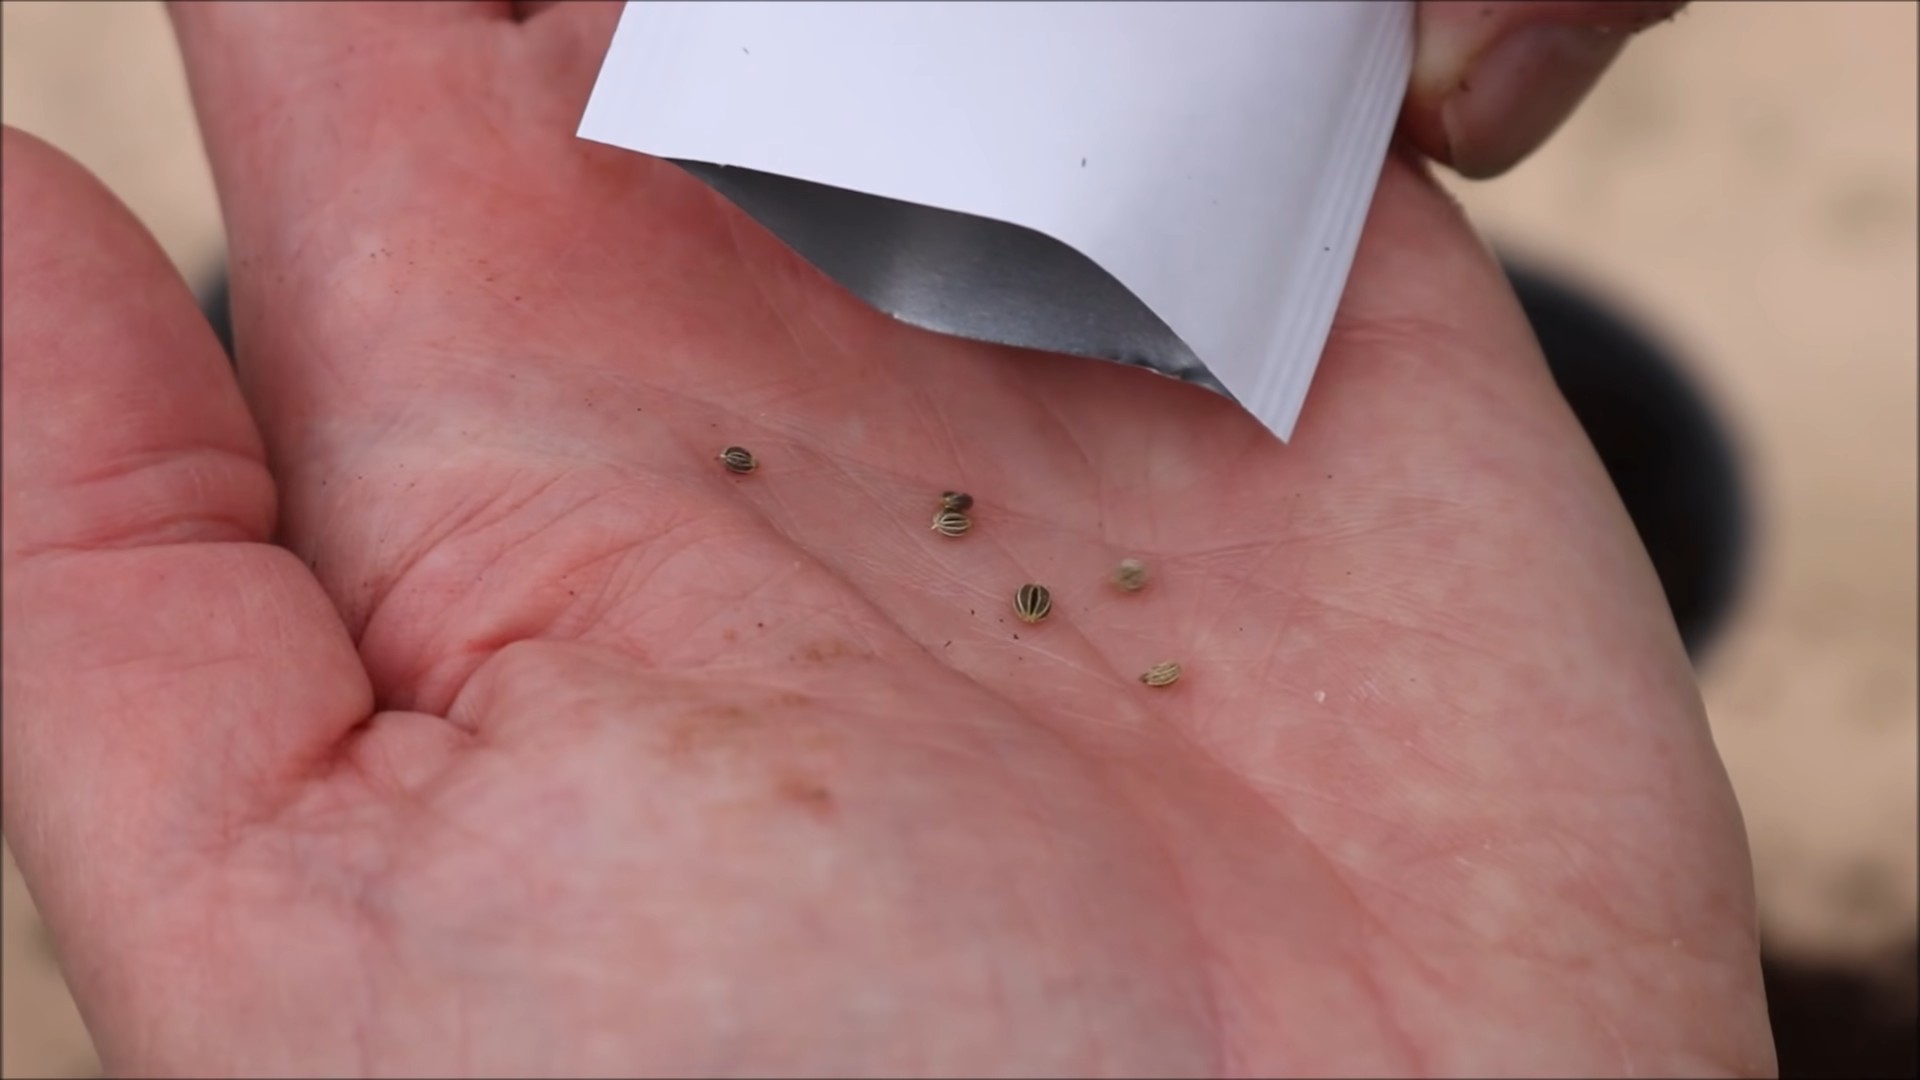
* Parsley Seeds or Seedlings: You can start from seed (which is more rewarding, in my opinion!) or buy a small parsley plant from a nursery. Flat-leaf (Italian) and curly parsley are the most common varieties. I personally prefer flat-leaf for its stronger flavor.
* Pot with Drainage Holes: A pot that’s at least 6 inches in diameter and 6 inches deep is ideal. Parsley needs room for its roots to grow. Make sure it has drainage holes! Soggy roots are a parsley’s worst enemy.
* High-Quality Potting Mix: Don’t skimp on the potting mix! Use a well-draining mix specifically formulated for containers. Avoid using garden soil, as it can compact and not drain well.
* Watering Can or Spray Bottle: Gentle watering is key, especially when the seeds are sprouting.
* Grow Light (Optional but Recommended): Parsley needs a lot of light, so if you don’t have a sunny windowsill, a grow light will be your best friend.
* Small Shovel or Trowel: For transferring seedlings or planting seeds.
* Plant Label and Marker: So you don’t forget what you planted! (Trust me, it happens.)
Section 1: Starting from Seeds (The Patient Gardener’s Route)
Starting from seeds takes a little longer, but it’s super satisfying to watch your parsley sprout from tiny specks. Parsley seeds can be a bit slow to germinate, so be patient!
1. Soak the Seeds (Optional but Helpful): Parsley seeds have a hard outer coating, so soaking them in warm water for 12-24 hours can help speed up germination. I usually put them in a small bowl of water on the counter.
2. Prepare the Pot: Fill your pot with potting mix, leaving about an inch of space at the top. Gently tap the pot to settle the soil.
3. Sow the Seeds: Sprinkle the parsley seeds evenly over the surface of the soil. You don’t need to bury them too deep – about 1/4 inch is perfect.
4. Cover the Seeds: Lightly cover the seeds with more potting mix.
5. Water Gently: Use a spray bottle or watering can with a gentle rose to water the soil. You want to moisten the soil without disturbing the seeds.
6. Cover with Plastic Wrap (Optional): Covering the pot with plastic wrap creates a humid environment that can help with germination. Just make sure to remove the plastic wrap once the seedlings start to emerge.
7. Place in a Warm Location: Parsley seeds germinate best in warm temperatures (around 70-75°F).
8. Be Patient! Parsley seeds can take anywhere from 2-4 weeks to germinate. Keep the soil consistently moist, but not soggy.
Section 2: Transplanting Seedlings (The Faster Track)
If you’re short on time (or patience!), buying a parsley seedling from a nursery is a great option.
1. Prepare the Pot: Fill your pot with potting mix, leaving about an inch of space at the top. Gently tap the pot to settle the soil.
2. Make a Hole: Dig a hole in the center of the pot that’s large enough to accommodate the seedling’s root ball.
3. Remove the Seedling: Gently remove the parsley seedling from its original container. If the roots are tightly bound, gently loosen them with your fingers.
4. Place the Seedling: Place the seedling in the hole, making sure the top of the root ball is level with the surrounding soil.
5. Fill with Soil: Fill in the space around the seedling with potting mix.
6. Water Gently: Water the seedling thoroughly.
7. Place in a Sunny Location: Place the pot in a sunny windowsill or under a grow light.
Section 3: Caring for Your Indoor Parsley Plant
Now that your parsley is planted, it’s time to give it the TLC it needs to thrive.
1. Light: Parsley needs at least 6-8 hours of sunlight per day. A south-facing windowsill is ideal. If you don’t have enough natural light, use a grow light. I’ve found that grow lights make a huge difference, especially during the winter months.
2. Watering: Water your parsley when the top inch of soil feels dry to the touch. Avoid overwatering, as this can lead to root rot. Make sure the pot has good drainage.
3. Fertilizing: Feed your parsley plant every 2-3 weeks with a balanced liquid fertilizer. Follow the instructions on the fertilizer label.
4. Pruning: Regular pruning encourages bushier growth. Snip off the outer leaves as needed, leaving the inner leaves to grow. Avoid cutting off more than one-third of the plant at a time.
5. Pest Control: Keep an eye out for pests like aphids and spider mites. If you spot any pests, spray the plant with insecticidal soap.
6. Temperature: Parsley prefers temperatures between 60-70°F. Avoid placing it near drafts or heat sources.
7. Rotation: If you’re using a windowsill, rotate the pot regularly to ensure even growth. Plants tend to lean towards the light source.
Section 4: Harvesting Your Homegrown Parsley
The best part! Harvesting your own fresh parsley is so rewarding.
1. When to Harvest: You can start harvesting parsley once the plant has several sets of leaves.
2. How to Harvest: Use scissors or pruning shears to snip off the outer leaves near the base of the plant.
3. Harvest Regularly: Regular harvesting encourages the plant to produce more leaves.
4. Preserving Parsley: If you have more parsley than you can use, you can dry it or freeze it. To dry parsley, hang it upside down in a cool, dry place or use a dehydrator. To freeze parsley, chop it up and freeze it in ice cube trays with water or olive oil.
Troubleshooting: Common Parsley Problems and Solutions
Even with the best care, you might encounter a few problems along the way. Here are some common issues and how to fix them:
* Yellowing Leaves: This could be a sign of overwatering, underwatering, or nutrient deficiency. Check the soil moisture and adjust your watering accordingly. If the soil is dry, water more frequently. If the soil is soggy, water less frequently. You may also need to fertilize the plant.
* Leggy Growth: This is usually caused by insufficient light. Move the plant to a sunnier location or use a grow light.
* Slow Growth: This could be due to a variety of factors, including insufficient light, poor soil, or lack of nutrients. Make sure the plant is getting enough light, use a high-quality potting mix, and fertilize regularly.
* Pests: Check the plant regularly for pests. If you spot any pests, spray the plant with insecticidal soap.
Extra Tips for Parsley Success
* Choose the Right Variety: Flat-leaf parsley (Italian parsley) has a stronger flavor than curly parsley.
* Use a Good Potting Mix: A well-draining potting mix is essential for healthy parsley growth.
* Provide Plenty of Light: Parsley needs at least 6-8 hours of sunlight per day.
* Water Regularly: Keep the soil consistently moist, but not soggy.
* Fertilize Regularly: Feed your parsley plant every 2-3 weeks with a balanced liquid fertilizer.
* Prune Regularly: Regular pruning encourages bushier growth.
* Be Patient: Parsley can be a bit slow to germinate, so be patient!
And there you have it! With a little bit of care and attention, you can enjoy fresh, homegrown parsley all year round. Happy gardening!
Conclusion
So, there you have it! Planting parsley indoors isn’t just a way to have fresh herbs at your fingertips year-round; it’s a rewarding experience that connects you to the natural world, even within the confines of your home. We’ve walked through the simple steps, from selecting the right container and soil to providing adequate light and water. You’ve learned how to nurture your parsley from seed or transplant, and how to harvest it to encourage continuous growth.
But why is this DIY trick a must-try? Beyond the obvious benefit of having readily available, flavorful parsley for your culinary creations, growing your own herbs offers a sense of accomplishment and control over the ingredients you use. You know exactly where your parsley comes from, what it’s been exposed to, and that it’s free from harmful pesticides or chemicals. Plus, the vibrant green of a thriving parsley plant adds a touch of life and freshness to your kitchen windowsill.
Consider these variations to personalize your indoor parsley garden:
* Experiment with different varieties: Curly parsley, flat-leaf parsley (Italian parsley), and even Hamburg parsley (grown for its root) offer unique flavors and textures. Try growing a few different types side-by-side to discover your favorites.
* Companion planting: Parsley thrives alongside other herbs like chives and basil. Consider creating a small herb garden in a larger container to maximize space and create a visually appealing display.
* Hydroponics: For a more advanced approach, explore growing parsley hydroponically. This soilless method can be incredibly efficient and produce impressive results.
* Creative containers: Don’t limit yourself to traditional pots! Repurpose old teacups, mason jars, or even a tiered planter to create a unique and eye-catching parsley garden.
Planting parsley indoors is more than just a gardening project; it’s an investment in your health, your culinary creativity, and your overall well-being. The fresh, vibrant flavor of homegrown parsley will elevate your dishes and bring a touch of sunshine to your kitchen, even on the gloomiest days.
We wholeheartedly encourage you to give this DIY trick a try. It’s easier than you might think, and the rewards are well worth the effort. Once you’ve experienced the joy of harvesting your own fresh parsley, you’ll never want to go back to store-bought again.
Don’t be afraid to experiment, adapt the techniques to your specific environment, and most importantly, have fun! We’re confident that you’ll be amazed by the results.
And now, we want to hear from you! Share your experiences, tips, and photos of your indoor parsley gardens in the comments below. What challenges did you face? What successes did you celebrate? Your insights will help other readers embark on their own parsley-growing adventures. Let’s create a community of indoor herb enthusiasts and inspire each other to cultivate a greener, more flavorful life, one parsley sprig at a time. We can’t wait to see what you grow!
Frequently Asked Questions (FAQ)
What is the best time of year to start planting parsley indoors?
Parsley can be started indoors at any time of year, which is one of the great advantages of indoor gardening! However, if you’re starting from seed, it’s generally best to begin in late winter or early spring (February-March) to give your plants a head start before transplanting them outdoors (if desired) or to ensure a continuous harvest throughout the year indoors. If you’re using a transplant from a nursery, you can start at any time, but be mindful of the plant’s needs in terms of light and temperature.
How much sunlight does indoor parsley need?
Parsley needs a good amount of sunlight to thrive. Aim for at least 6-8 hours of direct sunlight per day. A south-facing window is ideal. If you don’t have access to sufficient natural light, consider using a grow light. Fluorescent or LED grow lights can provide the necessary spectrum of light for healthy parsley growth. Position the grow light a few inches above the plants and keep it on for 12-14 hours per day.
What kind of soil is best for growing parsley indoors?
Parsley prefers well-draining soil that is rich in organic matter. A good potting mix specifically formulated for herbs or vegetables is a great choice. You can also create your own mix by combining equal parts of potting soil, compost, and perlite or vermiculite. The compost provides nutrients, while the perlite or vermiculite improves drainage and aeration. Avoid using garden soil, as it can be too heavy and may contain pests or diseases.
How often should I water my indoor parsley plant?
Water your parsley plant when the top inch of soil feels dry to the touch. Avoid overwatering, as this can lead to root rot. Water thoroughly until excess water drains out of the bottom of the pot. Be sure to empty the saucer beneath the pot to prevent the plant from sitting in water. During the warmer months, you may need to water more frequently than during the cooler months. Check the soil moisture regularly and adjust your watering schedule accordingly.
How do I harvest parsley to encourage growth?
Harvest parsley by snipping off the outer stems near the base of the plant. Avoid cutting off all the leaves at once, as this can shock the plant and slow down growth. Instead, harvest only what you need, leaving the inner stems to continue growing. Regular harvesting encourages the plant to produce more leaves, resulting in a bushier and more productive plant.
Why is my parsley plant turning yellow?
Yellowing leaves can be a sign of several problems, including overwatering, underwatering, nutrient deficiency, or pest infestation. Check the soil moisture to ensure that you are not overwatering or underwatering. If the soil is consistently wet, allow it to dry out slightly before watering again. If the soil is dry, water thoroughly. If you suspect a nutrient deficiency, try fertilizing your plant with a balanced liquid fertilizer. Inspect the leaves for signs of pests, such as aphids or spider mites. If you find pests, treat your plant with an appropriate insecticide or insecticidal soap.
Can I grow parsley from seed indoors?
Yes, you can definitely grow parsley from seed indoors. Parsley seeds can be slow to germinate, so be patient. Soak the seeds in warm water for 24 hours before planting to help soften the seed coat and speed up germination. Sow the seeds about 1/4 inch deep in a seed-starting mix. Keep the soil moist but not soggy. Germination can take anywhere from 2 to 4 weeks. Once the seedlings have developed a few sets of true leaves, you can transplant them into larger pots.
My parsley plant is leggy and weak. What should I do?
A leggy and weak parsley plant is often a sign of insufficient light. Move your plant to a brighter location or supplement with a grow light. Also, make sure you are providing adequate nutrients by fertilizing regularly. Prune back the leggy stems to encourage bushier growth.
How do I prevent pests and diseases on my indoor parsley plant?
Prevention is key when it comes to pests and diseases. Start with healthy, disease-free plants. Use a clean potting mix and avoid overwatering. Provide good air circulation around your plants. Inspect your plants regularly for signs of pests or diseases. If you find pests, treat them promptly with an appropriate insecticide or insecticidal soap. Remove any diseased leaves or stems to prevent the spread of disease.
Can I transplant my indoor parsley plant outdoors?
Yes, you can transplant your indoor parsley plant outdoors, but it’s important to acclimate it gradually to the outdoor conditions. Start by placing the plant outdoors in a sheltered location for a few hours each day, gradually increasing the amount of time it spends outdoors over the course of a week or two. Choose a location with well-draining soil and partial shade. Transplant the parsley plant into the ground or a larger container. Water thoroughly after transplanting.
Leave a Comment