
Growing fresh basil at home is easier than you might think, and I’m here to show you how! Forget those sad, wilted bunches from the grocery store – imagine stepping outside your door and snipping fragrant, vibrant basil leaves whenever you need them. This DIY guide is packed with simple tricks and hacks that will transform even the most novice gardener into a basil-growing pro.
Basil, with its rich history stretching back thousands of years, isn’t just a culinary delight; it’s been revered in various cultures for its medicinal and spiritual properties. From ancient India, where it was considered a sacred herb, to the sun-drenched hills of Italy, where it’s a cornerstone of countless dishes, basil has always held a special place in our hearts and kitchens.
But why should you bother with growing fresh basil yourself? Well, for starters, the flavor is simply unmatched. Store-bought basil often lacks the intense aroma and taste of homegrown varieties. Plus, think of the money you’ll save! Instead of constantly buying expensive bunches that go bad quickly, you can have a continuous supply right at your fingertips. More importantly, knowing exactly where your food comes from and how it’s grown gives you peace of mind. So, let’s dive in and unlock the secrets to a thriving basil garden, no matter how small your space!
Growing Fresh Basil Indoors: A Beginner’s Guide
Hey there, fellow plant enthusiasts! I’m so excited to share my tried-and-true method for growing fresh, fragrant basil right in your own home. Forget those wilted, overpriced bunches at the grocery store – with a little know-how, you can have a constant supply of this culinary staple at your fingertips. I’ve been doing this for years, and trust me, it’s easier than you think!
What You’ll Need
Before we dive in, let’s gather our supplies. Here’s a checklist to make sure you’re all set:
* **Basil Seeds:** Opt for a variety you love! Genovese is a classic, but lemon basil, Thai basil, and purple basil are also fantastic choices. I personally love growing Genovese and Thai basil together.
* **Seed Starting Tray or Small Pots:** These don’t need to be fancy. I often reuse plastic containers with drainage holes.
* **Seed Starting Mix:** This is crucial! Regular potting soil is too dense for delicate seedlings. Seed starting mix is light and airy, allowing for proper root development.
* **Spray Bottle:** For gentle watering.
* **Grow Lights (Optional but Recommended):** Especially if you don’t have a sunny windowsill.
* **Potting Soil:** For transplanting later on.
* **Larger Pots (4-6 inches):** One for each basil plant.
* **Small Shovel or Trowel:** For transplanting.
* **Watering Can:** For watering mature plants.
* **Scissors or Pruning Shears:** For harvesting.
* **A Sunny Windowsill or Grow Light Setup:** Basil needs plenty of light!
Phase 1: Starting Your Basil Seeds
This is where the magic begins! We’re going to coax those tiny seeds into becoming vibrant basil plants.
1. **Prepare Your Seed Starting Tray or Pots:** Fill your chosen containers with seed starting mix, leaving about half an inch of space at the top. Gently pat down the soil to create a level surface.
2. **Sow the Seeds:** Sprinkle a few basil seeds (2-3) on top of the soil in each cell or pot. Don’t overcrowd them! They need space to grow.
3. **Cover the Seeds:** Lightly cover the seeds with a thin layer of seed starting mix. Basil seeds need light to germinate, so don’t bury them too deep. A very thin layer is all you need.
4. **Water Gently:** Use your spray bottle to mist the soil thoroughly. You want it to be moist but not soggy.
5. **Create a Humid Environment:** Cover the seed starting tray or pots with a clear plastic lid or plastic wrap. This helps to retain moisture and create a greenhouse effect.
6. **Place in a Warm Location:** Basil seeds germinate best in warm temperatures (around 70-75°F or 21-24°C). A warm windowsill or a heat mat works well.
7. **Monitor and Water:** Check the soil moisture daily. Keep it consistently moist by misting with your spray bottle as needed. Remove the plastic lid or wrap for a few hours each day to allow for air circulation and prevent mold growth.
8. **Wait for Germination:** Basil seeds typically germinate within 5-10 days. Be patient! Once you see those tiny green sprouts, you’ll know your efforts are paying off.
Phase 2: Nurturing Your Seedlings
Once your basil seeds have sprouted, it’s time to provide them with the care they need to thrive.
1. **Remove the Cover:** Once the seedlings emerge, remove the plastic lid or wrap completely.
2. **Provide Adequate Light:** Basil seedlings need plenty of light to grow strong and healthy. Place them in a sunny windowsill that receives at least 6 hours of direct sunlight per day. If you don’t have a sunny windowsill, use grow lights. Position the grow lights a few inches above the seedlings and keep them on for 14-16 hours per day. I use a simple LED grow light I got online, and it works wonders!
3. **Water Regularly:** Water the seedlings when the top inch of soil feels dry to the touch. Use your spray bottle to gently water them, avoiding overwatering. Overwatering can lead to root rot.
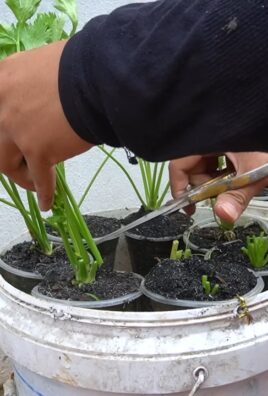
4. **Thin the Seedlings (If Necessary):** If you planted multiple seeds in each cell or pot, you’ll need to thin them out to give the strongest seedling room to grow. Use small scissors to snip off the weaker seedlings at the soil level, leaving only one healthy seedling per cell or pot. I know it feels brutal, but it’s necessary!
5. **Fertilize (Optional):** Once the seedlings have developed their first set of true leaves (the leaves that look like miniature basil leaves), you can start fertilizing them with a diluted liquid fertilizer. Follow the instructions on the fertilizer package. I prefer using an organic fertilizer.
Phase 3: Transplanting Your Basil Plants
Now that your seedlings are strong and healthy, it’s time to transplant them into larger pots where they can really spread their roots.
1. **Choose Your Pots:** Select pots that are at least 4-6 inches in diameter. Make sure the pots have drainage holes to prevent waterlogging.
2. **Fill the Pots with Potting Soil:** Fill the pots with high-quality potting soil, leaving about an inch of space at the top.
3. **Gently Remove the Seedlings:** Carefully remove the seedlings from their seed starting tray or pots. Gently loosen the soil around the roots and lift the seedlings out. Be careful not to damage the delicate roots.
4. **Plant the Seedlings:** Create a small hole in the center of each pot and place the seedling in the hole. Gently pat the soil around the seedling to secure it in place.
5. **Water Thoroughly:** Water the newly transplanted basil plants thoroughly.
6. **Place in a Sunny Location:** Place the pots in a sunny windowsill or under grow lights.
7. **Monitor and Water:** Check the soil moisture regularly and water when the top inch of soil feels dry to the touch.
Phase 4: Caring for Your Mature Basil Plants
Congratulations! You’ve successfully transplanted your basil plants. Now it’s time to provide them with the ongoing care they need to thrive and produce a bountiful harvest.
1. **Watering:** Water your basil plants regularly, especially during hot weather. Water deeply when the top inch of soil feels dry to the touch. Avoid overwatering, as this can lead to root rot. I usually water mine every 2-3 days, but it depends on the temperature and humidity.
2. **Fertilizing:** Fertilize your basil plants every 2-3 weeks with a diluted liquid fertilizer. Follow the instructions on the fertilizer package.
3. **Pruning:** Pruning is essential for encouraging bushy growth and preventing your basil plants from flowering too early. Pinch off the top set of leaves from each stem regularly. This will encourage the plant to produce more side shoots, resulting in a fuller, more productive plant.
4. **Pinching Off Flower Buds:** Basil plants will eventually produce flower buds. Pinch off these flower buds as soon as you see them. Flowering will cause the plant to stop producing leaves and the leaves will become bitter.
5. **Providing Adequate Light:** Basil plants need plenty of light to thrive. Place them in a sunny windowsill that receives at least 6 hours of direct sunlight per day. If you don’t have a sunny windowsill, use grow lights.
6. **Rotating the Pots:** Rotate the pots regularly to ensure that all sides of the plant receive equal amounts of light. This will prevent the plant from leaning towards the light source.
7. **Pest Control:** Keep an eye out for pests such as aphids, spider mites, and whiteflies. If you notice any pests, treat them with an insecticidal soap or neem oil. I prefer using neem oil because it’s a natural and effective pest control solution.
8. **Temperature:** Basil plants prefer warm temperatures (around 70-80°F or 21-27°C). Avoid exposing them to temperatures below 50°F (10°C).
Phase 5: Harvesting Your Basil
The best part! Time to enjoy the fruits (or rather, leaves) of your labor.
1. **Harvest Regularly:** Harvest your basil leaves regularly to encourage continued growth. The more you harvest, the more the plant will produce.
2. **Harvesting Technique:** Use scissors or pruning shears to cut the stems just above a set of leaves. This will encourage the plant to produce new growth from the cut stems.
3. **Best Time to Harvest:** The best time to harvest basil is in the morning, after the dew has dried. This is when the leaves are at their most flavorful.
4. **Storing Your Harvest:** Fresh basil leaves can be stored in the refrigerator for a few days. Wrap them in a damp paper towel and place them in a plastic bag. You can also freeze basil leaves for longer storage. To freeze basil, blanch the leaves in boiling

Conclusion
So, there you have it! Mastering the art of growing fresh basil at home is not only achievable but also incredibly rewarding. Forget those sad, wilted bunches from the grocery store. Imagine stepping into your kitchen and snipping vibrant, fragrant basil leaves whenever you need them. The difference in flavor between store-bought and homegrown basil is truly remarkable, elevating your culinary creations to a whole new level.
This DIY trick is a must-try for several reasons. First and foremost, it puts you in control. You know exactly where your basil is coming from and what (or rather, what isn’t) going into it. No pesticides, no questionable handling – just pure, unadulterated basil goodness. Secondly, it’s incredibly cost-effective. A single packet of basil seeds can yield a continuous supply of fresh herbs for months, if not years, far outweighing the cost of constantly purchasing basil from the store. Thirdly, it’s therapeutic! There’s something deeply satisfying about nurturing a plant from seed to harvest. It’s a little slice of nature right in your home.
But the best part? The possibilities are endless! Experiment with different varieties of basil. Try growing Genovese basil for classic pesto, Thai basil for Asian-inspired dishes, or lemon basil for a citrusy twist. You can even get creative with your containers. Use repurposed jars, terracotta pots, or even create a vertical garden for a stunning display. Consider companion planting your basil with tomatoes or peppers – they thrive together and enhance each other’s flavors. For those with limited space, growing basil indoors under a grow light is a fantastic option, ensuring a year-round supply of this beloved herb.
Don’t be intimidated if you’ve never grown herbs before. Basil is relatively easy to care for, making it a perfect starting point for beginner gardeners. Just remember the key ingredients: sunlight, well-draining soil, and regular watering. Watch for common pests like aphids and treat them promptly with organic solutions. And most importantly, don’t be afraid to experiment and learn as you go.
We are confident that once you experience the joy of growing your own fresh basil, you’ll never go back to store-bought again. It’s a simple, sustainable, and incredibly flavorful way to enhance your cooking and connect with nature.
So, what are you waiting for? Grab some seeds, find a sunny spot, and get growing! We encourage you to try this DIY trick and share your experiences with us. Tell us about your favorite basil varieties, your creative container ideas, and any tips or tricks you’ve learned along the way. Let’s build a community of basil-loving gardeners and inspire others to embrace the joy of homegrown herbs. Share your photos and stories on social media using #HomegrownBasil and let’s celebrate the deliciousness of fresh, homegrown flavor together!
Frequently Asked Questions (FAQ)
What kind of soil is best for growing basil?
Basil thrives in well-draining soil that is rich in organic matter. A good potting mix specifically formulated for herbs is ideal. You can also amend regular potting soil with compost or aged manure to improve its fertility and drainage. Avoid heavy clay soils, as they can retain too much moisture and lead to root rot. The ideal pH for basil is between 6.0 and 7.5, which is slightly acidic to neutral.
How much sunlight does basil need?
Basil needs at least 6-8 hours of direct sunlight per day to thrive. If you’re growing basil indoors, place it near a sunny window or use a grow light to supplement natural light. Insufficient sunlight can result in leggy growth and reduced flavor. Rotate your basil plant regularly to ensure all sides receive adequate light.
How often should I water my basil plant?
Water your basil plant regularly, keeping the soil consistently moist but not waterlogged. Check the soil moisture by sticking your finger about an inch deep. If the soil feels dry, it’s time to water. Avoid overwatering, as this can lead to root rot. During hot weather, you may need to water more frequently. When watering, water at the base of the plant to avoid wetting the leaves, which can increase the risk of fungal diseases.
How do I harvest basil leaves?
The best time to harvest basil leaves is in the morning, after the dew has dried. Pinch or cut the leaves from the top of the plant, just above a leaf node (where leaves grow from the stem). This will encourage the plant to branch out and produce more leaves. Avoid harvesting more than one-third of the plant at a time, as this can stress the plant. Regular harvesting will also prevent the plant from flowering, which can reduce the flavor of the leaves.
Why is my basil plant flowering?
Basil plants naturally flower as part of their life cycle. However, flowering can reduce the flavor of the leaves. To prevent flowering, pinch off the flower buds as soon as you see them. Regular harvesting of the leaves will also help to delay flowering. If your basil plant does flower, you can still use the leaves, but they may have a slightly bitter taste.
What are some common pests and diseases that affect basil?
Common pests that affect basil include aphids, spider mites, and whiteflies. These pests can be controlled with insecticidal soap or neem oil. Basil is also susceptible to fungal diseases such as powdery mildew and downy mildew. To prevent these diseases, ensure good air circulation around the plant and avoid wetting the leaves when watering. If you notice signs of disease, remove the affected leaves and treat the plant with a fungicide.
Can I grow basil indoors?
Yes, you can absolutely grow basil indoors! Choose a sunny window that receives at least 6-8 hours of direct sunlight per day. If you don’t have enough natural light, use a grow light to supplement. Use a well-draining potting mix and water regularly, keeping the soil consistently moist but not waterlogged. Be sure to provide good air circulation to prevent fungal diseases.
How do I propagate basil?
Basil is easy to propagate from stem cuttings. Simply cut a 4-6 inch stem from a healthy basil plant, remove the lower leaves, and place the cutting in a glass of water. Change the water every few days. After a few weeks, roots will begin to form. Once the roots are about an inch long, you can transplant the cutting into a pot filled with potting mix.
How do I store fresh basil?
Fresh basil is best used immediately, but you can store it for a few days in the refrigerator. Wrap the basil leaves in a damp paper towel and place them in a plastic bag or container. You can also store basil in a glass of water, like a bouquet of flowers. Change the water every day or two. For longer storage, you can freeze basil leaves. Blanch the leaves in boiling water for a few seconds, then plunge them into ice water. Drain the leaves and pat them dry. Place the leaves in a freezer bag or container and freeze. You can also make basil pesto and freeze it for later use.
What are some creative ways to use fresh basil?
Beyond the classic pesto, fresh basil can be used in countless ways. Add it to salads, sandwiches, and pizzas. Use it to flavor soups, sauces, and stews. Make basil-infused oil or vinegar. Add it to cocktails and mocktails. Use it to garnish grilled meats and vegetables. The possibilities are endless! Let your creativity guide you and enjoy the delicious flavor of fresh, homegrown basil.
Leave a Comment