
Oven Cleaning Baking Soda Vinegar: Sounds like a science experiment, right? Well, in a way, it is! But trust me, this isn’t your average volcano project. We’re talking about a powerful, natural, and incredibly effective way to get your oven sparkling clean without harsh chemicals.
For generations, resourceful homemakers have relied on simple, readily available ingredients to tackle tough cleaning tasks. Baking soda and vinegar, staples in most kitchens, have a rich history of being used for everything from leavening bread to deodorizing refrigerators. Think of your grandmother’s cleaning secrets – chances are, baking soda and vinegar were involved! This method isn’t just a trend; it’s a time-tested solution.
Let’s be honest, nobody enjoys cleaning the oven. It’s a greasy, grimy job that often involves battling stubborn baked-on messes. But a clean oven isn’t just about aesthetics; it’s about food safety and efficiency. A dirty oven can affect the taste of your food, smoke excessively, and even pose a fire hazard. That’s why mastering this simple oven cleaning baking soda vinegar trick is so important. I’m going to show you how to ditch those expensive, fume-filled oven cleaners and embrace a safer, more eco-friendly approach. Get ready to say goodbye to oven grime and hello to a sparkling clean cooking space!

DIY Oven Cleaning with Baking Soda and Vinegar: A Sparkling Clean Oven the Natural Way!
Okay, let’s face it, cleaning the oven is probably on everyone’s list of least favorite chores. But a clean oven isn’t just about aesthetics; it helps your food cook more evenly and can even prevent smoke and unpleasant odors. Forget those harsh chemical cleaners! I’m going to show you how to get your oven sparkling clean using just baking soda and vinegar – two ingredients you probably already have in your pantry. This method is not only effective but also much safer and eco-friendly.
What You’ll Need
Before we dive in, let’s gather our supplies. Here’s what you’ll need for this DIY oven cleaning adventure:
* Baking soda (about ½ cup to ¾ cup, depending on oven size)
* White vinegar (in a spray bottle)
* Water
* A bowl
* Rubber gloves (trust me, you’ll want these!)
* A sponge or scrubbing pad (non-scratch, please!)
* A plastic or silicone spatula (optional, but helpful)
* Paper towels or a clean cloth
* A small container or bag for soaking oven racks (optional, but recommended)
Step-by-Step Instructions: The Baking Soda Paste
This first part is all about creating our magical cleaning paste.
1. Empty the Oven: Start by removing everything from your oven – racks, baking stones, thermometers, anything that’s in there. We want a blank canvas to work with.
2. Mix the Baking Soda Paste: In your bowl, combine ½ cup of baking soda with enough water to form a spreadable paste. The consistency should be similar to pancake batter. You might need to add a little more baking soda or water to get it just right. Don’t worry about being too precise; we’re going for “easily spreadable.”
3. Coat the Oven Interior: Put on your rubber gloves (seriously, don’t skip this step!). Now, using your sponge, spatula, or even your hands (with gloves!), spread the baking soda paste all over the inside surfaces of your oven. This includes the back, sides, top, bottom, and door. Avoid the heating elements! We don’t want to mess with those.
4. Be Generous: Don’t be shy with the paste! A thick, even coating is key to loosening all that baked-on grime. Pay special attention to areas with heavy buildup.
5. Let it Sit (and Work its Magic!): This is the most important part: let the baking soda paste sit for at least 12 hours, or even better, overnight. The longer it sits, the more time it has to break down the grease and grime. I usually do this before I go to bed so it can work its magic while I sleep.
Dealing with the Oven Racks
While the baking soda is doing its thing inside the oven, let’s tackle those racks.
1. Choose Your Soaking Method: You have a couple of options here. You can use your bathtub (make sure it’s clean!), a large utility sink, or even a large, heavy-duty garbage bag. If you’re using a garbage bag, double-bag it to prevent leaks.
2. Prepare the Soaking Solution: Fill your chosen container with hot water and add about ½ cup of dish soap. The hot water will help loosen the grime, and the dish soap will cut through the grease.
3. Submerge the Racks: Carefully place the oven racks into the water, making sure they are completely submerged. If they’re too long to fit, you can try soaking them in sections, flipping them over halfway through.
4. Let Them Soak: Just like the baking soda paste in the oven, the racks need time to soak. Let them sit for at least 2-3 hours, or even overnight for really stubborn grime.
The Vinegar Power Wash!
After the baking soda has had its beauty sleep, it’s time for the vinegar to shine.
1. Prepare the Vinegar Spray: Fill your spray bottle with plain white vinegar. No need to dilute it; we want the full cleaning power of the vinegar.
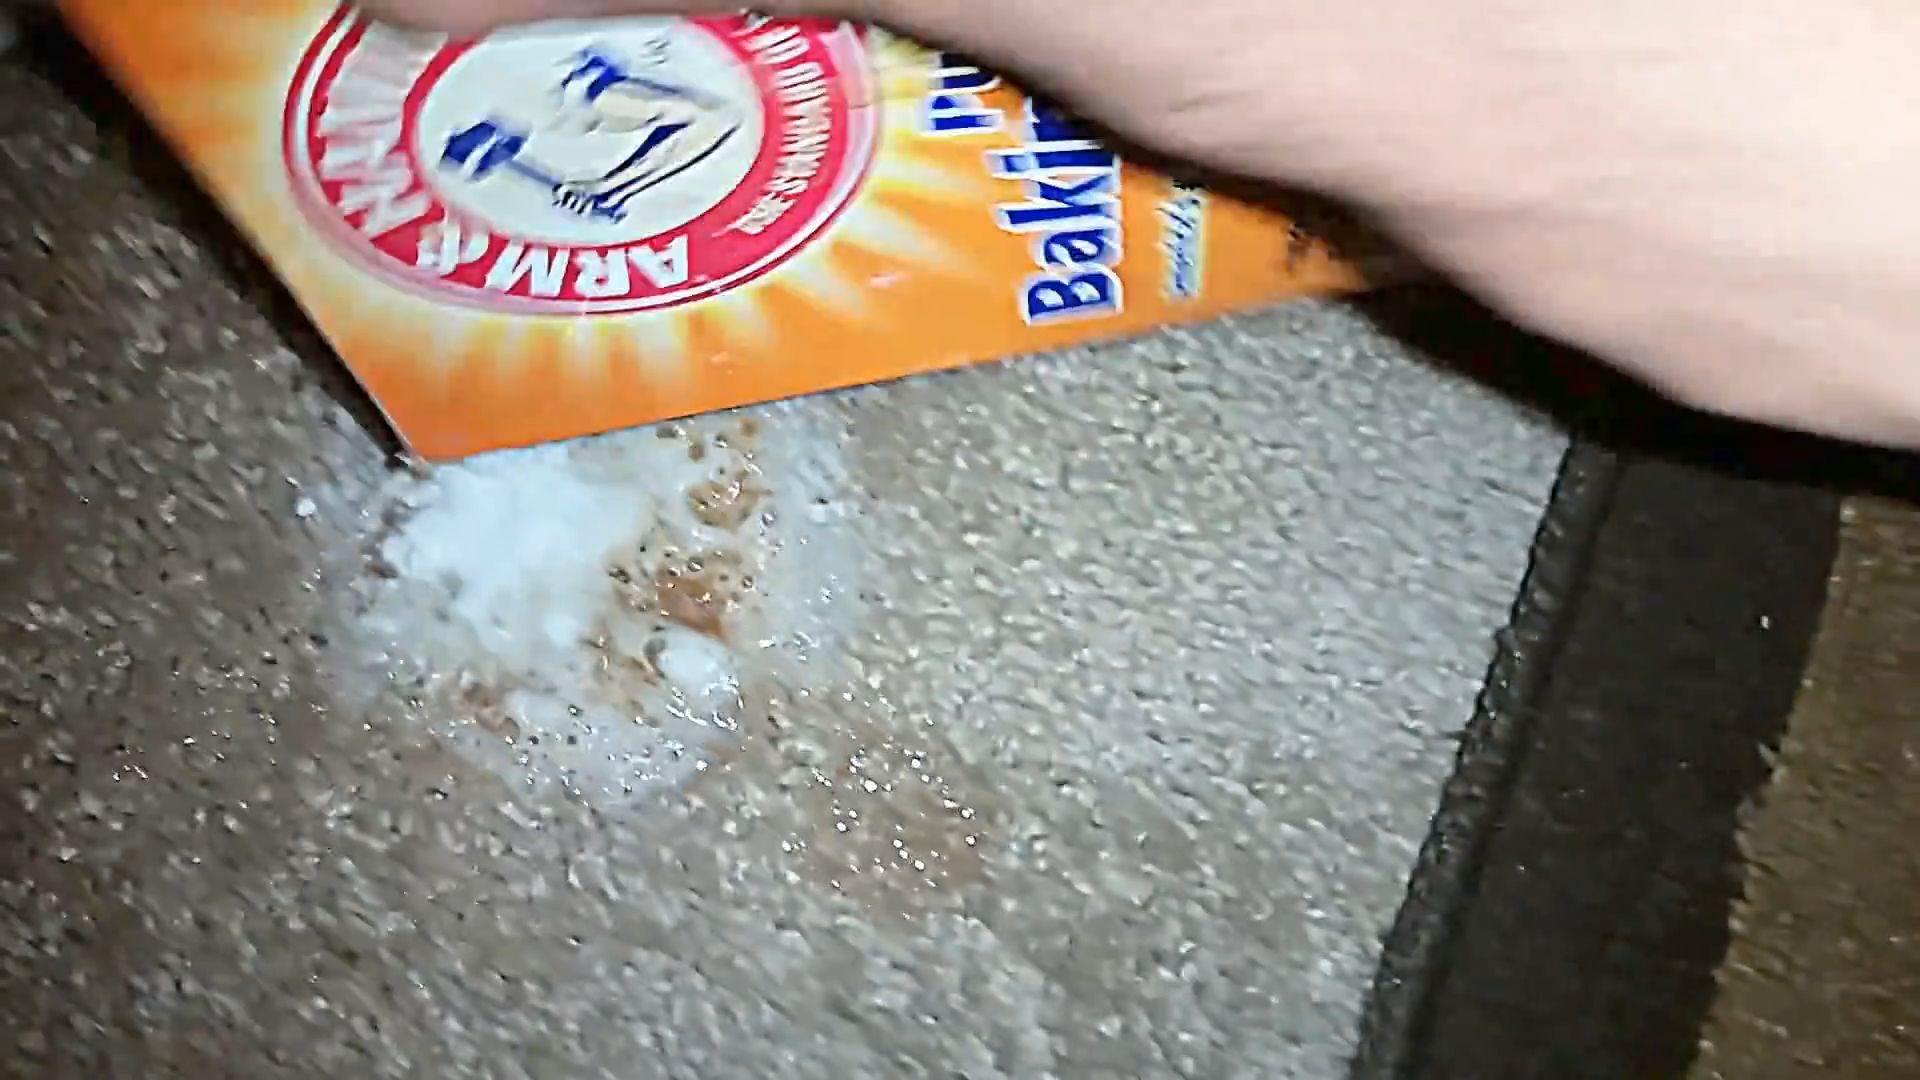
2. Spray the Baking Soda Paste: Liberally spray the baking soda paste inside the oven with vinegar. You’ll notice it starts to fizz and bubble – that’s the chemical reaction between the baking soda and vinegar, and it’s exactly what we want! This fizzing action helps to loosen the remaining grime.
3. Let it Fizz: Allow the vinegar to fizz for a few minutes. This will give it time to work its way into the loosened grime.
4. Scrub-a-dub-dub: Now, using your sponge or scrubbing pad, start scrubbing the oven interior. You should find that the grime comes off much easier than it would with just elbow grease alone. For really stubborn spots, you might need to apply a little extra pressure or use a more abrasive scrubbing pad (but be careful not to scratch the oven surface!).
5. Wipe Away the Residue: Once you’ve scrubbed away all the grime, use a damp sponge or cloth to wipe away the baking soda and vinegar residue. You might need to rinse your sponge frequently to keep it clean.
6. Repeat if Necessary: If there are still some stubborn spots, don’t be discouraged! Simply repeat the vinegar spraying and scrubbing process until your oven is sparkling clean.
Finishing Touches: Racks and Final Wipe-Down
Almost there! Let’s finish up the racks and give the oven one last once-over.
1. Scrub the Racks: After soaking, remove the oven racks from the water. Use a sponge or scrubbing pad to scrub away any remaining grime. You might need to use a little elbow grease, but the soaking should have loosened most of it.
2. Rinse and Dry: Rinse the racks thoroughly with clean water to remove any soap residue. Then, dry them with a clean towel or let them air dry.
3. Final Wipe-Down: Give the inside of your oven one last wipe-down with a clean, damp cloth to remove any remaining residue.
4. Reassemble: Once everything is dry, replace the oven racks and anything else you removed from the oven.
A Few Extra Tips and Tricks
* For Extra Stubborn Grime: If you have some really tough, baked-on grime, you can try making a thicker baking soda paste and letting it sit for even longer. You can also try using a plastic scraper to gently scrape away the grime before scrubbing.
* Cleaning the Oven Door: Don’t forget to clean the oven door! You can use the same baking soda paste and vinegar method on the inside of the door. For the outside of the door, you can use a glass cleaner or a mixture of vinegar and water.
* Preventative Measures: To keep your oven cleaner for longer, try placing a baking sheet on the bottom rack to catch any drips or spills. You can also try wiping up spills as soon as they happen.
* Self-Cleaning Ovens: While this method is great for regular cleaning, it’s not a replacement for the self-cleaning function on your oven. However, using this method regularly can help reduce the need for the self-cleaning function, which can be harsh on your oven.
* Ventilation is Key: Even though we’re using natural ingredients, it’s still a good idea to open a window or turn on your kitchen fan while you’re cleaning the oven.
And there you have it! A sparkling clean oven using just baking soda and vinegar. It might take a little time and effort, but it’s definitely worth it for a clean and healthy cooking environment. Plus, you’ll feel good knowing you’re using a safe and eco-friendly cleaning method. Happy cleaning!
Conclusion
So, there you have it! Mastering the art of growing strawberries in your home garden is not only achievable but also incredibly rewarding. We’ve walked through the steps, highlighted the key considerations, and hopefully, demystified the process. But why should you actually dedicate your time and effort to this endeavor?
Firstly, the taste. Store-bought strawberries, while convenient, simply cannot compare to the burst of flavor you get from a freshly picked, sun-ripened strawberry grown in your own backyard. The difference is undeniable, a testament to the care and attention you invest in your plants. Secondly, you have complete control over what goes into your strawberries. No more worrying about pesticides or unknown chemicals; you can cultivate organic, healthy fruit for yourself and your family.
Beyond the tangible benefits, there’s a certain satisfaction that comes from nurturing something from a tiny plant to a bountiful harvest. It’s a connection to nature, a therapeutic activity, and a source of immense pride. Imagine serving a dessert made with strawberries you grew yourself – the compliments will be endless!
But the journey doesn’t end here. Feel free to experiment with different strawberry varieties to find your personal favorite. Try alpine strawberries for their unique flavor and continuous fruiting, or explore everbearing varieties for a longer harvest season. Consider companion planting with herbs like basil or thyme to deter pests and enhance the flavor of your strawberries. You can also explore different growing methods, such as vertical gardening or hanging baskets, to maximize space and add visual appeal to your garden.
Don’t be afraid to get your hands dirty and embrace the learning process. Every garden is unique, and what works for one person may not work for another. The key is to observe your plants, adapt your approach, and enjoy the journey.
We are confident that with a little patience and dedication, you can successfully grow strawberries in your home garden and reap the delicious rewards. We encourage you to take the plunge, start small if you’re feeling overwhelmed, and most importantly, have fun!
Once you’ve had your first harvest, we’d love to hear about your experience. Share your tips, successes, and even your challenges in the comments below. Let’s create a community of strawberry enthusiasts and learn from each other. Happy gardening!
Frequently Asked Questions (FAQ)
Q: What is the best time of year to plant strawberries?
A: The best time to plant strawberries depends on your climate and the type of strawberry you’re planting. Generally, early spring (as soon as the ground can be worked) or late fall (after the first frost) are ideal. Planting in the spring allows the plants to establish themselves before the heat of summer, while fall planting gives them a head start for the following spring. For June-bearing varieties, spring planting is often preferred. Everbearing and day-neutral varieties can be planted in either spring or fall. Consider your local climate and consult with a local nursery for specific recommendations.
Q: What kind of soil do strawberries need?
A: Strawberries thrive in well-drained, slightly acidic soil with a pH between 5.5 and 6.5. The soil should be rich in organic matter. Before planting, amend the soil with compost, well-rotted manure, or other organic amendments to improve drainage and fertility. Avoid heavy clay soils, as they can retain too much moisture and lead to root rot. If you have clay soil, consider growing strawberries in raised beds or containers. A soil test can help you determine the pH and nutrient levels of your soil and guide you on what amendments are needed.
Q: How much sunlight do strawberries need?
A: Strawberries need at least 6-8 hours of direct sunlight per day to produce a good crop of fruit. Choose a planting location that receives full sun for most of the day. If you live in a hot climate, some afternoon shade may be beneficial to prevent the plants from getting scorched. Insufficient sunlight can result in smaller berries and reduced yields.
Q: How often should I water my strawberry plants?
A: Strawberries need consistent moisture, especially during fruit development. Water deeply and regularly, aiming to keep the soil consistently moist but not waterlogged. The frequency of watering will depend on the weather, soil type, and drainage. Check the soil moisture regularly by sticking your finger into the soil about an inch deep. If the soil feels dry, it’s time to water. Avoid overhead watering, as it can promote fungal diseases. Drip irrigation or soaker hoses are the best way to water strawberries, as they deliver water directly to the roots.
Q: How do I fertilize my strawberry plants?
A: Strawberries benefit from regular fertilization. Apply a balanced fertilizer (e.g., 10-10-10) in the spring, after the plants have started to grow. Avoid over-fertilizing, as this can lead to excessive foliage growth and reduced fruit production. You can also use organic fertilizers, such as compost tea or fish emulsion. For everbearing and day-neutral varieties, fertilize every 4-6 weeks throughout the growing season. Always follow the instructions on the fertilizer label.
Q: How do I protect my strawberries from pests and diseases?
A: Strawberries are susceptible to various pests and diseases, including slugs, snails, birds, and fungal diseases. To protect your plants, use organic pest control methods, such as hand-picking pests, using slug bait, or covering the plants with netting to deter birds. Ensure good air circulation around the plants to prevent fungal diseases. Remove any diseased leaves or fruit promptly. Consider using disease-resistant strawberry varieties. Crop rotation can also help prevent soilborne diseases.
Q: How do I prune my strawberry plants?
A: Pruning strawberries depends on the type of strawberry you’re growing. For June-bearing varieties, remove the runners (the long stems that grow out from the main plant) to encourage fruit production. For everbearing and day-neutral varieties, you can allow some runners to develop to propagate new plants, but remove excess runners to prevent overcrowding. After the harvest, prune away any old or damaged leaves.
Q: How do I overwinter my strawberry plants?
A: In cold climates, strawberries need protection during the winter. After the first frost, mulch the plants with straw, pine needles, or leaves to insulate the roots and protect them from freezing temperatures. Remove the mulch in the spring, after the danger of frost has passed. In milder climates, mulching may not be necessary.
Q: Can I grow strawberries in containers?
A: Yes, strawberries grow very well in containers. Choose a container that is at least 12 inches in diameter and has good drainage. Use a high-quality potting mix and water regularly. Container-grown strawberries may need more frequent fertilization than those grown in the ground. Consider using hanging baskets for a decorative and space-saving way to grow strawberries.
Q: How long does it take for strawberry plants to produce fruit?
A: The time it takes for strawberry plants to produce fruit depends on the variety and the planting time. June-bearing varieties typically produce fruit the following spring after planting. Everbearing and day-neutral varieties may produce some fruit in the first year, but the main harvest will be in the second year. Be patient and provide your plants with proper care, and you’ll be rewarded with a delicious harvest.


Leave a Comment