
Melon Planting Home Garden: Ever dreamed of biting into a juicy, homegrown melon, bursting with flavor that store-bought ones just can’t match? I know I have! There’s something incredibly satisfying about nurturing a plant from seed to fruit, especially when that fruit is as delicious as a melon. This isn’t just about gardening; it’s about creating a little slice of summer paradise right in your backyard.
Melons have a rich history, dating back thousands of years to Africa and Asia. They were prized by ancient civilizations for their sweetness and hydrating properties. Think of Cleopatra enjoying a refreshing melon – you can almost taste the history! But you don’t need to be royalty to enjoy this treat.
Many people shy away from growing melons, thinking they require vast amounts of space or are too difficult. But that’s where I come in! This DIY guide is packed with simple, effective tricks and hacks to make melon planting home garden a breeze, even if you’re a beginner or have limited space. I’ll show you how to choose the right varieties, prepare your soil, and provide the care your melons need to thrive. Get ready to impress your friends and family with your homegrown harvest – let’s get planting!
Growing Delicious Melons in Your Home Garden: A DIY Guide
Hey there, fellow gardening enthusiasts! I’m so excited to share my tried-and-true method for growing juicy, flavorful melons right in your own backyard. Forget those bland supermarket melons – with a little effort and this guide, you’ll be enjoying homegrown goodness in no time. This guide will cover everything from seed starting to harvesting, ensuring you have the best chance of success.
Choosing Your Melon Variety
Before we dive into the nitty-gritty, let’s talk about melon varieties. There are so many to choose from, and the best one for you will depend on your climate, space, and personal preferences. Here are a few popular options:
* Watermelon: A classic summer favorite! Look for varieties like ‘Sugar Baby’ (compact and early), “Crimson Sweet” (large and flavorful), or “Yellow Doll” (unique yellow flesh).
* Cantaloupe: Sweet and aromatic, cantaloupes are a delightful treat. ‘Athena’ and ‘Hales Best Jumbo’ are reliable choices.
* Honeydew: Known for its smooth, green flesh and mild sweetness. ‘Honeycrisp’ and ‘Temptation’ are worth considering.
* Galia Melon: A cross between cantaloupe and honeydew, offering a unique flavor profile.
* Specialty Melons: Don’t be afraid to experiment with unique varieties like Charentais, Casaba, or Crenshaw melons.
Important Note: Consider your growing season length when choosing a variety. Some melons require a longer growing season than others. Check the seed packet or plant label for specific information.
Preparing Your Melon Patch
Melons are sun-loving, heavy feeders, so proper soil preparation is crucial. Here’s what I recommend:
* Sunlight: Melons need at least 6-8 hours of direct sunlight per day. Choose a location in your garden that receives plenty of sunshine.
* Soil: Melons thrive in well-drained, fertile soil with a pH between 6.0 and 6.8. Amend your soil with plenty of organic matter, such as compost or well-rotted manure, to improve drainage and fertility.
* Space: Melons need plenty of space to spread out. Watermelons, in particular, can take up a lot of room. Allow at least 2-3 feet between plants, and 4-6 feet between rows. You can also train them to grow vertically on a trellis to save space.
* Warmth: Melons are warm-season crops and are sensitive to frost. Wait until the soil has warmed to at least 65°F (18°C) before planting.
Starting Your Melon Seeds
You can either direct sow melon seeds in your garden or start them indoors. I prefer starting them indoors, especially in areas with shorter growing seasons, as it gives them a head start.
Starting Seeds Indoors:
1. Timing: Start your melon seeds indoors about 3-4 weeks before the last expected frost.
2. Containers: Use peat pots or biodegradable containers to minimize root disturbance when transplanting.
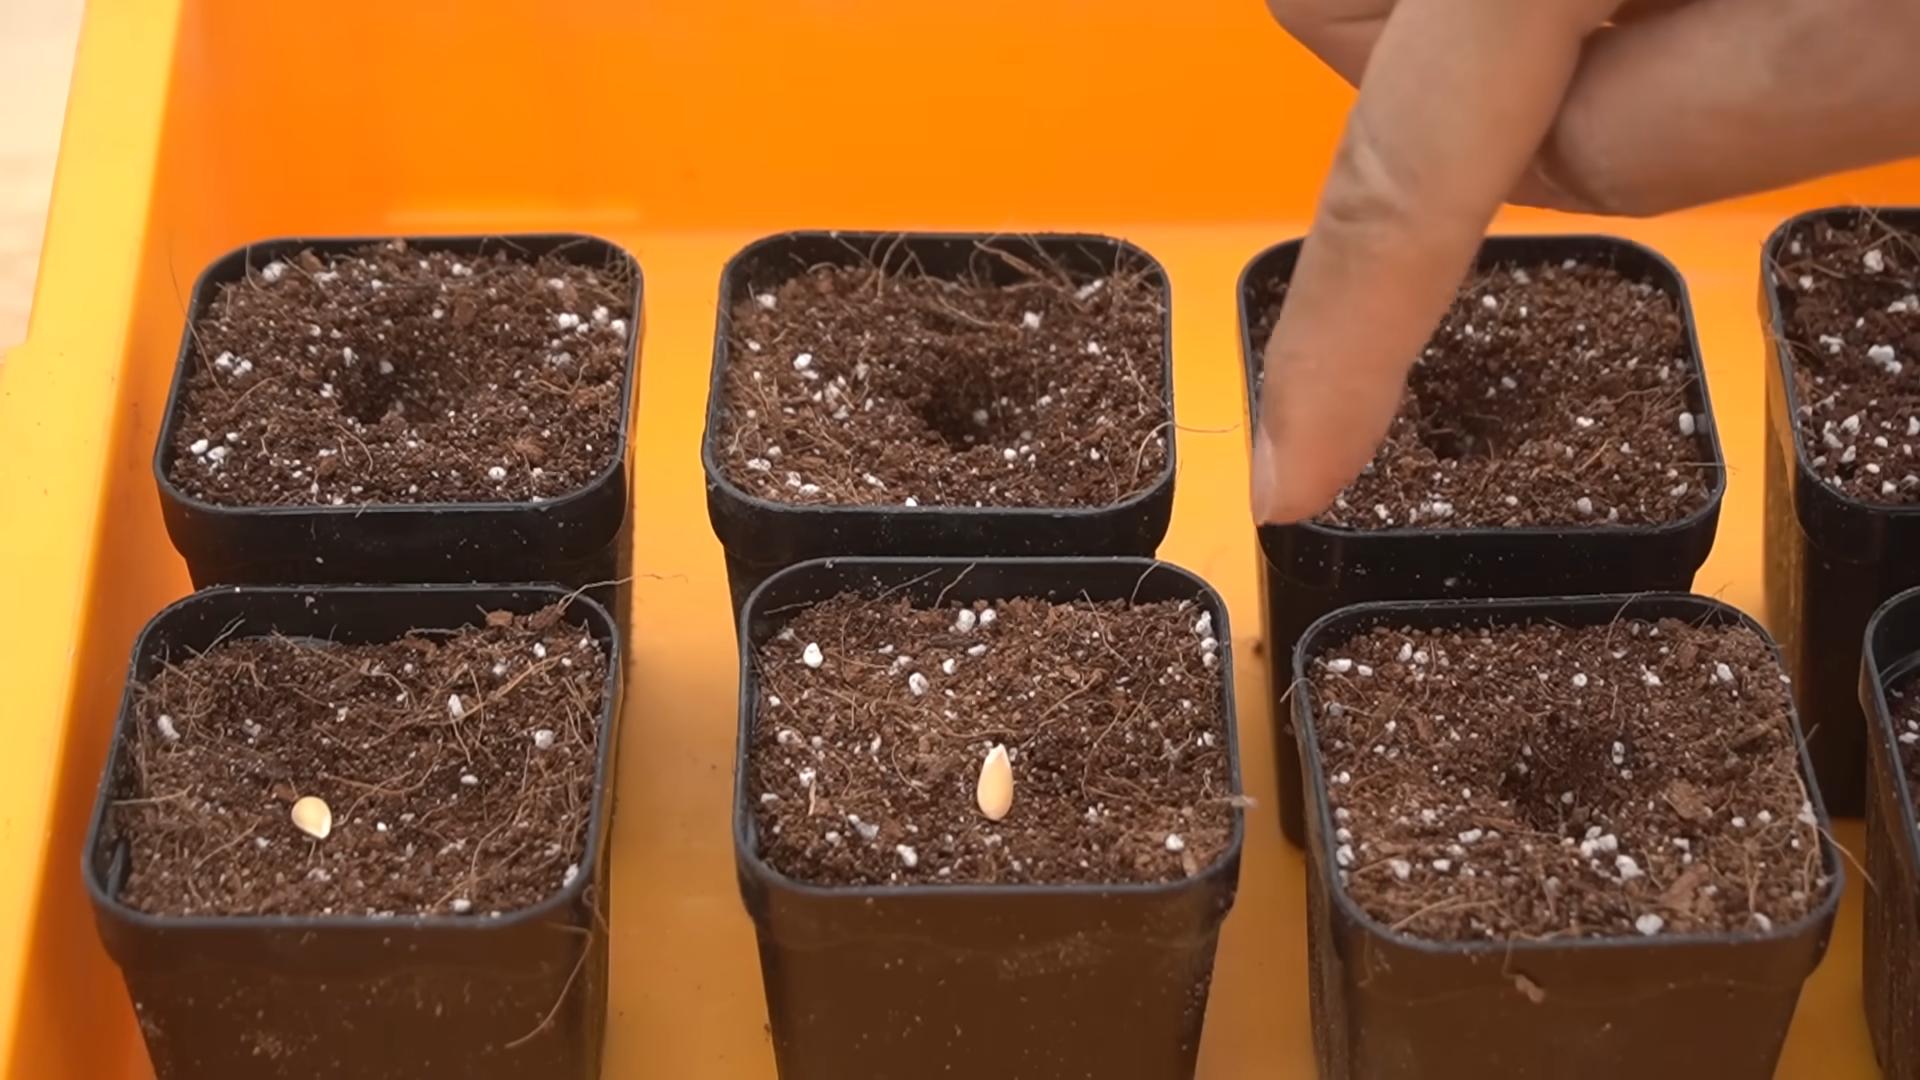
3. Soil: Fill the containers with a seed-starting mix.
4. Sowing: Sow 2-3 seeds per container, about ½ inch deep.
5. Watering: Water gently to moisten the soil.
6. Warmth: Place the containers in a warm location, such as on a heat mat or near a sunny window. The ideal temperature for germination is between 70-80°F (21-27°C).
7. Light: Once the seedlings emerge, provide them with plenty of light. If you don’t have a sunny window, use a grow light.
8. Thinning: Once the seedlings have developed their first true leaves, thin them to one plant per container. Choose the strongest, healthiest seedling.
9. Hardening Off: Before transplanting your seedlings outdoors, you’ll need to harden them off. This process gradually acclimates them to outdoor conditions. Start by placing the seedlings outdoors in a sheltered location for a few hours each day, gradually increasing the amount of time they spend outdoors over the course of a week.
Direct Sowing Seeds:
1. Timing: Direct sow melon seeds after the last expected frost, when the soil has warmed to at least 65°F (18°C).
2. Planting: Sow seeds about 1 inch deep, spacing them according to the variety’s recommendations.
3. Watering: Water gently to moisten the soil.
4. Thinning: Once the seedlings emerge, thin them to the strongest plant per hill.
Transplanting Your Melon Seedlings
Once your melon seedlings have been hardened off and the soil has warmed up, it’s time to transplant them into your garden.
1. Prepare the Planting Holes: Dig holes that are slightly larger than the root balls of your seedlings.
2. Amend the Soil: Add a handful of compost or well-rotted manure to each planting hole.
3. Transplant Carefully: Gently remove the seedlings from their containers, being careful not to damage the roots. Place the seedlings in the planting holes, making sure the top of the root ball is level with the surrounding soil.
4. Water Thoroughly: Water the seedlings thoroughly after transplanting.
5. Mulch: Apply a layer of mulch around the plants to help retain moisture, suppress weeds, and regulate soil temperature. I like to use straw or shredded leaves.
Caring for Your Melon Plants
Now that your melon plants are in the ground, it’s important to provide them with the care they need to thrive.
* Watering: Melons need consistent watering, especially during hot, dry weather. Water deeply and regularly, aiming for about 1-2 inches of water per week. Avoid overhead watering, as this can lead to fungal diseases. Drip irrigation is an excellent option for watering melons.
* Fertilizing: Melons are heavy feeders and benefit from regular fertilization. Use a balanced fertilizer, such as 10-10-10, according to the package directions. You can also side-dress your plants with compost or well-rotted manure every few weeks.
* Weeding: Keep your melon patch free of weeds, as weeds can compete with your plants for nutrients and water. Hand-pull weeds or use a hoe to remove them.
* Pest and Disease Control: Keep an eye out for common melon pests, such as aphids, squash bugs, and cucumber beetles. You can control these pests with insecticidal soap or neem oil. Melons are also susceptible to fungal diseases, such as powdery mildew and downy mildew. Prevent these diseases by providing good air circulation, avoiding overhead watering, and applying a fungicide if necessary.
* Pollination: Melons require pollination to produce fruit. If you’re not seeing any fruit set, you may need to hand-pollinate your plants. To hand-pollinate, use a small paintbrush to transfer pollen from the male flowers to the female flowers. Female flowers have a small fruit at the base of the flower, while male flowers do not.
* Pruning: While not essential, pruning can help improve air circulation and encourage fruit production. Remove any dead or diseased leaves and stems. You can also prune the vines to encourage the plant to focus its energy on producing fewer, larger fruits.
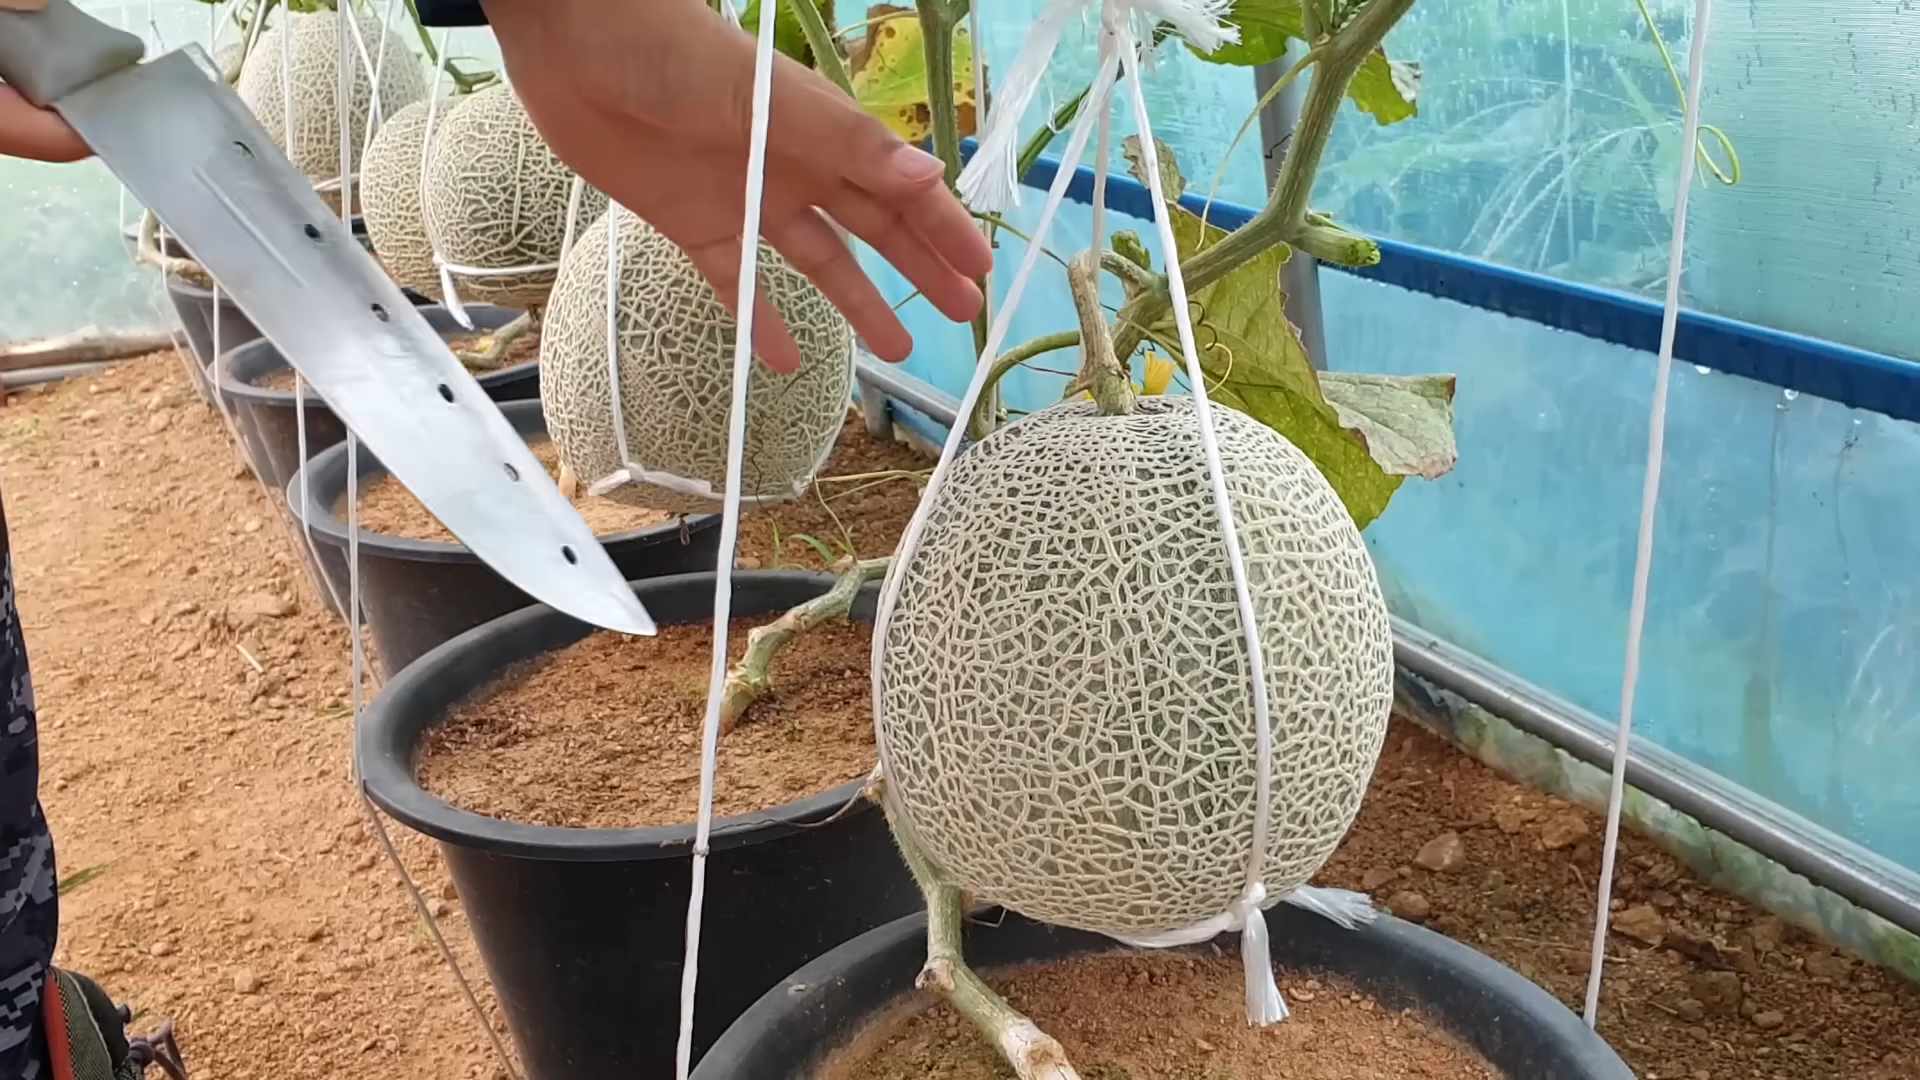
Harvesting Your Melons
Harvesting your melons at the right time is crucial for enjoying their full flavor and sweetness. Here are some tips for determining when your melons are ripe:
* Watermelon: Look for a dull, rather than shiny, rind. The underside of the melon (where it rests on the ground) should be yellow or cream-colored. When you thump the melon, it should sound hollow. The tendril closest to the melon should be brown and dry.
* Cantaloupe: The melon should have a sweet aroma. The stem should slip easily from the vine when the melon is ripe. The rind should be a golden-tan color.
* Honeydew: The melon should have a slightly waxy feel. The blossom end (opposite the stem end) should be slightly soft. The rind should be a creamy yellow color.
Once your melons are ripe, cut them from the vine with a sharp knife. Handle them carefully to avoid bruising.
Enjoying Your Homegrown Melons
Congratulations! You’ve successfully grown your own delicious melons. Now it’s time to enjoy the fruits (or rather, melons) of your labor.
* Storage: Store ripe melons in the refrigerator for up to a week.
* Serving: Melons are delicious eaten fresh, sliced, or cubed. They can also be used in salads, smoothies, and desserts.
* Seed Saving: If you want to save seeds from your melons for next year, choose the best-
Conclusion
So, there you have it! Transforming your home garden into a melon paradise is not only achievable but incredibly rewarding. This DIY melon planting trick is a game-changer for anyone looking to maximize their yield, improve the health of their plants, and enjoy the unparalleled taste of homegrown melons. Forget the store-bought varieties that often lack flavor and freshness; with a little effort and this simple technique, you can cultivate juicy, sweet melons right in your backyard.
The beauty of this method lies in its adaptability. Feel free to experiment with different melon varieties to discover your favorites. Watermelons, cantaloupes, honeydews – the possibilities are endless! Consider using different types of compost or soil amendments to tailor the growing environment to the specific needs of each variety. You can even try vertical gardening techniques to save space and create a visually stunning melon display.
Why is this DIY melon planting trick a must-try? Because it empowers you to take control of your food source, connect with nature, and experience the pure joy of harvesting something you’ve nurtured from seed to fruit. It’s about more than just growing melons; it’s about creating a sustainable and fulfilling gardening experience.
Don’t be intimidated if you’re a beginner. This method is designed to be accessible to gardeners of all skill levels. The key is to follow the steps carefully, pay attention to your plants’ needs, and be patient. Remember, gardening is a journey, and every season brings new lessons and opportunities for growth.
We encourage you to embrace this DIY melon planting trick and embark on your own melon-growing adventure. We are confident that you’ll be amazed by the results. Imagine biting into a perfectly ripe, sun-warmed melon that you grew yourself – the taste is simply incomparable.
But don’t just take our word for it. Try it out and see for yourself! We’re eager to hear about your experiences. Share your photos, tips, and challenges in the comments section below. Let’s create a community of melon enthusiasts and learn from each other. Together, we can transform our gardens into thriving havens of delicious, homegrown goodness. So, grab your seeds, prepare your soil, and get ready to enjoy the sweet taste of success with this fantastic DIY melon planting trick! Happy gardening!
Frequently Asked Questions (FAQs)
What type of soil is best for planting melons?
Melons thrive in well-drained, sandy loam soil that is rich in organic matter. The soil should have a pH between 6.0 and 6.8. Before planting, amend your soil with compost, aged manure, or other organic materials to improve its fertility and drainage. Avoid heavy clay soils, as they can retain too much water and lead to root rot. If you have clay soil, consider planting in raised beds or containers to improve drainage. A soil test can help you determine the specific nutrient needs of your soil and guide your amendment choices.
How often should I water my melon plants?
Melons need consistent moisture, especially during fruit development. Water deeply and regularly, aiming for about 1-2 inches of water per week. Avoid overhead watering, as this can promote fungal diseases. Instead, use a soaker hose or drip irrigation to deliver water directly to the roots. Check the soil moisture regularly by sticking your finger about an inch into the soil. If it feels dry, it’s time to water. Reduce watering as the fruits ripen to concentrate their sugars and enhance their flavor.
What are some common pests and diseases that affect melon plants, and how can I prevent them?
Common pests include aphids, squash bugs, vine borers, and cucumber beetles. Diseases include powdery mildew, fusarium wilt, and anthracnose. To prevent these problems, practice good garden hygiene by removing plant debris and weeds regularly. Use row covers to protect young plants from pests. Encourage beneficial insects like ladybugs and lacewings, which prey on aphids and other pests. Choose disease-resistant melon varieties. If you notice signs of pests or diseases, treat them promptly with organic insecticides or fungicides. Crop rotation can also help prevent soilborne diseases from building up.
How do I know when my melons are ripe?
Determining ripeness varies slightly depending on the melon variety. For watermelons, look for a dull rind, a yellowish ground spot (where the melon rests on the ground), and a hollow sound when you thump it. The tendril closest to the melon should also be brown and dry. For cantaloupes, the melon should slip easily from the vine with a gentle tug, and it should have a fragrant aroma. Honeydews are ripe when the rind turns a creamy yellow color and feels slightly soft to the touch. Experience is the best teacher, so pay attention to the subtle cues and keep track of when your melons ripen each year.
Can I grow melons in containers?
Yes, you can grow melons in containers, but you’ll need to choose a large container (at least 20 gallons) and select a compact or bush variety. Make sure the container has good drainage. Use a high-quality potting mix and provide regular fertilization. Container-grown melons may require more frequent watering than those grown in the ground. Consider using a trellis to support the vines and keep the fruits off the ground.
What are some good companion plants for melons?
Companion planting can help improve melon growth and deter pests. Good companion plants for melons include marigolds (which repel nematodes), nasturtiums (which attract aphids away from melons), radishes (which deter cucumber beetles), and basil (which repels flies and mosquitoes). Avoid planting melons near potatoes, as they can compete for nutrients.
How much sunlight do melon plants need?
Melons need at least 6-8 hours of direct sunlight per day to thrive. Choose a sunny location in your garden where your melon plants will receive ample sunlight throughout the growing season. If you live in a hot climate, provide some afternoon shade to prevent the fruits from scorching.
How do I fertilize my melon plants?
Melons are heavy feeders and benefit from regular fertilization. Apply a balanced fertilizer (e.g., 10-10-10) at planting time, and then side-dress with a nitrogen-rich fertilizer every 2-3 weeks during the growing season. Once the fruits begin to develop, switch to a fertilizer that is higher in phosphorus and potassium to promote fruit development and sweetness. Avoid over-fertilizing, as this can lead to excessive vine growth and reduced fruit production.
Can I save seeds from my homegrown melons?
Yes, you can save seeds from your homegrown melons, but keep in mind that hybrid varieties may not produce true-to-type offspring. To save seeds, allow the melon to fully ripen on the vine. Scoop out the seeds and rinse them thoroughly to remove any pulp. Spread the seeds on a paper towel to dry completely. Store the dried seeds in an airtight container in a cool, dark place.
What are some creative ways to use my homegrown melons?
Beyond simply eating them fresh, there are many creative ways to enjoy your homegrown melons. You can make refreshing melon salads, smoothies, and juices. Grill melon slices for a smoky flavor. Use melon to make sorbet, ice cream, or popsicles. Pickle melon rinds for a unique condiment. Or, get fancy and carve your melon into a decorative centerpiece. The possibilities are endless!

Leave a Comment