
Grow Oregano Indoors and unlock a world of fresh, flavorful possibilities right in your home! Imagine having a constant supply of aromatic oregano, ready to enhance your culinary creations whenever you desire. No more last-minute dashes to the grocery store or settling for dried herbs that lack that vibrant, fresh taste.
For centuries, oregano has been cherished not only for its culinary uses but also for its medicinal properties. Ancient Greeks and Romans revered it as a symbol of joy and happiness, often using it in wedding ceremonies and as a natural remedy. Today, we can easily bring this historical herb into our modern lives, and I’m here to show you how!
In today’s fast-paced world, convenience is key. But what if convenience could also be combined with freshness and sustainability? That’s where growing your own oregano indoors comes in. This DIY guide will provide you with simple, effective tricks and hacks to successfully grow oregano indoors, even if you have limited space or gardening experience. I’ll walk you through everything from choosing the right container and soil to providing the perfect amount of light and water. Get ready to enjoy the satisfaction of harvesting your own homegrown oregano and adding a burst of flavor to your favorite dishes!
Growing Tomatoes From Store-Bought Tomatoes: A DIY Adventure!
Hey there, fellow gardening enthusiasts! Ever looked at a juicy, ripe tomato from the grocery store and thought, “I wonder if I could grow more of these?” Well, guess what? You absolutely can! While it’s not always guaranteed to produce the exact same tomato (more on that later), it’s a fun and rewarding experiment. I’m going to walk you through the process, step-by-step, so you can try it yourself. Let’s get our hands dirty!
Understanding the Basics: Hybrid vs. Heirloom
Before we dive in, it’s important to understand the difference between hybrid and heirloom tomatoes. This will affect your chances of success and the type of tomatoes you’ll get.
* Heirloom Tomatoes: These are open-pollinated varieties that have been passed down through generations. The seeds from an heirloom tomato will generally produce plants that are very similar to the parent plant. This is what we want for this project.
* Hybrid Tomatoes: These are created by cross-pollinating two different tomato varieties. While they often have desirable traits like disease resistance or high yield, the seeds from a hybrid tomato will likely *not* produce plants that are true to type. You might get something completely different!
So, how do you know if your store-bought tomato is heirloom or hybrid? Unfortunately, it’s often not labeled. Look for tomatoes labeled as “heirloom” or specific variety names like “Brandywine,” “Cherokee Purple,” or “San Marzano.” If it just says “tomato,” it’s probably a hybrid. While you can still try with a hybrid, be prepared for a surprise!
Choosing Your Tomato and Preparing the Seeds
Okay, let’s get started! Here’s what you’ll need:
* A ripe tomato (preferably heirloom)
* A sharp knife
* A small bowl or container
* Paper towels
* A sunny windowsill or grow light
* Seed starting mix
* Small pots or seed trays
* Water spray bottle
Step 1: Selecting Your Tomato
Choose a tomato that looks healthy, ripe, and free from blemishes. The riper, the better, as the seeds will be more mature. If you can find an heirloom variety, that’s ideal.
Step 2: Extracting the Seeds
1. Carefully slice the tomato in half horizontally. This will expose the seed cavities.
2. Gently squeeze the tomato halves over a bowl, releasing the seeds and pulp into the bowl. Don’t worry about separating the seeds from the pulp just yet.
3. Add a little bit of water to the bowl – just enough to cover the seeds and pulp. This will help with the fermentation process, which we’ll talk about next.
Step 3: Fermenting the Seeds (Optional, but Recommended)
Fermentation is a natural process that helps to remove a germination-inhibiting gel-like substance surrounding the tomato seeds. It also helps to kill off some seed-borne diseases.
1. Leave the bowl of seeds, pulp, and water at room temperature for 2-4 days. You’ll notice a layer of mold forming on top – don’t worry, that’s normal! Stir the mixture once or twice a day.
2. You’ll know the fermentation process is complete when the seeds have sunk to the bottom of the bowl and the mold layer is thick.
Step 4: Cleaning and Drying the Seeds
1. Carefully pour off the moldy liquid, being careful not to lose the seeds.
2. Rinse the seeds thoroughly under running water, using a fine-mesh sieve to catch any stray seeds.
3. Spread the seeds out on a paper towel in a single layer.
4. Allow the seeds to dry completely for about a week. Make sure they are in a well-ventilated area and out of direct sunlight. The seeds should be hard and easily separated from the paper towel when they are dry.
Step 5: Storing the Seeds (If Not Planting Immediately)
If you’re not planning to plant the seeds right away, store them in an airtight container in a cool, dark, and dry place. A refrigerator is a good option. Properly stored tomato seeds can remain viable for several years.
Planting Your Tomato Seeds
Now for the fun part – planting!
Step 1: Preparing Your Seed Starting Mix
Use a good quality seed starting mix. This is a sterile, lightweight mix that is designed to provide the perfect environment for seed germination. Avoid using garden soil, as it can be too heavy and may contain diseases. Moisten the seed starting mix with water until it is damp but not soggy.
Step 2: Sowing the Seeds
1. Fill your small pots or seed trays with the moistened seed starting mix.
2. Make a small indentation in the center of each pot or cell, about ¼ inch deep.
3. Place 2-3 seeds in each indentation. This increases your chances of at least one seed germinating.
4. Gently cover the seeds with seed starting mix.
5. Lightly water the soil with a spray bottle. Avoid overwatering, as this can cause the seeds to rot.
Step 3: Creating the Ideal Germination Environment
Tomato seeds need warmth and moisture to germinate.
1. Cover the pots or seed trays with a clear plastic dome or plastic wrap to create a mini-greenhouse effect. This will help to retain moisture.
2. Place the pots or seed trays in a warm location, such as on top of a refrigerator or near a radiator. The ideal temperature for tomato seed germination is between 70-80°F (21-27°C).
3. Check the soil moisture daily and mist with water as needed to keep the soil damp.
Step 4: Waiting for Germination
Tomato seeds typically germinate within 5-10 days. Once the seedlings emerge, remove the plastic dome or plastic wrap.
Caring for Your Tomato Seedlings
Once your seedlings have sprouted, they’ll need proper care to grow into strong, healthy plants.
Step 1: Providing Adequate Light
Tomato seedlings need plenty of light to grow properly. Place them in a sunny windowsill that receives at least 6 hours of direct sunlight per day. If you don’t have a sunny windowsill, you can use a grow light. Keep the grow light a few inches above the seedlings and adjust the height as they grow.
Step 2: Watering Properly
Water the seedlings regularly, but avoid overwatering. Allow the soil to dry out slightly between waterings. Water at the base of the plants to avoid wetting the foliage, which can lead to fungal diseases.
Step 3: Thinning the Seedlings
Once the seedlings have developed their first true leaves (the leaves that appear after the initial seed leaves), thin them out by snipping off the weaker seedlings at the soil line. Leave only the strongest seedling in each pot or cell.
Step 4: Fertilizing the Seedlings
After a couple of weeks, start feeding the seedlings with a diluted liquid fertilizer. Use a fertilizer that is specifically formulated for tomatoes or vegetables. Follow the instructions on the fertilizer label.
Step 5: Hardening Off the Seedlings
Before transplanting your tomato seedlings outdoors, you’ll need to “harden them off.” This is the process of gradually acclimating the seedlings to outdoor conditions.
1. Start by placing the seedlings outdoors in a sheltered location for a few hours each day.
2. Gradually increase the amount of time they spend outdoors each day, exposing them to more sunlight and wind.
3. After about a week, the seedlings should be ready to be transplanted into the garden.
Transplanting Your Tomato Seedlings
Now that your seedlings are hardened off, it’s time to transplant them into the garden!
Step 1: Choosing the Right Location
Tomatoes need at least 6 hours of direct sunlight per day. Choose a location in your garden that receives plenty of sunlight. The soil should be well-drained and fertile.
Step 2: Preparing the Soil
Amend the soil with compost or other organic matter to improve drainage and fertility. Dig a hole that is slightly larger than the root ball of the seedling.
Step 3: Transplanting the Seedlings
1. Gently remove the seedling from its pot or cell.
2. Loosen the roots slightly.
3. Place the seedling in the hole and backfill with soil.
4. Water the seedling thoroughly.
Step 4: Providing Support
Tomato plants can get quite large and heavy, so they’ll need support. Use stakes, cages, or trellises to support the plants.
Caring for Your Tomato Plants
Once your tomato plants are in the garden, they’ll need regular care to thrive.
* Watering: Water the plants regularly, especially during dry spells. Water deeply at the base of the plants.
* Fertilizing: Fertilize the plants every few weeks with a tomato fertilizer.
* Pruning
Conclusion
So, there you have it! Growing oregano indoors is not only achievable, but it’s also incredibly rewarding. Imagine having fresh, fragrant oregano at your fingertips, ready to elevate your culinary creations any time of year. No more trips to the grocery store for wilted, overpriced herbs. No more settling for dried oregano when you crave that vibrant, peppery punch that only fresh oregano can deliver.
This DIY trick is a must-try for several compelling reasons. First, it’s incredibly cost-effective. A single packet of oregano seeds or a small starter plant is a fraction of the cost of repeatedly buying fresh oregano from the store. Second, it’s sustainable. You’re reducing your carbon footprint by eliminating the transportation and packaging associated with store-bought herbs. Third, it’s empowering. There’s a unique satisfaction that comes from nurturing a plant and harvesting its bounty. And finally, it’s delicious! The flavor of homegrown oregano is simply unmatched.
But the beauty of growing oregano indoors lies in its versatility. Feel free to experiment with different varieties. Greek oregano is known for its intense flavor, while Italian oregano offers a milder, sweeter profile. You can even try growing golden oregano for its beautiful foliage and subtle citrus notes. Consider using different types of containers, from terracotta pots to repurposed jars, to add a touch of personality to your indoor herb garden.
Don’t be afraid to get creative with your setup. If you don’t have a sunny windowsill, consider using a grow light to provide your oregano with the light it needs to thrive. You can also experiment with different soil mixes to find what works best for your growing conditions.
Growing oregano indoors is an adventure, and we encourage you to embark on it! It’s a simple, satisfying way to bring a touch of nature into your home and elevate your cooking.
We’re confident that you’ll be amazed by how easy and rewarding it is to grow your own oregano. But don’t just take our word for it. Try it for yourself! We’re eager to hear about your experiences. Share your tips, tricks, and photos with us in the comments below. Let’s build a community of indoor oregano growers and inspire others to discover the joy of fresh, homegrown herbs. What are you waiting for? Get planting!
Frequently Asked Questions (FAQ)
What kind of soil is best for growing oregano indoors?
Oregano thrives in well-draining soil. A good mix is equal parts potting soil, perlite, and vermiculite. This combination provides the necessary nutrients while ensuring proper drainage, which is crucial to prevent root rot. Avoid using garden soil, as it can be too heavy and compact for container gardening. You can also find specialized herb potting mixes at most garden centers, which are formulated to meet the specific needs of herbs like oregano.
How much sunlight does indoor oregano need?
Oregano needs at least six to eight hours of sunlight per day to thrive. A south-facing windowsill is ideal, but if you don’t have one, a west-facing window can also work. If you’re not getting enough natural light, supplement with a grow light. Position the grow light a few inches above the plant and keep it on for 12-14 hours per day. Insufficient light can lead to leggy growth and a weaker flavor.
How often should I water my indoor oregano plant?
Water your oregano when the top inch of soil feels dry to the touch. Avoid overwatering, as this can lead to root rot. Water thoroughly until water drains out of the bottom of the pot, and then allow the soil to dry out slightly before watering again. During the winter months, when growth slows down, you’ll need to water less frequently.
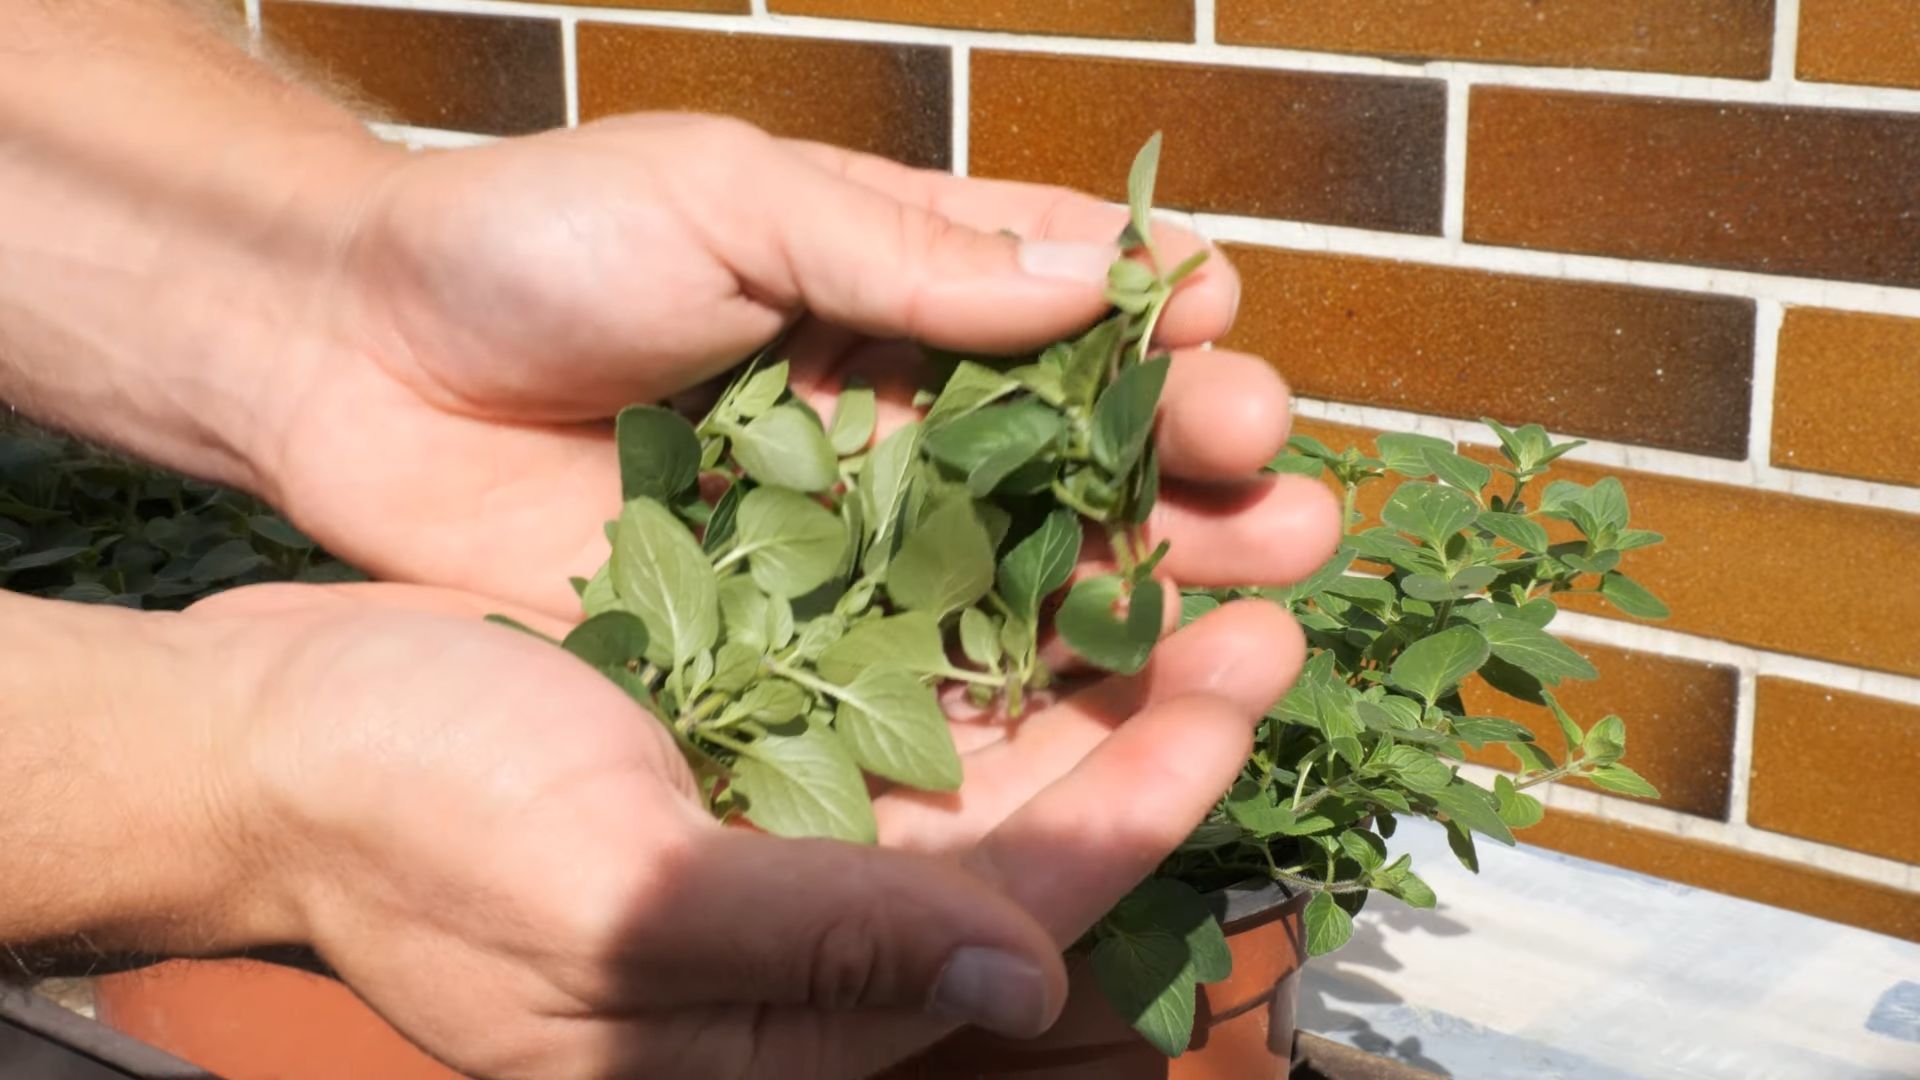
How do I harvest oregano from my indoor plant?
You can start harvesting oregano once the plant is about 4-6 inches tall. Use scissors or pruning shears to snip off stems just above a leaf node (the point where leaves grow from the stem). This will encourage the plant to branch out and produce more leaves. Harvest regularly to keep the plant compact and bushy. The best time to harvest is in the morning, after the dew has dried, as this is when the essential oils are most concentrated.
Can I propagate oregano from cuttings?
Yes, propagating oregano from cuttings is a simple and effective way to create new plants. Take a 4-6 inch cutting from a healthy stem, removing the leaves from the bottom inch. Dip the cut end in rooting hormone (optional, but it can speed up the process) and plant it in a small pot filled with moist potting mix. Cover the pot with a plastic bag or humidity dome to create a humid environment. Keep the soil moist but not soggy, and in a few weeks, the cutting should develop roots.
What are some common pests and diseases that affect indoor oregano?
Common pests that can affect indoor oregano include aphids, spider mites, and whiteflies. Inspect your plants regularly for signs of infestation, such as small insects on the leaves or webbing. Treat infestations with insecticidal soap or neem oil. Overwatering can lead to fungal diseases like root rot. Ensure proper drainage and avoid overwatering to prevent these problems. Good air circulation can also help prevent fungal diseases.
How do I fertilize my indoor oregano plant?
Oregano doesn’t need a lot of fertilizer. Feed it sparingly with a balanced liquid fertilizer diluted to half strength every 4-6 weeks during the growing season (spring and summer). Avoid over-fertilizing, as this can lead to leggy growth and a less intense flavor. You can also amend the soil with compost or worm castings to provide a slow-release source of nutrients.
My oregano plant is getting leggy. What should I do?
Leggy growth is often a sign of insufficient light. Move your plant to a sunnier location or supplement with a grow light. You can also prune the plant back to encourage bushier growth. Use scissors or pruning shears to cut back the stems by about one-third, just above a leaf node. This will stimulate new growth and create a more compact plant.
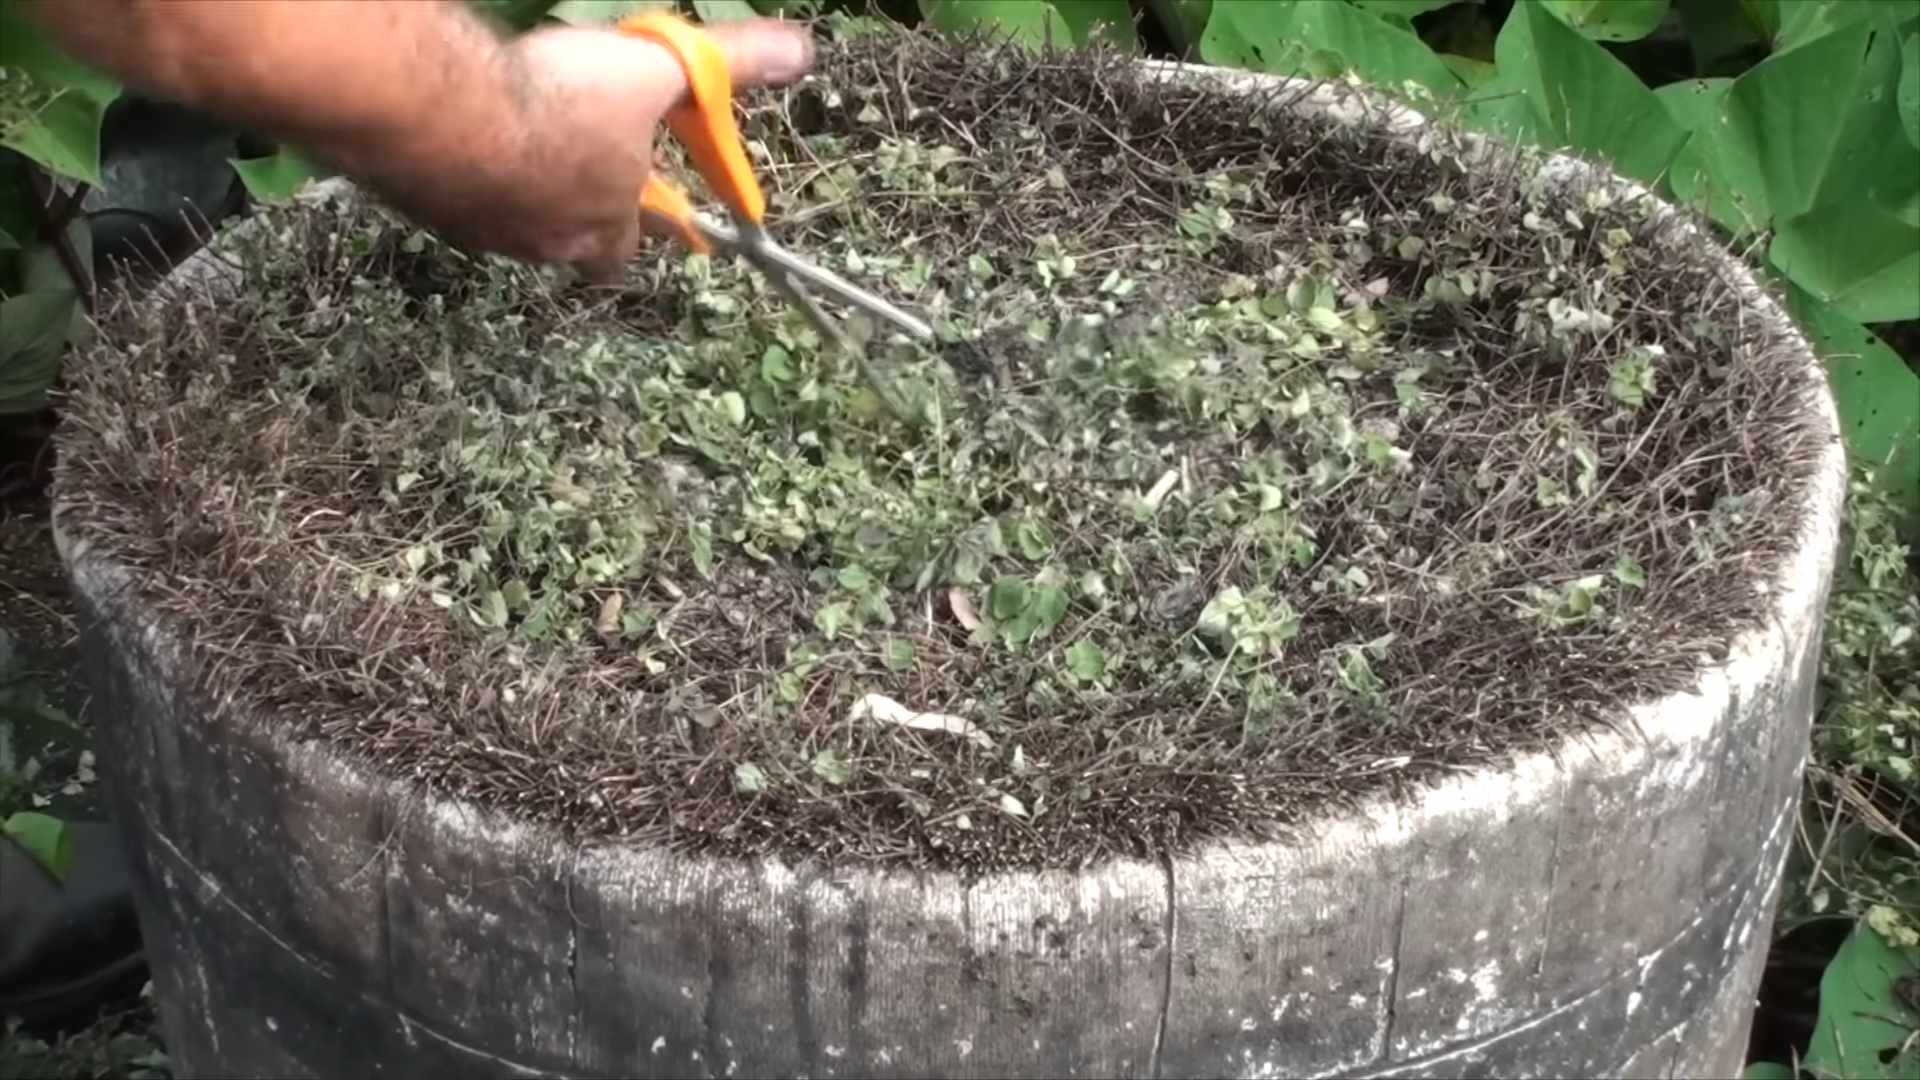
Can I dry my homegrown oregano?
Yes, drying your homegrown oregano is a great way to preserve it for later use. There are several ways to dry oregano:
* **Air Drying:** Tie stems of oregano together and hang them upside down in a cool, dry, well-ventilated place.
* **Oven Drying:** Spread oregano leaves on a baking sheet and dry them in a low oven (around 170°F) for a few hours, until they are brittle.
* **Dehydrator:** Use a food dehydrator according to the manufacturer’s instructions.
Once the oregano is completely dry, store it in an airtight container in a cool, dark place.
Is it possible to grow oregano indoors year-round?
Yes, with proper care, you can grow oregano indoors year-round. Provide adequate light, water, and fertilizer, and protect the plant from extreme temperatures. Prune regularly to keep the plant compact and bushy. With a little attention, you can enjoy fresh, homegrown oregano all year long.

Leave a Comment