
Grow Malabar Spinach Indoors? Absolutely! Imagine fresh, vibrant, and nutritious greens right at your fingertips, even if you don’t have a sprawling garden. For centuries, spinach, in its various forms, has been a staple in diets around the world, prized for its health benefits and versatility. While traditional spinach thrives in cooler climates, Malabar spinach, with its heat-loving nature, offers a fantastic alternative, especially when you learn how to cultivate it indoors.
But why bother with growing Malabar spinach indoors? Well, for starters, it extends your growing season, allowing you to enjoy fresh greens year-round. Plus, it’s incredibly rewarding to nurture a plant from seed to harvest, knowing you’re providing yourself and your family with healthy, homegrown food. Many people struggle with limited space or unfavorable weather conditions, making indoor gardening the perfect solution. This DIY guide will walk you through every step, from selecting the right container to harvesting your delicious, leafy bounty. Get ready to unlock the secrets to successfully grow Malabar Spinach Indoors and add a touch of green to your home!
Growing Malabar Spinach Indoors: Your Guide to Lush Greenery
Hey plant friends! Do you want to grow your own Malabar spinach (Basella alba), even if you don’t have a garden? Don’t worry, it’s super easy to do indoors! I’ll show you how to get this delicious and healthy spinach to sprout in your own four walls. Let’s get started!
What you need:
- Seeds: Malabar spinach seeds (preferably from a trusted source)
- Seed starting mix: Special seed starting mix is loose and low in nutrients, ideal for germination.
- Pots: Small seedling pots or egg cartons for starting seeds.
- Larger pot: A pot with at least a 20 cm diameter for the mature plant.
- Support/Trellis: A trellis, bamboo stakes, or a similar frame for the spinach to climb on.
- Plant lamp (optional): If you have little sunlight, a plant lamp is worth its weight in gold.
- Spray bottle: For moistening the soil.
- Watering can: For watering the plants.
- Liquid fertilizer: An organic liquid fertilizer for vegetables.
The Preparation: The Key to Success
Before we get started, good preparation is everything. Malabar spinach needs warmth and moisture to germinate.
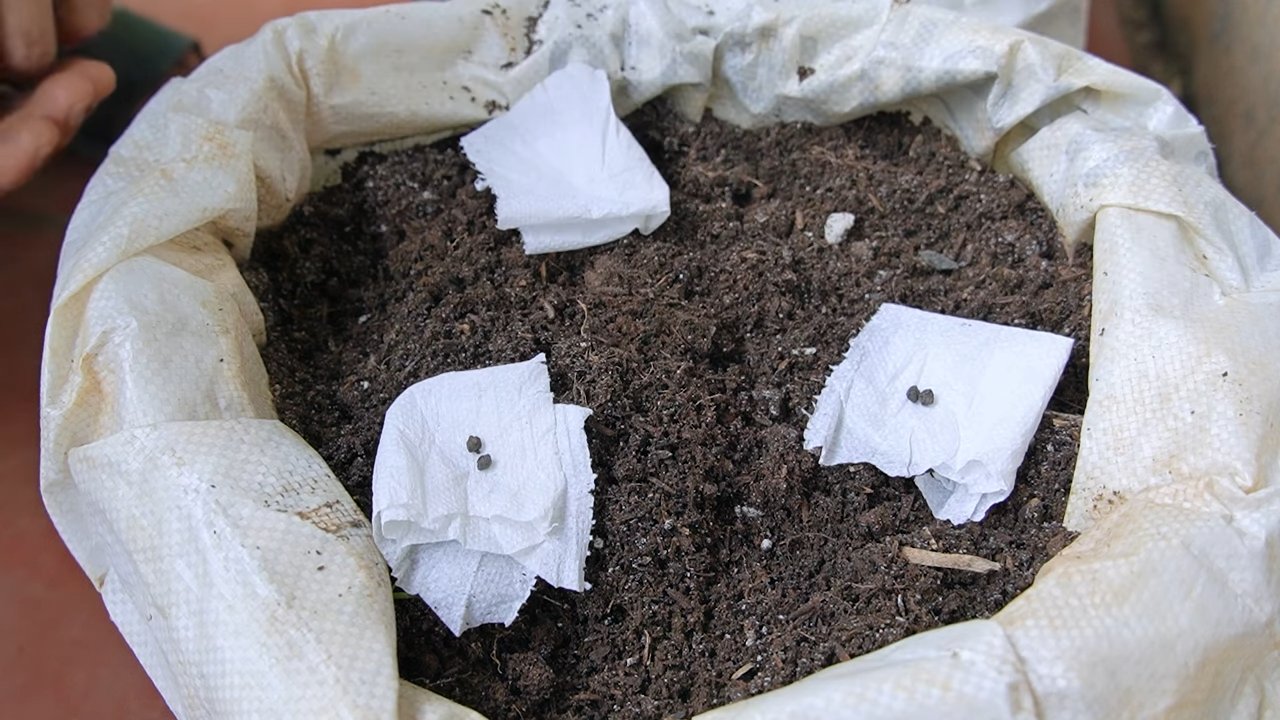
- Prepare the seeds: Malabar spinach seeds have a hard shell. To speed up germination, you can soak them in lukewarm water for 24 hours. This softens the shell and makes it easier for the seedling to break through.
- Prepare the seedling pots: Fill the seedling pots with seed starting mix. Press the soil down lightly, but not too firmly.
- Sow the seeds: Place 2-3 seeds in each pot. Cover them with a thin layer of soil (approx. 0.5 cm).
- Water: Moisten the soil carefully with a spray bottle. It should be damp, but not wet.
- Keep it warm and moist: Place the pots in a warm place (approx. 20-25°C). A mini-greenhouse or a clear plastic bag over the pots helps to keep the humidity high. Make sure to air out the bag regularly to prevent mold.
Germination: Patience is Required
The germination of Malabar spinach can take a while, so don’t despair if nothing happens immediately.
- Be patient: It usually takes 10-21 days for the seeds to germinate.
- Check moisture: Regularly check the moisture of the soil. It should always be slightly damp.
- Ventilate: If you are using a plastic bag or a mini-greenhouse, ventilate it daily to prevent mold.
- Light: As soon as the first seedlings appear, they need a lot of light. Place the pots in a bright spot, e.g., on a windowsill. If you have little sunlight, use a plant lamp.
Pricking Out: Giving the Strong a Chance
Once the seedlings have a few leaves, it’s time to prick them out. This means you select the strongest plants and transplant them into larger pots.
- Preparation: Fill the larger pot with high-quality potting soil or vegetable soil.
- Selection: Choose the strongest seedlings. These are the ones that are growing most vigorously and have healthy leaves.
- Transplant: Carefully dig a hole in the soil of the larger pot. Gently lift the seedling out of the seedling pot and place it in the hole. Be careful not to damage the roots.
- Water in: Water the plant thoroughly after transplanting.
The Care: Helping Your Spinach Thrive
Malabar spinach is relatively low-maintenance, but you should keep a few things in mind for it to thrive.
- Location: Malabar spinach needs a lot of light. Place the pot in a bright spot, e.g., on a sunny windowsill. If you have little sunlight, use a plant lamp.
- Watering: Water the plant regularly, but avoid waterlogging. The soil should always be slightly moist.
- Fertilizing: Fertilize the plant every 2-3 weeks with an organic liquid fertilizer for vegetables.
- Support/Trellis: Malabar spinach is a climbing plant. Give it a support to climb on. A trellis, bamboo stakes, or a similar frame are ideal.
- Pruning: Regularly pinch off the shoot tips to encourage growth and make the plant bushier.
The Harvest: Finally, Harvest Time!
After a few weeks, you can finally harvest your own Malabar spinach!
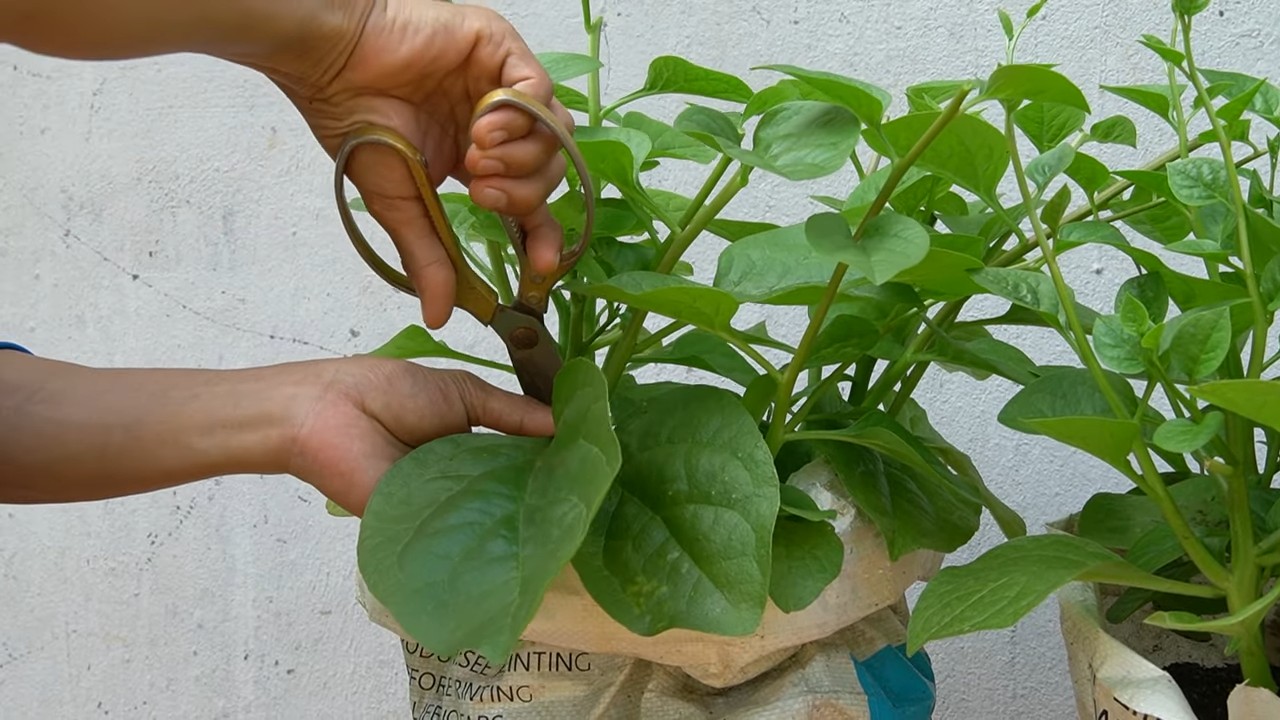
- Harvesting time: You can harvest the leaves as soon as they are large enough. They are usually ready to harvest after 6-8 weeks.
- Harvesting method: Cut the leaves with scissors or a knife. You can either harvest individual leaves or entire shoots.
- Harvest regularly: The more often you harvest, the more leaves will grow back.
Common Problems and Solutions:
- Yellow leaves: Can be a sign of overwatering or nutrient deficiency. Check your watering and fertilize the plant if necessary.
- Pests: Malabar spinach is relatively resistant to pests. If you do discover pests, you can combat them with an organic pesticide.
- Slow growth: Can be due to too little light or a lack of nutrients. Move the plant to a brighter location and fertilize it regularly.
Additional Tips:
- Different varieties: There are different varieties of Malabar spinach. Find out which variety is best suited for indoor cultivation.
- Saving seeds: If you wish, you can save seeds from your own plants. Simply let a few flowers mature and collect the seeds once they are dry.
- Creative supports: Be creative when choosing a support. For example, you can use old branches, wire, or even an old window screen.
Why Malabar Spinach?
Malabar spinach is not only delicious but also very healthy. It is rich in vitamins, minerals, and antioxidants. It is also very low-maintenance and grows quickly. Perfect for anyone who has little time but still wants to grow fresh vegetables.
I hope this guide helps you to successfully grow your own Malabar spinach indoors. Happy gardening! And remember: with a little patience and attention to detail, you can achieve a bountiful harvest even without a garden. Let it grow
Conclusion
So, there you have it! Growing Malabar spinach indoors is not only achievable, but it’s also a deeply rewarding experience that brings a touch of the tropics right into your home. Forget relying solely on grocery stores for this nutritious and delicious leafy green; with a little effort and the right conditions, you can enjoy fresh, homegrown Malabar spinach whenever you desire.
Why is this DIY trick a must-try? Because it empowers you to take control of your food source, ensuring you have access to fresh, organic produce regardless of the season or your geographical location. Imagine the satisfaction of harvesting your own vibrant green leaves, knowing exactly where they came from and what went into their growth. It’s a sustainable and cost-effective way to add a unique and healthy ingredient to your meals.
Beyond the basic method, there are numerous ways to personalize your indoor Malabar spinach growing experience. Consider experimenting with different types of containers, from traditional pots to vertical planters, to maximize space and add visual appeal. You can also explore various growing mediums, such as coco coir or perlite, to optimize drainage and aeration. For those seeking an extra boost, try incorporating organic fertilizers or compost teas to nourish your plants and promote vigorous growth.
Another exciting variation is to train your Malabar spinach vine to climb a trellis or support structure. This not only adds an aesthetic element to your indoor garden but also encourages air circulation and prevents overcrowding. You can even propagate new plants from cuttings, expanding your Malabar spinach collection and sharing the joy of homegrown produce with friends and family.
The possibilities are truly endless when it comes to growing Malabar spinach indoors. It’s a journey of discovery, experimentation, and ultimately, delicious rewards. Don’t be intimidated by the prospect of indoor gardening; with a little patience and attention, you’ll be amazed at how easily you can cultivate this versatile leafy green in the comfort of your own home.
We wholeheartedly encourage you to embark on this exciting adventure and discover the joys of growing Malabar spinach indoors. It’s a simple yet profound way to connect with nature, enhance your culinary creations, and embrace a more sustainable lifestyle.
So, grab your seeds, prepare your containers, and get ready to witness the magic of homegrown Malabar spinach. And most importantly, don’t forget to share your experiences with us! We’d love to hear about your successes, challenges, and creative variations. Share your photos, tips, and recipes in the comments below, and let’s build a community of passionate indoor gardeners. Happy growing!
Frequently Asked Questions (FAQ)
What are the ideal growing conditions for Malabar spinach indoors?
Malabar spinach thrives in warm, humid environments with plenty of sunlight. Aim for a temperature range of 70-85°F (21-29°C) and provide at least 6-8 hours of direct sunlight per day. If you don’t have access to sufficient natural light, consider using grow lights to supplement. Humidity is also crucial, so mist your plants regularly or use a humidifier to maintain a humidity level of around 60-70%.
What type of soil is best for growing Malabar spinach indoors?
Malabar spinach prefers well-draining, fertile soil that is rich in organic matter. A good potting mix for indoor growing would consist of a combination of peat moss, perlite, and vermiculite. You can also amend the soil with compost or aged manure to provide additional nutrients. Ensure the pH level of the soil is slightly acidic to neutral, around 6.0-7.0.
How often should I water my Malabar spinach plants indoors?
Water your Malabar spinach plants regularly, keeping the soil consistently moist but not waterlogged. Check the soil moisture level daily by sticking your finger about an inch into the soil. If it feels dry, it’s time to water. Avoid overwatering, as this can lead to root rot. During the warmer months, you may need to water more frequently than during the cooler months.
How do I fertilize my Malabar spinach plants indoors?
Malabar spinach is a heavy feeder, so regular fertilization is essential for optimal growth. Use a balanced liquid fertilizer diluted to half strength every 2-3 weeks. You can also incorporate slow-release fertilizer granules into the soil at planting time. Organic options like compost tea or fish emulsion are also excellent choices. Avoid over-fertilizing, as this can burn the roots.
When can I start harvesting my Malabar spinach leaves?
You can start harvesting Malabar spinach leaves about 6-8 weeks after planting, once the plants have reached a sufficient size. Harvest the outer leaves first, leaving the inner leaves to continue growing. Regular harvesting encourages bushier growth and prolongs the harvest period. Avoid harvesting more than one-third of the plant at a time.
How do I deal with pests and diseases on my indoor Malabar spinach plants?
Malabar spinach is generally resistant to pests and diseases, but it can occasionally be affected by aphids, spider mites, or whiteflies. Inspect your plants regularly for any signs of infestation. If you spot any pests, try washing them off with a strong stream of water or using insecticidal soap. For fungal diseases, ensure good air circulation and avoid overwatering.
Can I grow Malabar spinach from cuttings?
Yes, Malabar spinach can be easily propagated from cuttings. Take a 4-6 inch cutting from a healthy stem, remove the lower leaves, and place the cutting in a glass of water. Change the water every few days. Once roots have developed, transplant the cutting into a pot filled with well-draining soil.
Is Malabar spinach the same as regular spinach?
No, Malabar spinach (Basella alba) is not the same as regular spinach (Spinacia oleracea). While both are leafy green vegetables, they belong to different plant families and have distinct characteristics. Malabar spinach is a heat-tolerant vine, while regular spinach is a cool-season crop. Malabar spinach has a slightly thicker, more succulent texture and a milder flavor than regular spinach.
How do I store harvested Malabar spinach leaves?
Store harvested Malabar spinach leaves in the refrigerator in a plastic bag or container. They will stay fresh for about 3-5 days. You can also blanch and freeze the leaves for longer storage.
Can I grow Malabar spinach in a hydroponic system indoors?
Yes, Malabar spinach can be successfully grown in a hydroponic system indoors. Hydroponics provides a controlled environment and allows for efficient nutrient delivery. Use a nutrient solution specifically formulated for leafy greens and ensure proper lighting and aeration.
Leave a Comment