
Growing tomatoes from store tomatoes? Absolutely! I know what you’re thinking: can you really turn that supermarket tomato into a thriving plant bursting with juicy goodness? The answer, my friend, is a resounding YES! For generations, resourceful gardeners have been experimenting with propagating plants from unexpected sources, and using store-bought produce is a fantastic way to dip your toes into the world of DIY gardening.
Think about it: before the advent of commercial seed companies, people relied heavily on saving seeds from their own harvests or trading with neighbors. This resourceful spirit is alive and well, and growing tomatoes from store tomatoes is a modern twist on that age-old tradition. It’s a budget-friendly, sustainable way to expand your garden and enjoy the satisfaction of nurturing life from something you’d normally toss in a salad.
But why should you try this? Well, for starters, it’s incredibly rewarding! Imagine the bragging rights when you tell your friends you grew those delicious tomatoes from a simple store-bought fruit. Plus, in a world where we’re increasingly conscious of food waste and sustainability, this DIY trick allows you to give new life to something that might otherwise end up in the compost bin. So, grab your gardening gloves, and let’s unlock the secrets to transforming those supermarket tomatoes into a bountiful harvest!
Growing Tomatoes From Store-Bought Tomatoes: A DIY Adventure!
Hey there, fellow gardening enthusiasts! Ever looked at a juicy, ripe tomato from the grocery store and thought, “I wonder if I could grow more of these?” Well, guess what? You absolutely can! While it’s not *always* guaranteed to work perfectly (hybrid varieties can be tricky), it’s a fun and rewarding experiment. I’m going to walk you through the process of growing tomatoes from store-bought tomatoes. Let’s get our hands dirty!
Choosing Your Tomato and Gathering Supplies
Before we dive into the nitty-gritty, let’s talk about selecting the right tomato and gathering everything we need. This is crucial for setting ourselves up for success.
* Choosing the Right Tomato:
* Opt for Organic: This is my top recommendation. Organic tomatoes are more likely to be open-pollinated or heirloom varieties, meaning their seeds will produce plants that are true to type (i.e., the offspring will resemble the parent). Non-organic tomatoes are often hybrids, and their seeds might not produce the same kind of tomato you started with.
* Look for Ripe, Healthy Tomatoes: Choose tomatoes that are fully ripe, free from blemishes, bruises, or signs of rot. The healthier the tomato, the better the chance of viable seeds.
* Consider Variety: Beefsteak, Roma, and heirloom varieties tend to work best. Cherry tomatoes can also be successful. Avoid anything that looks suspiciously perfect and uniform – those are often heavily hybridized.
* Gathering Your Supplies:
* A Sharp Knife: For slicing the tomato.
* A Small Bowl or Jar: To collect the seeds and pulp.
* Paper Towels: For drying the seeds.
* Seed Starting Trays or Small Pots: To plant the seeds.
* Seed Starting Mix: A light, well-draining soil mix specifically designed for starting seeds. Regular potting soil can be too heavy.
* Spray Bottle: For misting the soil.
* A Warm, Sunny Location: Or a grow light.
* Labels: To keep track of what you’re planting. Trust me, you’ll forget!
* Optional: A small strainer or sieve: To help separate the seeds from the pulp.
Extracting and Preparing the Tomato Seeds
Okay, now for the fun part! We’re going to get those seeds out and ready for planting. This process involves a little fermentation, which helps remove a germination-inhibiting gel around the seeds. Don’t worry, it’s not as complicated as it sounds!
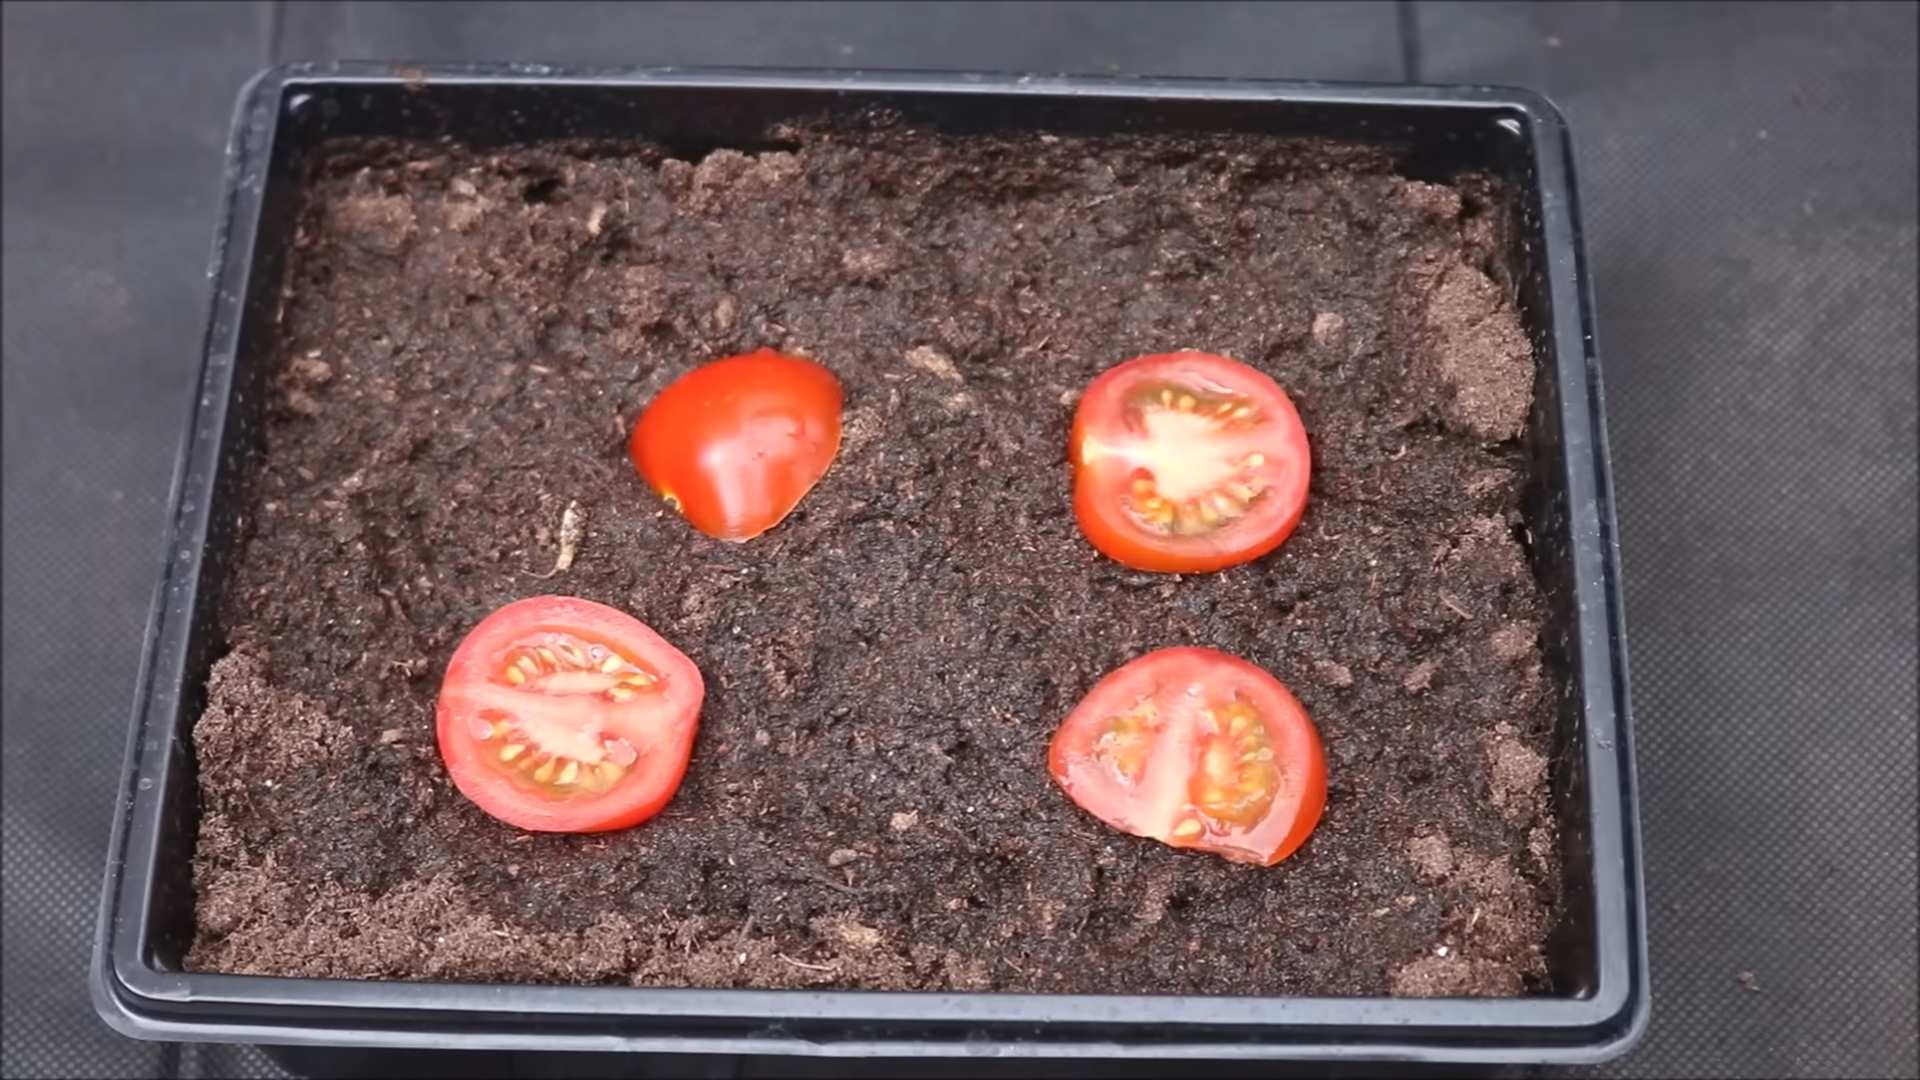
1. Slice the Tomato: Carefully slice the tomato in half horizontally. This will expose the seed cavities.
2. Squeeze Out the Seeds and Pulp: Gently squeeze the seeds and pulp from each half of the tomato into your bowl or jar. Don’t be shy – get it all in there!
3. Add a Little Water: Add about half a cup of water to the bowl. This will help with the fermentation process.
4. Ferment the Mixture: Cover the bowl loosely with plastic wrap or a lid. Leave it in a warm place (room temperature is fine) for 3-4 days. You’ll notice a layer of mold forming on top – don’t panic! This is normal. It’s a sign that the fermentation process is working. Stir the mixture once a day.
5. Rinse the Seeds: After 3-4 days, rinse the seeds thoroughly under running water. Use a strainer or sieve to help separate the seeds from the remaining pulp and mold. Keep rinsing until the water runs clear and you’re left with clean seeds.
6. Dry the Seeds: Spread the seeds out in a single layer on a paper towel. Make sure they’re not touching each other. Let them dry completely in a cool, dry place for about a week. This is crucial to prevent mold growth and ensure the seeds are viable.
7. Store the Seeds: Once the seeds are completely dry, store them in an airtight container in a cool, dark place. A labeled envelope or small jar works perfectly. Properly stored tomato seeds can remain viable for several years!
Planting Your Tomato Seeds
Alright, our seeds are prepped and ready to go! Now it’s time to plant them and watch them sprout into tiny tomato plants.
1. Prepare Your Seed Starting Trays or Pots: Fill your seed starting trays or small pots with seed starting mix. Moisten the soil thoroughly with water, but don’t let it get soggy.
2. Sow the Seeds: Make a small indentation (about 1/4 inch deep) in the soil. Place 2-3 seeds in each indentation. This increases your chances of at least one seed germinating.
3. Cover the Seeds: Gently cover the seeds with a thin layer of seed starting mix.
4. Water Gently: Mist the soil with a spray bottle to avoid disturbing the seeds.
5. Provide Warmth and Light: Place the seed starting trays or pots in a warm, sunny location. A south-facing window is ideal. If you don’t have enough natural light, use a grow light. Keep the light on for about 14-16 hours a day.
6. Keep the Soil Moist: Keep the soil consistently moist, but not waterlogged. Mist the soil regularly with a spray bottle.
7. Wait Patiently: Germination typically takes 7-14 days, but it can sometimes take longer. Be patient and keep an eye on your seeds.
Caring for Your Tomato Seedlings
Once your tomato seeds have germinated and you have tiny seedlings, it’s important to provide them with the right care to help them grow into strong, healthy plants.
1. Thin the Seedlings: Once the seedlings have developed their first true leaves (the second set of leaves that appear after the initial seed leaves), thin them out by snipping off the weaker seedlings at the soil line with scissors. Leave only the strongest seedling in each pot or cell.
2. Provide Adequate Light: Tomato seedlings need plenty of light to grow properly. If you’re using a grow light, adjust the height of the light as the seedlings grow to keep it close to the plants.
3. Water Regularly: Water the seedlings regularly, allowing the soil to dry out slightly between waterings. Avoid overwatering, which can lead to root rot.
4. Fertilize Lightly: Once the seedlings are a few weeks old, you can start fertilizing them with a diluted liquid fertilizer specifically formulated for seedlings. Follow the instructions on the fertilizer label.
5. Harden Off the Seedlings: Before transplanting the seedlings outdoors, you need to “harden them off.” This process gradually acclimates the seedlings to outdoor conditions. Start by placing the seedlings outdoors in a sheltered location for a few hours each day, gradually increasing the amount of time they spend outdoors over the course of a week or two. Protect them from direct sunlight and strong winds.
Transplanting Your Tomato Seedlings
After hardening off, your tomato seedlings are ready to be transplanted into their final growing location, whether it’s in your garden, in raised beds, or in containers.
1. Choose a Sunny Location: Tomatoes need at least 6-8 hours of sunlight per day to thrive. Choose a location that receives plenty of sunlight.
2. Prepare the Soil: Amend the soil with compost or other organic matter to improve drainage and fertility.
3. Dig a Hole: Dig a hole that is slightly larger than the root ball of the seedling.
4. Remove the Seedling from the Pot: Gently remove the seedling from its pot, being careful not to damage the roots.
5. Plant the Seedling: Place the seedling in the hole and backfill with soil. Plant the seedling deep enough so that the lowest set of leaves is just above the soil line. This will encourage the plant to develop more roots along the buried stem.
6. Water Thoroughly: Water the seedling thoroughly after planting.
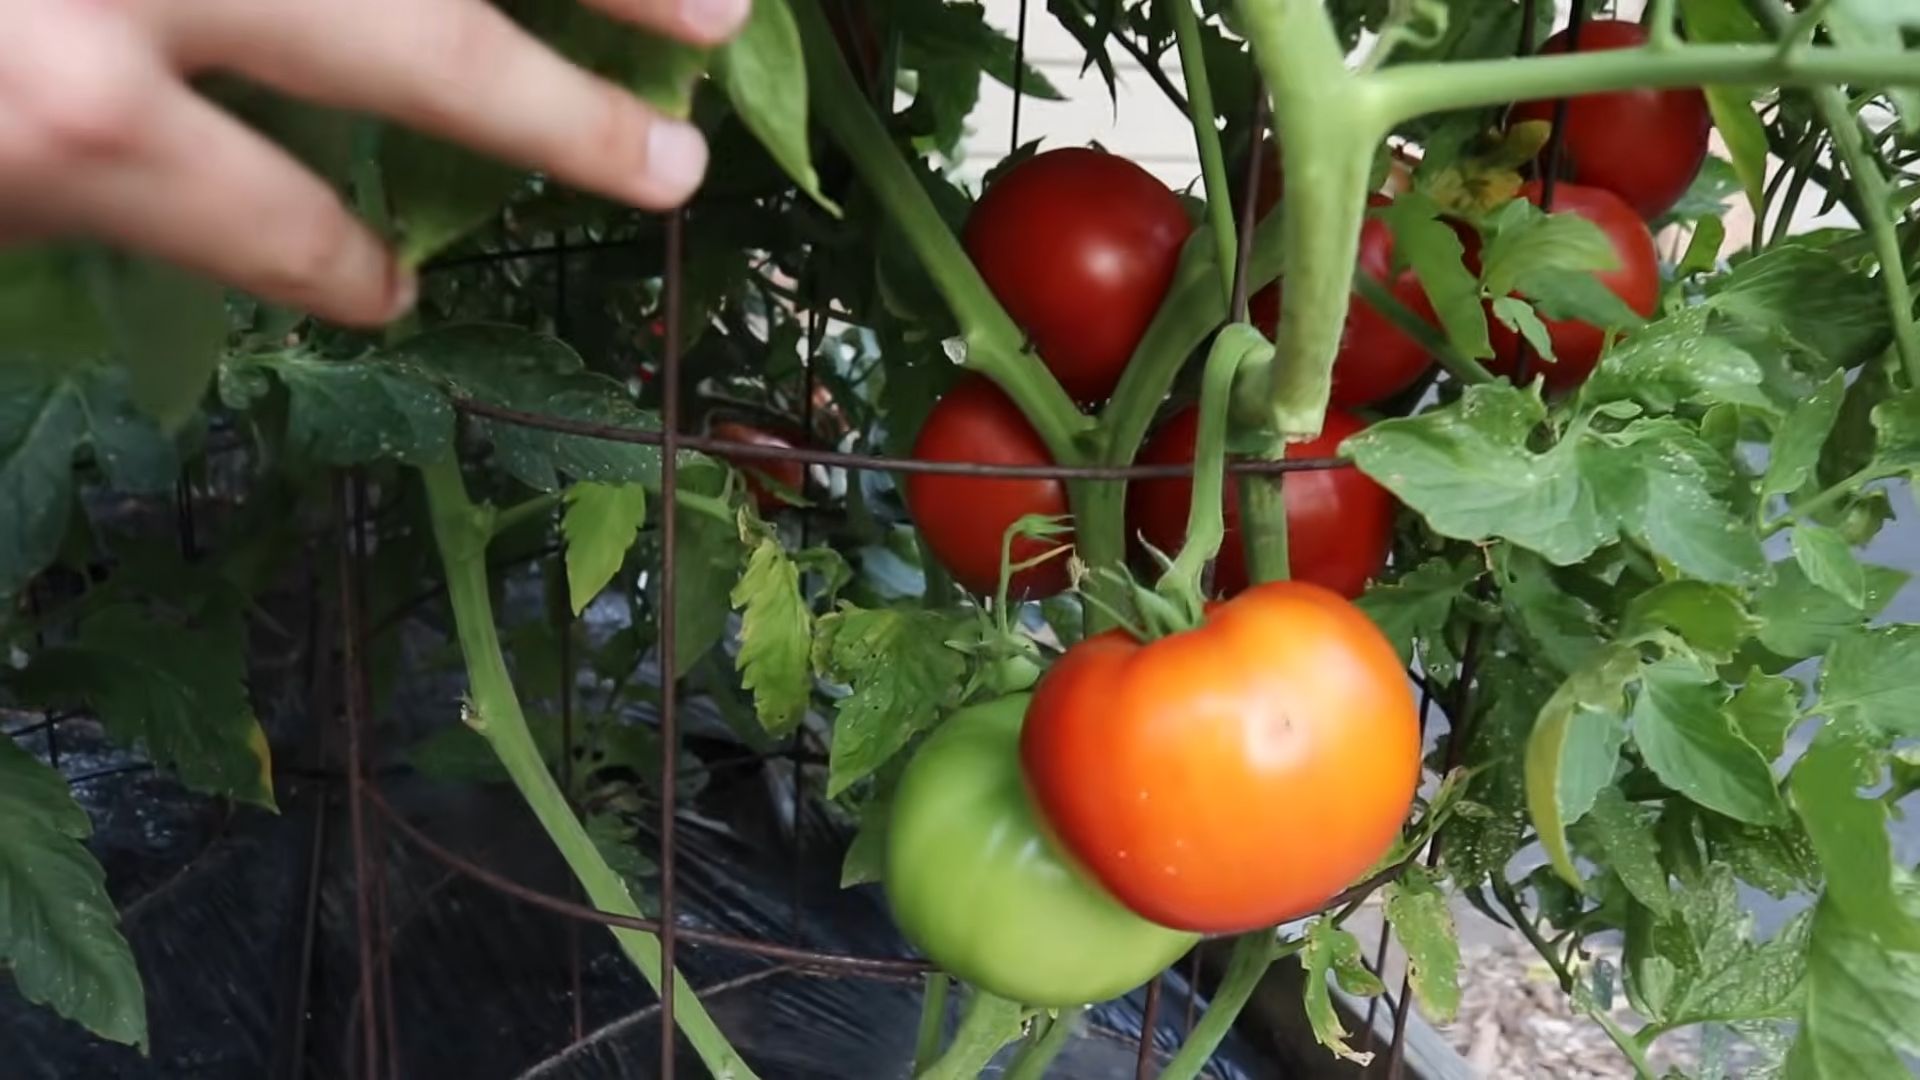
7. Add Support: Provide support for the tomato plant by staking it, caging it, or using a trellis. This will help prevent the plant from falling over as it grows and produces fruit.
Caring for Your Tomato Plants
Once your tomato plants are in the ground, it’s important to provide them with ongoing care to ensure a bountiful harvest.
1. Water Regularly: Water the tomato plants regularly, especially during dry spells. Water deeply and infrequently, rather than shallowly and frequently.
2. Fertilize Regularly: Fertilize the tomato plants every few weeks with a fertilizer specifically formulated for tomatoes. Follow the instructions on the fertilizer label.
3. Prune the Plants: Prune the tomato plants regularly to remove suckers (the small shoots that grow between the main stem and the branches). This will help improve air circulation and encourage the plant
Conclusion
So, there you have it! Growing tomatoes from store-bought tomatoes might seem like a gardening gamble, but with a little patience and the right approach, it can be a surprisingly rewarding experience. It’s a fantastic way to recycle, reduce food waste, and potentially discover a unique tomato variety perfectly suited to your local climate.
Why is this DIY trick a must-try? Firstly, it’s incredibly cost-effective. Instead of purchasing seedlings, you’re utilizing something you already have – a tomato! Secondly, it’s an exciting experiment. You never quite know what you’re going to get, which adds an element of surprise and discovery to your gardening journey. You might end up with a tomato plant that produces fruits even tastier than the original! Thirdly, it’s a fantastic learning opportunity. You’ll gain a deeper understanding of seed germination, plant growth, and the fascinating world of botany.
But remember, success isn’t always guaranteed. The variety of the store-bought tomato, its hybrid status, and the treatment it received before reaching the store can all influence the outcome. However, even if you don’t get a bumper crop, the process itself is a valuable learning experience.
Ready to take your tomato growing to the next level?
Here are a few suggestions and variations to consider:
* Experiment with different tomato varieties: Try using different types of store-bought tomatoes, such as Roma, beefsteak, or cherry tomatoes, to see which ones germinate and grow best in your area.
* Enhance your soil: Use a high-quality potting mix or amend your garden soil with compost and other organic matter to provide your tomato plants with the nutrients they need to thrive.
* Provide adequate support: As your tomato plants grow, they will need support to prevent the stems from breaking. Use stakes, cages, or trellises to keep your plants upright and healthy.
* Consider grafting: If you’re feeling adventurous, you can try grafting your store-bought tomato seedlings onto a more disease-resistant rootstock. This can help to improve the overall health and productivity of your plants.
* Hydroponics: For those without access to a garden, consider trying a hydroponic setup. This method allows you to grow tomatoes indoors without soil, using a nutrient-rich water solution.
Don’t be afraid to experiment and adapt the process to suit your specific needs and preferences. Gardening is all about learning and growing, so embrace the challenges and celebrate the successes.
We highly encourage you to try this DIY trick and share your experience with us! Post photos of your seedlings, share your tips and tricks, and let us know what varieties of store-bought tomatoes worked best for you. Together, we can learn and grow a community of passionate tomato growers. Let’s see what amazing tomato plants we can cultivate from those humble store-bought fruits! Happy gardening, and may your tomato plants be bountiful! Remember, the key to successful **growing tomatoes from store tomatoes** lies in patience, observation, and a willingness to experiment.
Frequently Asked Questions (FAQ)
Q: Will any store-bought tomato work for growing seedlings?
A: Not necessarily. The success rate depends on several factors, including the tomato variety, whether it’s a hybrid or heirloom, and how it was treated before reaching the store. Heirloom tomatoes are generally more likely to produce true-to-type offspring, while hybrids may not. Also, tomatoes that have been treated with ethylene gas to ripen them may have reduced germination rates. Organic tomatoes are often a better choice as they are less likely to be treated with chemicals that could inhibit germination.
Q: How long does it take for tomato seeds to germinate?
A: Tomato seeds typically germinate within 5-14 days, but it can sometimes take longer depending on the temperature and moisture levels. Keep the soil consistently moist but not waterlogged, and maintain a temperature of around 70-80°F (21-27°C) for optimal germination. Using a heat mat can help to speed up the process.
Q: What kind of soil should I use for starting tomato seeds?
A: Use a seed-starting mix or a well-draining potting mix. Avoid using garden soil, as it can be too heavy and may contain pathogens that can harm the seedlings. A good seed-starting mix will be light and airy, allowing for good drainage and aeration.
Q: How much light do tomato seedlings need?
A: Tomato seedlings need plenty of light to grow strong and healthy. Ideally, they should receive at least 6-8 hours of direct sunlight per day. If you don’t have enough natural light, you can use grow lights to supplement. Keep the grow lights a few inches above the seedlings and adjust as they grow.
Q: When should I transplant my tomato seedlings into larger pots or the garden?
A: Transplant your tomato seedlings when they have developed their first set of true leaves (the leaves that appear after the initial seed leaves, or cotyledons) and are about 2-3 inches tall. If transplanting into larger pots, choose pots that are at least 4 inches in diameter. If transplanting into the garden, wait until the danger of frost has passed and the soil has warmed up.
Q: How do I harden off my tomato seedlings before transplanting them into the garden?
A: Hardening off is the process of gradually acclimating your seedlings to outdoor conditions. About a week before you plan to transplant them, start by placing them outdoors in a sheltered location for a few hours each day. Gradually increase the amount of time they spend outdoors each day, and expose them to more sunlight and wind. This will help them to adjust to the harsher conditions of the garden and prevent transplant shock.
Q: What are some common problems that can affect tomato plants grown from store-bought tomatoes?
A: Some common problems include blossom end rot, early blight, and pests such as aphids and tomato hornworms. Blossom end rot is caused by a calcium deficiency and can be prevented by ensuring that the soil is well-drained and that the plants receive adequate calcium. Early blight is a fungal disease that can be prevented by providing good air circulation and avoiding overhead watering. Pests can be controlled with organic insecticides or by hand-picking them off the plants.
Q: Can I save seeds from the tomatoes I grow from store-bought tomatoes?
A: You can save seeds, but keep in mind that if the original tomato was a hybrid, the seeds may not produce plants that are true to type. This means that the tomatoes you grow from the saved seeds may not look or taste the same as the original tomato. If you want to save seeds from heirloom tomatoes, make sure to choose tomatoes that are fully ripe and healthy.
Q: What if my tomato seeds don’t germinate?
A: There could be several reasons why your tomato seeds didn’t germinate. The seeds may be old or of poor quality, the soil may be too cold or too wet, or the seeds may not have received enough light. Try starting with fresh seeds, using a well-draining seed-starting mix, and providing adequate warmth and light. You can also try scarifying the seeds (gently scratching the surface) to help them absorb water more easily.
Q: Are there any specific store-bought tomato varieties that are more likely to be successful when growing from seed?
A: While there’s no guarantee, heirloom varieties generally have a higher success rate than hybrids. Look for tomatoes labeled as “heirloom” or “open-pollinated.” Roma tomatoes are often a good starting point, as they are relatively easy to grow. Experimenting with different varieties is part of the fun!

Leave a Comment