
Growing Rosemary Indoors Soil Free might sound like something out of a science fiction movie, but trust me, it’s totally achievable and a game-changer for any herb lover! Imagine having fresh, fragrant rosemary at your fingertips, ready to spice up your dishes, all without the mess and fuss of soil.
Rosemary, with its rich history dating back to ancient civilizations, has always been prized for its culinary and medicinal properties. The ancient Greeks and Romans revered it as a symbol of remembrance and fidelity. Now, you can bring this historical herb into your home in a modern, innovative way.
Let’s face it, traditional gardening can be intimidating. Soil can be messy, pests can be a pain, and sometimes, despite our best efforts, our plants just don’t thrive. That’s where this soil-free method comes in!
Why You Need This DIY Hack
I’m going to show you a simple, effective way to enjoy growing rosemary indoors soil free, even if you have limited space or a less-than-green thumb. This method is perfect for apartment dwellers, busy individuals, or anyone who wants a cleaner, more sustainable way to cultivate their favorite herbs. Get ready to unlock the secrets to effortless indoor gardening and enjoy the delightful aroma and flavor of fresh rosemary year-round!
Growing Rosemary Indoors: A Soil-Free Adventure!
Hey there, fellow plant enthusiasts! Ever dreamt of having fresh rosemary at your fingertips, even without a garden? Well, I’m here to tell you it’s totally possible, and we’re going to do it soil-free! That’s right, we’re diving into the world of hydroponics (sort of!) to grow our own fragrant rosemary indoors. It’s easier than you think, and I’m going to walk you through every step.
What You’ll Need: The Rosemary Arsenal
Before we get our hands dirty (or rather, not dirty!), let’s gather our supplies. This is what you’ll need to embark on this rosemary-growing journey:
* Rosemary Cuttings: You can either take cuttings from an existing rosemary plant (the best option, in my opinion!) or buy them online. Make sure they’re healthy and about 4-6 inches long.
* A Clean Glass Jar or Vase: This will be our growing container. Make sure it’s clean to prevent any unwanted bacteria from messing with our rosemary.
* Water: Tap water is fine, but filtered water is even better.
* Rooting Hormone (Optional but Recommended): This will significantly increase your chances of success. You can find it at most garden centers.
* Pebbles or Gravel: These will help support the cuttings and keep them upright in the jar.
* Liquid Fertilizer (Specifically for Herbs): Once the roots develop, we’ll need to feed our rosemary.
* A Sunny Spot: Rosemary loves sunshine, so a bright windowsill is ideal.
* Spray Bottle: For misting the cuttings.
* Sharp Scissors or Pruning Shears: For taking cuttings.
* Measuring Spoon or Cup: For measuring fertilizer.
Taking Rosemary Cuttings: The Foundation of Our Soil-Free Garden
If you’re taking cuttings from an existing rosemary plant, here’s how to do it right:
1. Choose Healthy Stems: Look for stems that are green and vibrant, without any signs of disease or damage.
2. Make the Cut: Using your sharp scissors or pruning shears, make a clean cut just below a leaf node (the point where a leaf grows from the stem). Aim for a cutting that’s about 4-6 inches long.
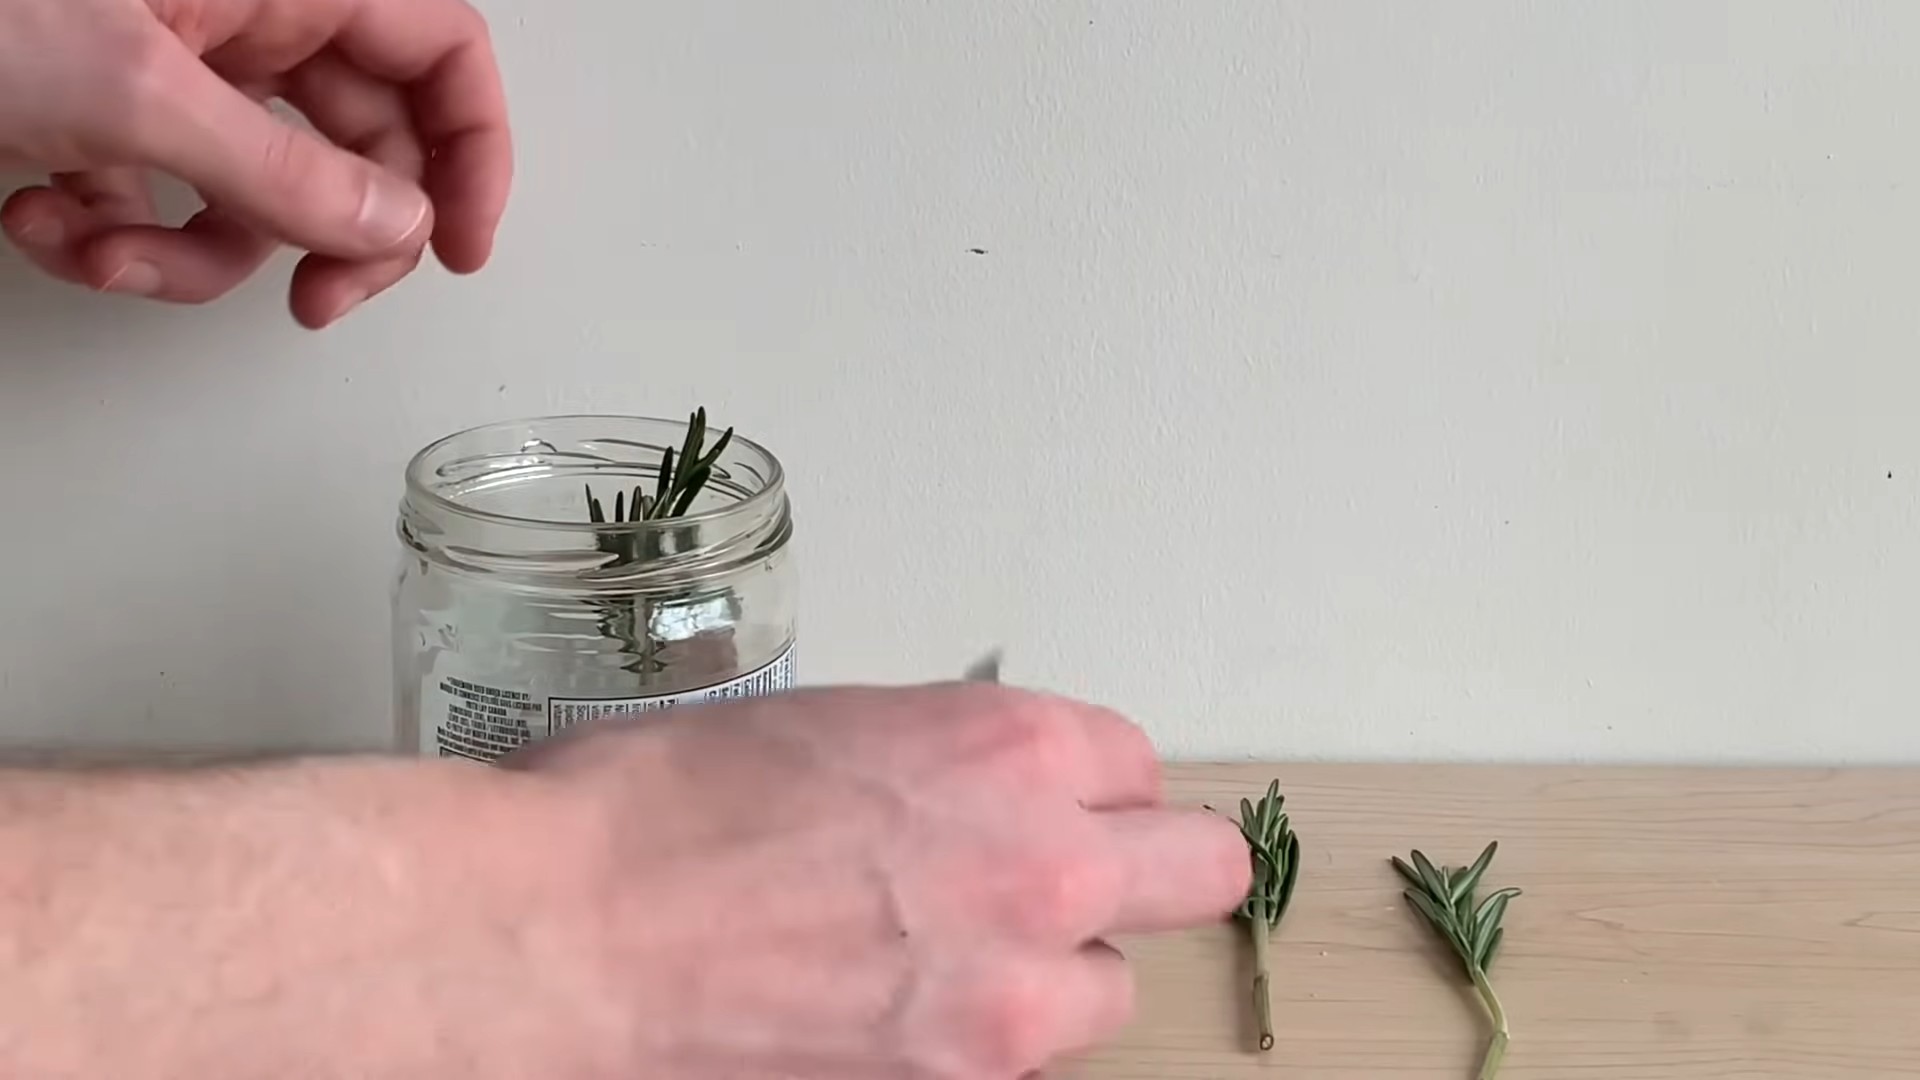
3. Remove Lower Leaves: Gently remove the leaves from the bottom inch or two of the cutting. This is where the roots will emerge, and we don’t want any leaves rotting in the water.
4. Apply Rooting Hormone (Optional): If you’re using rooting hormone, dip the cut end of the stem into the powder or liquid. This will encourage root growth.
Setting Up Your Soil-Free Rosemary Nursery
Now that we have our cuttings, let’s get them ready for their water bath:
1. Prepare the Jar: Fill your clean glass jar or vase with water.
2. Add Pebbles or Gravel: Place a layer of pebbles or gravel at the bottom of the jar. This will help support the cuttings and prevent them from tipping over.
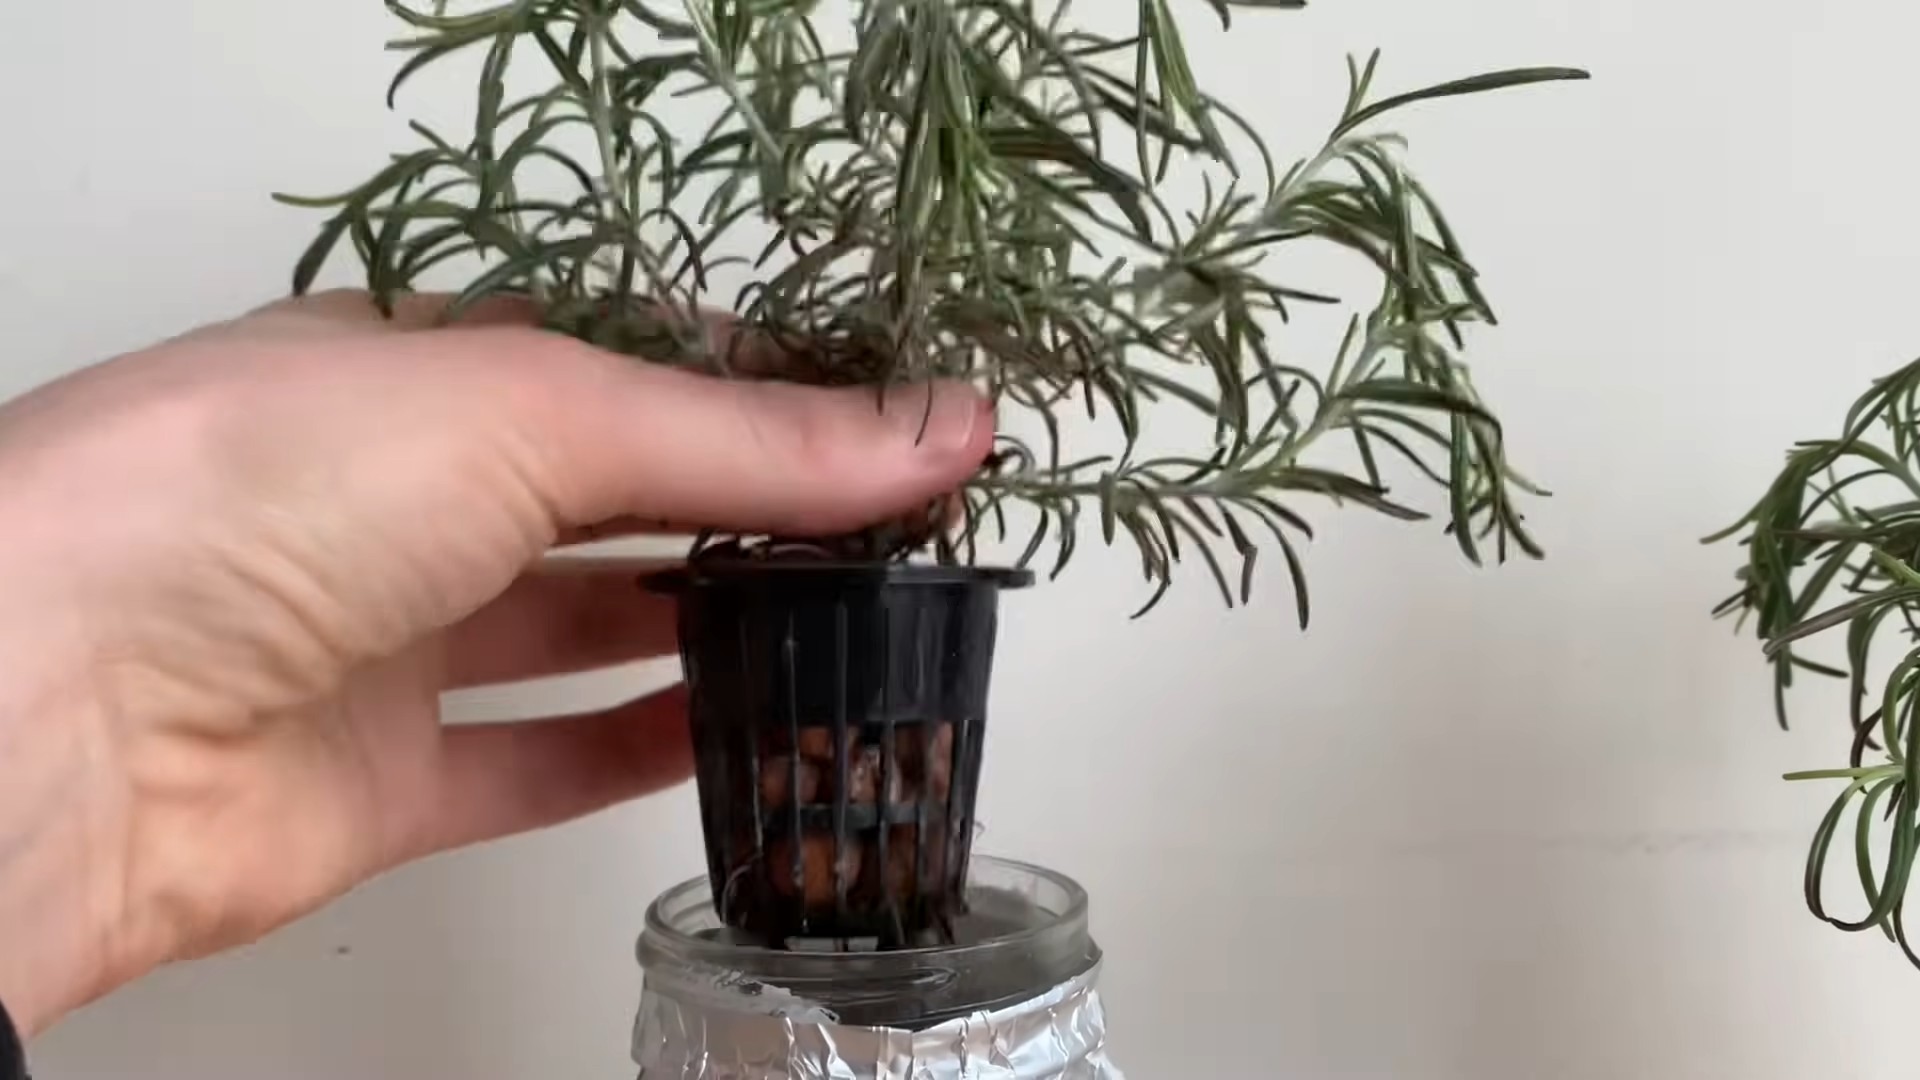
3. Arrange the Cuttings: Carefully place the rosemary cuttings in the jar, making sure the bottom inch or two of the stems are submerged in water. Don’t overcrowd the jar; give each cutting some space.
4. Find a Sunny Spot: Place the jar in a bright, sunny location, such as a windowsill that gets at least 6 hours of sunlight per day.
Nurturing Your Rosemary Cuttings: Patience is Key
This is where the waiting game begins. But don’t worry, it’s not a completely passive process. Here’s what you need to do to keep your rosemary cuttings happy and healthy:
1. Change the Water Regularly: Every 2-3 days, change the water in the jar to prevent the growth of algae and bacteria. Use fresh, clean water.
2. Mist the Cuttings: Use a spray bottle to mist the cuttings with water every day. This will help keep them hydrated and prevent them from drying out.
3. Be Patient: It can take several weeks for roots to develop. Don’t get discouraged if you don’t see results right away. Just keep changing the water and misting the cuttings, and eventually, you’ll see those little roots emerge.
From Cuttings to Seedlings: The Rooting Process
This is the exciting part! You’ll know your cuttings are starting to root when you see small, white roots emerging from the stems. This usually takes about 2-4 weeks, but it can vary depending on the conditions.
1. Monitor Root Growth: Keep an eye on the roots as they develop. You want them to be at least an inch or two long before you start feeding the plants.
2. Remove Any Rotting Leaves: If you notice any leaves rotting in the water, remove them immediately to prevent the spread of bacteria.
Feeding Your Soil-Free Rosemary: Time for Nutrients
Once the roots are well-developed, it’s time to start feeding your rosemary with liquid fertilizer. This will provide the essential nutrients they need to grow and thrive.
1. Choose the Right Fertilizer: Use a liquid fertilizer specifically formulated for herbs. These fertilizers are typically lower in nitrogen than fertilizers for other types of plants.
2. Dilute the Fertilizer: Follow the instructions on the fertilizer label to dilute it properly. It’s always better to under-fertilize than over-fertilize.
3. Add Fertilizer to the Water: Add the diluted fertilizer to the water in the jar when you change it.
4. Fertilize Regularly: Fertilize your rosemary every 2-4 weeks, depending on the growth rate.
Maintaining Your Soil-Free Rosemary: Keeping it Happy
Now that your rosemary is growing, here are a few tips to keep it healthy and happy:
Hey there, fellow plant enthusiasts! Ever dreamt of having fresh rosemary at your fingertips, even without a garden? Well, I’m here to tell you it’s totally possible, and we’re going to do it soil-free! That’s right, we’re diving into the world of hydroponics (sort of!) to grow our own fragrant rosemary indoors. It’s easier than you think, and I’m going to walk you through every step.
What You’ll Need: The Rosemary Arsenal
Before we get our hands dirty (or rather, not dirty!), let’s gather our supplies. This is what you’ll need to embark on this rosemary-growing journey:
* Rosemary Cuttings: You can either take cuttings from an existing rosemary plant (the best option, in my opinion!) or buy them online. Make sure they’re healthy and about 4-6 inches long.
* A Clean Glass Jar or Vase: This will be our growing container. Make sure it’s clean to prevent any unwanted bacteria from messing with our rosemary.
* Water: Tap water is fine, but filtered water is even better.
* Rooting Hormone (Optional but Recommended): This will significantly increase your chances of success. You can find it at most garden centers.
* Pebbles or Gravel: These will help support the cuttings and keep them upright in the jar.
* Liquid Fertilizer (Specifically for Herbs): Once the roots develop, we’ll need to feed our rosemary.
* A Sunny Spot: Rosemary loves sunshine, so a bright windowsill is ideal.
* Spray Bottle: For misting the cuttings.
* Sharp Scissors or Pruning Shears: For taking cuttings.
* Measuring Spoon or Cup: For measuring fertilizer.
Taking Rosemary Cuttings: The Foundation of Our Soil-Free Garden
If you’re taking cuttings from an existing rosemary plant, here’s how to do it right:
1. Choose Healthy Stems: Look for stems that are green and vibrant, without any signs of disease or damage.
2. Make the Cut: Using your sharp scissors or pruning shears, make a clean cut just below a leaf node (the point where a leaf grows from the stem). Aim for a cutting that’s about 4-6 inches long.
3. Remove Lower Leaves: Gently remove the leaves from the bottom inch or two of the cutting. This is where the roots will emerge, and we don’t want any leaves rotting in the water.
4. Apply Rooting Hormone (Optional): If you’re using rooting hormone, dip the cut end of the stem into the powder or liquid. This will encourage root growth.
Setting Up Your Soil-Free Rosemary Nursery
Now that we have our cuttings, let’s get them ready for their water bath:
1. Prepare the Jar: Fill your clean glass jar or vase with water.
2. Add Pebbles or Gravel: Place a layer of pebbles or gravel at the bottom of the jar. This will help support the cuttings and prevent them from tipping over.
3. Arrange the Cuttings: Carefully place the rosemary cuttings in the jar, making sure the bottom inch or two of the stems are submerged in water. Don’t overcrowd the jar; give each cutting some space.
4. Find a Sunny Spot: Place the jar in a bright, sunny location, such as a windowsill that gets at least 6 hours of sunlight per day.
Nurturing Your Rosemary Cuttings: Patience is Key
This is where the waiting game begins. But don’t worry, it’s not a completely passive process. Here’s what you need to do to keep your rosemary cuttings happy and healthy:
1. Change the Water Regularly: Every 2-3 days, change the water in the jar to prevent the growth of algae and bacteria. Use fresh, clean water.
2. Mist the Cuttings: Use a spray bottle to mist the cuttings with water every day. This will help keep them hydrated and prevent them from drying out.
3. Be Patient: It can take several weeks for roots to develop. Don’t get discouraged if you don’t see results right away. Just keep changing the water and misting the cuttings, and eventually, you’ll see those little roots emerge.
From Cuttings to Seedlings: The Rooting Process
This is the exciting part! You’ll know your cuttings are starting to root when you see small, white roots emerging from the stems. This usually takes about 2-4 weeks, but it can vary depending on the conditions.
1. Monitor Root Growth: Keep an eye on the roots as they develop. You want them to be at least an inch or two long before you start feeding the plants.
2. Remove Any Rotting Leaves: If you notice any leaves rotting in the water, remove them immediately to prevent the spread of bacteria.
Feeding Your Soil-Free Rosemary: Time for Nutrients
Once the roots are well-developed, it’s time to start feeding your rosemary with liquid fertilizer. This will provide the essential nutrients they need to grow and thrive.
1. Choose the Right Fertilizer: Use a liquid fertilizer specifically formulated for herbs. These fertilizers are typically lower in nitrogen than fertilizers for other types of plants.
2. Dilute the Fertilizer: Follow the instructions on the fertilizer label to dilute it properly. It’s always better to under-fertilize than over-fertilize.
3. Add Fertilizer to the Water: Add the diluted fertilizer to the water in the jar when you change it.
4. Fertilize Regularly: Fertilize your rosemary every 2-4 weeks, depending on the growth rate.
Maintaining Your Soil-Free Rosemary: Keeping it Happy
Now that your rosemary is growing, here are a few tips to keep it healthy and happy:
1. Provide Plenty of Sunlight: Rosemary needs at least 6 hours of sunlight per day. If you don’t have a sunny windowsill, you may need to supplement with a grow light.
2. Maintain Proper Water Levels: Keep the water level in the jar consistent, making sure the roots are always submerged.
3. Prune Regularly: Prune your rosemary regularly to encourage bushier growth. You can use the pruned stems for cooking or drying.
4. Watch for Pests: Keep an eye out for pests, such as aphids or spider mites. If you see any, treat them with an appropriate insecticide.
5. Consider Transplanting (Optional): While you can keep your rosemary growing in water indefinitely, you may eventually want to transplant it into a pot with soil. This will give it more room to grow and access to more nutrients. If you choose to transplant, use a well-draining potting mix and a pot that’s at least 6 inches in diameter.
Troubleshooting: Common Rosemary Problems and Solutions
Even with the best care, you may encounter some problems along the way. Here are a few common issues and how to fix them:
* Yellowing Leaves: This can be caused by overwatering, underwatering, or nutrient deficiencies. Make sure you’re changing the water regularly, fertilizing properly, and providing enough sunlight.
* Brown Leaves: This can be caused by dry air or sunburn. Mist the cuttings regularly and avoid placing them in direct sunlight during the hottest part of the day.
* Root Rot: This is caused by bacteria or fungi in the water. Change the water regularly and make sure the jar is clean.
* Slow Growth: This can be caused by insufficient sunlight or nutrients. Provide more sunlight and fertilize regularly.
Harvesting Your Soil-Free Rosemary: Enjoy the Fruits (or Leaves!) of Your Labor
Once your rosemary plant is established, you can start harvesting the leaves for cooking. Simply snip off a few stems as needed. The more you prune, the bushier the plant will become.
1. Harvest Regularly: Regular harvesting encourages new growth and keeps the plant healthy.
2. Use Fresh or Dried: You can use the rosemary leaves fresh or dry them for later use. To dry them, simply hang the stems upside down in a cool, dry place until they are brittle.
Why Grow Rosemary Soil-Free? The Perks of Hydroponics (Lite)
You might be wondering, why go through all this trouble to grow rosemary without soil? Well, there are several advantages:
* Space-Saving: Soil-free growing is perfect for small spaces, such as apartments or condos.
* Cleanliness: No soil means no mess!
* Easy Maintenance: Soil-free growing can be easier to maintain than traditional gardening, as you don’t have to worry about weeding or watering as often.
* Faster Growth: In some cases, plants can grow faster in a soil-free environment because they have direct access to nutrients.
*
Conclusion
So, there you have it! Growing rosemary indoors, completely soil-free, is not only possible but surprisingly straightforward. We’ve walked through the simple steps, highlighting the benefits of this hydroponic approach – cleaner, less messy, and potentially faster growth compared to traditional soil methods.
Why is this DIY trick a must-try? Because it empowers you to cultivate fresh, fragrant rosemary right in your kitchen, regardless of your outdoor space or gardening experience. Imagine the convenience of snipping off sprigs of rosemary whenever you need them, adding that distinctive flavor to your roasted chicken, homemade bread, or infused oils. No more last-minute trips to the grocery store or relying on dried herbs that lack the vibrant aroma of fresh rosemary.
Beyond the convenience, this method offers a fascinating glimpse into the world of hydroponics. It’s a fantastic educational project for kids and adults alike, demonstrating the power of water and nutrients in plant growth. Plus, it’s a sustainable way to grow your own herbs, reducing your reliance on commercially grown produce and minimizing your environmental impact.
Ready to experiment? Here are a few suggestions and variations to consider:
* Experiment with Nutrient Solutions: While the general hydroponic nutrient solution works well, you can explore different formulations specifically designed for herbs. Some solutions may promote faster growth or enhance the flavor of your rosemary.
* Try Different Containers: Get creative with your containers! Mason jars, repurposed plastic bottles, or even decorative glass vases can all work well. Just ensure the container is clean and allows for adequate light exposure to the roots.
* Propagate from Cuttings: Once your rosemary plant is established, you can easily propagate new plants from cuttings. Simply snip off a healthy stem, remove the lower leaves, and place it in water until roots develop. Then, transfer the cutting to your hydroponic setup.
* Consider Companion Planting: Even though your rosemary is growing soil-free, you can still incorporate companion planting principles. Place your hydroponic rosemary near other herbs like thyme or oregano, which are known to deter pests.
* Explore Different Lighting Options: While a sunny windowsill is ideal, you can supplement with grow lights, especially during the winter months or in areas with limited natural light. LED grow lights are energy-efficient and provide the full spectrum of light that plants need to thrive.
We are confident that you’ll find this soil-free rosemary growing method rewarding and enjoyable. It’s a simple yet effective way to bring the beauty and fragrance of rosemary into your home.
Now, it’s your turn! We encourage you to give this DIY trick a try. Don’t be afraid to experiment and adapt the method to suit your specific needs and preferences. And most importantly, share your experience with us! We’d love to hear about your successes, challenges, and any tips you discover along the way. Post photos of your soil-free rosemary plants on social media using #SoilFreeRosemary and tag us so we can see your amazing results. Let’s build a community of indoor herb growers and inspire others to embrace the joys of hydroponics. Happy growing!
Frequently Asked Questions (FAQ)
What exactly is hydroponics, and is it difficult?
Hydroponics is a method of growing plants without soil, using water-based nutrient solutions to provide the necessary elements for growth. It might sound complicated, but it’s actually quite simple, especially for beginners. This soil-free rosemary method is a great introduction to hydroponics because it requires minimal equipment and is relatively low-maintenance. The key is to provide the right balance of nutrients and ensure adequate light exposure.
What kind of nutrient solution should I use for growing rosemary indoors?
A general-purpose hydroponic nutrient solution designed for herbs or leafy greens will work well for rosemary. Look for a balanced formula containing macronutrients like nitrogen, phosphorus, and potassium, as well as micronutrients like iron, manganese, and zinc. Follow the instructions on the nutrient solution packaging for proper dilution. It’s generally recommended to start with a weaker solution and gradually increase the concentration as your plant grows. You can find these solutions at most garden centers or online retailers specializing in hydroponics.
How often should I change the nutrient solution?
It’s generally recommended to change the nutrient solution every 1-2 weeks to prevent the buildup of salts and maintain optimal nutrient levels. However, the frequency may vary depending on the size of your container, the growth rate of your rosemary plant, and the specific nutrient solution you’re using. Monitor the solution regularly and change it more frequently if it becomes cloudy or discolored.
How much light does my soil-free rosemary plant need?
Rosemary thrives in bright, indirect sunlight. A south-facing windowsill is ideal, but an east- or west-facing window can also work. If you don’t have access to enough natural light, you can supplement with grow lights. Aim for at least 6-8 hours of light per day. If you’re using grow lights, position them about 6-12 inches above the plant.
Can I use tap water for my hydroponic rosemary?
While tap water can be used, it’s best to use filtered or distilled water to avoid the buildup of minerals and chemicals that can harm your plant. If you must use tap water, let it sit for 24 hours to allow chlorine to evaporate.
How do I know if my rosemary plant is getting enough nutrients?
Signs of nutrient deficiency can include yellowing leaves, stunted growth, and weak stems. If you notice any of these symptoms, try increasing the concentration of your nutrient solution or switching to a different formula. Conversely, signs of nutrient toxicity can include burnt leaf tips and slow growth. If you suspect nutrient toxicity, dilute the nutrient solution or change it completely.
My rosemary plant is getting leggy. What should I do?
Leggy growth, characterized by long, spindly stems with few leaves, is often a sign of insufficient light. Move your plant to a brighter location or supplement with grow lights. You can also prune the leggy stems to encourage bushier growth.
Can I grow other herbs using this soil-free method?
Yes, absolutely! This hydroponic method is suitable for growing a variety of herbs, including basil, mint, oregano, thyme, and chives. Each herb may have slightly different nutrient requirements, so it’s a good idea to research the specific needs of each plant.
How do I prevent algae growth in my hydroponic system?
Algae growth is a common problem in hydroponic systems, but it can be easily prevented. The key is to block light from reaching the nutrient solution. Use an opaque container or wrap the container in aluminum foil to prevent light penetration. You can also add a small amount of hydrogen peroxide to the nutrient solution to kill algae.
Is growing rosemary indoors soil-free better than growing it in soil?
Both methods have their advantages and disadvantages. Soil-free growing can be cleaner, less messy, and potentially faster, while soil-based growing is more traditional and may be easier for some beginners. Ultimately, the best method depends on your individual preferences and circumstances. This soil-free method is a great option for those who want to experiment with hydroponics or who have limited space for traditional gardening.


Leave a Comment