
Kohlrabi harvest compact spaces can feel like a distant dream if you’re working with a small garden or even just a balcony. But trust me, it’s totally achievable! I know what you’re thinking: “Kohlrabi? In my tiny space?” Absolutely! This often-overlooked vegetable, with its unique flavor and texture, is surprisingly well-suited for container gardening and other space-saving techniques.
For centuries, kohlrabi has been a staple in European cuisine, particularly in German-speaking countries where it’s often enjoyed raw, cooked, or pickled. Its name even translates to “cabbage turnip” in German! But you don’t need a sprawling German farm to enjoy the fruits (or rather, stems!) of your labor.
In today’s world, where space is a premium and access to fresh, healthy produce can be challenging, learning how to maximize your garden’s potential is more important than ever. That’s why I’m so excited to share these DIY tricks and hacks that will help you achieve a bountiful kohlrabi harvest compact spaces, even if you only have a few square feet to work with. Imagine the satisfaction of harvesting your own fresh kohlrabi, knowing you grew it yourself, right in your own little urban oasis! Let’s get started and unlock the secrets to successful kohlrabi growing in even the smallest of spaces.
Growing Kohlrabi in Compact Spaces: A DIY Guide
Hey there, fellow gardening enthusiasts! I’m so excited to share my tried-and-true method for growing kohlrabi, that quirky and delicious vegetable, even if you’re short on space. Don’t let a small balcony or patio stop you from enjoying fresh, homegrown goodies. This guide will walk you through everything you need to know, from choosing the right variety to harvesting your bounty. Let’s get started!
Choosing the Right Kohlrabi Variety
First things first, you need to pick the perfect kohlrabi variety for container gardening. Some varieties get quite large, which isn’t ideal for limited spaces. Here are a few of my favorites that stay relatively compact:
- ‘Early White Vienna’: This is a classic choice, known for its mild flavor and early maturity. It’s a reliable producer and doesn’t get too big.
- ‘Early Purple Vienna’: Similar to the white variety, but with a beautiful purple hue. It adds a pop of color to your garden and tastes just as delicious.
- ‘Grand Duke’: This hybrid variety is known for its disease resistance and uniform bulb size. It’s a great option if you’re looking for a consistent harvest.
- ‘Kossak’: If you want to try a larger variety, ‘Kossak’ is a good choice, but make sure you have a larger container to accommodate its growth.
Preparing Your Container and Soil
Now that you’ve chosen your variety, let’s get your container ready. The right container and soil are crucial for successful kohlrabi growing.
- Container Size: For most compact varieties, a container that’s at least 12 inches in diameter and 12 inches deep is ideal. If you’re growing ‘Kossak’ or another larger variety, go for a 15-18 inch container.
- Drainage: Make sure your container has drainage holes! Kohlrabi doesn’t like soggy roots. If your container doesn’t have enough holes, you can easily drill a few more.
- Soil: Use a high-quality potting mix that’s well-draining and rich in organic matter. Avoid using garden soil, as it can compact in containers and hinder root growth. I like to amend my potting mix with compost for extra nutrients.
Planting Your Kohlrabi
You can start kohlrabi seeds indoors or directly sow them into your container, depending on your climate and the time of year.
- Starting Seeds Indoors: If you live in a colder climate, starting seeds indoors gives you a head start. Sow the seeds about 4-6 weeks before the last expected frost. Use seed starting trays or small pots filled with seed starting mix. Keep the soil moist and provide plenty of light.
- Direct Sowing: If you live in a warmer climate, you can directly sow the seeds into your container. Sow the seeds about 1/2 inch deep and 1 inch apart. Thin the seedlings to about 4-6 inches apart once they’re a few inches tall.
Caring for Your Kohlrabi Plants
Once your kohlrabi plants are established, it’s important to provide them with the right care to ensure a healthy and bountiful harvest.
- Watering: Kohlrabi needs consistent moisture, especially during hot weather. Water deeply whenever the top inch of soil feels dry. Avoid overwatering, as this can lead to root rot.
- Fertilizing: Feed your kohlrabi plants with a balanced fertilizer every 2-3 weeks. Look for a fertilizer that’s specifically formulated for vegetables. You can also use compost tea or other organic fertilizers.
- Sunlight: Kohlrabi needs at least 6 hours of sunlight per day. Place your container in a sunny spot where it will receive plenty of light.
- Pest Control: Keep an eye out for common pests like aphids, cabbage worms, and flea beetles. You can control these pests with organic methods like insecticidal soap, neem oil, or handpicking.
- Weeding: Keep your container free of weeds, as they can compete with your kohlrabi plants for nutrients and water.
Step-by-Step Instructions: From Seed to Harvest
Okay, let’s break down the entire process into easy-to-follow steps.
Phase 1: Getting Started (Weeks 1-4)
1. Gather Your Supplies: You’ll need kohlrabi seeds (choose your variety!), a container (at least 12 inches in diameter), potting mix, seed starting trays (if starting indoors), a watering can, and fertilizer.
2. Start Seeds Indoors (Optional): If you’re starting indoors, fill your seed starting trays with seed starting mix. Sow the seeds about 1/4 inch deep and gently water. Place the trays in a warm, sunny location or under grow lights. Keep the soil moist but not soggy.
3. Direct Sow Seeds (If Weather Permits): If you’re direct sowing, fill your container with potting mix. Sow the seeds about 1/2 inch deep and 1 inch apart. Gently water the soil.
4. Germination: Kohlrabi seeds typically germinate in 5-10 days. Keep the soil moist during this time.
5. Thin Seedlings (If Necessary): Once the seedlings are a few inches tall, thin them to about 4-6 inches apart. This will give them enough room to grow.
Phase 2: Nurturing Your Plants (Weeks 5-8)
6. Transplant Seedlings (If Started Indoors): Once the seedlings have developed a few sets of true leaves, transplant them into your container. Gently remove the seedlings from the seed starting trays and plant them at the same depth they were growing before. Space them about 4-6 inches apart.
7. Water Regularly: Water your kohlrabi plants deeply whenever the top inch of soil feels dry. Avoid overwatering.
8. Fertilize: Feed your plants with a balanced fertilizer every 2-3 weeks. Follow the instructions on the fertilizer package.
9. Provide Sunlight: Make sure your plants are getting at least 6 hours of sunlight per day.
10. Monitor for Pests: Check your plants regularly for pests. If you find any, take action immediately to control them.
Phase 3: Harvesting and Enjoying Your Kohlrabi (Weeks 9-12)
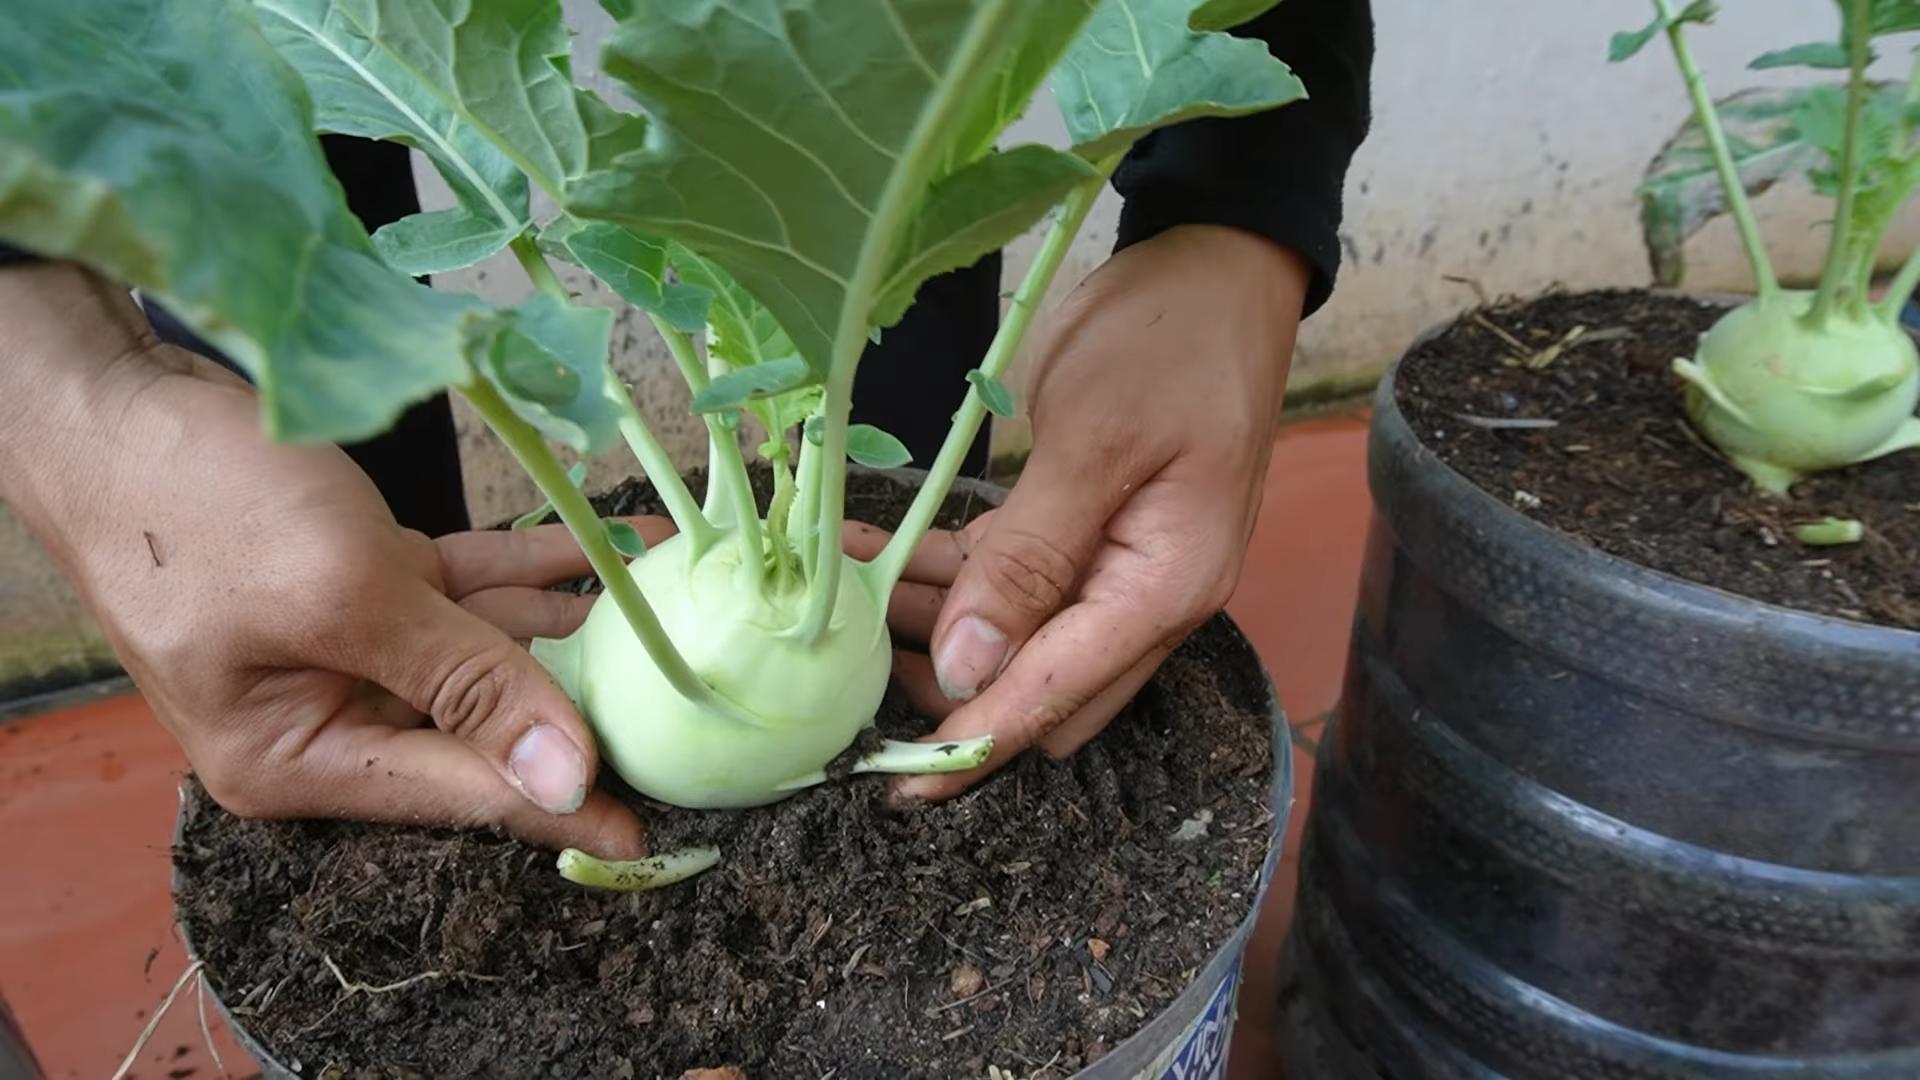
11. Harvest Time: Kohlrabi is typically ready to harvest about 50-60 days after planting. The bulbs should be about 2-3 inches in diameter. Don’t let them get too big, as they can become tough and woody.
12. Harvesting: To harvest, simply cut the bulb from the stem with a sharp knife.
13. Enjoy Your Harvest: Kohlrabi can be eaten raw or cooked. It’s delicious in salads, slaws, stir-fries, and soups. You can also roast it, grill it, or steam it. The leaves are also edible and can be used like spinach.
Troubleshooting Common Problems
Even with the best care, you might encounter a few problems along the way. Here are some common issues and how to address them:
- Bolting: Bolting is when the plant prematurely flowers and goes to seed. This can happen if the plant is stressed by heat, drought, or poor soil. To prevent bolting, make sure your plants are getting enough water and nutrients. You can also try planting them in a shadier location during hot weather.
- Cracking: Cracking can occur if the soil is too dry or if the plant is exposed to sudden changes in temperature. To prevent cracking, water your plants regularly and protect them from extreme weather.
- Pest Infestations: As mentioned earlier, kohlrabi can be susceptible to pests like aphids, cabbage worms, and flea beetles. Use organic pest control methods to keep these pests at bay.
- Root Rot: Root rot is caused by overwatering and poor drainage. To prevent root rot, make sure your container has drainage holes and avoid overwatering.
Tips for Success
Here are a few extra tips to help you grow the best kohlrabi possible:
- Succession Planting: Plant a new batch of kohlrabi seeds every few weeks to ensure a continuous harvest.
- Companion Planting: Plant kohlrabi with companion plants like dill, chamomile, and mint to attract beneficial insects and deter pests.
- Mulching: Mulch around your kohlrabi plants to help retain moisture and suppress weeds.
- Record Keeping: Keep a gardening journal to track your progress and learn from your

Conclusion
So, there you have it! Transforming your kohlrabi harvest, even from the most compact of spaces, into a culinary adventure is not only achievable but incredibly rewarding. We’ve explored a simple yet effective DIY trick that unlocks the full potential of this often-underappreciated vegetable. Forget the bland, store-bought versions; with this method, you’ll be enjoying kohlrabi that bursts with freshness and flavor, all thanks to your own green thumb and a little bit of ingenuity.
Why is this DIY trick a must-try? Because it empowers you to take control of your food source, reduce waste, and experience the unparalleled satisfaction of eating something you’ve nurtured from seed to table. It’s about more than just saving money; it’s about connecting with nature, understanding the growing process, and appreciating the true value of fresh, homegrown produce. Plus, let’s be honest, the bragging rights are pretty great too! Imagine serving a dish featuring kohlrabi you grew yourself, even if you only have a small balcony or patio.
But the fun doesn’t stop there! Feel free to experiment with variations on this DIY trick. For example, if you’re dealing with particularly tough kohlrabi, try blanching it briefly before using it in your chosen recipe. This will help to soften the texture and make it more palatable. You could also try pickling your kohlrabi for a tangy and refreshing treat that will last for weeks. Or, if you’re feeling adventurous, try grating it raw into salads for a crunchy and slightly spicy kick. The possibilities are endless!
Consider adding different herbs and spices to your kohlrabi dishes to customize the flavor to your liking. Dill, parsley, and chives are all excellent choices that complement the mild flavor of kohlrabi perfectly. You can also experiment with different cooking methods, such as roasting, grilling, or stir-frying, to discover your favorite way to prepare this versatile vegetable.
Don’t be afraid to get creative and adapt this DIY trick to your own specific needs and preferences. The most important thing is to have fun and enjoy the process of growing and cooking your own kohlrabi.
We are confident that this DIY trick will revolutionize the way you think about kohlrabi. It’s simple, effective, and incredibly rewarding. So, what are you waiting for? Grab some kohlrabi seeds, find a sunny spot, and get growing!
We can’t wait to hear about your experiences with this DIY trick. Share your photos, recipes, and tips in the comments below. Let’s build a community of kohlrabi enthusiasts and inspire others to embrace the joys of homegrown produce. Remember, even the smallest of spaces can yield a bountiful harvest with a little bit of know-how and a lot of passion. Happy growing and happy cooking!
Frequently Asked Questions (FAQ)
What exactly is kohlrabi, and what does it taste like?
Kohlrabi, often called a German turnip, is a cruciferous vegetable related to cabbage, broccoli, and cauliflower. It has a bulbous stem that grows above ground and edible leaves. The taste is often described as a mild and slightly sweet version of a turnip or cabbage, with a crisp and refreshing texture similar to an apple. The younger, smaller kohlrabi bulbs tend to be sweeter and more tender.
How much sunlight does kohlrabi need when grown in compact spaces?
Kohlrabi thrives in full sun, meaning at least 6 hours of direct sunlight per day. However, it can tolerate partial shade, especially in hotter climates. When growing in compact spaces like balconies or patios, position your containers where they receive the most sunlight possible. If you’re limited to a shadier spot, consider using grow lights to supplement the natural sunlight. Rotate the containers regularly to ensure even light exposure on all sides of the plants.
What kind of soil is best for growing kohlrabi in containers?
Kohlrabi prefers well-draining, fertile soil that is rich in organic matter. A good potting mix specifically designed for vegetables is ideal. You can also amend your own potting mix by adding compost, aged manure, or other organic materials. Ensure the soil pH is between 6.0 and 7.5 for optimal growth. Avoid using heavy clay soils, as they can become waterlogged and hinder root development.
How often should I water kohlrabi plants in containers?
Water kohlrabi plants regularly, especially during hot and dry weather. The soil should be kept consistently moist but not waterlogged. Check the soil moisture level by sticking your finger about an inch deep into the soil. If it feels dry, it’s time to water. Water deeply until excess water drains out of the bottom of the container. Avoid overhead watering, as this can lead to fungal diseases.
When is the best time to harvest kohlrabi?
Kohlrabi is typically ready to harvest 50-60 days after planting. The ideal size for harvesting is when the bulb is about 2-3 inches in diameter. Larger bulbs can become tough and woody. To harvest, simply cut the bulb from the stem just above the soil line. You can also harvest the leaves, which are edible and can be used in salads or cooked like spinach.
Can I grow kohlrabi in the same container with other plants?
Yes, kohlrabi can be grown in companion planting arrangements. Good companions for kohlrabi include lettuce, spinach, radishes, and herbs like dill and chamomile. Avoid planting kohlrabi near other members of the cabbage family, such as broccoli, cauliflower, and kale, as they can attract the same pests and diseases.
What are some common pests and diseases that affect kohlrabi?
Common pests that can affect kohlrabi include cabbage worms, aphids, and flea beetles. Diseases include clubroot, black rot, and downy mildew. To prevent pests and diseases, practice good garden hygiene, such as removing weeds and debris, and rotate your crops regularly. You can also use organic pest control methods, such as insecticidal soap or neem oil.
How do I store kohlrabi after harvesting?
After harvesting, remove the leaves from the kohlrabi bulb and store them separately. The leaves can be stored in the refrigerator for a few days. The kohlrabi bulb can be stored in the refrigerator for several weeks. To prevent it from drying out, wrap it in a damp paper towel and place it in a plastic bag.
Can I freeze kohlrabi?
Yes, you can freeze kohlrabi, but it’s best to blanch it first to preserve its texture and flavor. To blanch kohlrabi, cut it into small pieces and boil it for 2-3 minutes. Then, immediately transfer it to an ice bath to stop the cooking process. Drain the kohlrabi thoroughly and pack it into freezer bags or containers. Frozen kohlrabi can be stored for up to 12 months.
What are some creative ways to use my kohlrabi harvest?
Beyond the traditional uses, kohlrabi can be incredibly versatile. Try grating it into coleslaw for a refreshing crunch, slicing it thinly and adding it to salads, or roasting it with other root vegetables for a hearty side dish. You can also use it in soups, stews, and stir-fries. The leaves can be used in salads or cooked like spinach. Don’t be afraid to experiment and discover your own favorite ways to enjoy this unique vegetable.
Leave a Comment