
Imagine standing in your kitchen, needing fresh mint for a Mojito or a refreshing tea, and not having to rush to the supermarket first. Instead, you simply go into your garden or onto your balcony and pick a few fragrant leaves. That’s not only super practical, but also incredibly satisfying!
Mint has a long and fascinating history. Even the ancient Romans and Greeks appreciated the healing and aromatic properties of mint. They used it not only in the kitchen, but also in medicine and even as a fragrance. In the Middle Ages, mint was cultivated in monastery gardens and spread from there throughout Europe.
But why should you bother growing mint yourself? Well, aside from the convenience and fresh taste you have at your fingertips, it’s also a great way to discover your green thumb and do something for the environment. Home-grown mint is free of pesticides and other harmful chemicals often found in commercially grown herbs. Plus, it’s an incredibly relaxing hobby that helps you relieve stress and connect with nature. In this article, I’ll show you some simple and effective DIY tricks that make it easy to grow mint at home, whether you have a large garden or just a small balcony. Let’s get started!
Growing Mint at Home: A Comprehensive DIY Guide
Hello, dear gardening friends! Today I’ll show you how to easily and successfully grow mint at home. Mint is not only super versatile in the kitchen (think Mojitos, tea, salads!), but also incredibly easy to care for. However, it has one small quirk: it likes to spread rampantly. That’s why it’s best to grow it in a pot or container. Let’s go!
What you need:
- Mint seedlings or seeds: You can buy mint as a seedling in the garden center or grow it from seeds. Personally, I find seedlings easier because they grow faster.
- A pot or container: Choose a pot with a diameter of at least 20 cm (approximately 8 inches). Make sure it has drainage holes so that the water can drain away.
- High-quality potting soil: Mint likes nutrient-rich soil. You can use normal potting soil or a special herb soil.
- Gravel or clay shards: For good drainage at the bottom of the pot.
- Watering can: For watering.
- Optional: Liquid fertilizer for herbs.
The right preparation is everything!
Before we start planting, it’s important to prepare everything. This saves time and ensures a smooth process.
- Prepare the pot: Place a layer of gravel or clay shards on the bottom of the pot. This ensures good drainage and prevents waterlogging. Mint doesn’t like waterlogging at all!
- Fill with soil: Fill the pot with potting soil. Leave about 2-3 cm (approx. 1 inch) of space to the rim.
- Moisten the soil: Lightly moisten the soil with water. It shouldn’t be dripping wet, but just moist.
Planting Mint: Step by Step
Now comes the exciting part: planting the mint! Whether you’re using seedlings or seeds, the following steps will help you.
- Prepare seedlings (if applicable): If you have seedlings, carefully remove them from the propagation pot. Loosen the roots slightly so that they can spread better in the new pot.
- Dig planting holes: Dig small holes in the soil that are large enough to accommodate the root balls of the seedlings. If you are using seeds, simply sprinkle them on the soil and cover them lightly with a thin layer of soil.
- Insert mint: Place the seedlings in the holes and press the soil down lightly. Make sure that the top of the root ball is level with the soil surface. If you have used seeds, press the soil lightly as well.
- Watering: Water the mint carefully. Make sure the soil is evenly moist. But avoid waterlogging.
Growing Mint from Seed: A Little Challenge
Growing mint from seed is a bit more time-consuming, but definitely doable. Here are a few tips:
- Sowing: Sprinkle the mint seeds on the prepared soil and cover them lightly with a thin layer of soil.
- Moisture: Keep the soil moist, but not wet. You can moisten the soil with a spray bottle to avoid washing the seeds away.
- Location: Place the pot in a bright, warm place. Direct sunlight can burn the seedlings.
- Patience: Mint seeds take some time to germinate. Be patient and keep the soil moist. After about 2-3 weeks, the first seedlings should be visible.
- Pricking out: When the seedlings are large enough (about 5-10 cm/2-4 inches), you can prick them out into larger pots.
The Right Care: Keeping Your Mint Happy
Mint is easy to care for, but there are a few things you should keep in mind so it thrives.
- Location: Mint likes a bright location, but no blazing midday sun. A partially shaded place is ideal.
- Watering: Water the mint regularly, especially on hot days. The soil should always be slightly moist, but not wet.
- Fertilizing: Fertilize the mint every few weeks with a liquid fertilizer for herbs. This ensures strong growth and aromatic leaves.
- Pruning: Prune the mint regularly. This promotes growth and prevents it from spreading too much. You can use the cut leaves for cooking or tea.
- Overwintering: Mint is hardy, but in a pot it can be a little more sensitive to frost. Place the pot in a sheltered place in winter or cover it with brushwood.
Common Problems and Solutions
Problems can also occur with mint. Here are a few common problems and how to solve them:
- Yellow leaves: Yellow leaves can be a sign of too much or too little water. Check the moisture of the soil and adjust the watering accordingly.
- Brown leaves: Brown leaves can be caused by too much sun or dryness. Place the pot in a shadier spot and water the mint regularly.
- Pests: Mint can be infested with aphids or spider mites. Spray the leaves with a solution of water and dish soap or use a biological pesticide.
- Fungal diseases: Fungal diseases can occur in high humidity. Ensure good ventilation and avoid waterlogging.
Harvesting Mint: When and How?
You can harvest the mint as soon as it is large enough. It is best to harvest it in the morning when the essential oils are most concentrated.
- Pluck off leaves: Simply pluck the leaves off with your fingers. You can also cut off entire stems.
- Harvest regularly: Harvest the mint regularly to promote growth.
- Remove flowers: Remove the flowers before they open. This prevents the mint from putting its energy into flowering and ensures more leaves.
Using Mint: Versatile and Delicious!
Mint is incredibly versatile in the kitchen. Here are a few ideas on how to use it:
- Tea: Fresh mint is perfect for a refreshing tea.
- Mojitos: Mint is a must for Mojitos!
- Salads: Mint gives salads a fresh touch.
- Sauces: Mint goes well with yogurt or herb sauces.
- Desserts: Mint can refine desserts such as chocolate mousse or ice cream.
- Decoration: Mint is a pretty decoration for dishes and drinks.
Mint Varieties: Variety for Your Garden
There are countless varieties of mint, each with its own taste and aroma. Here are a few popular varieties:
- Peppermint: The classic mint with an intense, peppery taste.
- Spearmint: A milder mint with a sweet aroma.
- Chocolate Mint: A mint with a hint of chocolate.
- Orange Mint: A mint with a fruity orange flavor.
- Lemon Mint: A mint with a refreshing lemon aroma.
Try different varieties and find your favorite mint!
Conclusion: Growing Mint is Child’s Play!
With this guide, you should succeed in growing mint at home successfully. It’s really not difficult, and fresh mint is a great…
Conclusion
Growing your own mint is not only an incredibly rewarding experience, but also a practical way to always have fresh and aromatic herbs on hand. Forget about bland, wilted mint from the supermarket – with this simple DIY trick, you can turn your kitchen or balcony into a fragrant mint oasis.
Why is this DIY trick a must? It’s simple: it’s cost-effective, environmentally friendly and provides you with an inexhaustible source of fresh mint. Imagine preparing a refreshing mojito on a warm summer evening, refined with mint that you have grown yourself. Or how you can enhance your morning tea with a touch of fresh mint that invigorates your day. The possibilities are endless!
In addition, growing mint at home is a wonderful project for the whole family. Children can learn how plants grow and thrive, and take responsibility for their care. It is an educational and entertaining activity that promotes an appreciation for nature.
Variations and suggestions:
- Mint Variety: Experiment with different mint varieties! In addition to classic peppermint, there is also chocolate mint, apple mint, lemon mint and many more. Each variety has its own unique taste and fragrance.
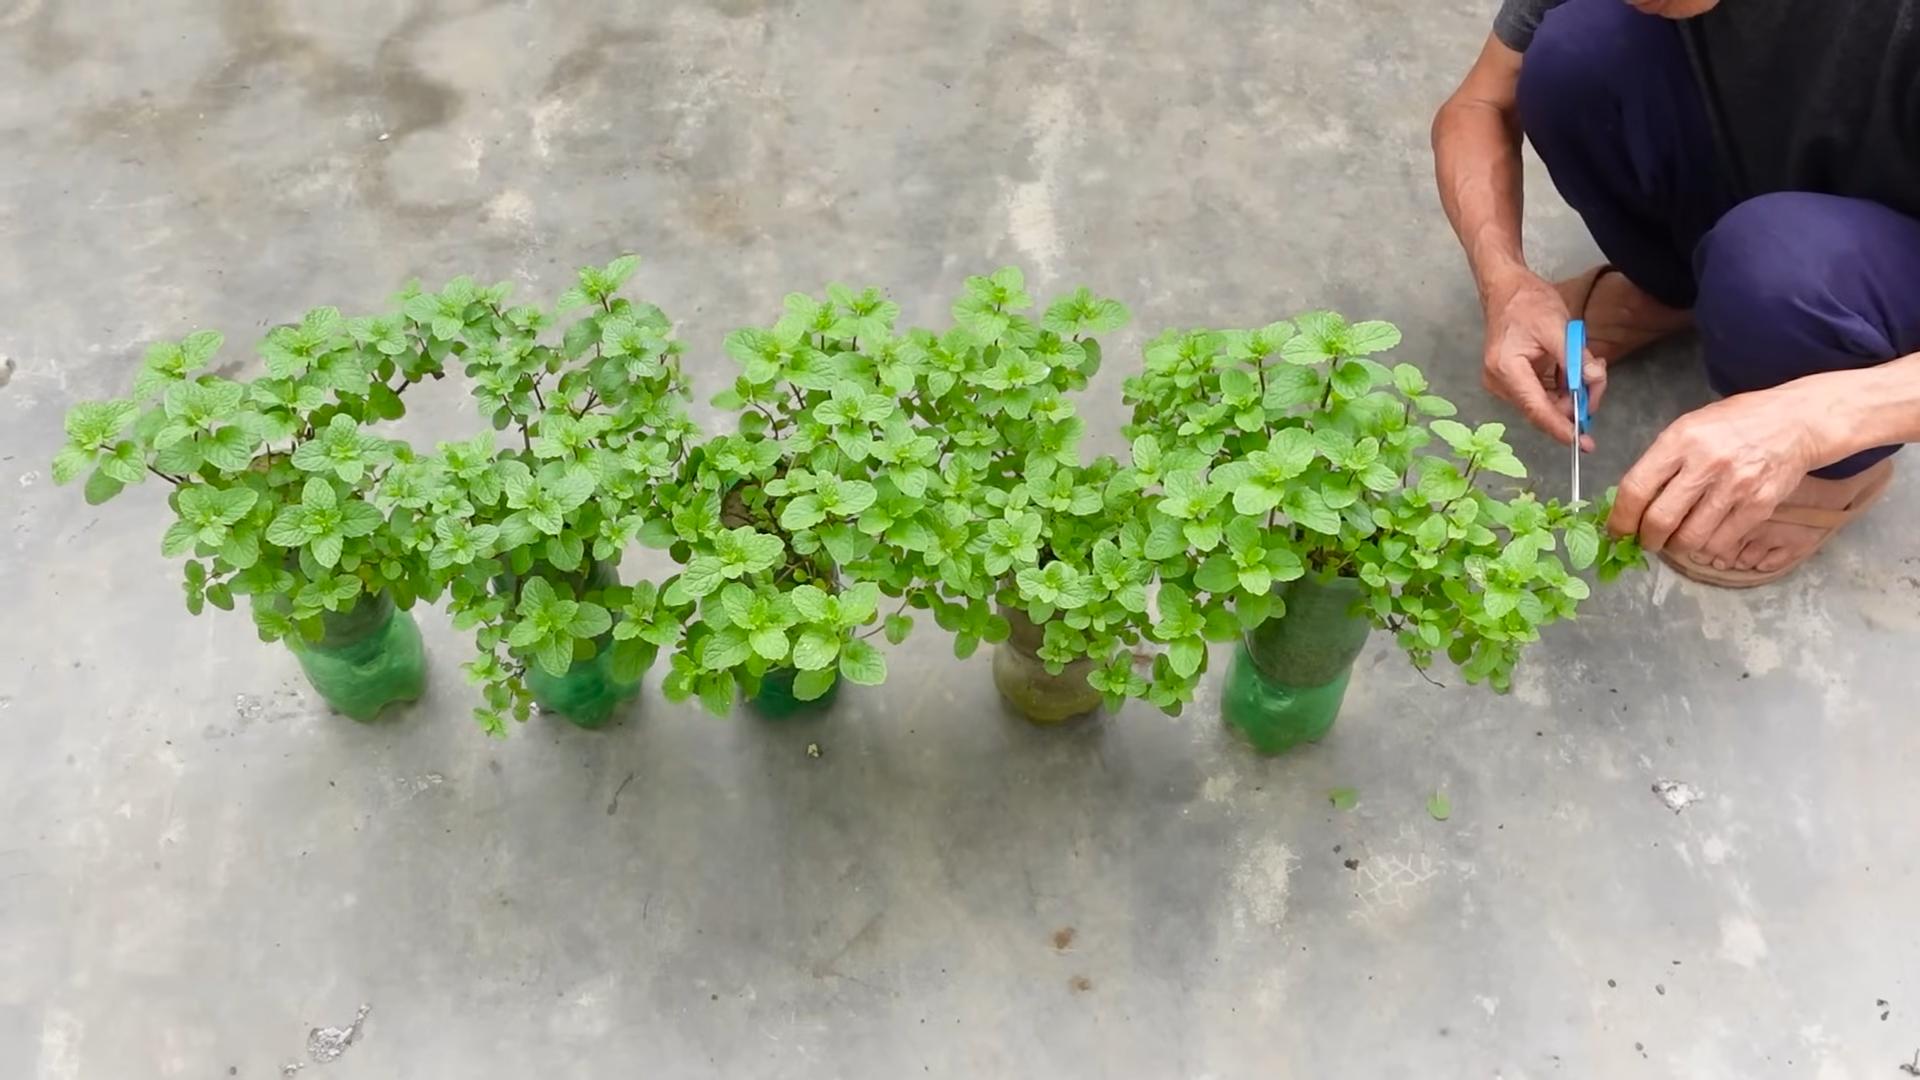
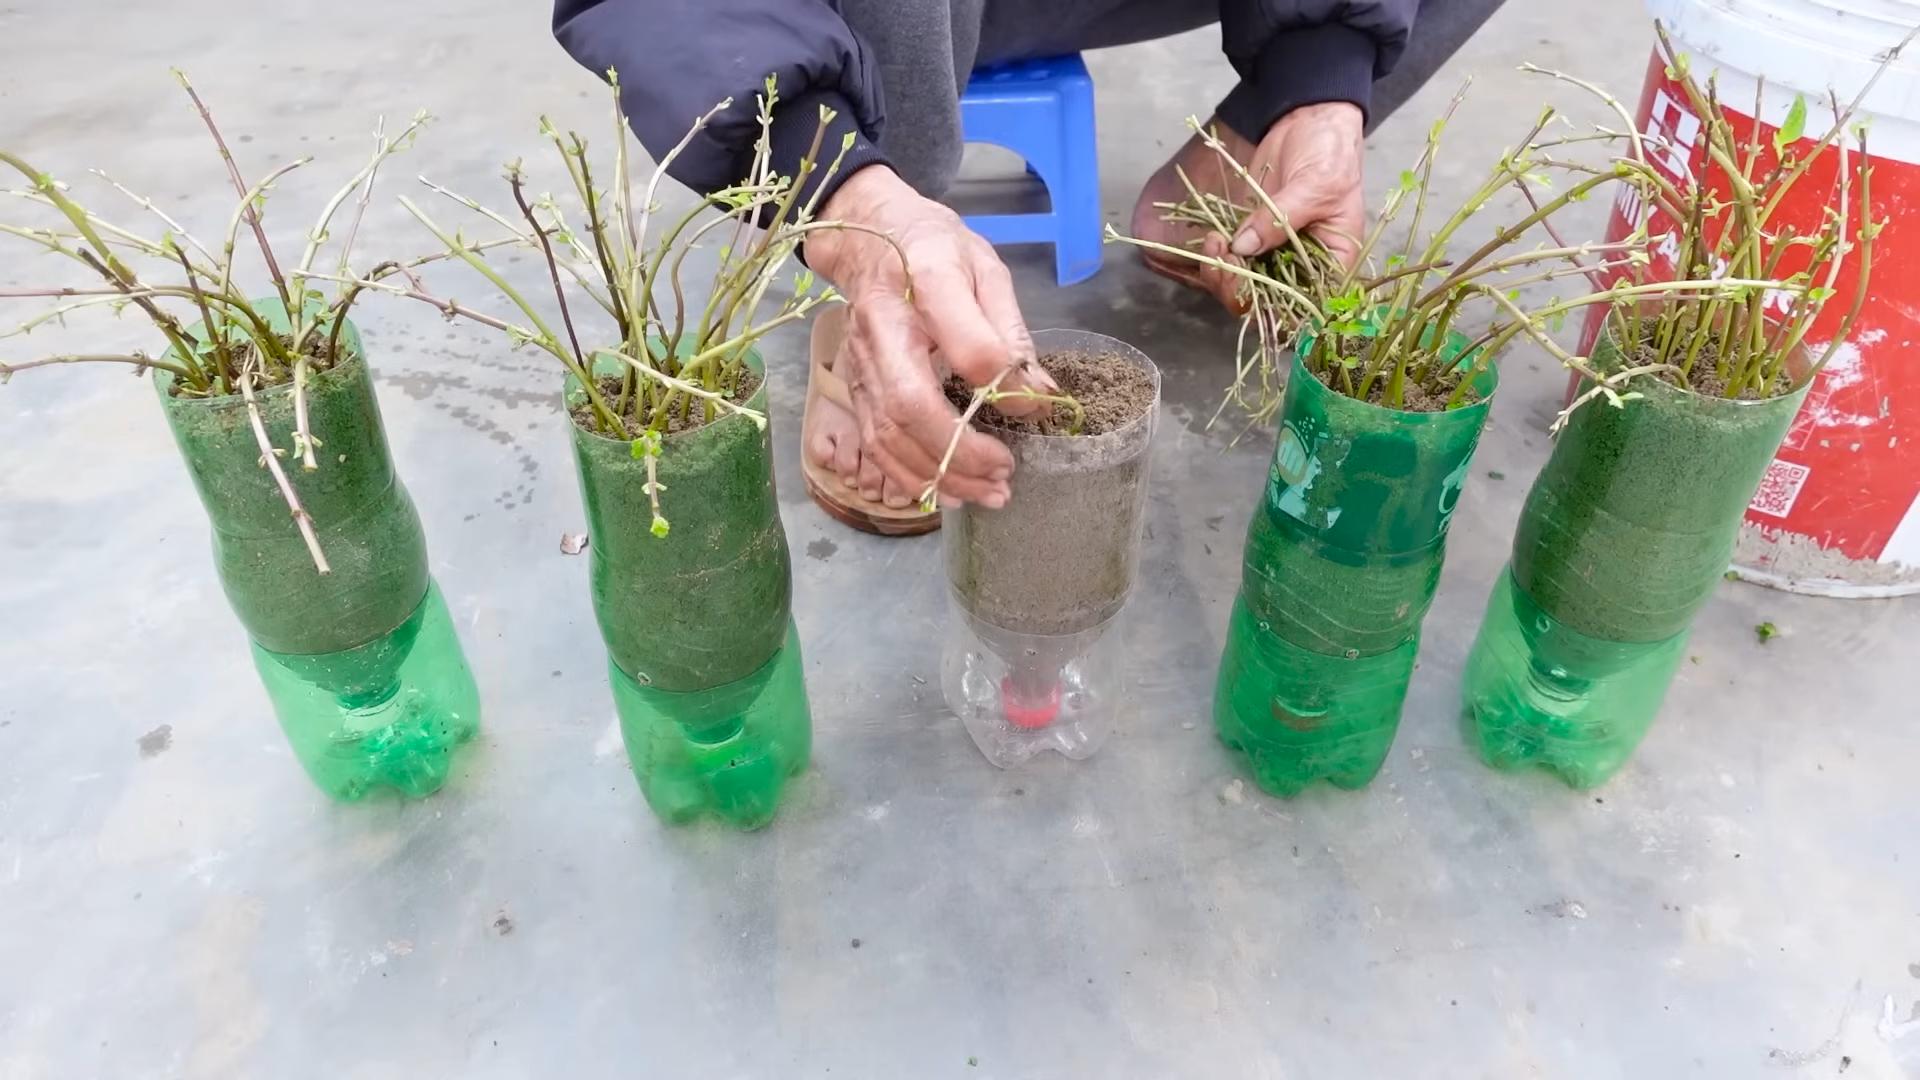
- Creative Planters: Use recycled materials such as old cups, cans or buckets as planters. This gives your mint garden an individual touch and protects the environment.
- Hydroponics: If you don’t have a garden or balcony, you can also grow mint hydroponically. The plants are grown in water with nutrients, without using soil.
- Mint Tea Blends: Create your own mint tea blends by combining different mint varieties or mixing them with other herbs such as lemon balm or chamomile.
- Mint in the Kitchen: Use your fresh mint not only for drinks, but also for refining salads, desserts, sauces and much more.
We are confident that you will be thrilled with this DIY trick. It is a simple and effective way to grow fresh mint at home and enjoy the many benefits it offers.
So, what are you waiting for? Get started and transform your living space into a fragrant mint oasis! We are excited to hear about your experiences. Share your successes, challenges and creative ideas with us in the comments. Let’s build a community of mint lovers together!
Growing mint at home is not just a trend, but a sustainable and enjoyable way of life. Try it out and discover the joy of gardening and the variety of flavors that your own mint offers you.
FAQ – Frequently Asked Questions about Growing Mint at Home
What location does mint need?
Mint prefers a partially shaded location. Direct midday sun can burn the leaves. A place with morning or evening sun is ideal. If you are growing mint indoors, place it in a bright window, but avoid direct sunlight.
What soil is best for mint?
Mint thrives best in loose, humus-rich and well-drained soil. A mixture of potting soil, compost and some sand is ideal. Make sure that the pot or bed has good drainage to avoid waterlogging.
How often do I have to water mint?
Mint needs regular watering, especially during the growing season. The soil should always be slightly moist, but not wet. Water when the top layer of soil feels dry. Reduce watering in winter when the mint is less active.
How can I propagate mint?
Mint is very easy to propagate, either by cuttings or by dividing the rootstock. For cuttings, cut off a healthy shoot, remove the lower leaves and place it in a glass of water. Roots will form after a few days. Once the roots are sufficiently developed, you can plant the cutting in a pot with soil. To divide the rootstock, dig up the plant and divide the root ball into several parts. Then plant the individual parts in separate pots or beds.
Do I have to fertilize mint?
Mint is not particularly demanding, but regular fertilization promotes growth and aroma formation. Use an organic fertilizer or a liquid fertilizer for herbs. Fertilize every two to four weeks during the growing season.
How can I prevent mint from spreading uncontrollably?
Mint is known to spread quickly. To prevent this, it is best to plant it in a pot or bed with a root barrier. A root barrier can consist of a film or a plastic container that is embedded in the ground. Alternatively, you can prune the mint regularly and remove runners.
Can I leave mint outside in winter?
Mint is hardy, but in very cold regions it may be advisable to protect it from frost. Cover the plant with brushwood or foliage or place the pot in a sheltered place. Grown indoors, mint also needs a bright location in winter.
How do I harvest mint properly?
Harvest mint by cutting the stems just above a leaf node. This promotes the growth of new shoots. Harvest regularly to keep the plant bushy and prevent flowering. The leaves are most aromatic before the plant flowers.
What can I do with my harvested mint?
The possibilities are endless! Use fresh mint for tea, cocktails, salads, desserts, sauces and much more. You can also dry the mint to store it for later. Tie the stems together in small bundles and hang them in a dry, dark place. Once the leaves are dry, you can crumble them and store them in an airtight container.
Which pests and diseases can affect mint?
Mint is relatively resistant to pests and diseases, but occasionally aphids, spider mites or mildew can occur. You can combat aphids and spider mites with a jet of water or with a mild soap solution. Mildew often occurs in damp weather. Ensure good ventilation and remove affected leaves.
Can I also grow mint in a pot on the balcony?
Yes, mint is excellent for growing in pots on the balcony. Make sure that the pot is large enough and has good drainage. Choose a partially shaded location and water the mint regularly.
How long does it take until I can harvest my own mint?
You can usually start harvesting a few weeks after planting. The growth rate can vary depending on the variety and location. Harvest regularly to promote the growth of new shoots.

Leave a Comment