
Celery container gardening might sound like a challenge, but trust me, it’s a surprisingly rewarding and space-saving way to enjoy fresh, crisp celery right from your own home! Forget those limp, store-bought stalks – imagine the vibrant flavor and satisfying crunch of homegrown celery gracing your salads, soups, and snacks.
For centuries, celery has been cultivated for its culinary and medicinal properties, dating back to ancient Greece and Rome where it was prized for its therapeutic uses. Now, you don’t need acres of land to participate in this rich history. This DIY guide will unlock the secrets to successfully growing celery in containers, even if you’re a complete beginner.
Why should you embrace celery container gardening? Well, think about it: you control the soil quality, watering, and sunlight exposure, leading to healthier, more flavorful celery. Plus, it’s a fantastic way to add a touch of green to your balcony, patio, or even a sunny windowsill. This DIY project is perfect for urban dwellers, apartment residents, or anyone looking to maximize their gardening potential in a limited space. I’m excited to share my tried-and-true tips and tricks to help you cultivate a thriving celery patch, one container at a time!
Growing Celery in Containers: A Beginner’s Guide
Hey there, fellow gardening enthusiasts! Ever thought about growing your own celery? It might seem a bit intimidating, but trust me, with the right approach, you can absolutely cultivate crisp, delicious celery right on your patio or balcony. I’m going to walk you through everything you need to know to successfully grow celery in containers. Let’s get started!
Choosing the Right Container and Soil
Before we even think about seeds, let’s talk about the foundation of our celery garden: the container and the soil.
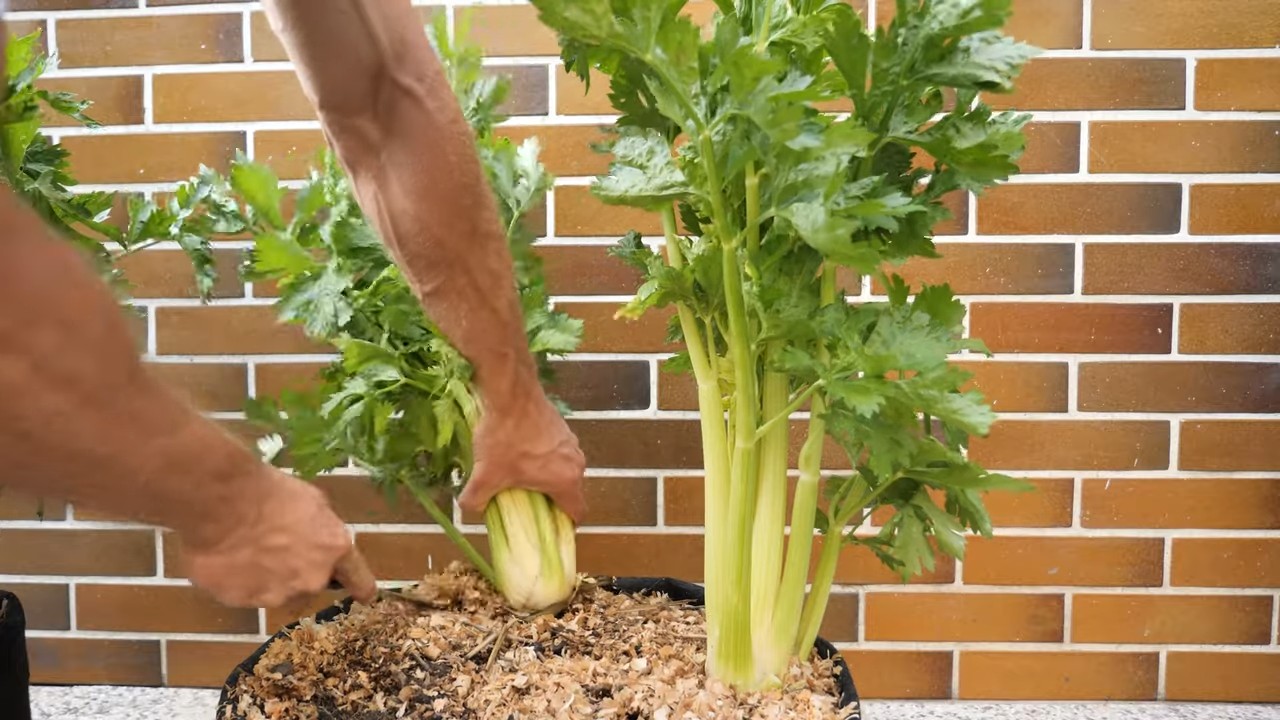
* Container Size: Celery needs room to grow, both above and below the soil. I recommend a container that’s at least 12 inches deep and 12 inches in diameter. A larger container is even better, especially if you plan on growing multiple celery plants together. Think about a large pot, a half-barrel planter, or even a sturdy plastic storage container with drainage holes drilled in the bottom.
* Drainage is Key: Celery loves moisture, but it hates sitting in soggy soil. Make sure your container has plenty of drainage holes to prevent root rot. If you’re using a container without pre-drilled holes, don’t be afraid to grab a drill and add some yourself.
* Soil Mix: Celery thrives in rich, well-draining soil that retains moisture. A good quality potting mix is essential. I like to amend my potting mix with compost and perlite. The compost adds nutrients and improves water retention, while the perlite enhances drainage and aeration. A good ratio is 2 parts potting mix, 1 part compost, and 1 part perlite. You can also add a slow-release fertilizer to the mix to give your celery plants a boost.
Starting Celery from Seed (or Seedlings!)
Celery can be a bit slow to germinate, so starting seeds indoors is often the best approach, especially if you live in a cooler climate. Alternatively, you can purchase celery seedlings from your local garden center.
Starting from Seed:
1. Timing is Everything: Celery needs a long growing season, so start your seeds indoors about 10-12 weeks before the last expected frost. I usually start mine in late winter or early spring.
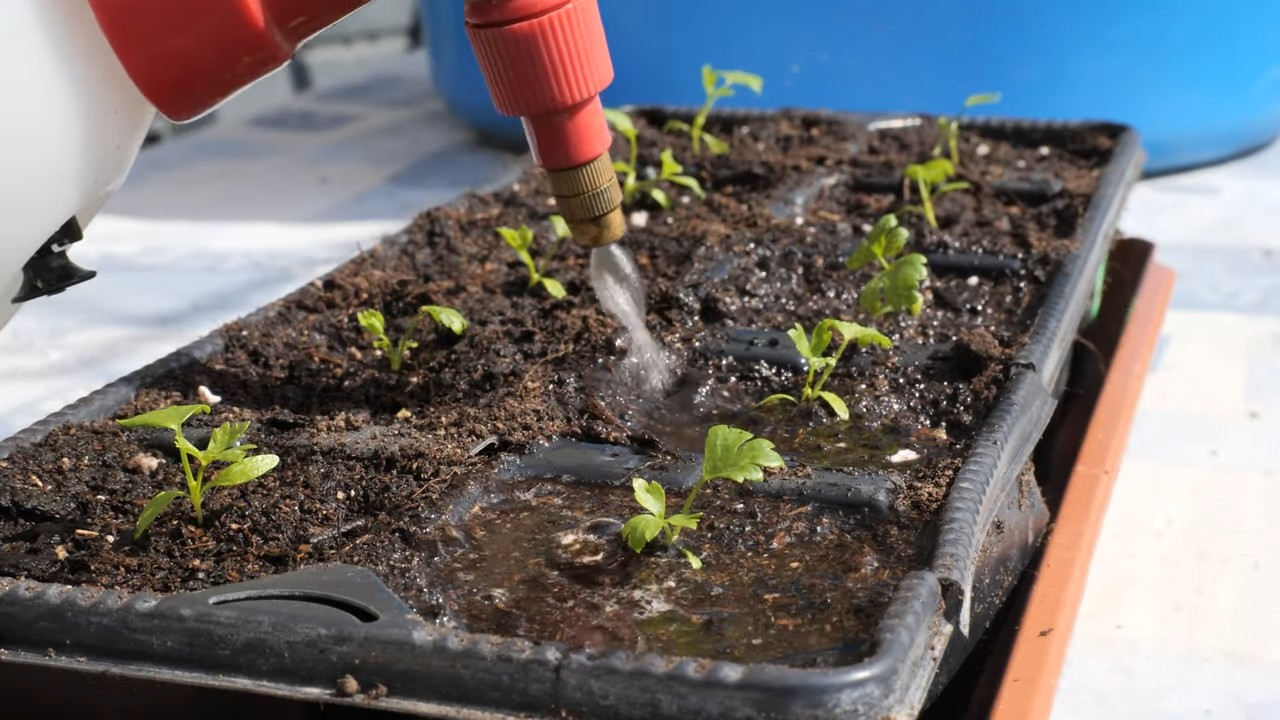
2. Seed Starting Trays: Fill seed starting trays or small pots with a seed starting mix. This mix is finer and lighter than regular potting mix, making it easier for delicate seedlings to emerge.
3. Sowing the Seeds: Celery seeds are tiny! Sprinkle them lightly on the surface of the soil. Don’t bury them too deep, as they need light to germinate. Gently press the seeds into the soil.
4. Watering: Mist the soil gently with a spray bottle to avoid dislodging the seeds. Keep the soil consistently moist, but not soggy.
5. Creating a Humid Environment: Cover the seed starting trays with a clear plastic dome or plastic wrap to create a humid environment. This will help the seeds germinate.
6. Warmth and Light: Place the trays in a warm location, ideally around 70-75°F (21-24°C). A heat mat can be helpful. Once the seeds germinate, remove the plastic cover and provide plenty of light. A grow light is ideal, but a sunny windowsill can also work.
7. Thinning the Seedlings: Once the seedlings have a few true leaves, thin them out, leaving only the strongest seedling in each cell or pot.
Using Seedlings:
1. Choosing Healthy Seedlings: Select seedlings that are vibrant green, sturdy, and free from any signs of disease or pests. Avoid seedlings that are leggy or have yellowing leaves.
2. Gently Remove Seedlings: Carefully remove the seedlings from their containers, being gentle with the roots.
Transplanting Your Celery
Whether you started your celery from seed or purchased seedlings, transplanting them into your container is a crucial step.
1. Hardening Off: Before transplanting, you need to “harden off” your seedlings. This means gradually exposing them to outdoor conditions over a period of about a week. Start by placing them in a sheltered location for a few hours each day, gradually increasing the amount of time they spend outdoors. This will help them acclimate to the sun, wind, and temperature changes.
2. Preparing the Container: Fill your chosen container with the prepared soil mix, leaving a few inches of space at the top.
3. Transplanting: Dig a hole in the soil that’s large enough to accommodate the root ball of the seedling. Gently remove the seedling from its container and place it in the hole. Make sure the top of the root ball is level with the surrounding soil.
4. Spacing: If you’re planting multiple celery plants in the same container, space them about 6-8 inches apart.
5. Watering: Water the transplanted seedlings thoroughly. This will help settle the soil around the roots.
6. Mulching: Add a layer of mulch around the base of the plants. Mulch helps retain moisture, suppress weeds, and regulate soil temperature. Straw, shredded leaves, or wood chips are all good options.
Caring for Your Celery Plants
Now that your celery is planted, it’s time to provide the care it needs to thrive.
* Watering: Celery needs consistent moisture. Water deeply whenever the top inch of soil feels dry to the touch. Avoid letting the soil dry out completely, as this can stress the plants and affect their growth. I usually water my celery every other day, but this will depend on the weather and the drainage of your container.
* Fertilizing: Celery is a heavy feeder, so regular fertilization is important. Use a balanced liquid fertilizer every 2-3 weeks. You can also side-dress the plants with compost or aged manure.
* Sunlight: Celery prefers full sun, but it can tolerate partial shade, especially in hot climates. Aim for at least 6 hours of sunlight per day.
* Blanching (Optional): Blanching celery stalks makes them milder and more tender. About two weeks before harvest, you can blanch the stalks by wrapping them with newspaper, cardboard, or even old pantyhose. Leave the tops of the stalks exposed to sunlight. This will prevent them from turning green and bitter.
* Pest and Disease Control: Keep an eye out for pests like aphids, celery leaf tiers, and slugs. You can control aphids with insecticidal soap or neem oil. Handpick celery leaf tiers and slugs. Celery is also susceptible to diseases like early blight and pink rot. Ensure good air circulation around the plants and avoid overhead watering to prevent these diseases. If you notice any signs of disease, remove the affected leaves immediately.
Harvesting Your Celery
The moment you’ve been waiting for! Harvesting your homegrown celery is incredibly rewarding.
1. Timing: Celery is typically ready to harvest about 80-100 days after transplanting. The stalks should be at least 6-8 inches long and thick enough to eat.
2. Harvesting: You can harvest the entire plant at once or harvest individual stalks as needed. To harvest the entire plant, use a sharp knife to cut the stalks at the base of the plant, just below the soil line. To harvest individual stalks, simply snap them off from the outside of the plant.
3. Storage: Celery can be stored in the refrigerator for up to two weeks. Wrap the stalks in a damp paper towel and place them in a plastic bag.
Troubleshooting
Even with the best care, you might encounter some challenges along the way. Here are a few common problems and how to address them:
* Yellowing Leaves: This can be caused by overwatering, underwatering, nutrient deficiencies, or pests. Check the soil moisture and adjust your watering accordingly. Fertilize the plants with a balanced fertilizer. Inspect the plants for pests and treat them as needed.
* Stunted Growth: This can be caused by poor soil, lack of sunlight, or rootbound plants. Make sure your soil is rich and well-draining. Provide at least 6 hours of sunlight per day. If the plants are rootbound, transplant them into a larger container.
* Bolting: Bolting is when the plant prematurely flowers and goes to seed. This can be caused by stress, such as extreme heat or drought. Provide consistent moisture and protect the plants from extreme temperatures.
Enjoying Your Homegrown Celery
Congratulations! You’ve successfully grown your own celery in containers. Now it’s time to enjoy the fruits (or rather, vegetables) of your labor. Use your homegrown celery in salads, soups, stews, smoothies, or as a healthy snack with your favorite dip. The possibilities are endless!
Growing celery in containers is a fun and rewarding experience. With a little patience and care, you can enjoy fresh, delicious celery right from your own backyard. Happy gardening!
Conclusion
So, there you have it! Growing your own celery in containers is not only achievable, but it’s also incredibly rewarding. Forget those limp, flavorless stalks from the grocery store. With a little patience and this simple DIY trick, you can enjoy crisp, vibrant, and intensely flavorful celery right from your own patio, balcony, or even a sunny windowsill.
This method is a must-try for several reasons. First, it puts you in control of the entire growing process. You know exactly what goes into your celery, avoiding potentially harmful pesticides and ensuring the freshest possible product. Second, it’s a fantastic way to reduce food waste. How many times have you bought a whole head of celery only to use a few stalks and watch the rest wilt away in the crisper drawer? Container gardening allows you to harvest only what you need, when you need it. Third, and perhaps most importantly, homegrown celery simply tastes better. The flavor is more pronounced, the texture is crisper, and the satisfaction of eating something you’ve nurtured from seed or seedling is unparalleled.
But don’t stop there! Once you’ve mastered the basics of **celery container gardening**, feel free to experiment. Try different varieties of celery, such as ‘Utah Tall’ for classic green stalks or ‘Golden Self-Blanching’ for a milder, sweeter flavor. You can also play around with companion planting. Marigolds, for example, can help deter pests, while onions and garlic can enhance the flavor of your celery. Consider adding a slow-release fertilizer specifically formulated for vegetables to boost growth and yield.
Another fun variation is to try growing celery from the base of a store-bought stalk. Simply cut off the bottom two inches of the celery, place it in a shallow dish of water, and watch it regrow. This is a great way to recycle food scraps and get a head start on your next celery crop. You can also try growing celery indoors during the colder months to enjoy fresh celery year-round. Just make sure to provide it with plenty of light, either from a sunny window or a grow light.
We’re confident that you’ll find this DIY trick to be a game-changer for your culinary adventures. Imagine adding freshly harvested celery to your soups, salads, smoothies, and snacks. The possibilities are endless!
So, what are you waiting for? Grab a container, some potting mix, and a celery seedling or seeds, and get started today. We’re eager to hear about your experiences with celery container gardening. Share your tips, tricks, and photos in the comments below. Let’s create a community of celery-loving gardeners and inspire others to grow their own fresh produce. Happy gardening!
Frequently Asked Questions (FAQ)
1. What size container do I need for growing celery?
A container that is at least 8-12 inches deep and 8-12 inches in diameter is ideal for growing celery. Celery has a relatively shallow but spreading root system, so a wider container is generally better than a taller, narrower one. If you plan to grow multiple celery plants in the same container, choose a larger container accordingly, allowing at least 6-8 inches of space between plants. Remember that adequate drainage is crucial, so ensure your container has drainage holes.
2. What type of soil is best for celery container gardening?
Celery thrives in rich, well-draining soil that is high in organic matter. A good potting mix specifically formulated for vegetables is a great option. You can also amend your own potting mix by adding compost, aged manure, or other organic materials. The ideal soil pH for celery is between 6.0 and 6.8. Avoid using garden soil in containers, as it can become compacted and doesn’t drain as well as potting mix.
3. How much sunlight does celery need?
Celery needs at least 6 hours of sunlight per day to thrive. Choose a location for your container that receives full sun, especially during the morning hours. If you live in a hot climate, some afternoon shade can be beneficial to prevent the celery from bolting (going to seed prematurely). If you’re growing celery indoors, supplement with a grow light if necessary to ensure adequate light exposure.
4. How often should I water my container-grown celery?
Celery needs consistent moisture to grow properly. Water your celery plants deeply whenever the top inch of soil feels dry to the touch. Avoid letting the soil dry out completely, as this can stress the plants and affect their growth. However, also avoid overwatering, as this can lead to root rot. A good rule of thumb is to water thoroughly until water drains out of the drainage holes. During hot weather, you may need to water your celery plants more frequently.
5. What are some common pests and diseases that affect celery, and how can I prevent them?
Celery can be susceptible to several pests and diseases, including aphids, celery leaf tiers, and fungal diseases like early blight and late blight. To prevent these problems, inspect your plants regularly for signs of infestation or disease. Remove any affected leaves or plants immediately. You can also use organic pest control methods, such as insecticidal soap or neem oil, to control aphids and other pests. To prevent fungal diseases, ensure good air circulation around your plants and avoid overhead watering. Consider using a copper fungicide as a preventative measure.
6. How long does it take to grow celery in a container?
Celery typically takes 100-130 days to mature from seed, or 60-80 days from transplanting seedlings. The exact time will depend on the variety of celery, the growing conditions, and the climate. Be patient and provide your celery plants with the care they need, and you’ll be rewarded with a bountiful harvest.
7. How do I harvest celery from a container?
You can harvest celery stalks as needed once they reach a desirable size. Simply cut the outer stalks near the base of the plant with a sharp knife. The inner stalks will continue to grow, allowing you to harvest celery over an extended period. You can also harvest the entire plant at once by cutting it off at the base.
8. Can I grow celery indoors?
Yes, you can grow celery indoors, but it requires more attention than growing it outdoors. Ensure your celery plants receive at least 6 hours of sunlight per day, either from a sunny window or a grow light. Maintain consistent moisture and humidity levels. You may also need to hand-pollinate the flowers if you want to save seeds.
9. What are some good companion plants for celery?
Good companion plants for celery include onions, garlic, marigolds, and nasturtiums. Onions and garlic can help deter pests, while marigolds can attract beneficial insects. Nasturtiums can act as a trap crop, attracting aphids away from your celery plants.
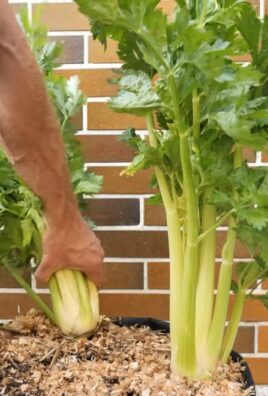
10. Can I grow celery from the base of a store-bought stalk?
Yes, you can regrow celery from the base of a store-bought stalk. Cut off the bottom two inches of the celery, place it in a shallow dish of water, and watch it regrow. Change the water every day or two. After a few days, you should see new roots and leaves emerging. Once the roots are well-developed, you can transplant the celery base into a container filled with potting mix. This is a fun and easy way to recycle food scraps and get a head start on your next celery crop.
Leave a Comment