
Grow cantaloupes in grow bags? Absolutely! I know what you’re thinking: cantaloupes are big, sprawling vines – how can they possibly thrive in a bag? Well, that’s exactly what we’re going to explore! Forget the sprawling garden plot; we’re bringing the sweet taste of summer melons to even the smallest of spaces with this incredibly rewarding DIY project.
For centuries, cantaloupes have been cherished for their refreshing sweetness and nutritional benefits. Originating in Africa and India, they’ve become a global favorite, gracing tables from humble picnics to elegant feasts. But traditionally, growing them required ample space, putting them out of reach for many urban gardeners.
That’s where this DIY trick comes in! Imagine harvesting juicy, sun-ripened cantaloupes right from your balcony or patio. No more battling weeds in a vast garden, no more worrying about soil quality – just pure, homegrown goodness. This method of grow cantaloupes in grow bags is perfect for apartment dwellers, those with limited garden space, or anyone looking for a more manageable and efficient way to enjoy this delicious fruit. Plus, it’s a fantastic way to control the growing environment and protect your precious melons from pests and diseases. So, let’s dive in and unlock the secrets to successful cantaloupe cultivation in grow bags!
Growing Cantaloupes in Grow Bags: A Sweet Success Story!
Hey there, fellow gardening enthusiasts! I’m so excited to share my experience with growing cantaloupes in grow bags. I know, it might sound a little unconventional, but trust me, it’s totally doable and incredibly rewarding. If you’re short on space or just want to try something new, this is the perfect project for you. I’ve learned a lot along the way, and I’m here to guide you through every step so you can enjoy your own homegrown, juicy cantaloupes.
Why Grow Cantaloupes in Grow Bags?
Before we dive in, let’s talk about why grow bags are a fantastic option for cantaloupes:
* **Space Saving:** Grow bags are perfect for balconies, patios, or small gardens. You don’t need a huge plot of land to enjoy fresh cantaloupes.
* **Portability:** You can easily move your cantaloupe plants around to follow the sun or protect them from harsh weather.
* **Improved Drainage:** Grow bags provide excellent drainage, preventing root rot, which cantaloupes are susceptible to.
* **Air Pruning:** The fabric of grow bags allows air to reach the roots, promoting healthy root growth and preventing them from becoming root-bound.
* **Warmer Soil:** Grow bags tend to warm up faster than the ground, giving your cantaloupe plants a head start in the spring.
What You’ll Need
Okay, let’s gather our supplies. Here’s what you’ll need to get started:
* **Grow Bags:** I recommend using at least 15-gallon grow bags per plant. Bigger is better, as cantaloupes need plenty of room for their roots to spread.
* **Cantaloupe Seeds or Seedlings:** You can start from seeds or buy seedlings from your local nursery. I’ve had success with both!
* **High-Quality Potting Mix:** Choose a well-draining potting mix that’s rich in organic matter. Avoid using garden soil, as it can compact in grow bags.
* **Compost:** Compost is your best friend! It adds nutrients and improves soil structure.
* **Slow-Release Fertilizer:** A balanced slow-release fertilizer will provide your cantaloupe plants with the nutrients they need throughout the growing season.
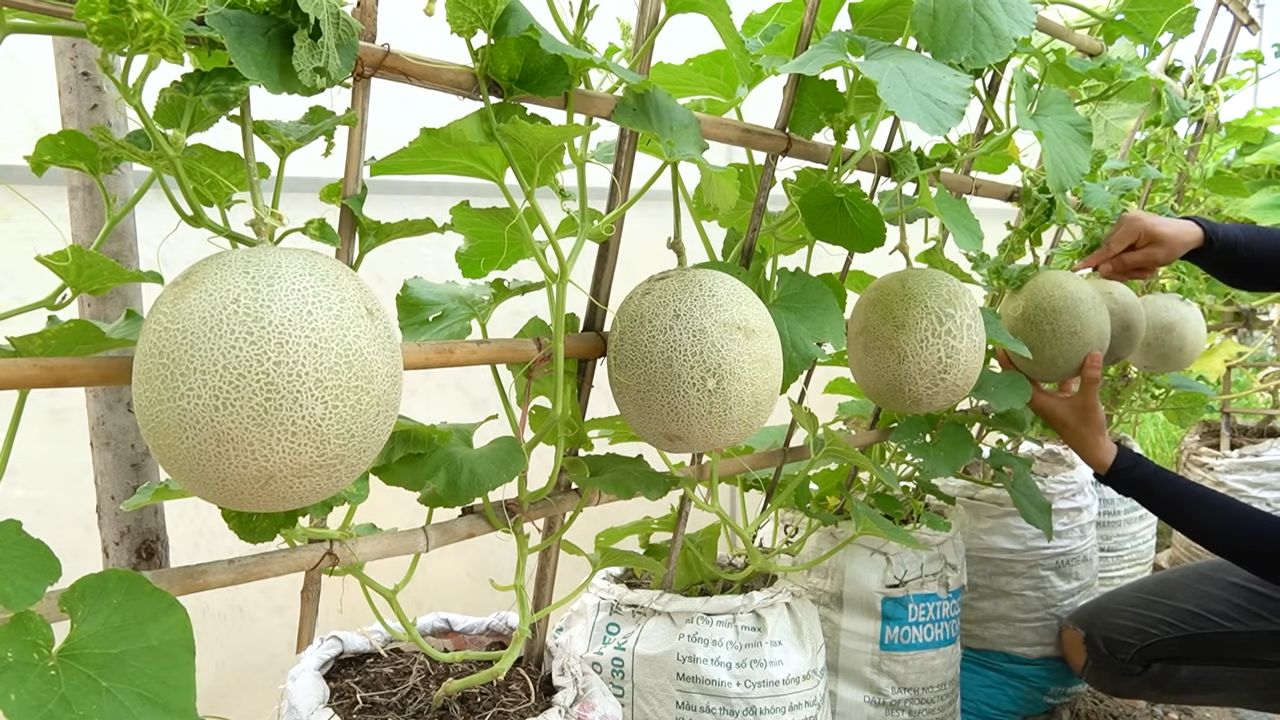
* **Trellis or Support System:** Cantaloupes are vining plants, so you’ll need a trellis or some other support system to keep them off the ground.
* **Watering Can or Hose:** For regular watering.
* **Gardening Gloves:** To keep your hands clean.
* **Pruning Shears:** For trimming and pruning.
* **Mulch:** To help retain moisture and suppress weeds.
Step-by-Step Guide: Planting Your Cantaloupes
Alright, let’s get our hands dirty! Here’s how to plant your cantaloupes in grow bags:
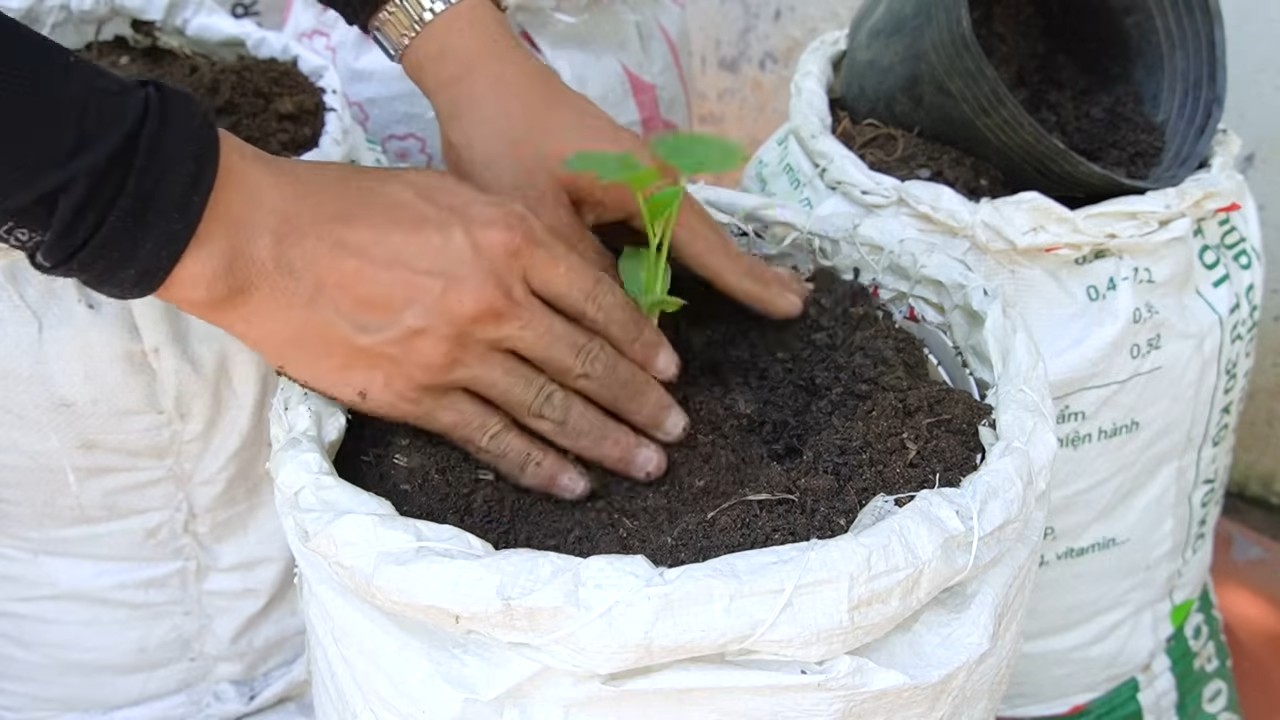
1. **Prepare the Grow Bags:** Fill your grow bags about two-thirds full with your potting mix.
2. **Add Compost and Fertilizer:** Mix in a generous amount of compost and the slow-release fertilizer according to the package instructions. This will give your cantaloupe plants a nutrient boost.
3. **Plant Your Seeds or Seedlings:**
* **From Seeds:** Sow 2-3 seeds per grow bag, about 1 inch deep. Water gently and keep the soil consistently moist. Once the seedlings emerge, thin them to one strong plant per bag.
* **From Seedlings:** Gently remove the seedling from its container and loosen the roots. Dig a hole in the center of the grow bag and plant the seedling, making sure the top of the root ball is level with the soil surface.
4. **Water Thoroughly:** Water your newly planted cantaloupe plants thoroughly until the water drains out of the bottom of the grow bag.
5. **Mulch:** Add a layer of mulch around the base of the plant to help retain moisture and suppress weeds.
6. **Position Your Grow Bags:** Place your grow bags in a sunny location that receives at least 6-8 hours of direct sunlight per day. Cantaloupes love the sun!
7. **Install Trellis or Support System:** Set up your trellis or support system near the grow bag. As the cantaloupe vines grow, gently train them to climb the trellis.
Caring for Your Cantaloupe Plants
Now that your cantaloupe plants are in their grow bags, it’s time to provide them with the care they need to thrive.
1. **Watering:** Cantaloupes need consistent moisture, especially during hot weather. Water deeply whenever the top inch of soil feels dry to the touch. Avoid overwatering, as this can lead to root rot. I usually water every other day, but it depends on the weather.
2. **Fertilizing:** Cantaloupes are heavy feeders, so you’ll need to fertilize them regularly. In addition to the slow-release fertilizer you added at planting time, you can supplement with a liquid fertilizer every 2-3 weeks. Look for a fertilizer that’s high in phosphorus and potassium, as these nutrients are essential for fruit development.
3. **Pruning:** Pruning can help improve air circulation and encourage fruit production. Remove any yellowing or dead leaves. You can also prune the lateral vines (the ones that grow from the main vine) to encourage the plant to focus its energy on producing fruit. I usually prune the lateral vines after the first few fruits have set.
4. **Pollination:** Cantaloupes need to be pollinated in order to produce fruit. If you’re growing your cantaloupes outdoors, bees and other pollinators will usually take care of this for you. However, if you’re growing them indoors or in a greenhouse, you may need to hand-pollinate them. To hand-pollinate, use a small paintbrush to transfer pollen from the male flowers to the female flowers. The female flowers have a small fruit-like structure at the base of the flower.
5. **Pest and Disease Control:** Keep an eye out for pests and diseases. Common pests that affect cantaloupes include aphids, squash bugs, and cucumber beetles. Common diseases include powdery mildew and fusarium wilt. If you notice any pests or diseases, take action immediately. You can use organic pesticides or fungicides to control them. I prefer to use neem oil, as it’s a natural and effective way to control many pests and diseases.
6. **Supporting the Fruit:** As your cantaloupes grow, they can become quite heavy. If you’re using a trellis, you may need to provide additional support for the fruit. You can use netting or fabric slings to support the cantaloupes and prevent them from breaking off the vine.
Harvesting Your Cantaloupes
The moment we’ve all been waiting for! Harvesting your homegrown cantaloupes is the most rewarding part of the process. Here’s how to know when your cantaloupes are ripe:
1. **Check the Color:** The skin of the cantaloupe should turn from green to a tan or yellowish color.
2. **Smell the Aroma:** A ripe cantaloupe will have a sweet, musky aroma.
3. **Feel the Stem:** The stem should easily slip from the vine with a gentle tug. This is called “slipping.” If the stem is still firmly attached, the cantaloupe is not ripe yet.
4. **Tap the Cantaloupe:** A ripe cantaloupe will have a hollow sound when you tap it.
Once your cantaloupe is ripe, gently cut it from the vine with pruning shears. Enjoy your delicious, homegrown cantaloupe!
Troubleshooting
Even with the best care, you might encounter some challenges along the way. Here are a few common problems and how to address them:
* **Yellowing Leaves:** This could be a sign of overwatering, underwatering, or nutrient deficiency. Check the soil moisture and adjust your watering accordingly. Fertilize with a balanced fertilizer.
* **Powdery Mildew:** This fungal disease appears as a white, powdery coating on the leaves. Improve air circulation by pruning the plants. Treat with a fungicide or neem oil.
* **Lack of Fruit:** This could be due to poor pollination or nutrient deficiency. Hand-pollinate the flowers if necessary. Fertilize with a fertilizer high in phosphorus and potassium.
* **Fruit Rot:** This can be caused by overwatering or poor drainage. Make sure your grow bags have good drainage. Avoid overwatering.
Tips for Success
Here are a few extra tips to help you succeed with growing cantaloupes in grow bags:
* **Choose the Right Variety:** Some cantaloupe varieties are better suited for growing in containers than others. Look for varieties that are compact and disease-resistant.
* **Start Early:** Start your seeds indoors 6-8 weeks before the last frost. This will give your plants a head start.
* **Provide Plenty of Sunlight:** Cantaloupes need at least 6-8 hours of direct sunlight per day.
* **Water Regularly:** Cant
Conclusion
So, there you have it! Growing cantaloupes in grow bags isn’t just a trendy gardening experiment; it’s a game-changer for anyone who dreams of savoring sweet, homegrown melons, regardless of their space constraints. We’ve walked through the steps, highlighted the benefits, and addressed potential challenges. Now, it’s time to put that knowledge into action.
The beauty of this method lies in its accessibility. Whether you have a sprawling backyard or a tiny balcony, grow bags offer a flexible and manageable solution for cultivating these delicious fruits. The improved drainage, enhanced aeration, and warmer soil temperatures all contribute to healthier plants and a more abundant harvest. Plus, the portability of grow bags allows you to chase the sun and protect your cantaloupes from unexpected weather events.
But don’t just take our word for it. The real magic happens when you experience the joy of nurturing a cantaloupe from seed to fruit, witnessing its transformation, and finally, indulging in its unparalleled flavor. Imagine the satisfaction of serving a slice of your own homegrown cantaloupe, knowing that you played a part in its creation.
Ready to take your cantaloupe cultivation to the next level? Consider these variations to personalize your growing experience:
* Vertical Gardening: Utilize trellises or supports to train your cantaloupe vines upwards, maximizing space and improving air circulation. This is especially beneficial in smaller areas.
* Companion Planting: Plant basil, marigolds, or nasturtiums near your cantaloupes to deter pests and attract beneficial insects. These companion plants can create a healthier and more vibrant growing environment.
* Grafting: For advanced gardeners, consider grafting your cantaloupe scions onto disease-resistant rootstock for increased vigor and resilience.
* Experiment with Varieties: Don’t limit yourself to just one type of cantaloupe. Explore different varieties with varying sizes, flavors, and ripening times to discover your favorites.
The key to success is observation and adaptation. Pay close attention to your plants, monitor their growth, and adjust your watering and feeding schedules as needed. Don’t be afraid to experiment and learn from your mistakes. Gardening is a journey, and every season brings new opportunities for growth and discovery.
We are confident that you’ll find growing cantaloupes in grow bags to be a rewarding and fulfilling experience. So, grab your seeds, gather your supplies, and get ready to embark on your cantaloupe-growing adventure.
We’d love to hear about your experiences! Share your tips, tricks, and photos with us in the comments below. Let’s create a community of cantaloupe enthusiasts and inspire others to embrace the joys of homegrown goodness. Happy gardening!
Frequently Asked Questions (FAQ)
What size grow bag is best for cantaloupes?
The ideal grow bag size for cantaloupes is typically between 15 and 25 gallons. This provides ample space for the root system to develop and allows for sufficient soil volume to retain moisture and nutrients. While a 10-gallon bag might work for smaller varieties, a larger bag is generally recommended to ensure optimal growth and fruit production. Remember, cantaloupes are vigorous growers and need plenty of room to thrive.
How often should I water cantaloupes in grow bags?
Watering frequency depends on several factors, including the weather, the size of the grow bag, and the stage of plant growth. Generally, you should water your cantaloupes deeply whenever the top inch of soil feels dry to the touch. During hot, sunny weather, this may mean watering daily, while in cooler or cloudier conditions, you may only need to water every other day. Be sure to avoid overwatering, as this can lead to root rot. A good rule of thumb is to water thoroughly until you see water draining from the bottom of the bag.
What type of soil is best for cantaloupes in grow bags?
Cantaloupes thrive in well-draining, nutrient-rich soil. A good potting mix specifically formulated for vegetables is an excellent choice. You can also create your own mix by combining equal parts of compost, peat moss (or coconut coir), and perlite or vermiculite. The compost provides essential nutrients, the peat moss or coir helps retain moisture, and the perlite or vermiculite improves drainage and aeration. Avoid using garden soil, as it can be too heavy and may not drain well in a grow bag.
Do cantaloupes in grow bags need fertilizer?
Yes, cantaloupes are heavy feeders and require regular fertilization to produce abundant, high-quality fruit. Start with a balanced fertilizer (e.g., 10-10-10) at planting time, following the instructions on the label. Once the plants begin to flower, switch to a fertilizer that is higher in phosphorus and potassium (e.g., 5-10-10) to promote fruit development. You can also supplement with liquid seaweed or fish emulsion every few weeks to provide additional micronutrients. Be careful not to over-fertilize, as this can lead to excessive foliage growth and reduced fruit production.
How do I prevent pests and diseases on cantaloupes in grow bags?
Prevention is key when it comes to pests and diseases. Start by using disease-free seeds or transplants. Ensure good air circulation around your plants by spacing them properly and pruning away any overcrowded foliage. Regularly inspect your plants for signs of pests or diseases, such as aphids, squash bugs, or powdery mildew. If you spot any problems, take action immediately. Insecticidal soap or neem oil can be effective against many common pests, while copper fungicide can help control fungal diseases. Companion planting with basil or marigolds can also help deter pests.
How long does it take for cantaloupes to ripen in grow bags?
The time it takes for cantaloupes to ripen depends on the variety, the weather, and the growing conditions. Generally, it takes between 70 and 90 days from planting to harvest. You’ll know your cantaloupe is ripe when it develops a sweet aroma, the skin turns from green to tan or yellow, and the stem begins to crack or slip easily from the fruit. Gently press on the blossom end of the cantaloupe; if it feels slightly soft, it’s likely ripe.
Can I grow cantaloupes in grow bags indoors?
While it’s possible to grow cantaloupes indoors in grow bags, it requires a significant investment in grow lights and careful attention to environmental conditions. Cantaloupes need at least 6-8 hours of direct sunlight per day, so you’ll need to supplement with powerful grow lights if you’re growing them indoors. You’ll also need to ensure adequate ventilation and humidity control. Growing cantaloupes outdoors in grow bags is generally easier and more successful, but with the right setup and dedication, it can be done indoors as well.
What are the benefits of using grow bags for cantaloupes compared to traditional gardening?
Grow bags offer several advantages over traditional gardening for cantaloupes:
* Improved Drainage: Grow bags allow for excellent drainage, preventing waterlogging and root rot.
* Enhanced Aeration: The breathable fabric of grow bags promotes air circulation around the roots, leading to healthier growth.
* Warmer Soil Temperatures: Grow bags warm up faster in the spring, allowing you to start your cantaloupes earlier.
* Portability: Grow bags can be easily moved to chase the sun or protect plants from adverse weather.
* Space Saving: Grow bags are ideal for small spaces, such as balconies or patios.
* Reduced Soilborne Diseases: Using fresh potting mix in grow bags minimizes the risk of soilborne diseases.
How do I support the cantaloupe as it grows in the grow bag?
As the cantaloupe grows, it will become heavy and may need support to prevent the vine from breaking or the fruit from touching the ground. You can use a trellis, stakes, or even a sling made from netting or fabric to support the fruit. Tie the vine to the support structure with soft twine or plant ties. For larger cantaloupes, you may need to create individual slings to support each fruit.
Can I reuse grow bags for cantaloupes?
Yes, grow bags can be reused for several seasons if properly cared for. After harvesting your cantaloupes, empty the grow bag and remove any remaining plant debris. Wash the bag with soap and water to remove any dirt or residue. Allow the bag to dry completely before storing it in a cool, dry place. Before reusing the bag, consider amending the soil with fresh compost or fertilizer to replenish nutrients.
Leave a Comment